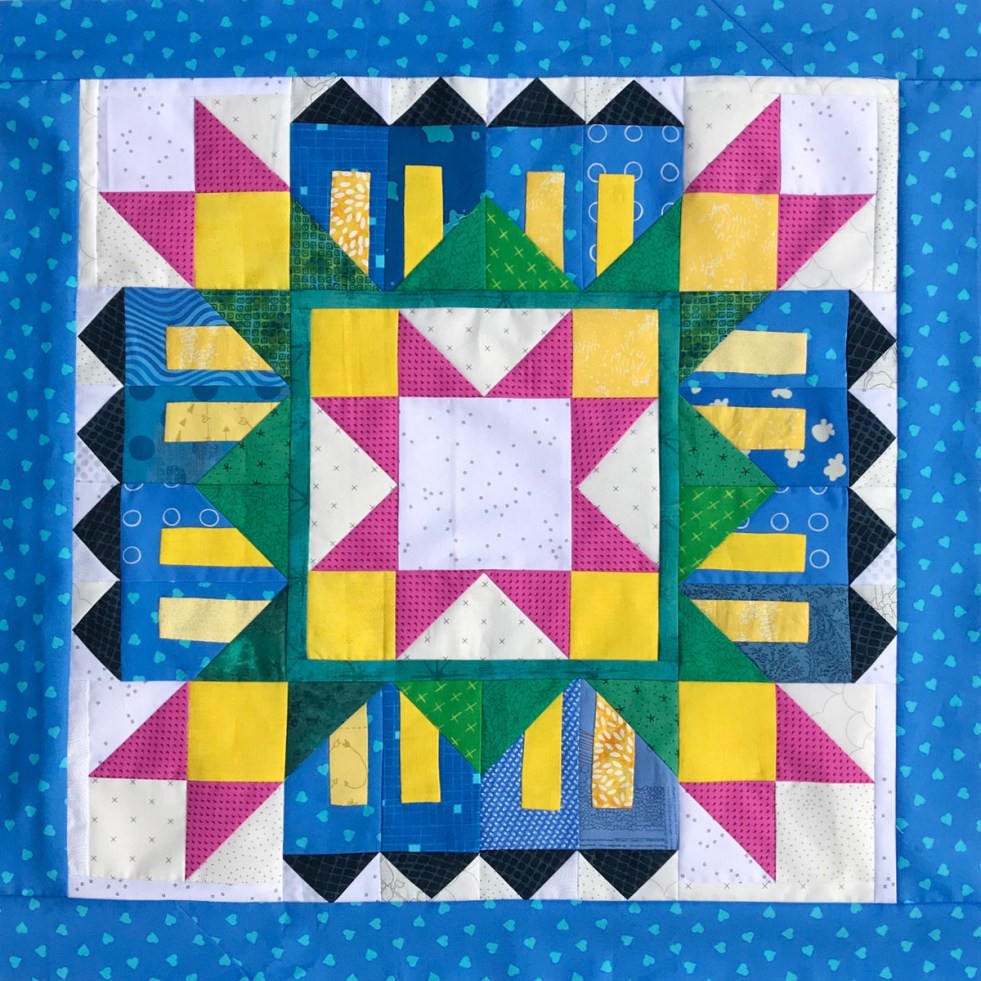
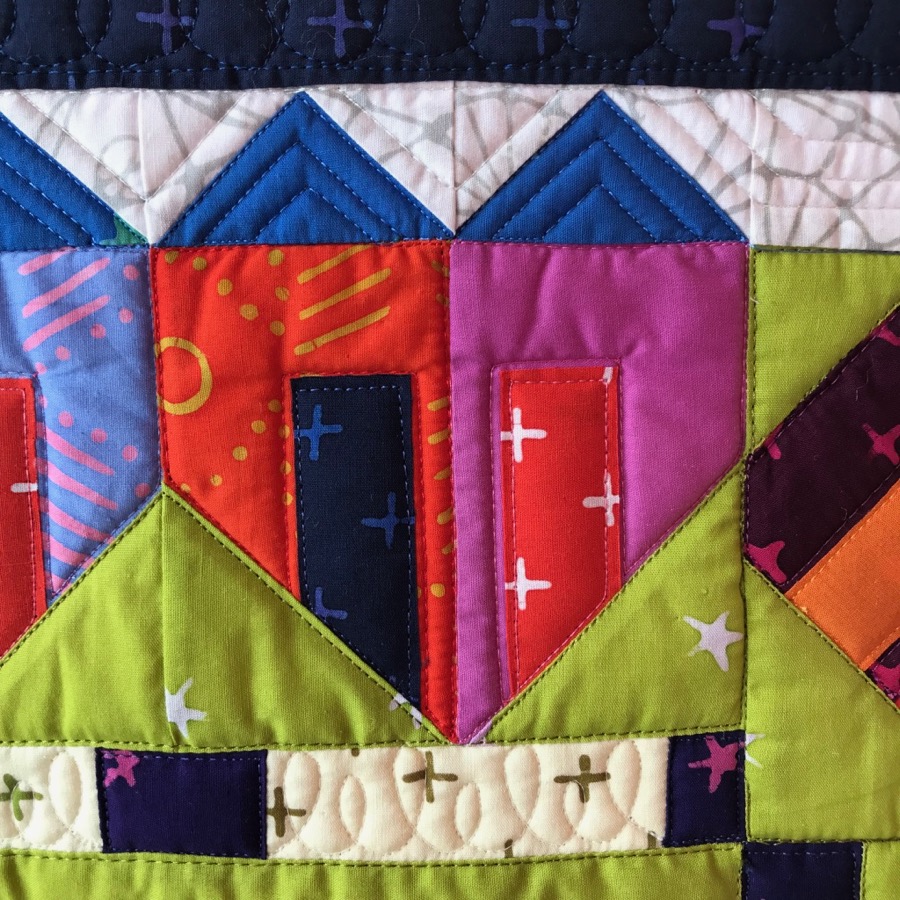
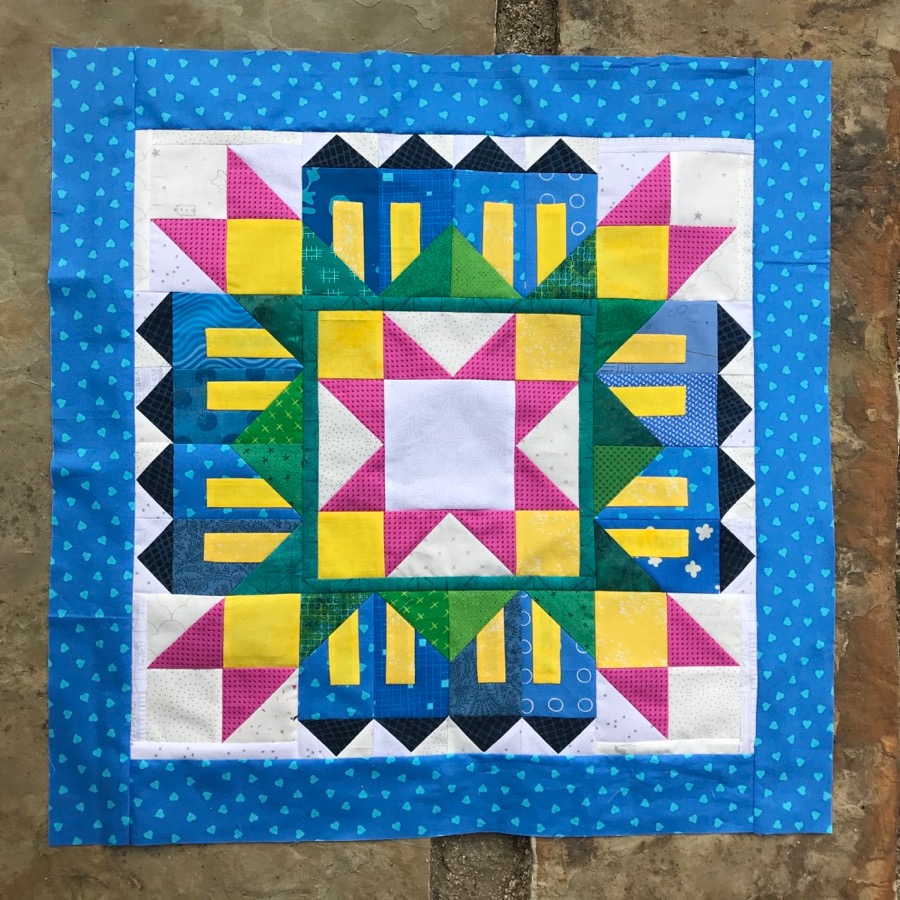
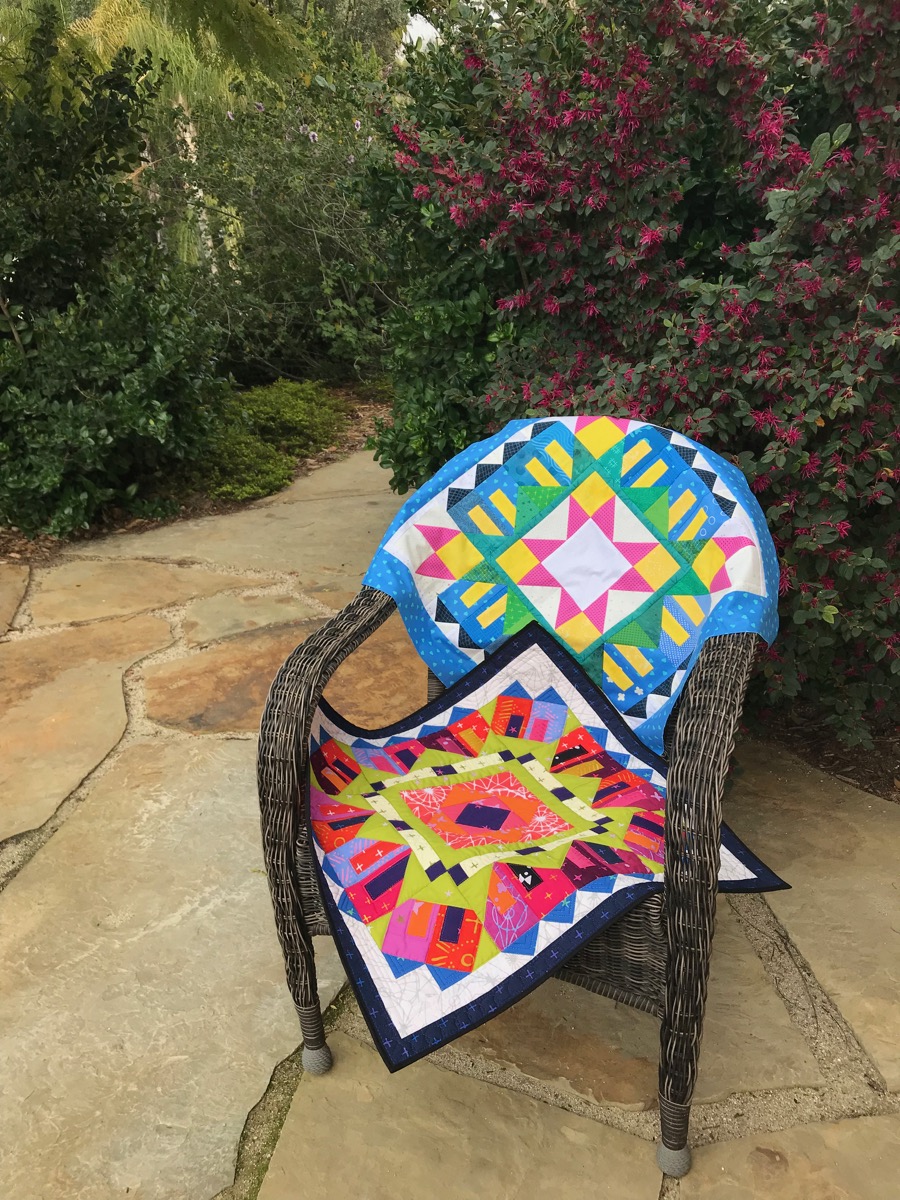
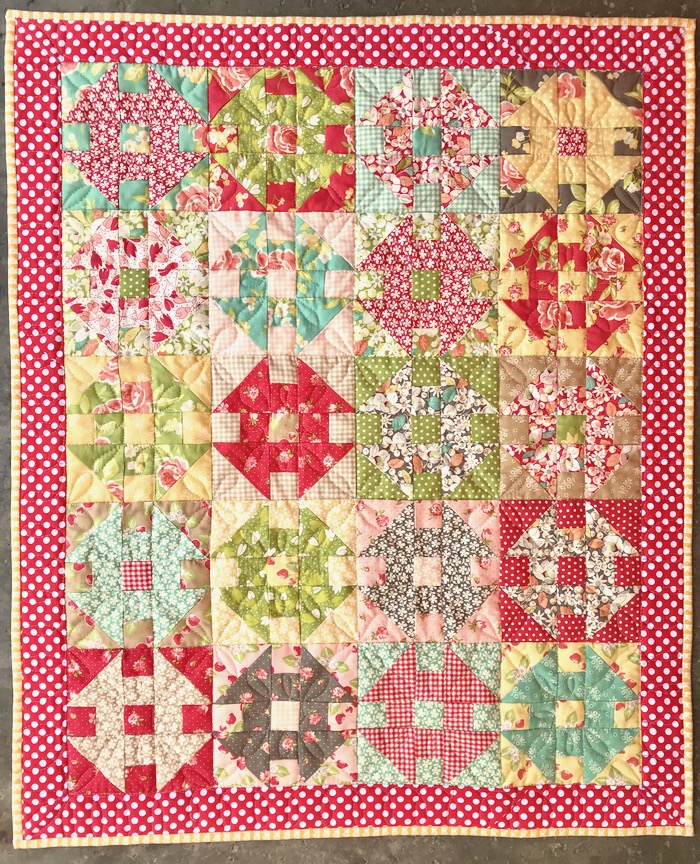
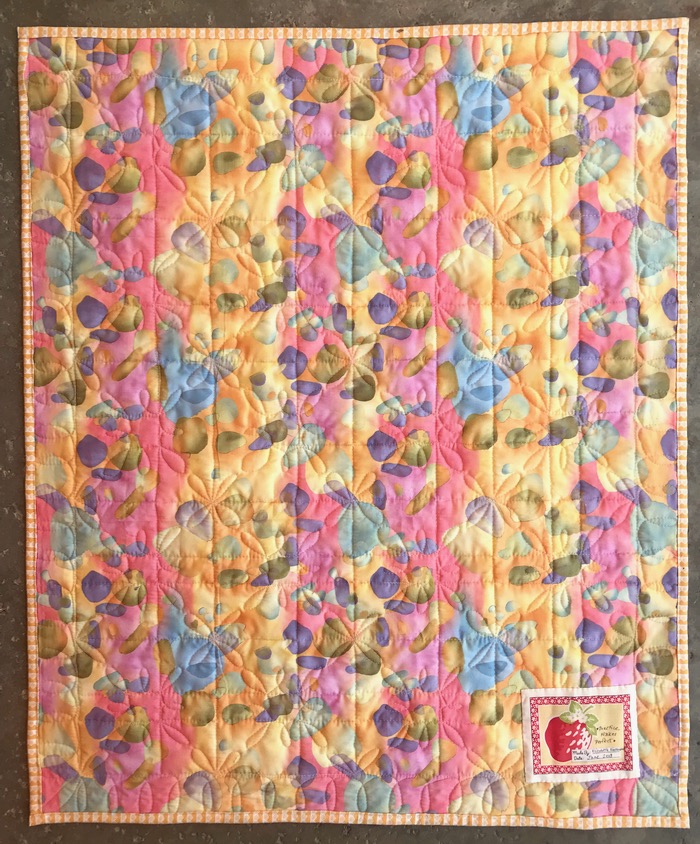
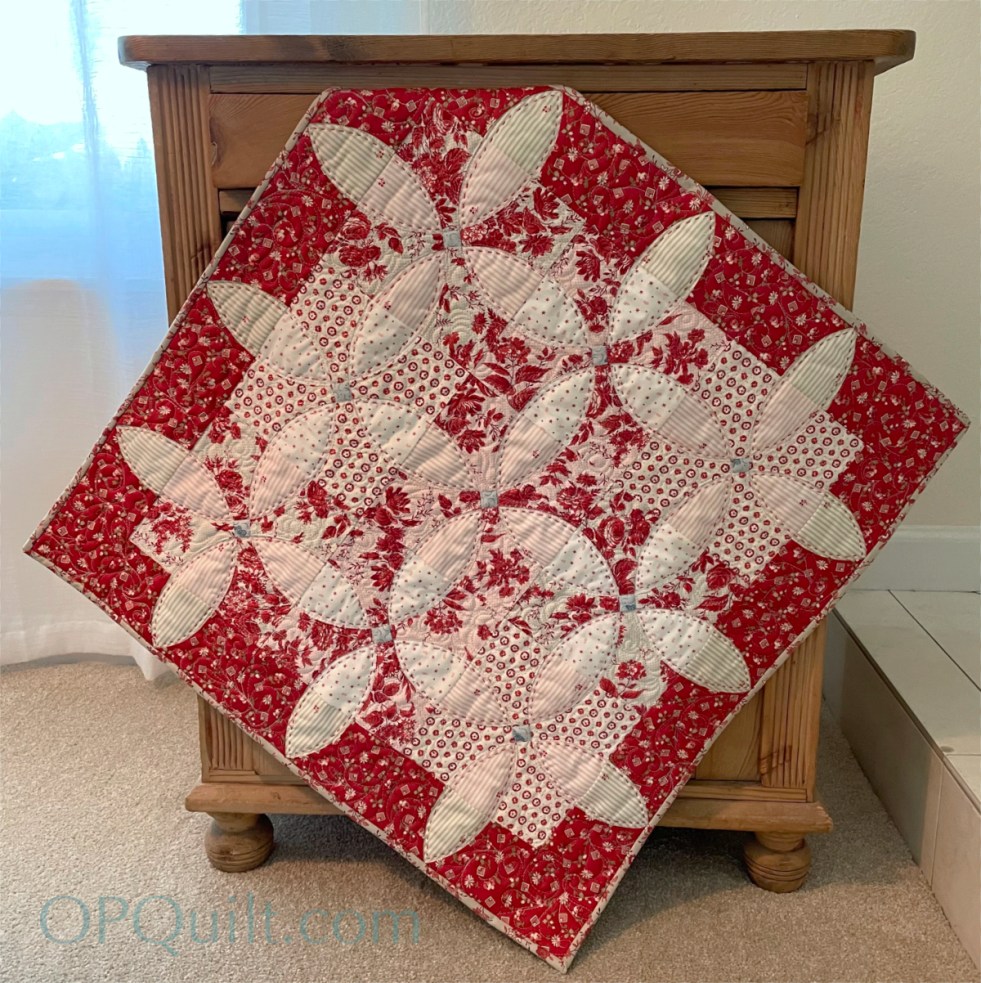
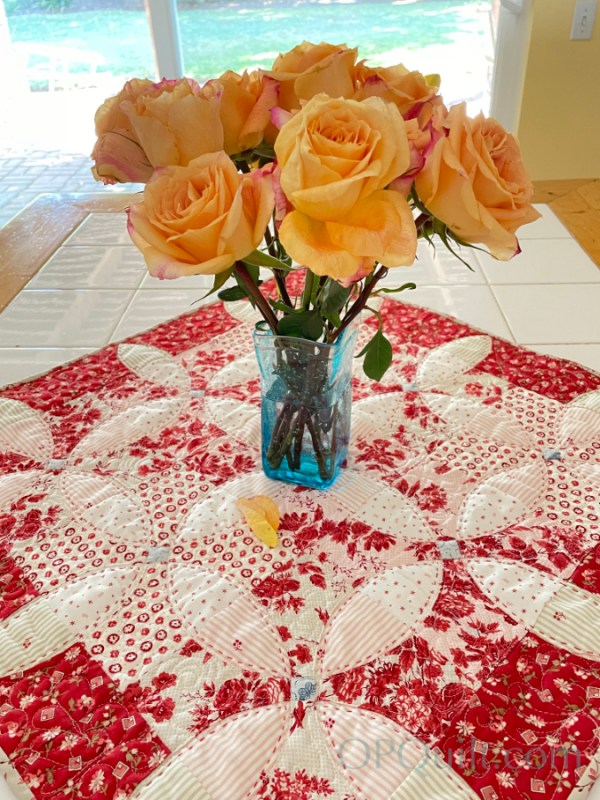
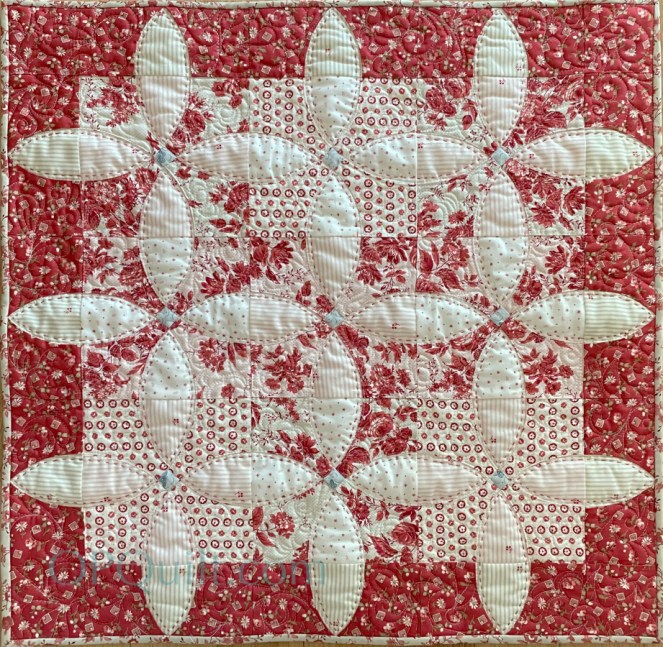
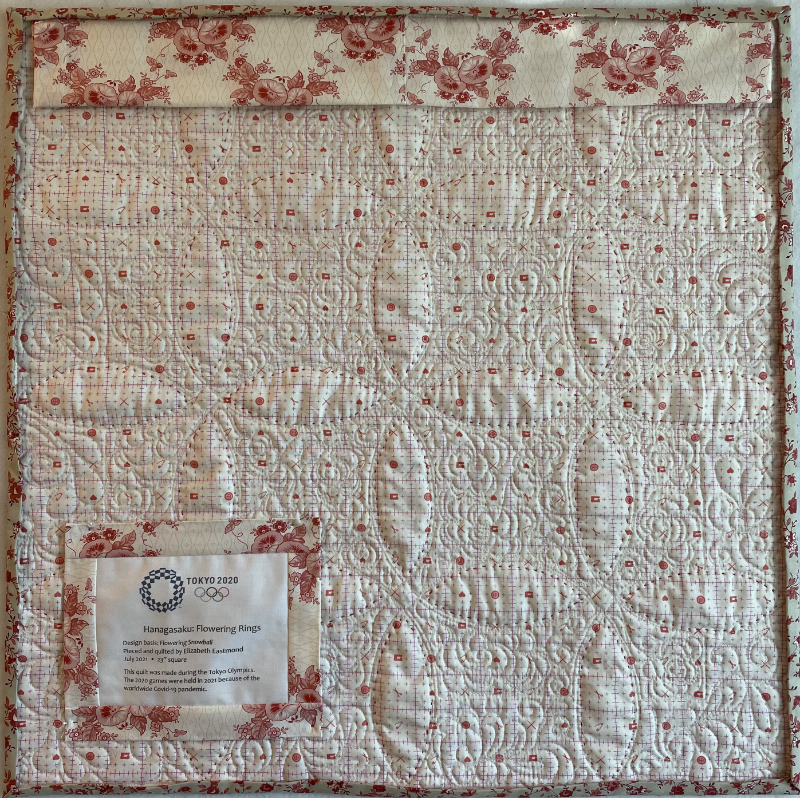
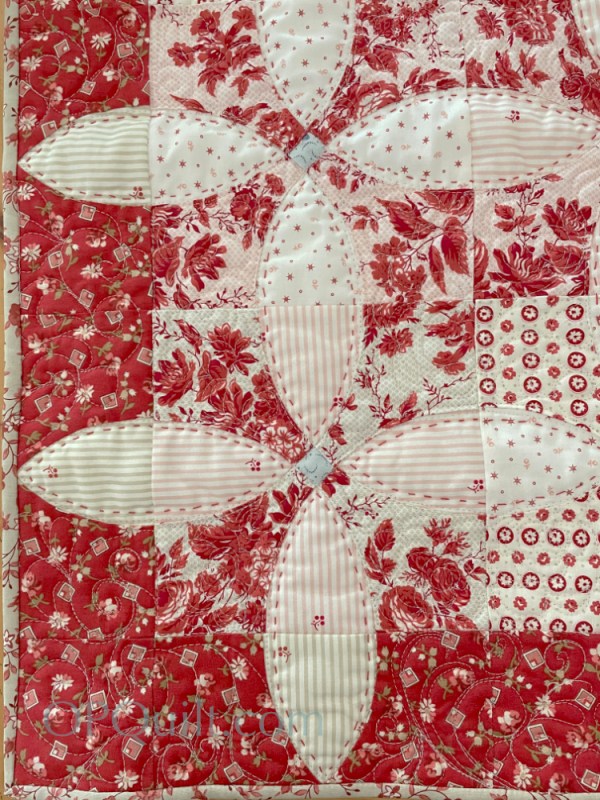
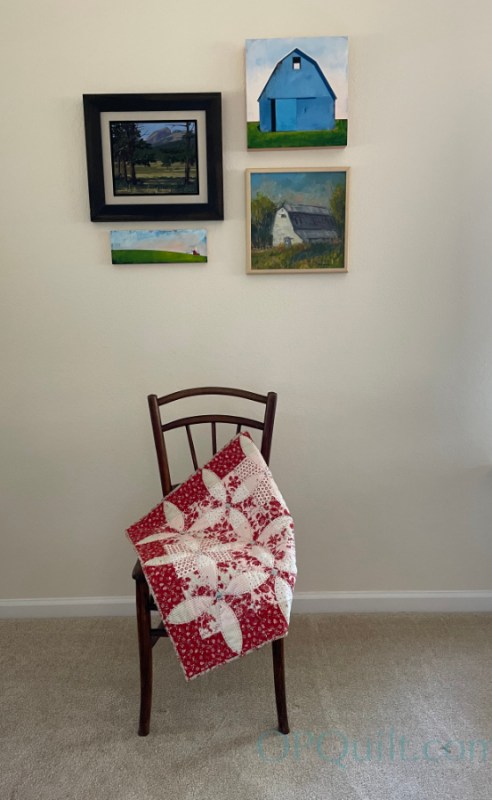
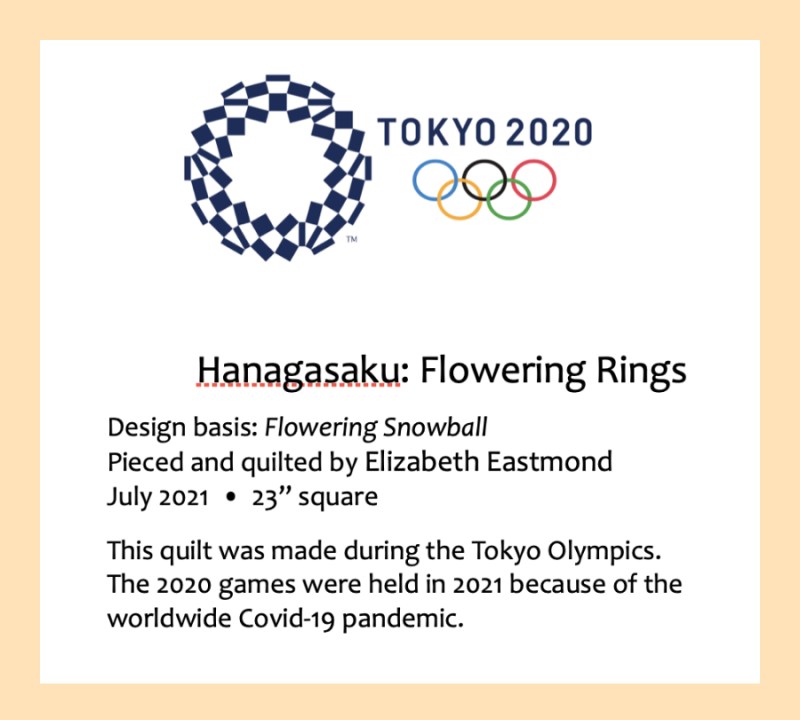
Recently I taught a class for my Home, Sweet, Home mini quilt. I snapped these photos as they were working; they’d all mostly prepped up their pieces before coming, and it made the class go quite smoothly. I loved all the different ways that people did their blocks (shown here at our Guild Meeting):
Here are most of them (some didn’t bring them to Guild):
It wasn’t until posting these up that I found two errors in these quilts. Isn’t it funny that you don’t see things…until you do? (Hint: it’s in the bushes.) I love the rainbow quilt made by my friend Lisa. I may have to make one for myself.
It’s Four-in-Art Challenge Reveal day today, the penultimate challenge in 2017. We began this art mini-quilt group in November of 2012, and we are in our fifth year. Bette, Rachel and I have been with the group since the beginning, with additions and changes here and there. It’s been wonderful to have this to look forward to four times a year, a chance to stretch and try some new things, all contained in a mini-quilt (we are more flexible with the size now, but originally, it had to be contained in a 12″ square).
Rose Window
13 1/2″ wide by 18″ long
Quilt Number 185
Since I chose the challenge of Stained Glass Shadows, obviously I’m in love with the highly saturated blocks of color left on the floors of cathedrals and churches when the sun shines through stained glass windows. I originally thought I’d try some figurative work, but the colors are what always catch my eye.
So I began with the warm tones, adding the layers of earth-colors as they moved toward the bottom, and celestial-colors as it moved upward.
I also knew that somewhere on this quilt there had to be a Rose Window, that enormous circular window high above entryway doors.
Then it was quilt the background, and I went with the idea of the rose window as the center, with thread-streams of color coming out from there: navy and deep colors from the top and the warmer yellow-orange-red tones as the sun filters downward through the stained glass. My solid fabrics are Paintbrush Studio Solids, and the thread is Magnifico by Superior Threads (with Bottom Line in the bobbin) with some So Fine here and there, as the color dictated.
Details of Rose Window quilting.
Back of quilt, with standard label, and added corners for easy hanging.
Please visit the others in our Four-in-Art group, and see how they interpreted the Challenge of Stained Glass Shadows:
Welcome to Day 4 of the Patriotic Palette Blog Hop, hosted by Paintbrush Studios and Painter’s Palette Solids!
Red, White, and Blue Star • Quilt #183
25″ square, made from Painter’s Palette Solids
A couple of weeks ago, the fine people who make Painter’s Palette Solids sent me some fabric and asked if I would make something. At the end of this post, there is a giveaway so you can win your own stack of red, white and blue fabrics.
I’m part of a series of posts showing items you can make with just three reds, three blues and some white. Here is the complete list and the days that they are presenting:
The project I chose was a quick and easy mini-quilt, which finishes at 25″ square, and is perfect for a table top when you want to give a little patriotic flare to the kitchen. I’ve written up a free pattern, available in my Craftsy shop for download (see button to the right), but the instructions are here if you need any tips and help with construction.
I was sent fat quarters in three shades of red, three shades of blue and a fat quarter of white. The white needs special cutting: cut the long borders first (see chart on pattern), then the squares for the half-square triangles. You may have enough the other way, but do it this way to be safe. I also was tight on the medium blue, as I used it for the binding, too. You’ll need to provide your own backing (about 3/4 yard, or pieced scraps).
I basically constructed this as a nine-patch, a favorite thing of mine to do with minis. I started by sewing four bright red triangles on the edges of the blue square, then pressed them all away from the center. I squared this unit to 7 1/2″. (This quilt is forgiving if yours is slightly smaller.) I squared all my nine units to the same 7 1/2″ as then I wouldn’t have to square up (or true up, depending on how you refer to it) the finished quilt top.
Next was the construction on this corner, sewing the medium and dark red triangles together to make a square, then sewing on the dark blue triangles to make a larger triangle.
Sew on the medium blue triangle to make it a square; true it up to 7-1/2″ inches.
Now make the rest of the blocks: sew the triangles together as shown, then seam those together to make a square. I always press to the side, if you are wondering. Only rarely do I press open, so avoid that.
Lay out all your squares (as shown above, left), then sew them together like a nine-patch (upper right). Measure the square; the sides should measure 21-1/2″. Trim your long white border rectangles to measure. Sew the darkest red blocks on each of two of the white rectangle borders.
Sew two white borders: one on top of the quilt and one of the bottom. Press. Then sew on the borders with the squares attached; press. Admire your quilt top.
Let’s get quilting!
Here’s a picture of the quilt in the sunshine, showing my quilting stitches. I always have the hardest time coming up with what to quilt where; yours may vary. The “bandstand swag” arcs on the outside were a happy accident.
This was all done on my Sweet Sixteen machine, but that functions like a domestic sewing machine. I did do ruler work (which is probably easier on my machine than a domestic) but it can be done on your regular sewing machine. Just make sure you have a thick enough hopping foot and thick rulers designed for this task (not your cutting rulers!); put grippy stuff on the bottom of your rulers, as you’ll use them to help you move the fabric under your needle.
Happy Fourth of July!
If you haven’t heard me tell you about Painter’s Palette Solids, made by Paintbrush Studio, you must be a new reader. It is my FAVORITE solid: it’s easy to work with, has a nice hand, deals well when I need to unpick and re-stitch (I had to do that with the quilting, but you can’t see it, right?). It’s a fairly new fabric to the market, but many brick-and-mortar shops, as well as online shops, are starting to carry it.
As is my custom when sewing for Painter’s Palette, I give away my scraps when I finish a project, so that some fortunate quilter can give this fabric a try. BUT! Paintbrush Studios has generously offered up a stack of the fabrics I used in this quilt — seven fat quarters — so you can make your own (giveaway is for domestic/US only).
To enter, leave me a comment telling me if you like fireworks, and why (or your most memorable). I’m not talking the little things that are lit up down on street level, but those glorious bursting displays of color and light. It will get us all in the mood for Independence Day.
I’ll activate the Husband Random Number Generator and pick a winner, to be contacted by email.
Giveaway closed. Winner has been notified and will be announced in next post. Thank you all!
I made this for an exchange at my Guild Night, but then my daughter and her family came into town and I didn’t go, so now I have my own little quilt.
It has its own stand, and it’s easy-peasy to make.
First, buy one of these. They used to be more durable, but this is cheap-cheap-cheap and it works.
Make yourself a sailboat. I pieced the sail on the left first before sewing it into the mini-mini-quilt. Here’s the templates in a PDF file (be sure to set your printer to 100% before printing): Tiny Sailboat And if you like to foundation paper-piece, here it is again: Tiny Sailboat PaperPiece Pattern
If you are using the foundation paper-piece, cut the pattern into three pieces, as shown by the red lines, being sure to mark it somehow with seam allowances. (I use a colored pencil and draw it along the line before cutting it apart to remind me it is NOT a cutting line, but a seam line.)
The little sailboat finishes at 6 1/2″ by 8″ which isn’t big enough for the frame. I added the sunshiney fabric on three sides, seaming a bit of “ocean” fabric on the sides to keep the horizon line. I also added ocean fabric to the bottom, so now my little boat is afloat.
Quilt as desired (curvy waves in the ocean, straight lines outlining the sailboat and sails, and stippling in the sunshine), then trim to the above size: 8-3/4″ by 10-1/2.”
Make the sleeve: Hem one short edge of a piece of fabric cut to 8-3/4″ by 9-1/2″ and place it wrong-sides-down on the back of your mini-mini quilt. Pin in a couple of places.
Cut strips of binding 1 1/4″ wide, seaming if necessary to get the desired length. Stitch the binding from the front, right-sides-together, then turn the back, tucking under the raw edge. Hand-stitch closed.
Our guild does these a couple of times a year, creating a changeable scene for your home. I’ve previously hung minis on a wall, but I’m really liking this quilt-on-a-stand idea.
Rainbow Gardens (the original) was made for a swap back in 2015, and I always wished I’d kept it for myself. So this week I did the next, best thing: I made a new one.
I had all but one of the fabrics for this 18″ mini quilt still in my stash, as I pretty much hoard my Kaffe Fasset fabrics. I tried to quilt it the same, too, using my favorite Magnifico Thread from Superior Threads. But the backing is different, as is the label:
The backing is “pindar paisley” from Alexander Henry, from 2012. The front of the quilt is all Kaffe Fasset fabrics, some new, some older.
I also updated the pattern, trimming out this and that, and editing it more tightly, and it is up on Craftsy for sale, if you want to replicate this. And even though it feels strange to say this, I’m going backwards and keeping the number from the original make: this is quilt #148 of mine.
I so rarely duplicate my quilts, that this feels a little odd. I have plans to remake one more, but that will come later this summer. After sending off these two quilts to their owners, I wised up and began duplicating everything I swapped from then on. I rather like my quilts, I guess. Have you ever swapped a quilt, and then wished you had it back?
I also finished another quilt this week. Stay tuned.
I have always wanted a patriotic mini-quilt, so before surgery, I prepped up these little stars, fused them down to 2 1/2″ squares of fabric and stitched them together in a block. I figured I could stitch on them while healing. I would use some of those pearl cottons I’d collected while doing Oh! Christmas Tree, and blanket stitch around the shapes.
The first day, all I could stitch was ten minutes. I came back to it a week later and over a few days, finished them up. Now what?
I taught my husband how to rotary cut, and we got some stripes together (short is 8-1/2″ x 2-1/2″; longer is 16-1/2″ long x 2-1/2″). I swapped out my big machine for my teeny Featherweight, and stitched them together, one-handed. At my first check-up the doctor gave me the go-ahead to do stitching, as long as I wore my sling, saying it would be “therapeutic.” Oh, yes.
Putting on these scissor-cut 1-1/4″ borders was not easy (finish at 3/4″). I’m so used to man-handling the fabric for speed, I’d forgotten how to slow-stitch, or slow-quilt, or whatever you want to call it. Before, I would grab the strip in front and in back and put some tension on it, floor my foot pedal, and force that fabric into place. Since I only have one hand available to help guide it through the machine, this wasn’t going to work.
Auditioning the next border, with the realization that there is no driving, either, so no running to the fabric store if I don’t like what I have. I scissor cut the borders, laid out the little mini quilt face-up on the ironing board, and gave it a good press and smoothed it out. Next I laid the border face-down on top, and again pressed it. Since I can’t force these pieces together, I have to coax them. I pinned them together in many places, and fed the seam slowly through the machine. Flattest border I ever put on, with no puckers anywhere.
I had an old printout from the internet (couldn’t find the source when I went back to reference it) that had this word, so I drew two lines, 5″ apart, then another guideline 1″ inside the top and bottom and freehanded the letters. I fused them on to the quilt. They are about 5″ tall overall, as that outer border was 6″ scissor-cut.
I sketched out a bud, figured out some leaves. I drew joined leaves, inspired by my love of samaras, or those joined helicopter seeds from maple trees, but also inspired by this photo [PDF of pattern shapes is at the end of this post]. Above, I am trying Sarah Fielke’s method of prepping up shapes for appliqué. It worked fairly well.
I laid out all the parts: leaves, byds (small and large), tubing for stems and more cut stars (on the pattern sheet), trying to decide if I like two leaf sets next to the word Liberty, or one. I’ll appliqué or blanket stitch down everything…then decide. Since I work in small segments of time, and ever so slowly, I might make my goal of July 4th. Here’s the pattern sheet in a PDF document: liberty-usa-quilt-bits Please be sure to set your printer’s settings to 100% so the large star will measure 3-1/4″ where noted. It contains: large flower bud (top and two sides), small flower bud (next to Liberty), joined leaf shape and the large star. You can either shrink this star for the 16 stars in the central star section, or look for a star online that will measure about 1-3/4″ to 2″ across.
My set-up is a pattern-cutting board laid out on the extra bed, a chair pulled up to it.