
I am the Queen Bee this month for the Gridsters Bee, and thought and thought and thought of what I could do. I happened on this design while surfing the blogs, and something about it just made me smile. Since I am one month post-op on my interminable rotator cuff repair recovery, I realize that it’s probably because I just needed some happy-cheery-goofy-fun in my life.

Yes, I made the tutorial and wrote it all up before I went in to surgery, perhaps anticipating the need for something happy-cheery-goofy-fun. To start us off, here’s something to get you in the mood for making my block this month (stop it about 3:00):
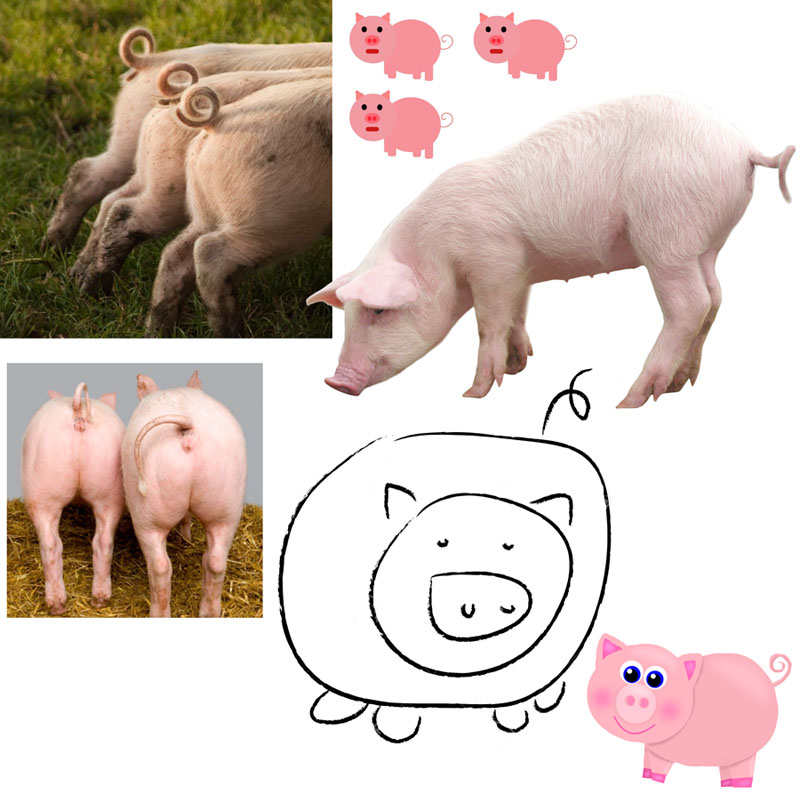
Yep. Somehow little piggies have gotten in my heart and under my skin and I want a whole quilt of them, although I may add a barn or tree to break things up. I first found them on Gayle’s blog, Mangofeet, where it says she is a bonafide farmer. She found them on Sally’s blog, The Object of Design, which is where I found a tutorial for littler guys. And I found Gayle, by following a link from Bonnie Hunter’s Quiltville’s Linky Party for her En Provence mystery quilt. Connections everywhere!
Before I leave all the attributions, please visit Sally’s tutorial page, where she has other tutorials for bunnies and fish and all sorts of creatures.

But mine are slightly different, both in size and in style, so I wrote up atutorial for what I want. Since they are small, I’d like you to make me two, if you wouldn’t mind. I used Gayle’s post for inspiration (also look *here.*). To make it easier on yourself, make them both the same, but if you get adventurous, it’s okay to flip the orientation of the piglets, or make one going up and one coming down. But really, keep it simple so you aren’t calling me names in the middle of this process.
Again, while Sally has a tutorial (linked above) and she is the designer of this block, I changed up a few things (like the dimensions), so please follow along and make my piglet according to my tutorial. The piggies are all scrappy, but I do need:
- sky–a consistent low-volume or “background–no need to make them the same fabric, but the do need to be the same lightness: pale blue, cream, white, tan, low-volume with grey/tan/etc. prints. Avoid prints with too dark of text or design so that it throws it to a muddy tonality. Some background prints are fun and will make the quilt more sparkly. It’s okay to mix up the borders, but I’d probably stick to the same fabric around the piglet.
- body–a medium value fabric: small print or geometric, floral, Kaffe, but avoid fabrics that look “splotchy” when cut this small (such as cutting a giant polka dot in half)–generally anything in your stash. Have fun. Make me some colorful piglets.
- ears, feet, snout–a darker-toned fabric that stands out from the body fabric
- tail–embroidery floss/Perle cotton to match your piglet, to embroider the tail. Pattern is not given for this, but below are some piglet tail ideas. Please use a back stitch. More info in the tutorial.

Gayle showed hers on a tilting grassy hill, which I like quite well, so that’s what I’m asking you to make for me. Copious amounts of photography and images and text follow, but really it isn’t too hard. The following directions yield one piggie, so cut everything out double, out of two different piles of scrappiness.
Lastly, I follow standard print journalism standards: the caption in UNDERNEATH the image (MQG had theirs backwards on their award-winners page and I was so confused!)

Cut the background (sky).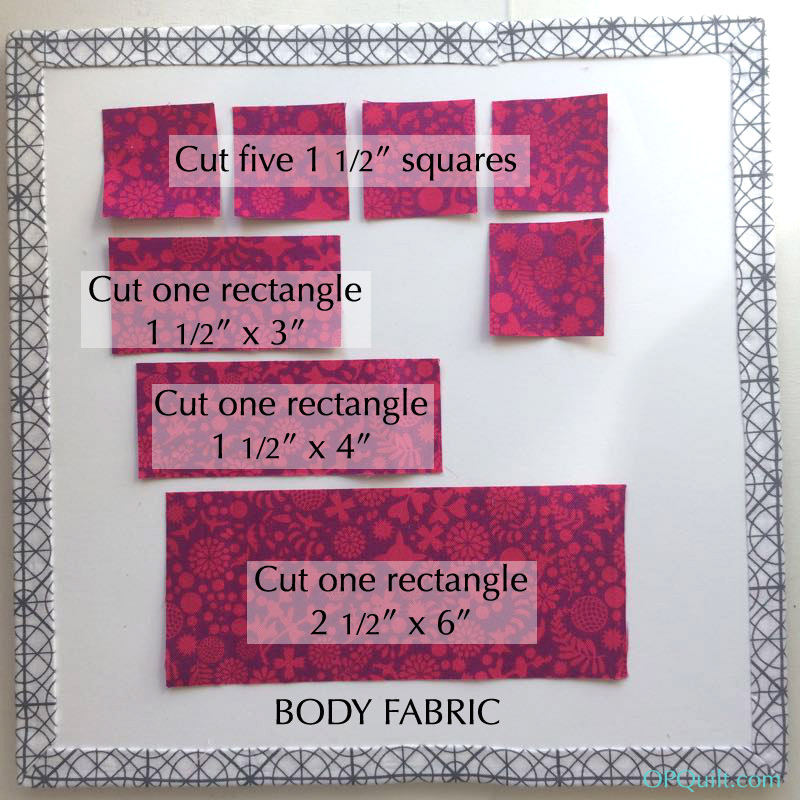
Cut the body fabric.
Cut the accent pieces of snout, ear and feet.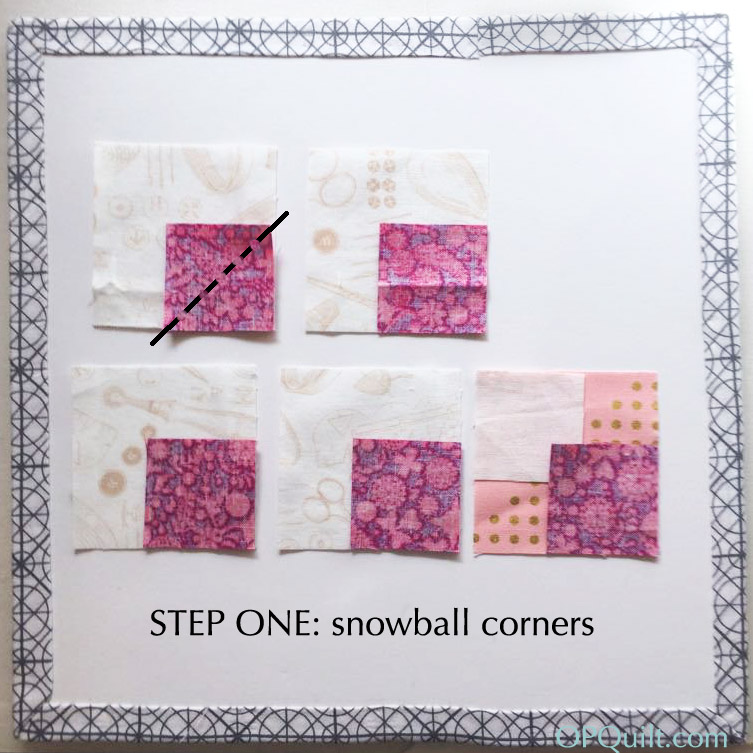
Step one is to snowball body fabric onto the background fabric, using the 2- 1/2″ square pieces of background and the 1 -1/2″ square pieces of body fabric. Then the last snowball is a double: use one 2- 1/2″ square of accent fabric and snowball on one 1 -1/2″ square of background and one 1- 1/2″ square of body fabric. Press the snowball corners to the dark side, and trim after pressing. With the double-snowball, you’ll press one square’s seam allowance toward the accent fabric and the other toward the body fabric.
Step two is to gather the other pieces together: Line up the 1 -1/2″ x 4″ pieces in body and background, AND the 1- 1/2″ x 3″ pieces in body and accent. Place on the front accent piece (snout) and the back background piece on the large body piece (lowest piece).
Step three: sew the strips together and then press to the dark side on the top one. I don’t care which way you press the bottom one, but I went towards the dark as well.
Now cut those strips in half. Exactly. The top strip set (A) will yield two with body and background fabric that will measure 2″ across. The bottom set (B) will yield body and accent fabric that will measure 1 1/2″ across.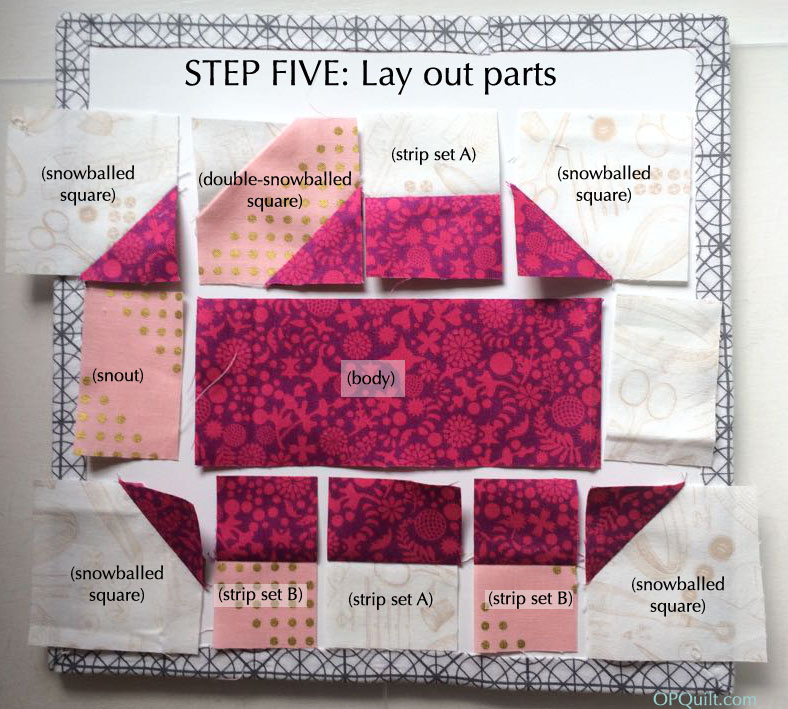
Step Five is to lay them all out. If you were going to make a reverse-direction pig, you’d need to fiddle with that ear (double-snowball) piece to sew that up differently, otherwise, everything else is the same/can be moved around. (See second pig at the end.)
Sew the top row together, then the middle and yes…sew the bottom row of pieces together. Pressing instructions are in a minute, but generally press towards the dark. PLEASE DO NOT PRESS THE SEAMS OPEN. 
Babe!!! Babe!!
This is how I pressed the seams. I just realized I pressed the legs the wrong way. Oh well. Either way is fine, but just not open. [NOTE: I show it correctly in the second pig, at the end.]
Time to tilt this little guy. Start by sewing on a 2- 1/2″ strip of ground–can be green for grass, or flowery for a meadow, or brown for forest floor or purple for Outer Space. It just has to have contrast to the background and side strips.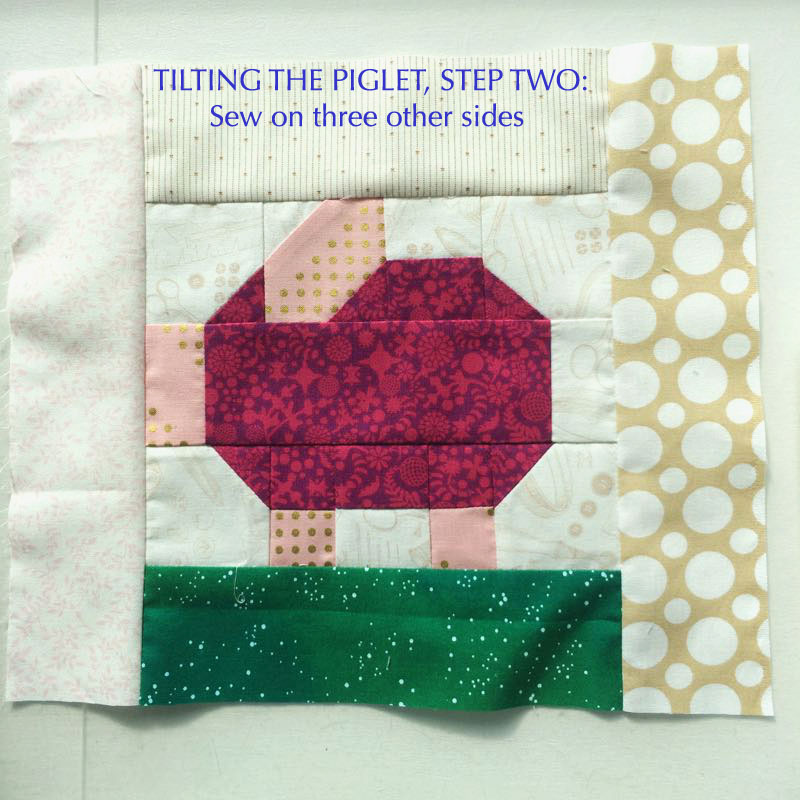
Sew on three side strips, by FIRST sewing on the top, then the two sides, all 2 -1/2″ wide strips.
UPDATE FOR MY BEE MEMBERS:
Please do not trim. After sewing on borders, just send untrimmed, untilted.
Now back to our regular programming.
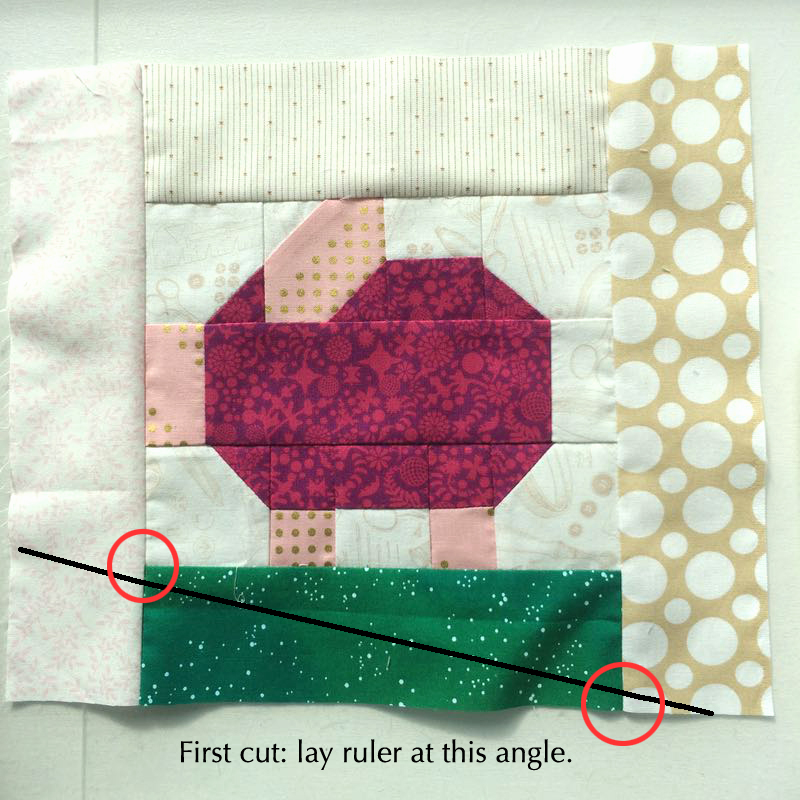
Now to cut. Please check the areas in those red circles to make sure you are leaving 1/4″ seam allowances (one above the line, one below the line). Lay your ruler with the edge along the black line, above. Cut.
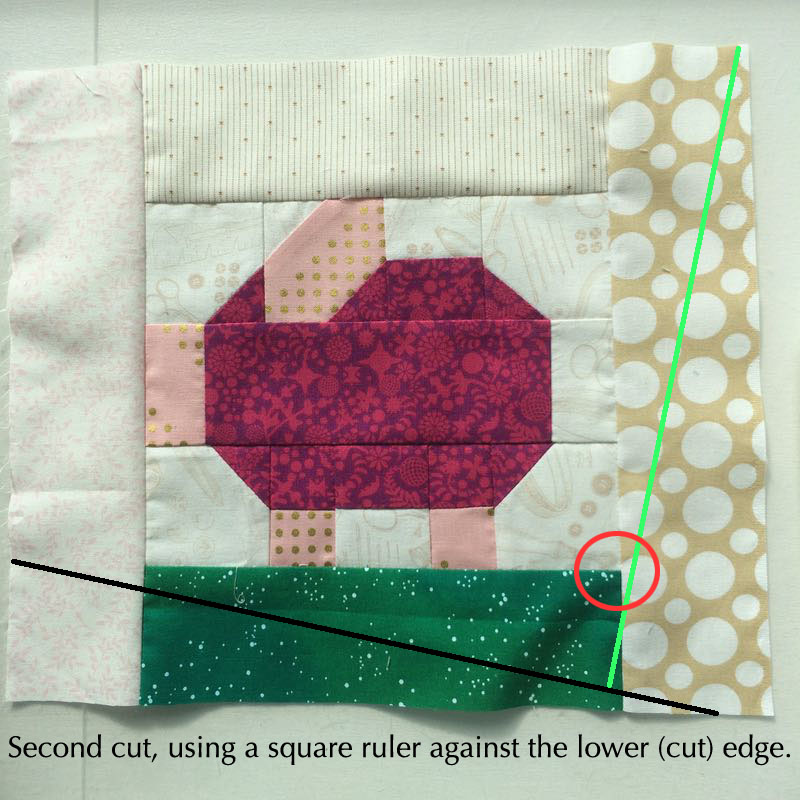
Now lay a square ruler at the bottom (newly cut) edge. Now play with the adjacent side it a bit, making sure to leave that 1/4″ in the circled area. Cut.
Now think about it as a beginning rectangle. Turn the piglet 1/4 turn clockwise so that the newly cut green line is at the bottom of the mat and the black line is to your left. Measure over 7 3/4″ from the black line; cut.
Measure 9 1/4″ up from the green line; cut.
Tilt the pig back to a proper vertical and it should look like this:
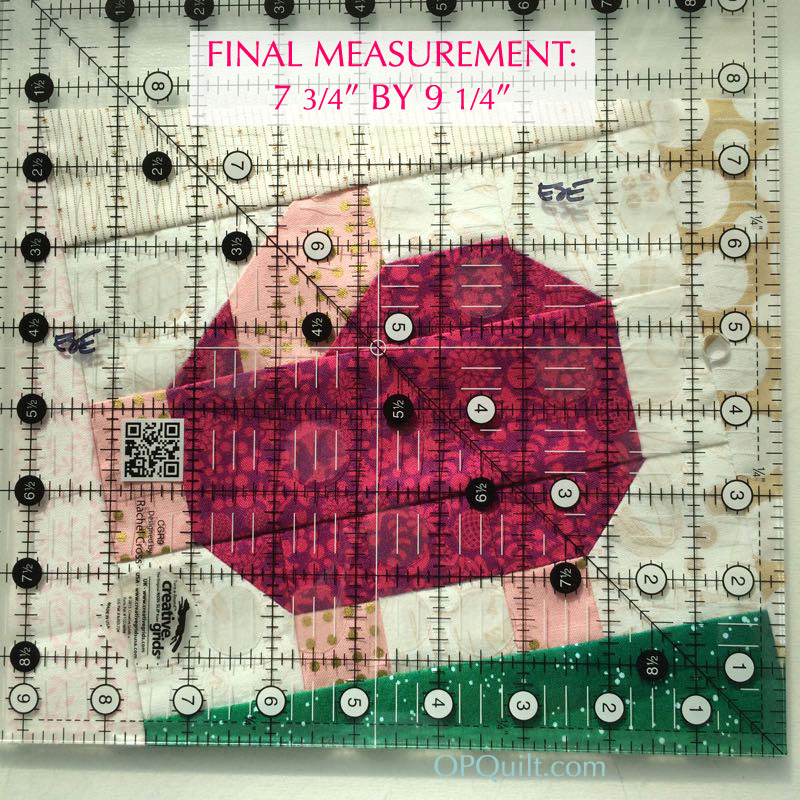
The piglet’s rectangle will measure as shown above: 7-3/4″ high by 9-1/4″ wide..

Again, this is the most important corner when you cut for the tilt. It’s so the ground will look merged together when seamed.

I made you an overlay, if you are nervous. Download the PDF file: piglet-tilt-overlay1 and print it out on vellum paper, or make a template out of this (too much trouble, I think). It will help you get the right angles.
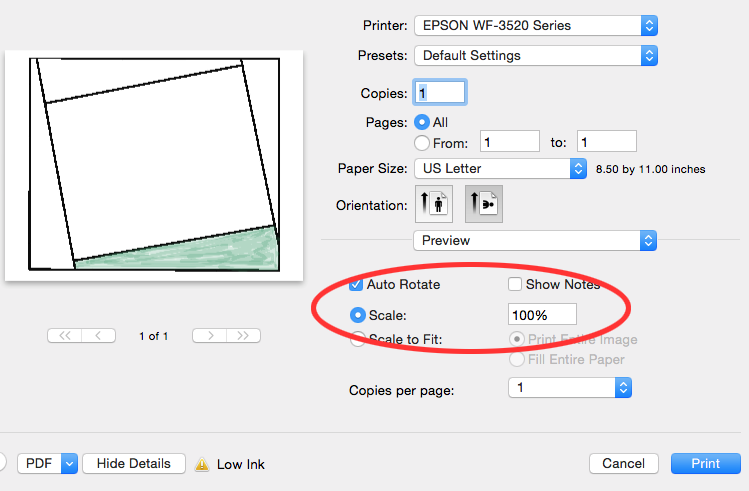 Please print it at 100% or you will again find yourself cursing.
If you are really truly too nervous to cut this pig, send it back to me untrimmed and when I get better, I’ll be happy to trim it up.
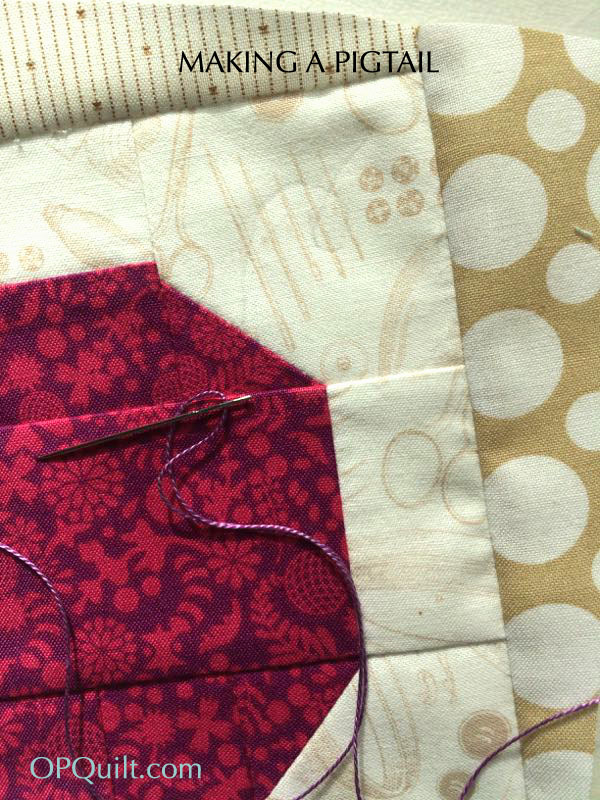
Now let’s add the pigtail. Draw on a squiggle, originating from the pig’s backside edge. My drawn line is really faint, above because I don’t want to have to figure out how to get the pencil off. Sometimes I’ve just eyeballed it. Sometimes I’ve just scratched it in. See the picture at the top of the post for pigtail ideas.
Tie a knot in your perle cotton (I used size 8, but 5 or 12 is fine, too) and bring it out at the fold, at the beginning of your drawn line, hiding the knot in the seam.
Take one stitch (#1) and then skip a stitch, coming out as shown in the photo on the left. Now put your needle in the same hole as where you came out on your starting stitch (#2) and backtrack and stitch that empty place, which will put you on the road to backstitching the piglet’s tail on. 
Insert the needle in the last stitch and pull it to the wrong side.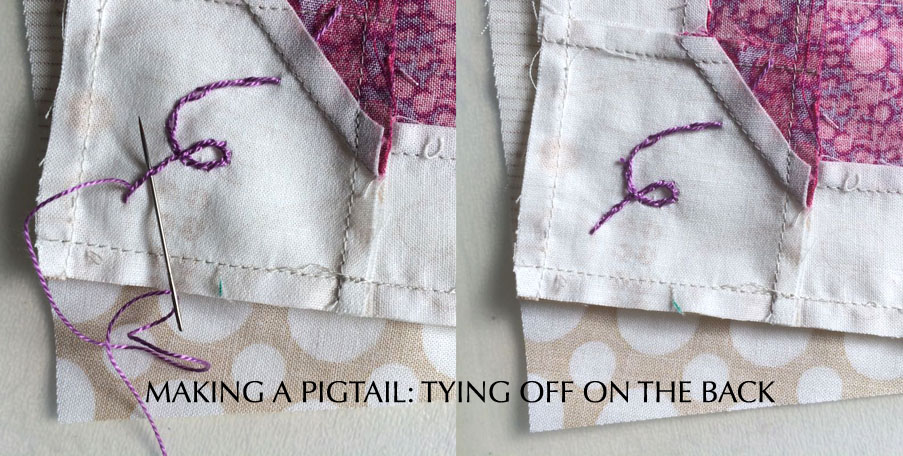
On the wrong side, weave your thread down from the top , then make a knot (below) by making a loop and drawing your needle through it. Continue weaving your thread for one or two more stitches, then cut it off.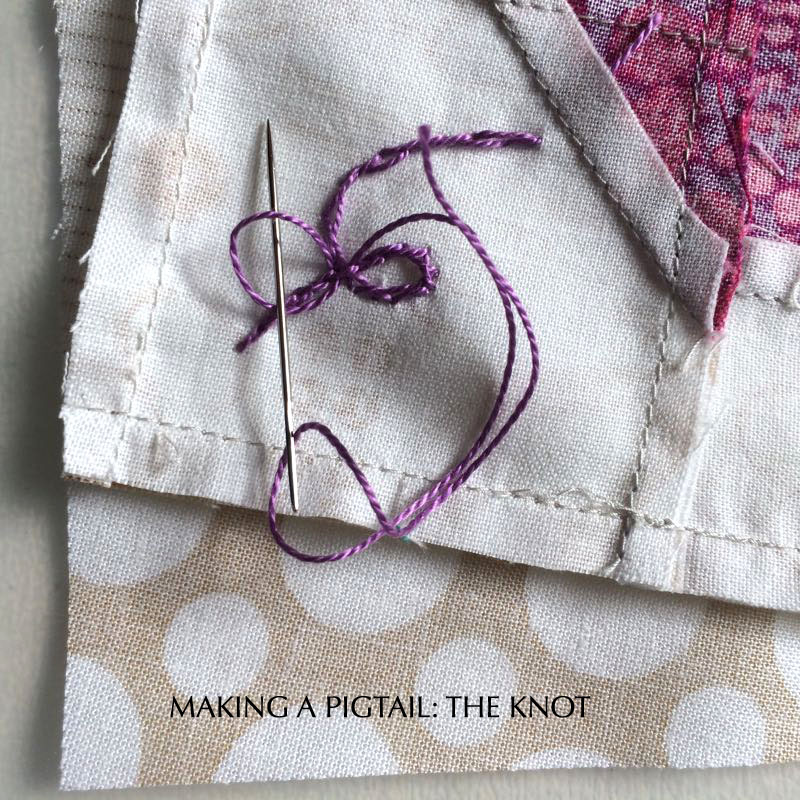
Okay, let’s do it again, but with the pig flipped to the other side.

You can see how the ear needs the double-snowballed corners switched.
And the back, showing the pressing, this time with the correct pressing for the legs.
You have to think on this step: do you want your piggie going uphill? Or downhill? 
I voted for downhill since I already have an uphill.
Here’s how I laid my ruler, keeping an eye on those 1/4-inch seam allowances.
Now you can see how I use my square ruler to find the next edge. 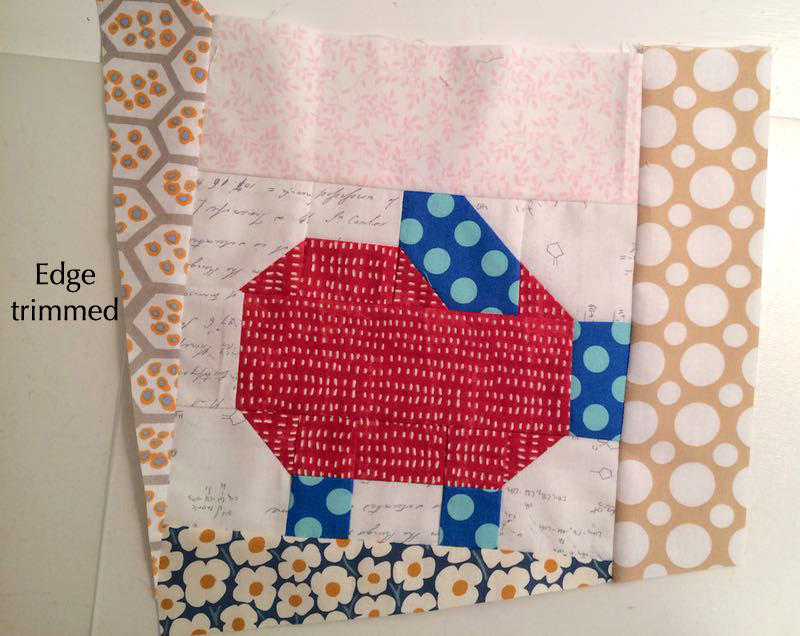
It’s really straight, even though the photo doesn’t look like it.
I put the ruler on as I described above, and worked it until I had the correct measurements of 7-3/4″ by 9-1/4.” I ended up trimming off a slice of a previous cut to get those dimensions. Then I do the tail. 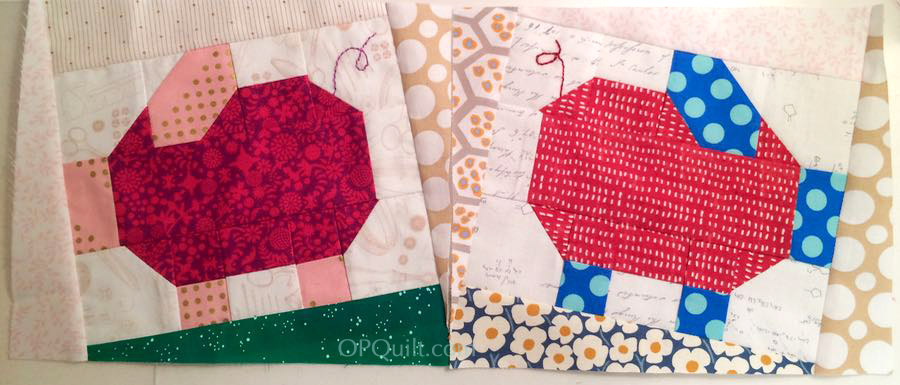
Here they are together, but not sewn together.

That’ll do, Pig.
Thank you everyone! I look forward to a whole farmyard of little piggies, running around my design wall. While I attribute all these ideas to two very fine quilters: Gayle, of Mangofeet (she is hilarious to read) and Sally of The Objects of Design (who has made a stunner of an En Provence Mystery Quilt), all the photographs and instructions above are my own. Please do visit their blogs to see all the fun piglets that are running around there.
Discover more from OccasionalPiece--Quilt!
Subscribe to get the latest posts sent to your email.

Scrappy 🐷 piggies! So cute!
My husband’s maternal grandmother loves pigs (and has a huge collection)… I am thinking she might need a sweet pig pillow! Eep!
So cute! I can’t wait to make these!
What a lovely clear tutorial!
Super fun. Two of my boys have pig quilts from their great grandmother. I’ll have to share some pics. Theirs are appliqued.
I am SO looking forward to making these! I will have great fun diving into my scrap bins to find the perfect fabric! I hope I can work out those angles..I don’t know what vellum is so probably don’t have any! Do you think I can cut them without that overlay? Any advice is really appreciated! I want to read those other blog posts too!
Cute little blocks 🙂
These are so cute. I can’t wait to start making mine. Thanks for the great tutorial.
How cute are these!
Doesn’t everyone know and love Babe, the sheep-pig? La la la laaaa!
Cutest little pig!
Would you hold it against me if I’m reminded of this: http://aquilterstable.blogspot.com/2016/11/baconrific.html