
Merry Christmas 2017

I’m decorating for Christmas and wanted to change out my Tiny Quilt from Autumn to Christmas, but then got wondering how a teeny-weeny quilt would look, so got busy. These little quilts fit onto plastic picture frames:


I have two free patterns for you here, but please remember the drill: Don’t print off umpteen for your next class, or guild meeting swap or your mother. Please send them here to get their own pattern.
The teeny tree (4×6″) pattern is in this downloadable PDF file: Teeny Christmas Tree quilt
Updated, one-page version (2021): Teeny Christmas Tree quilt
The tiny tree (8×10″) pattern is in this downloadable PDF file:Tiny Christmas tree quilt
As you can see from the samples I made up, I play fast and loose with some of the placement of pieces, really using them more as a guideline for cutting, than anything else (although I did cut out the tree exactly).

Cut out all the pieces for the pattern you’ve chosen. As I noted above, sometimes I used the pattern (shown here before I added the labels) as sort of a general guidelines. You need an accurate tree, and a nice straight edge where you’ll sew it to the tree (the diagonal line in the photo, above).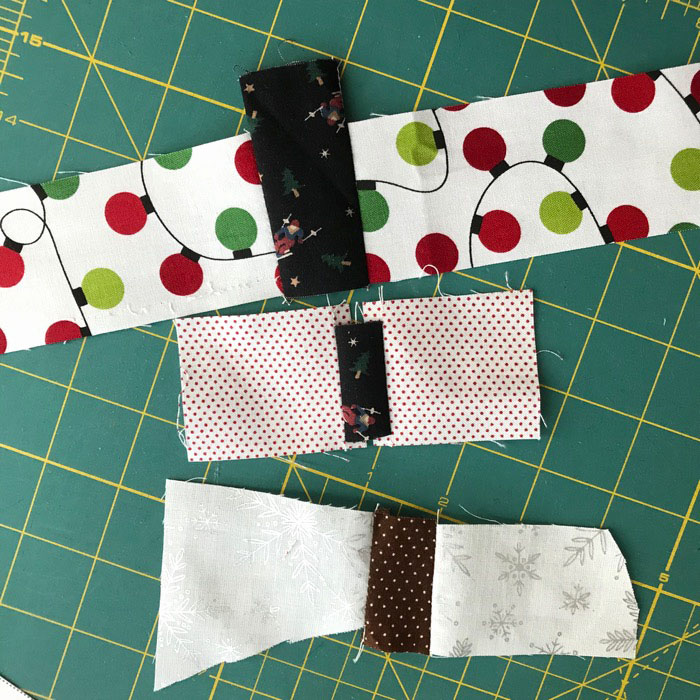
I sewed the “sky” pieces to the sides of the trunks then trimmed the edge that would attach to the tree. More detailed tutorial is also on my OTHER Christmas Tree block tutorial, which is sized somewhere in between these two tree sizes. (I should open up a Christmas Tree lot with all these patterns.)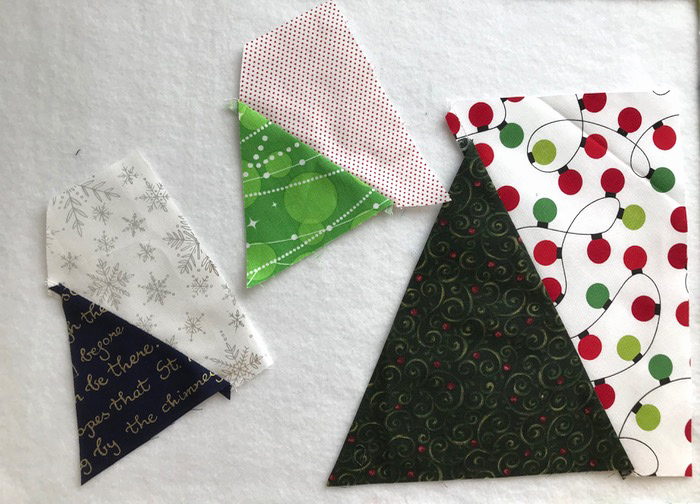
Sew the “right” side onto the tree. Make sure you keep the marked top triangle point pointing upwards.

Trim any stray areas (above), then add the other side.

Straighten out the bottom of the tree assembly. Center, then sew on the tree-trunk unit, pressing seam towards tree (so it looks like the trunk is under the tree).
Now to add the snowdrifts on the little tree. On the left, I sort of place that wedge-shaped piece, determine the angle but flipping it up and down (on the right). When I have the angle I like, flip it back up so right sides are together, and stitch along the upper edge. Trim.
Repeat for lower snowdrift. Trim excess.

For the bigger tree, I added on 2″ strips to frame the tree. It needed something to jazz it up, so I got rid of the bottom strip on the pattern and just used strips all around.
Layer with batting and backing and quilt. I did a meander in the sky area around the trees, then some straight lines in the snowdrift on the teeny tree, and some straight lines in the frame around the bigger tree:

I also quilted some swirls in the center of the tree.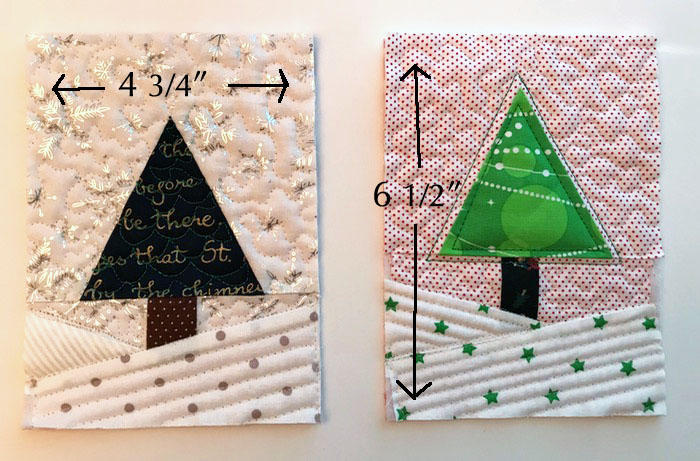
Time to trim. The teeny trees trim to 4-3/4″ by 6-1/2″ and the larger tree is trimmed to 8-3/4″ by 10-1/2.”
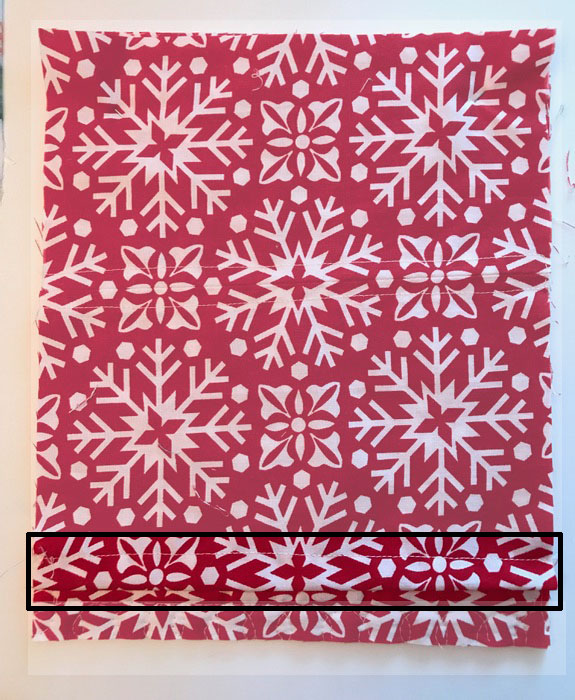
Make a sleeve for the back by cutting a piece the same size as the quilt top, but then hem the lower edge, turning it up twice and top-stitching. I know it’s hard to see in this print, but again, feel free to check out the other tutorials of tiny quilts.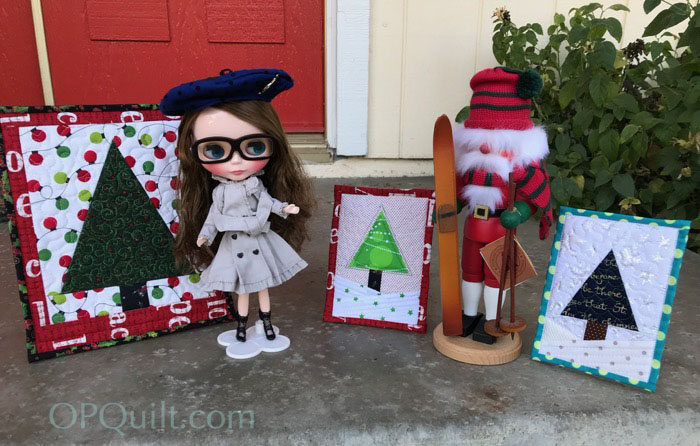
I brought out my Blythe doll and one of my husband’s nutcrackers to pose by the quilts.


Looks like Blythe has the hots for the Santa skier. And here I thought she’d go for the more traditional guy:

He does look a little formal. Hmmm. Evidently not her type.
Okay, that’s enough–I’m off to sew!


(Buttons added!)
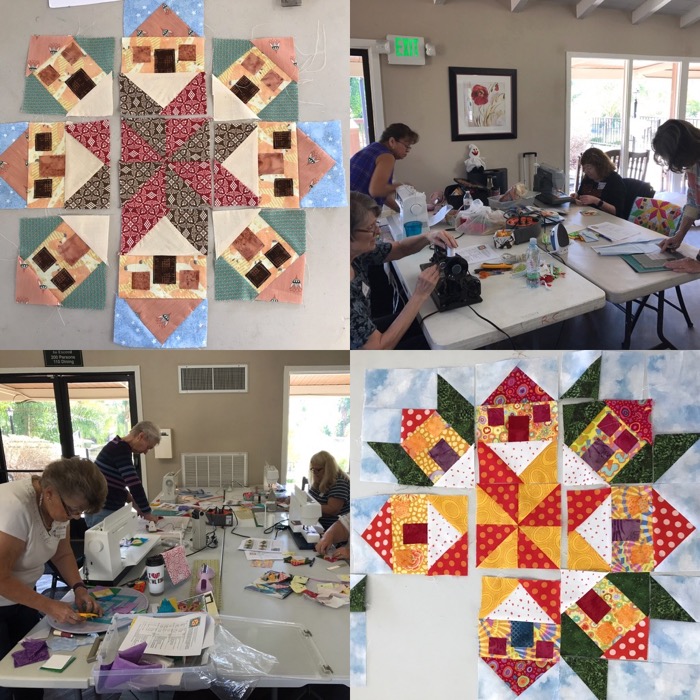 Recently I taught a class for my Home, Sweet, Home mini quilt. I snapped these photos as they were working; they’d all mostly prepped up their pieces before coming, and it made the class go quite smoothly. I loved all the different ways that people did their blocks (shown here at our Guild Meeting):

Here are most of them (some didn’t bring them to Guild):


It wasn’t until posting these up that I found two errors in these quilts. Isn’t it funny that you don’t see things…until you do? (Hint: it’s in the bushes.) I love the rainbow quilt made by my friend Lisa. I may have to make one for myself.

(Breaking News: Melissa finished hers!)
This is the post where I reveal all my beauty secrets. Kidding.
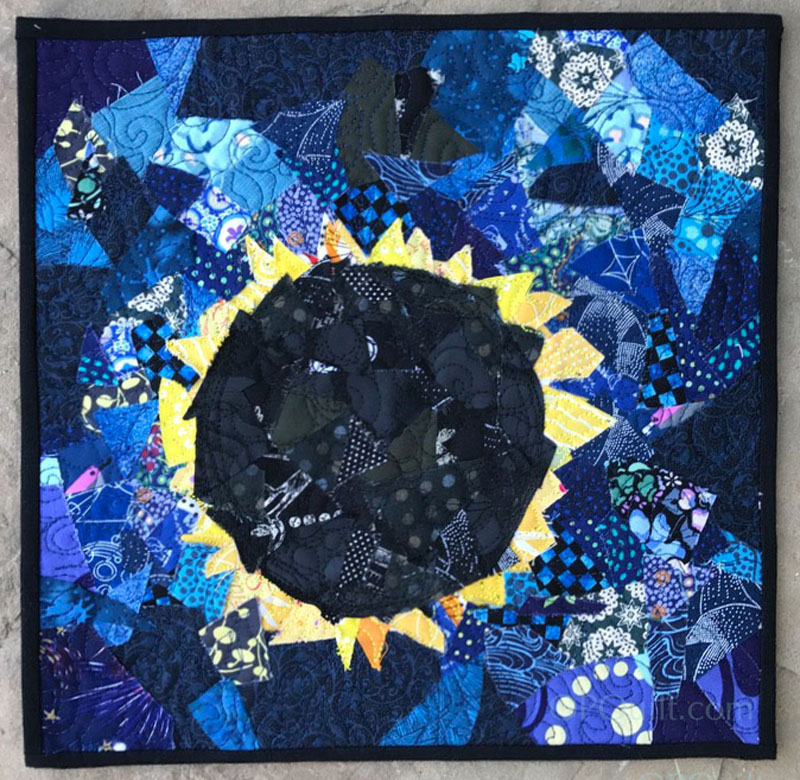
This is the post where I tell you how I made my Four-in-Art quilt, showing a technique I’d read about this technique somewhere, but that crazed-woman-at-the-computer didn’t bookmark it or file it away neatly. So I had to wing it, which is okay.
First, cut yourself a square of black fabric. I used the wrong side of a fabric that I hoarded about 15 years ago, and I’m still trying to get rid of it. (It’s a great fabric, really.) Then get yourself some Steam-A-Seam II, the fusible applique stuff that will be sticky when you lift up the transfer paper, after you’ve ironed it on.
I did check to make sure that I adhered the non-release side of the Steam-A-Seam II, leaving the side that would release easily facing me.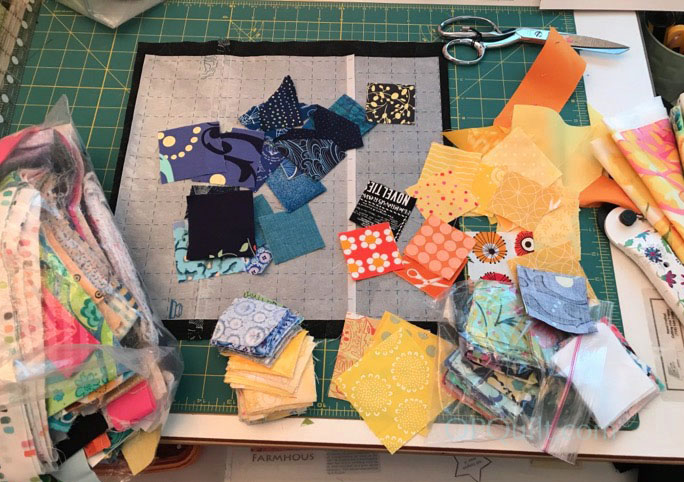
Gather together some scraps in the colors you want to place on your background. Since I was doing the eclipse, I basically had three: yellow, black, blue. Throw in some related colors, just to keep it interesting. For me, that meant some lighter blues, and orange.
Pile up your color, then randomly cut through the fabrics, and then do it again. You need some bigger pieces (1-1/2″), but also lots of smaller pieces (1/2″).
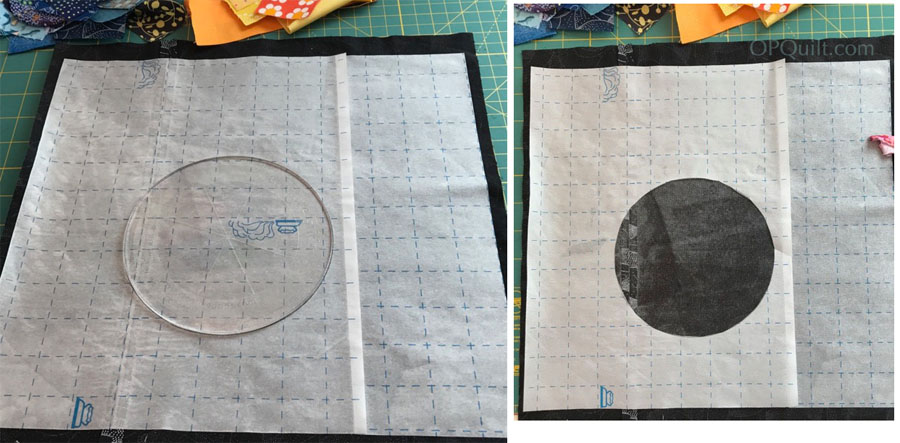
I traced a circle on my paper, slightly off-center — because none of us saw that eclipse dead-center — and cut out a hole out of the paper backing.

I laid out my black scraps, making a loose circle. Then I tucked my yellow/orange sun flares behind the circle, pressing down with my fingers to make them adhere to that sticky surface.
Then I oopsed:
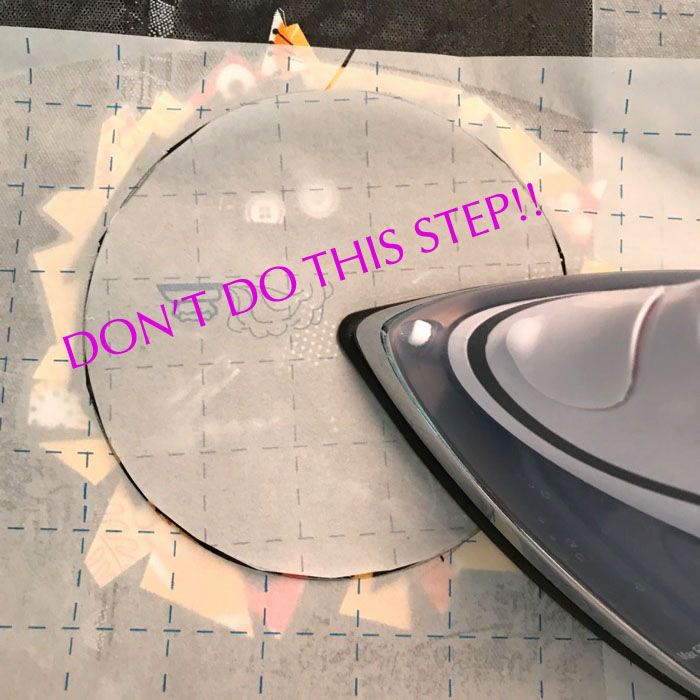
I went to the ironing board and ironed it all down. WRONG. While this seemed like a good idea, you know–to make sure all those pieces were not going to go anywhere — in reality it prevented me from lifting up the edges and tucking in more yellows, and the blues. So maybe if you can protect the edges of your design from the hot iron it might be a good idea? Or just wait until the end?

Then my son Matthew, who is an expert landscape photographer, put up pictures of the Milky Way on his Instagram, MattsClicks. This gave me to freedom to really add in color to the heavens, so I pulled a greater variety of blues (and some with purples) and started scattering them around, trying to keep a “street” of lighter blues to represent the Milky Way. (Thanks, Matt!)
 Add in your bits and pieces, filling up the background in a random, organic way.
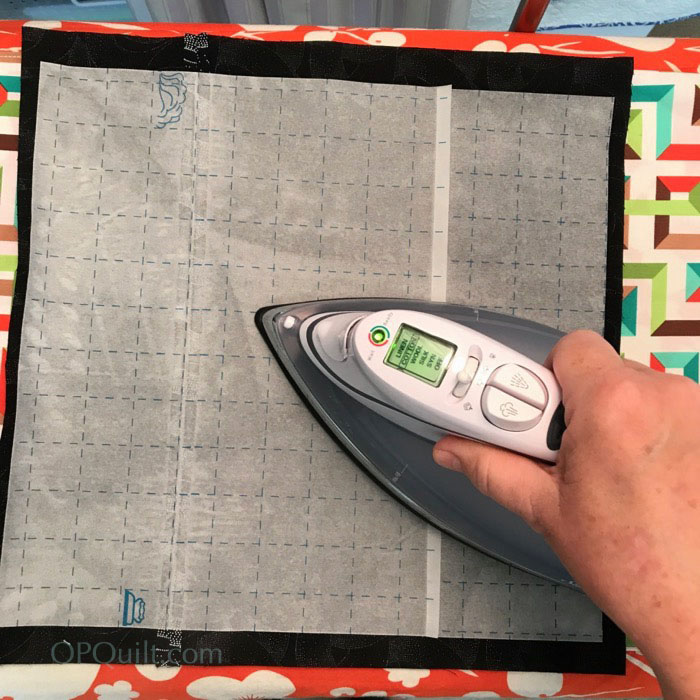
NOW go to the ironing board, lay your transfer paper over the design (the crackly sheet that came with your fusible), and press, lifting up and down, not sliding, until you think it’s adhered.
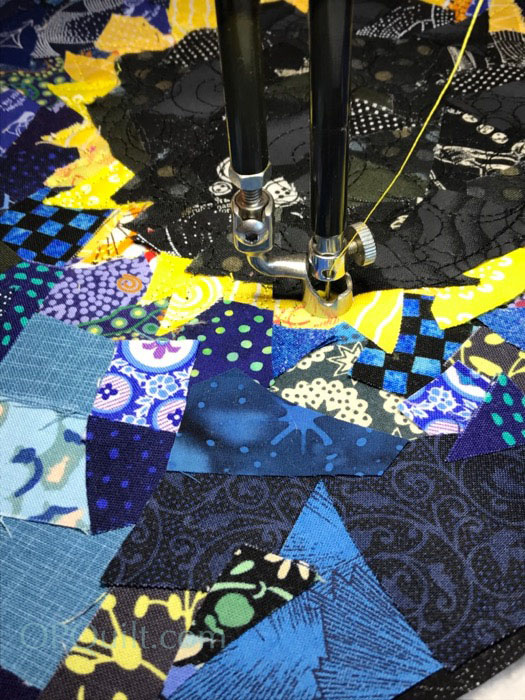
I used three different colors of thread, and just scribbled free-motion-quilted the pieces down. I did a series of circles in black in the moon, the followed the shapes for the solar flares, then a random loopy design in the heavens.
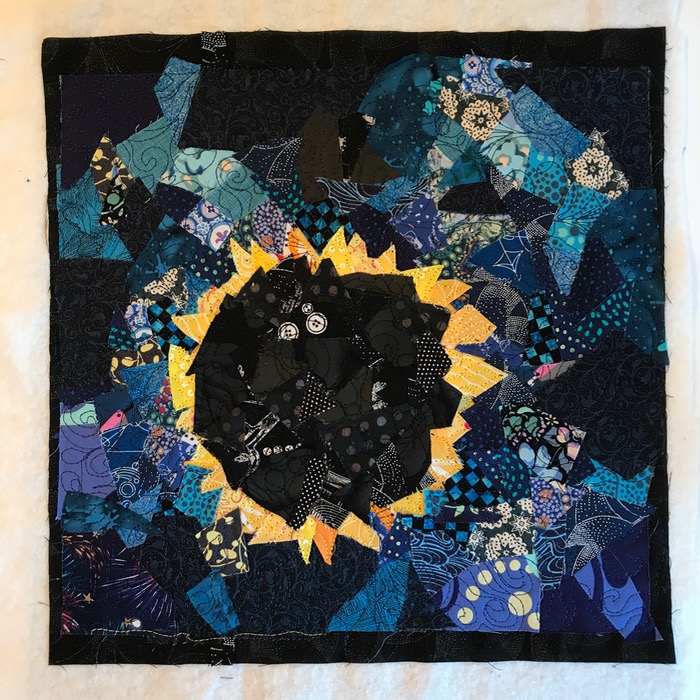 This is where I notice that the moon has two eyeballs staring right at me. And this is where I go get some more scraps, use a regular old-school glue stick and paste more fabric scraps over the eyeballs (you don’t see it in the first one, do you?). Quilt, again. And then I thought that the moon looked more like a black lump of coal than the moon (even though it does have a mountain-y horizon…it’s not THAT bumpy). More scraps glued on, more FMQ. I finished up by going in giant circle around the perimeter of the moon, to reinforce that Orb in the Sky thing.
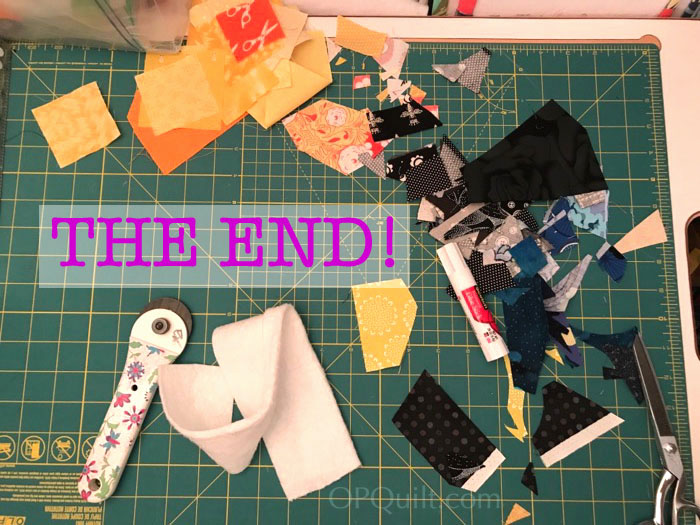
Well. Not quite. But that’s what my work table looked like after I trimmed it up, bound it, and made the label. I’m a total believer in a clean workspace at all times. I’m a total believer in a clean workspace at least once every couple of weeks. I mean, I’d like it to be all the time, but I create in small room, and I decided to adjust to the life I have.
Hope you’ve enjoyed the Deconstruction Post for the Final Four-in-Art Quilt. I probably won’t leave the art quilt in the dust, though, as it’s a quick way to make a quilt while trying out a new technique. Given that it is often smaller (most of mine were 12″ square), you can crank one out in a day, or an afternoon, if your design is not too complicated.
Thank you for coming along on this five-year journey.
~Elizabeth, of OPQuilt.com

