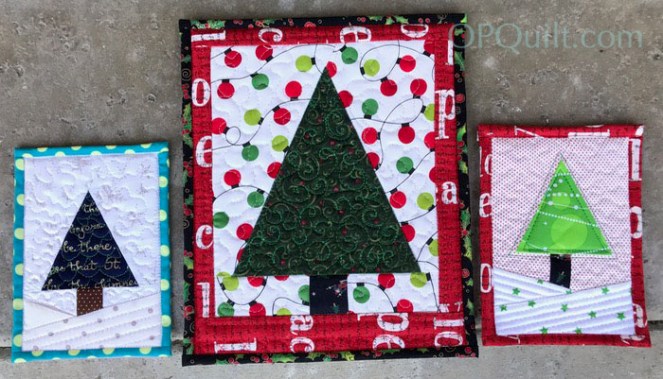
I’m decorating for Christmas and wanted to change out my Tiny Quilt from Autumn to Christmas, but then got wondering how a teeny-weeny quilt would look, so got busy. These little quilts fit onto plastic picture frames:


I have two free patterns for you here, but please remember the drill: Don’t print off umpteen for your next class, or guild meeting swap or your mother. Please send them here to get their own pattern.
The teeny tree (4×6″) pattern is in this downloadable PDF file: Teeny Christmas Tree quilt
Updated, one-page version (2021): Teeny Christmas Tree quilt
The tiny tree (8×10″) pattern is in this downloadable PDF file:Tiny Christmas tree quilt
As you can see from the samples I made up, I play fast and loose with some of the placement of pieces, really using them more as a guideline for cutting, than anything else (although I did cut out the tree exactly).

Cut out all the pieces for the pattern you’ve chosen. As I noted above, sometimes I used the pattern (shown here before I added the labels) as sort of a general guidelines. You need an accurate tree, and a nice straight edge where you’ll sew it to the tree (the diagonal line in the photo, above).
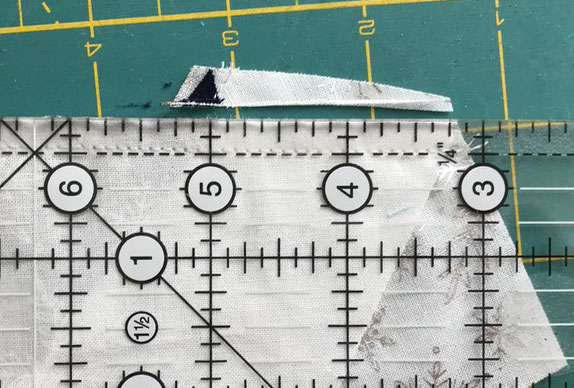
I sewed the “sky” pieces to the sides of the trunks then trimmed the edge that would attach to the tree. More detailed tutorial is also on my OTHER Christmas Tree block tutorial, which is sized somewhere in between these two tree sizes. (I should open up a Christmas Tree lot with all these patterns.)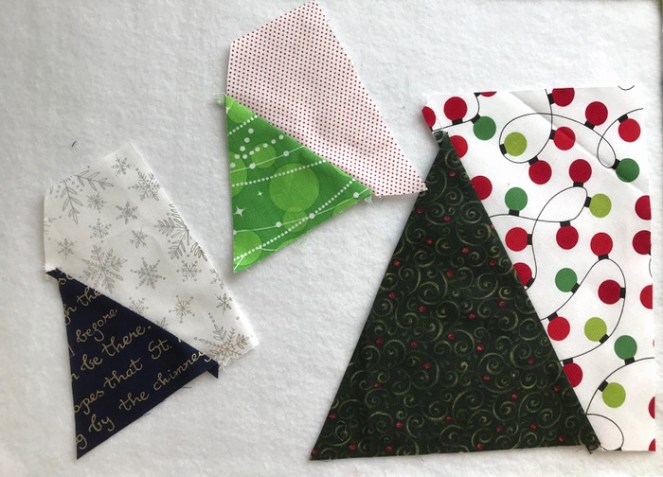
Sew the “right” side onto the tree. Make sure you keep the marked top triangle point pointing upwards.
Trim any stray areas (above), then add the other side.

Straighten out the bottom of the tree assembly. Center, then sew on the tree-trunk unit, pressing seam towards tree (so it looks like the trunk is under the tree).
Now to add the snowdrifts on the little tree. On the left, I sort of place that wedge-shaped piece, determine the angle but flipping it up and down (on the right). When I have the angle I like, flip it back up so right sides are together, and stitch along the upper edge. Trim.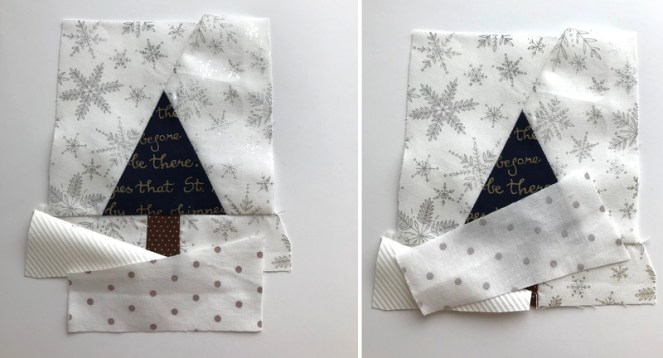
Repeat for lower snowdrift. Trim excess.

For the bigger tree, I added on 2″ strips to frame the tree. It needed something to jazz it up, so I got rid of the bottom strip on the pattern and just used strips all around.
Layer with batting and backing and quilt. I did a meander in the sky area around the trees, then some straight lines in the snowdrift on the teeny tree, and some straight lines in the frame around the bigger tree:

I also quilted some swirls in the center of the tree.
Time to trim. The teeny trees trim to 4-3/4″ by 6-1/2″ and the larger tree is trimmed to 8-3/4″ by 10-1/2.”

Make a sleeve for the back by cutting a piece the same size as the quilt top, but then hem the lower edge, turning it up twice and top-stitching. I know it’s hard to see in this print, but again, feel free to check out the other tutorials of tiny quilts.
I brought out my Blythe doll and one of my husband’s nutcrackers to pose by the quilts.


Looks like Blythe has the hots for the Santa skier. And here I thought she’d go for the more traditional guy:

He does look a little formal. Hmmm. Evidently not her type.
Okay, that’s enough–I’m off to sew!


(Buttons added!)
Discover more from OccasionalPiece--Quilt!
Subscribe to get the latest posts sent to your email.

What a cute idea and I love that they fit in the plastic frames. Perfect for changing out for the seasons. Thank you so much for the patterns. Definitely adding this project to my list.
Fantastic little projects!!! I have several of those frames ( used on a display with prices ) that are a little scratched. Great recycling
Those are adorable little trees and such a quick and fun project – a perfect cute for that sewing itch.
Thank you, such a cute idea..and scrappy!
These trees are so festive! Thank you for the tutorial;). Merry Christmas ❤️🌲
Thanks for the tuts. I had made 3 trees when you first posted about these and wanted a fourth but couldn’t find the pattern. Now I can get this table runner done.
Very fun project. I love how your Blythe doll is scouting out all the possibilities.
Your Blythe doll is actually Meghan Markle in disguise you know. She is dying off an incognito Prince Harry! 😆 Cute trees!
Your Blythe doll looks quite darling with the nutcrackers and other holiday items. Thanks for the patterns for the trees. The teeny one is the right size for fabric postcards too. I hope you won’t mind if I make a few that way next year too.
Love these little trees. Thanks for the pattern. I think one of the littlest would make a great little postcard.
Thanks Elizabeth. I just love the concept of how they slip over a plexi frame for display. Besides making one (or more) of your trees, I might “borrow” the plexi stand idea and make my own minis for other themes if that’s ok?
Very Cute!
You come up with such great ideas. And I still love that Blythe doll. Are you sure you didn’t buy an extra to surprise me with for Christmas? Or you could loan me yours so I could make her a wardrobe! 😉 ❤ ❤ ❤
Very cute, and clever! Those trees are just the right size for those of us who don’t put up a full-sized tree. And they look great with Blythe. Those dolls are cute, and I’m glad you could choose her, and a nutcracker, as souvenirs of your trips. I bet your house is looking beautifully Christmasy now.
I love the idea of mounting the mini quilts on those plastic frames!