Rookie Mistakes could be another title, even though I don’t consider myself a rookie. Both of these ideas are true for me this week.
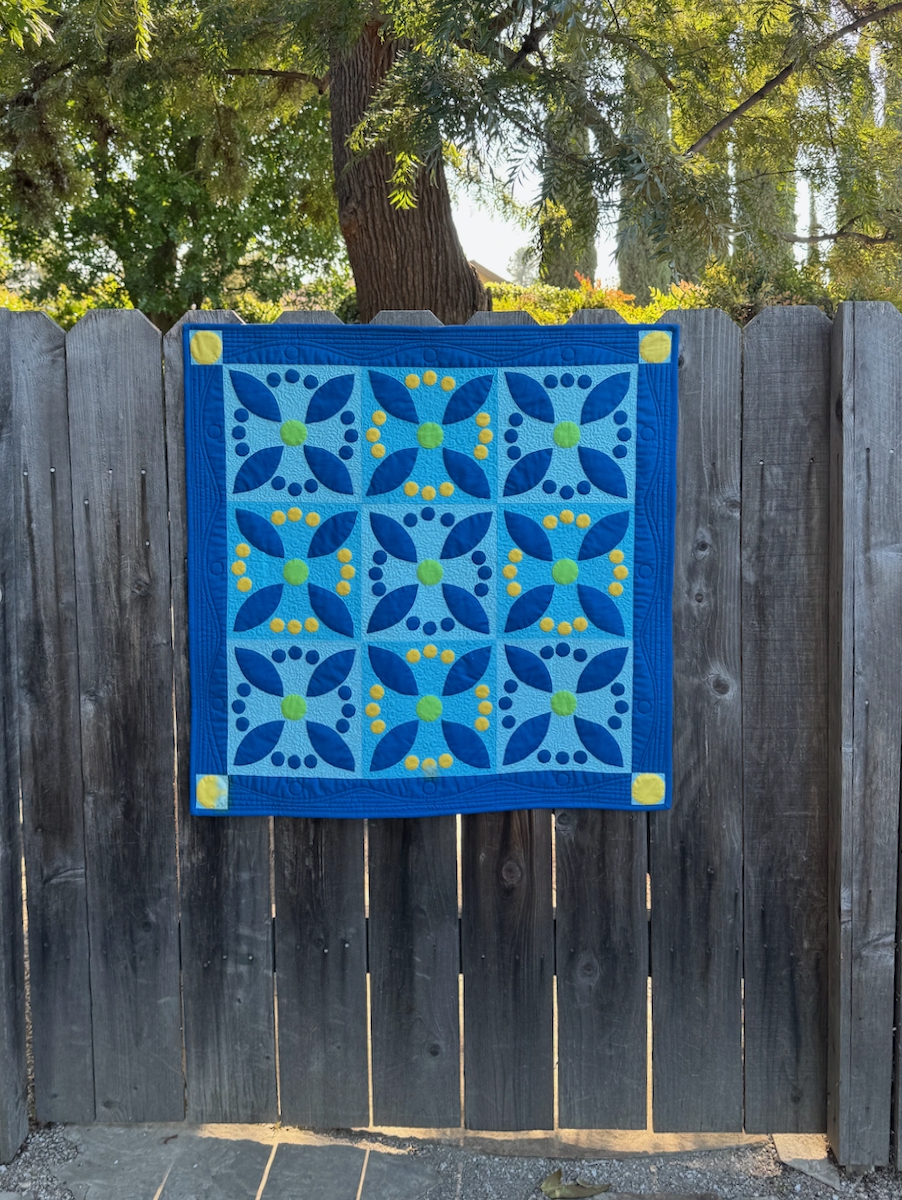
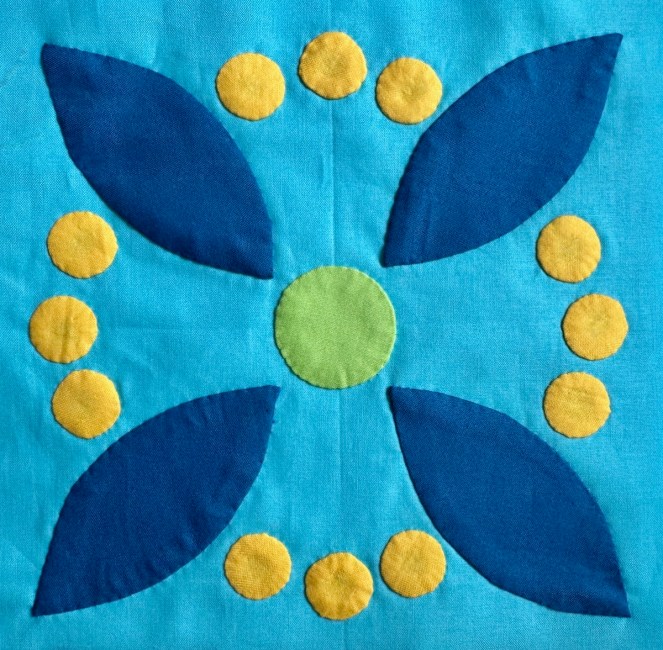
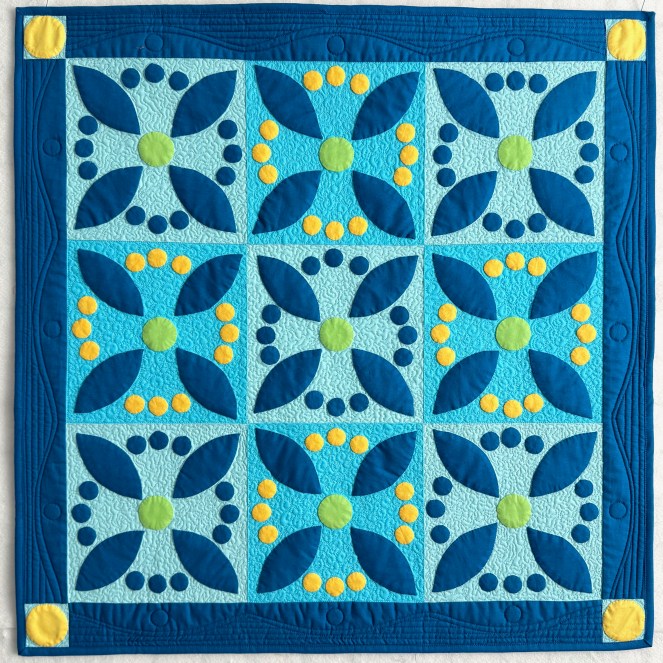
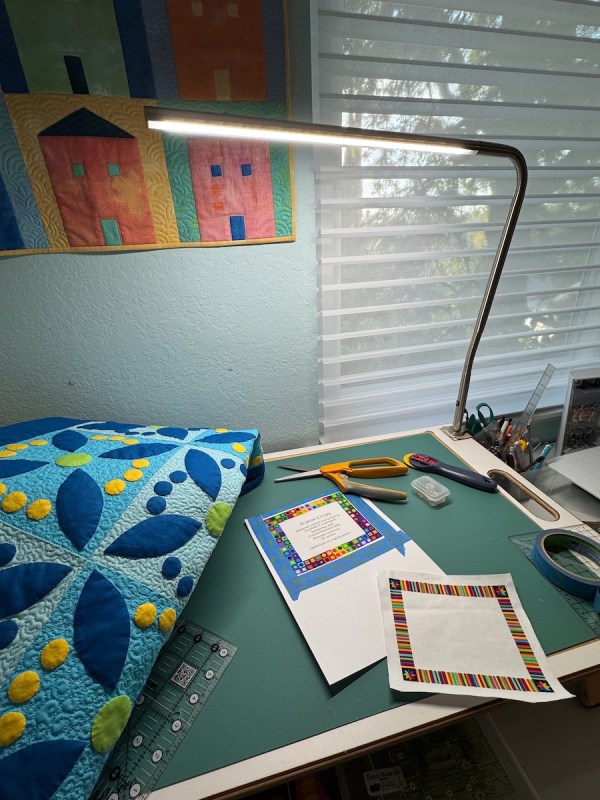
I’ve had Krakow Circles kicking around since Spring, and when I needed a small something to finish, I chose this.
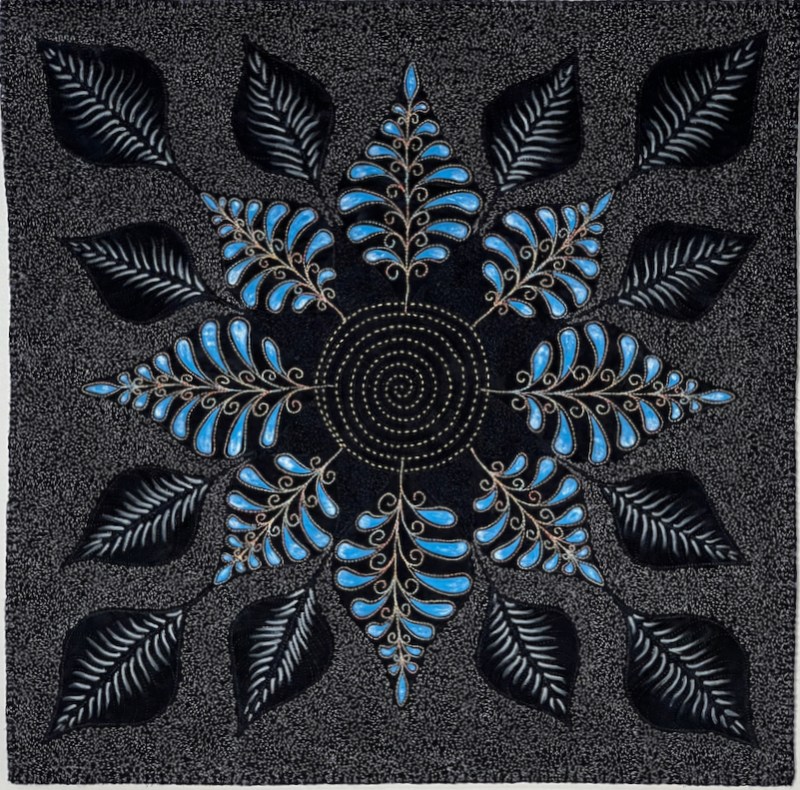
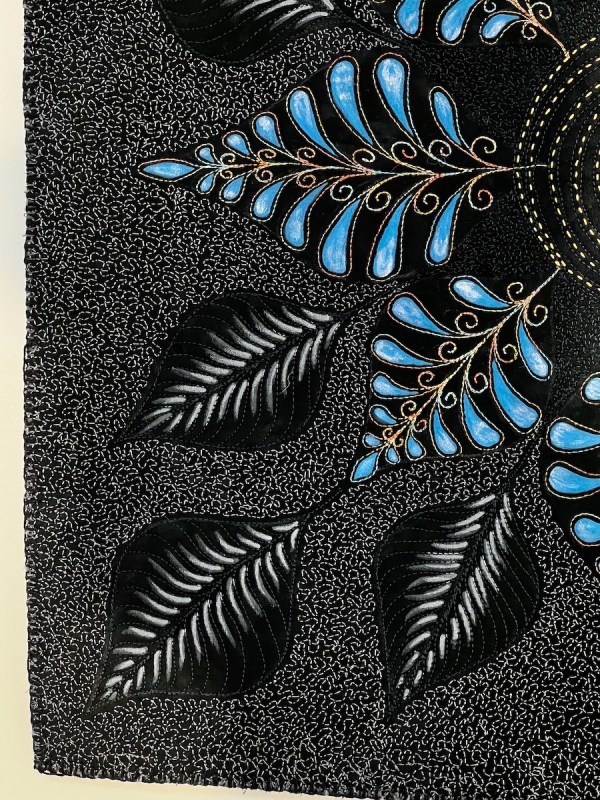
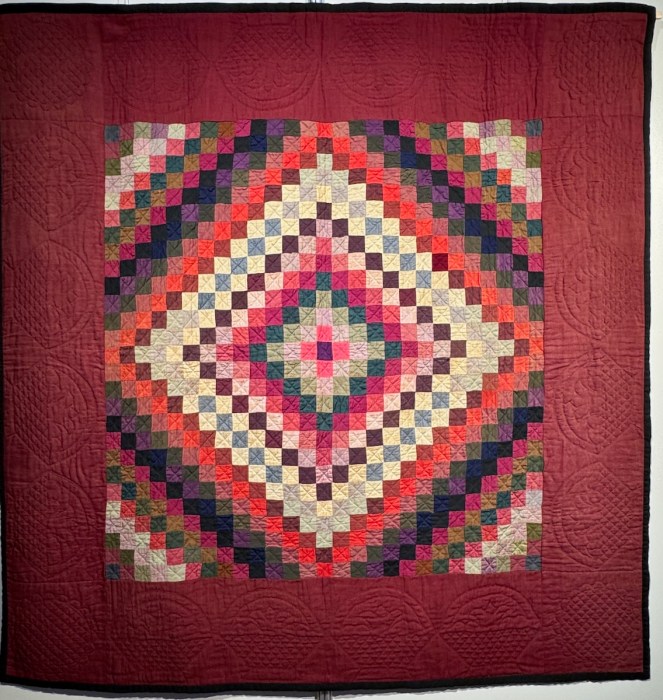
A quilt from Lois Parish Evans (Australia): Mandala 6 • Winter Solstice
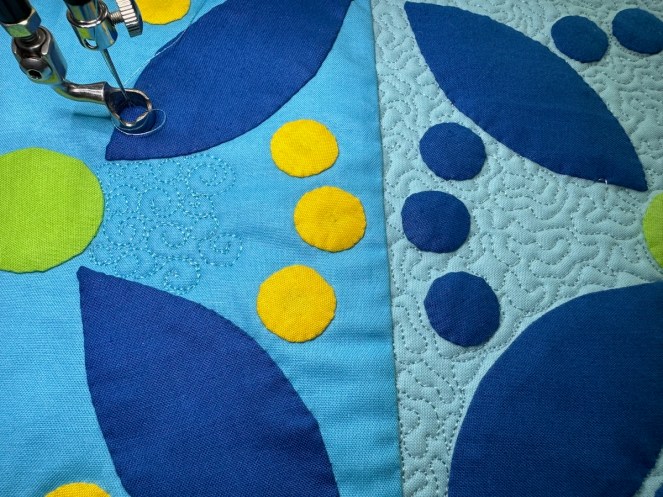
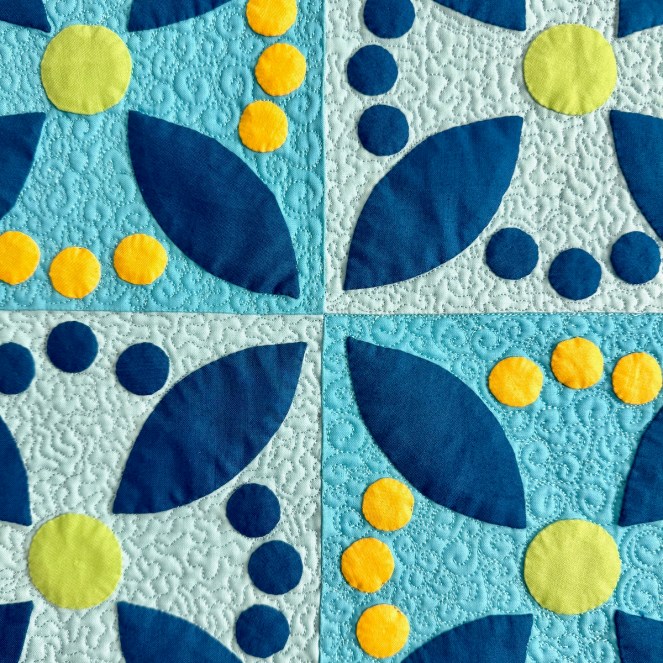
After seeing Lois Evans’ quilts at Carrefour I decided to attempt her tiny stipple. Okay, not as tiny as hers, but a reasonable facsimile. Tiny victory, on this one too.
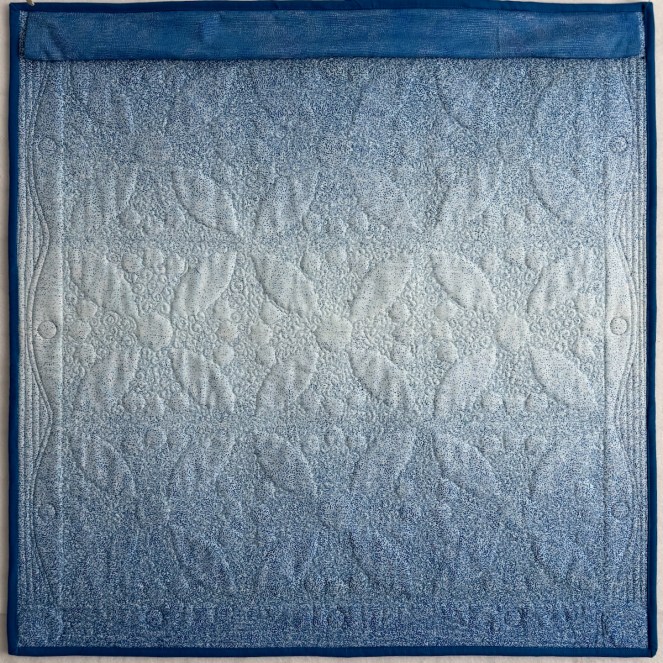
Then I continued the small stuff with swirly-circles. Tired of that, and not wanting a whole quilt to be that way, for the borders I drew on a wavy line, added more lines, then finally, a circle to echo all the others. Cool, I thought, a close-to-the-end tiny victory. Now, on to the binding. I chose to do it from the back-wrap-to-the-front, as for some quilts, I’ve come to love this look of the finished binding being on top.
Trouble.
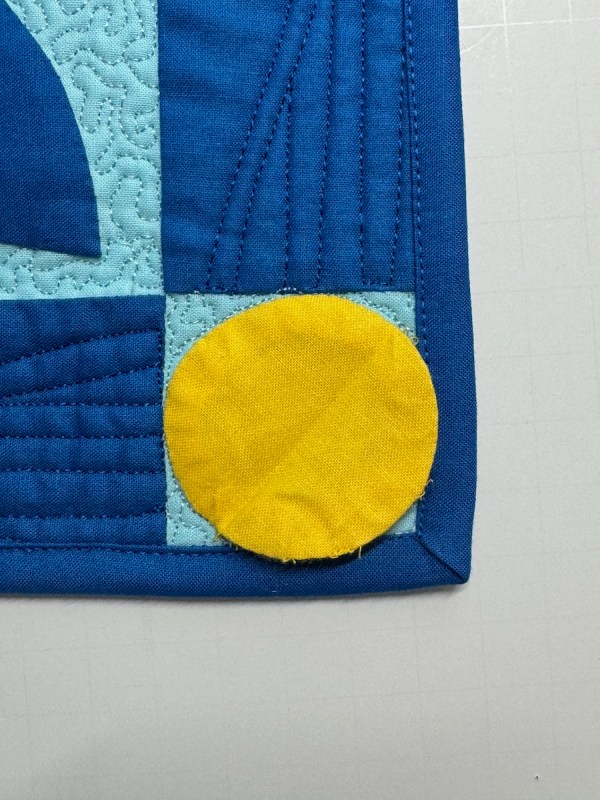
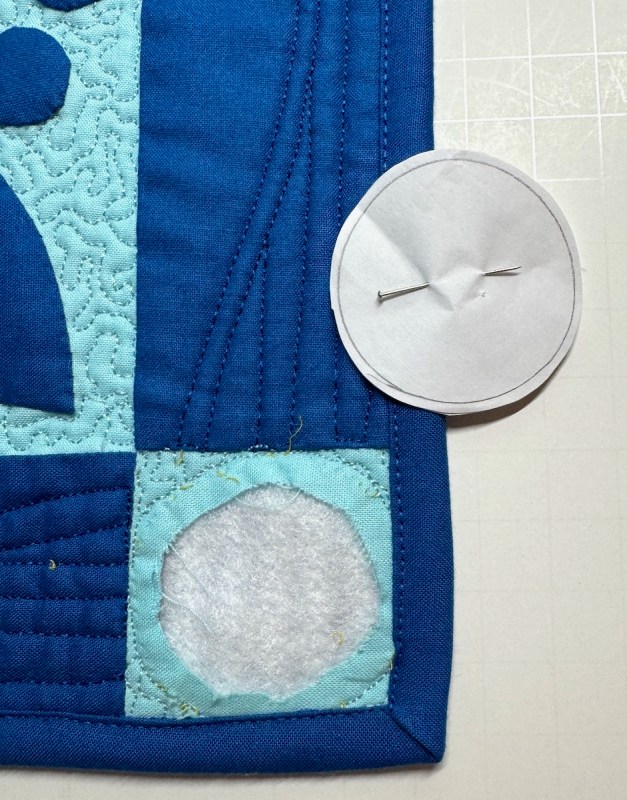
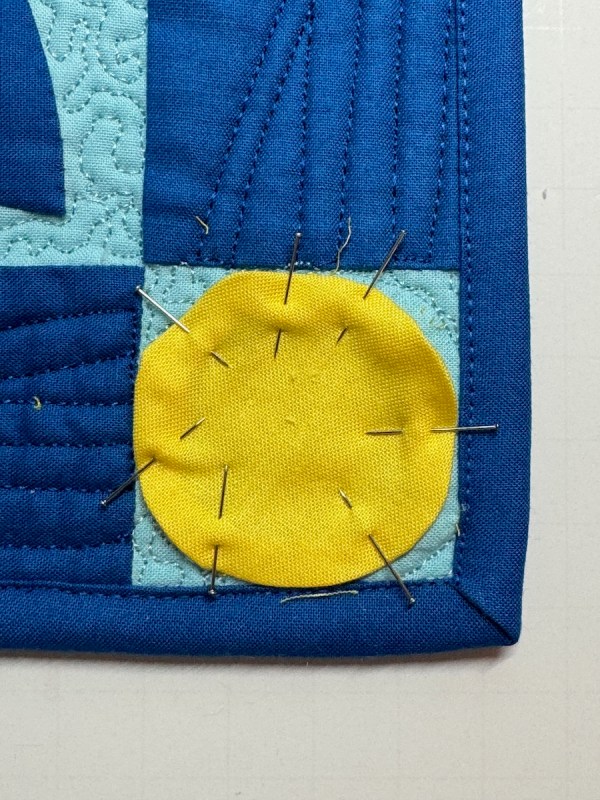
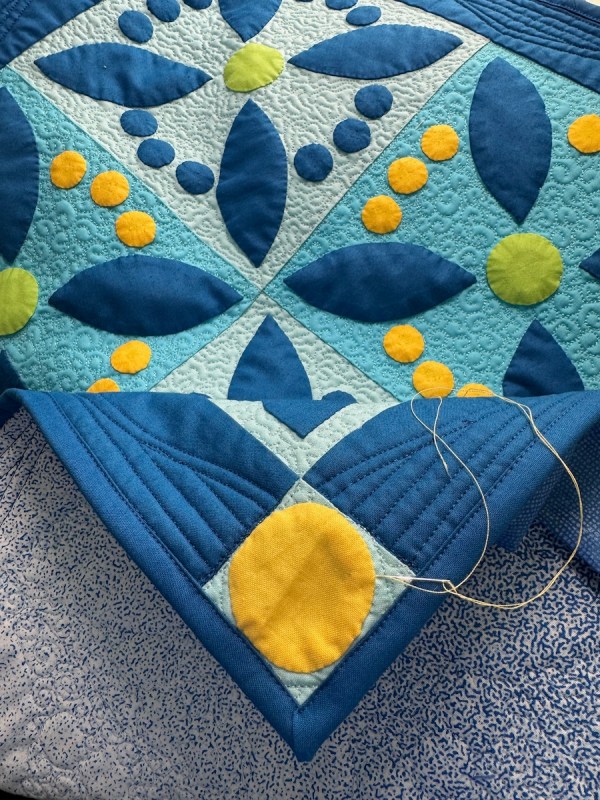
I didn’t count on/remember/realize that the teensy stippling would draw up the quilt that much. Now those corner yellow circles would be cut off by the binding. I snipped a few threads, releasing them, and finished sewing the binding.
None of my circle templates would work, so I traced the end of a spool of thread onto freezer paper, cut those out and shaped them for appliqué. Except for one. That one I had to make even smaller. Yes, I do personalize my patchwork.
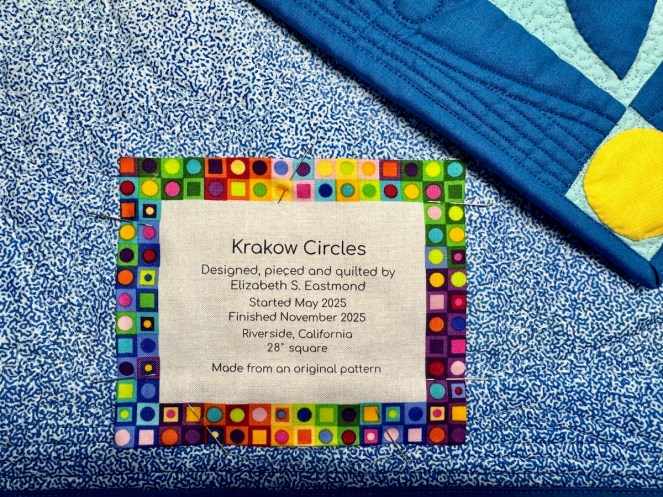
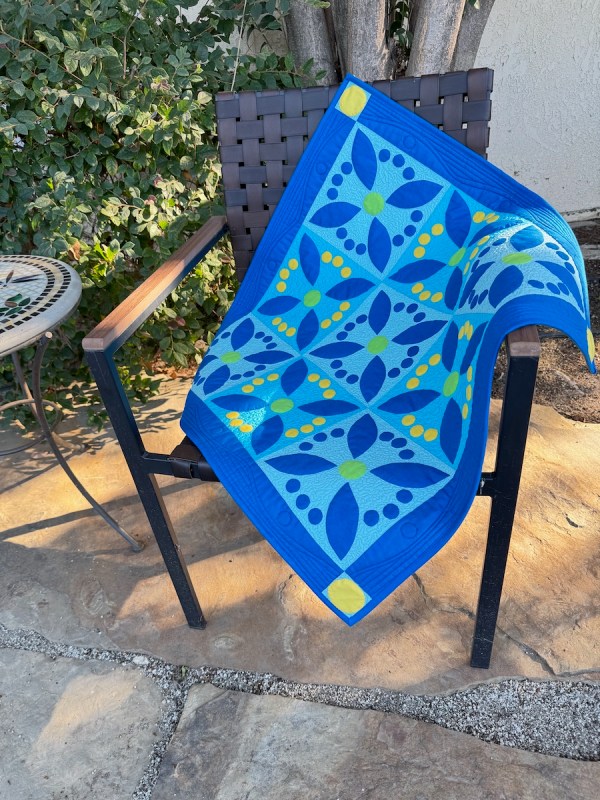
Kraków Circles, quilt #309, 28″ square I started designing this at the end of May, after our return from Poland, and cut the first shapes June 3, 2025.
I think the back looks cool — it’s an older ombre-type fabric.
Labels are oldies from Northcott, by Deborah Edwards. I found them when we had to pull out the sewing desk from the wall when the new blinds went in. (Hmmm. There’s a lesson here somewhere.)
Finished: November 3, 2025. It’s a little victory to get this one done and it will hang in my sewing room, reminding me of Krakow’s churches and our trip there this past May. I’ll take tiny victories, these days.
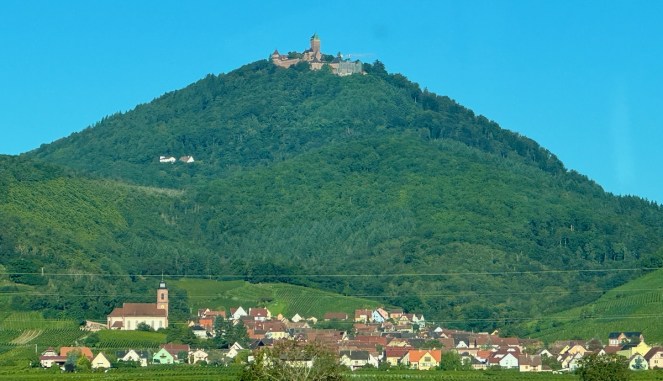
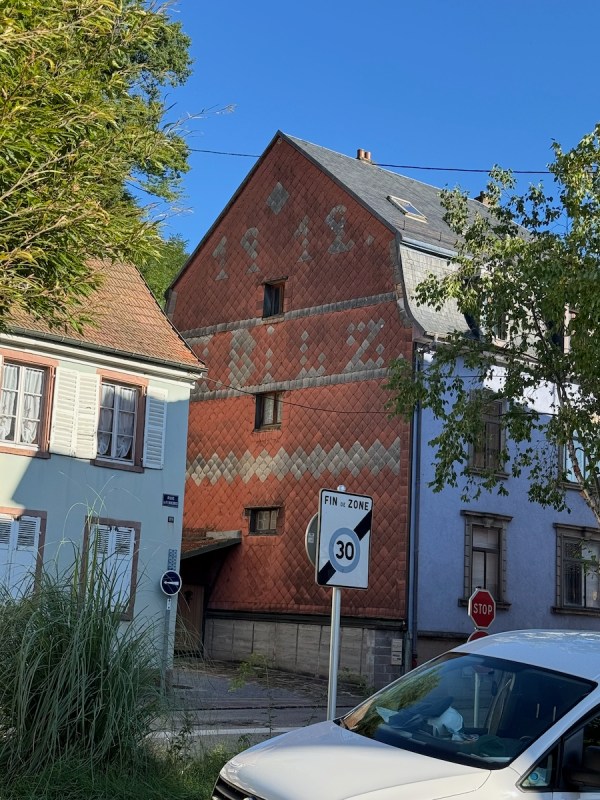
I’ve now been to the Carrefour Quilt Show in the Alsace area of France three times, and this is start of my third write-up of that amazing experience. The Carrefour Show is like none other: set in four small towns in France (some with castles, like the above photo), in the Val D’Argent, or Silver Valley, where silver was once mined.
The show draws from all over Europe and the quilts are as varied as the quilters in all these different nations. I am often surprised by what I see. I am never disappointed.
This post covers:
Espace Commercial
Venue 1: Theater with its traditional antique quilts
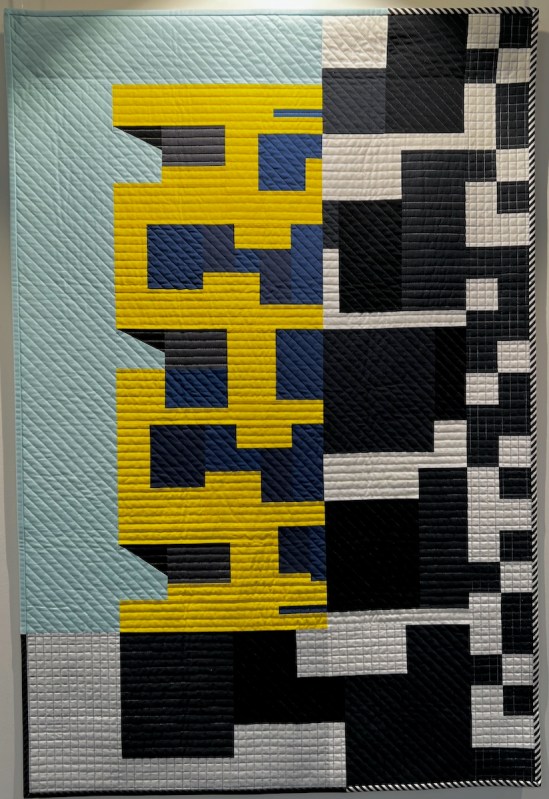
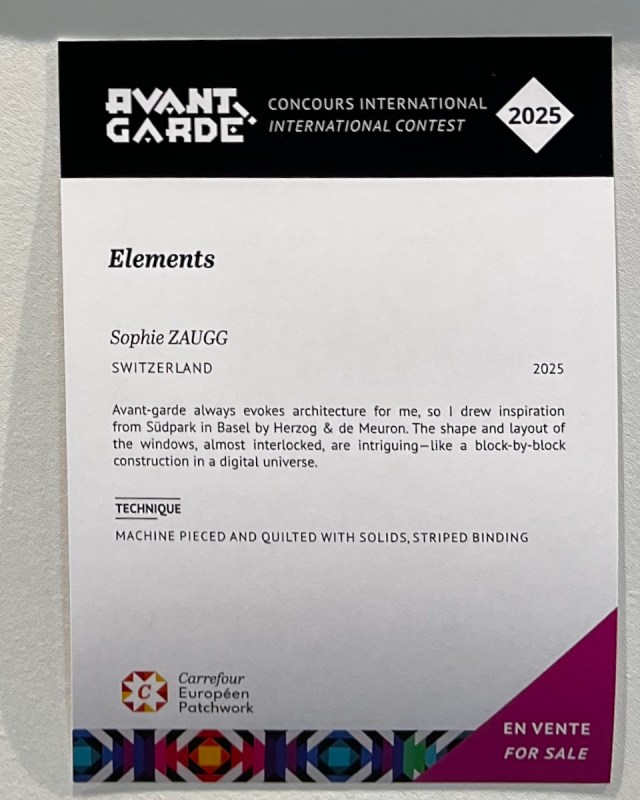
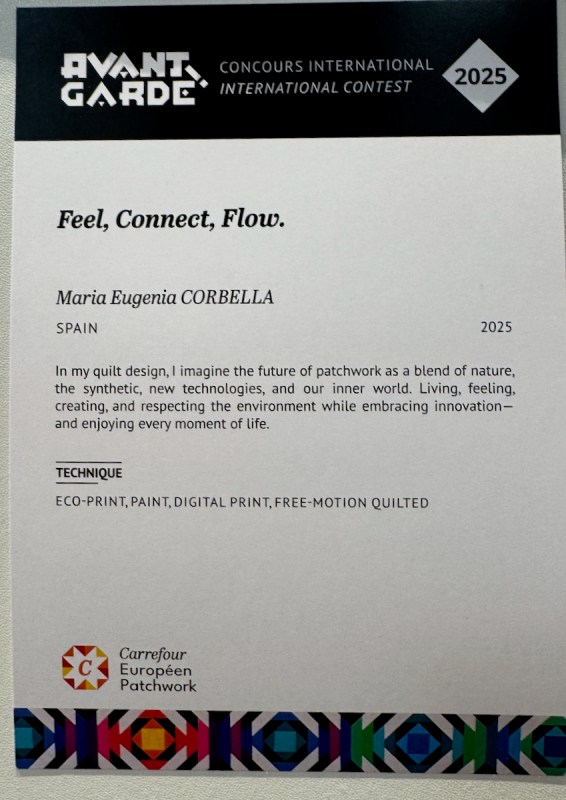
Venue 2: Carrefour Contest, one of three exhibits in that space
I have a main page where I link all the posts, so you can see the ones from before, as well, and see why I have loved going back over the years. Of course, my husband Dave is hugely enthusiastic, too, and he took many of these photos. This year we were able to spend the better part of two days there, and took a zillion photos. That means that when I post — which I will do sporadically over the next while — there will be lots of beautiful quilts to see.
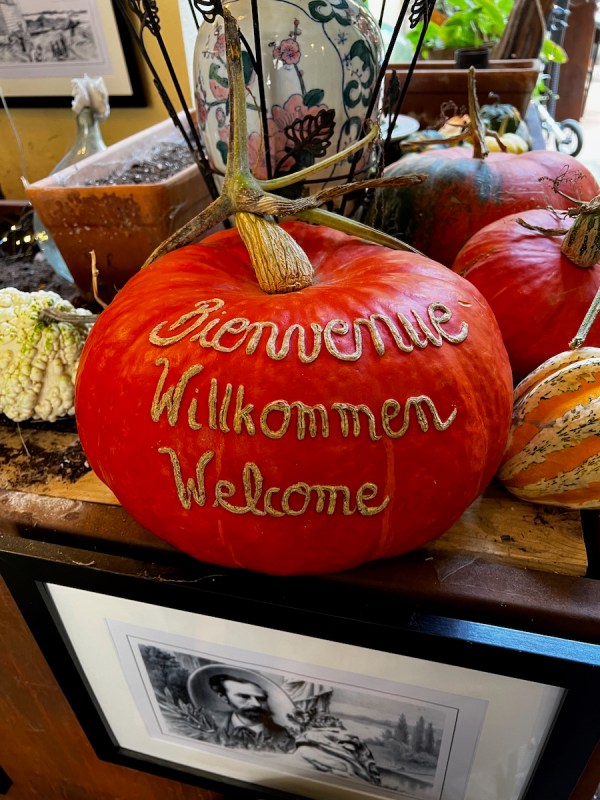
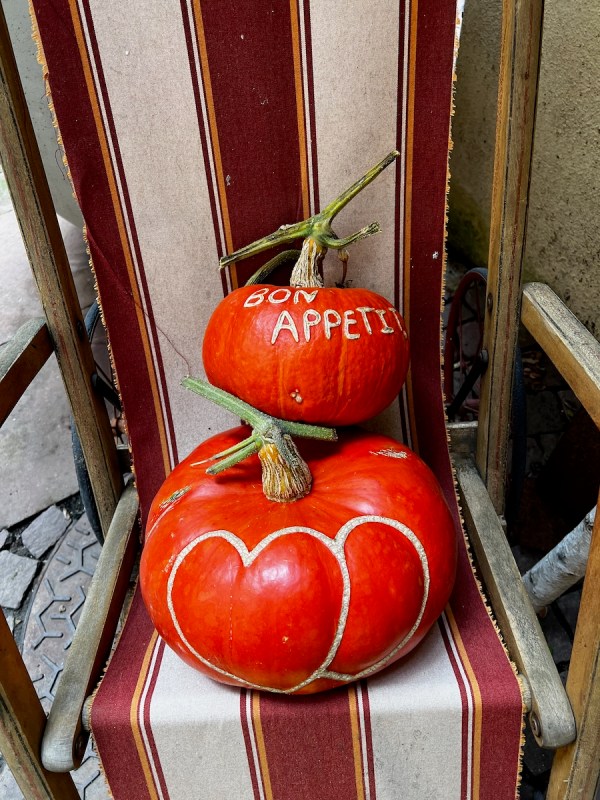
We lodged this time in Colmar, a lovely town that feels medieval, but has all the comforts (like pumpkins with words).
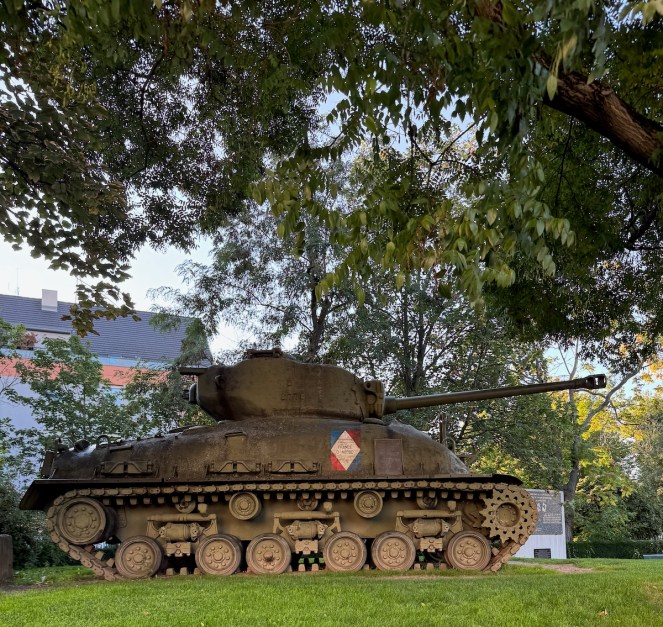
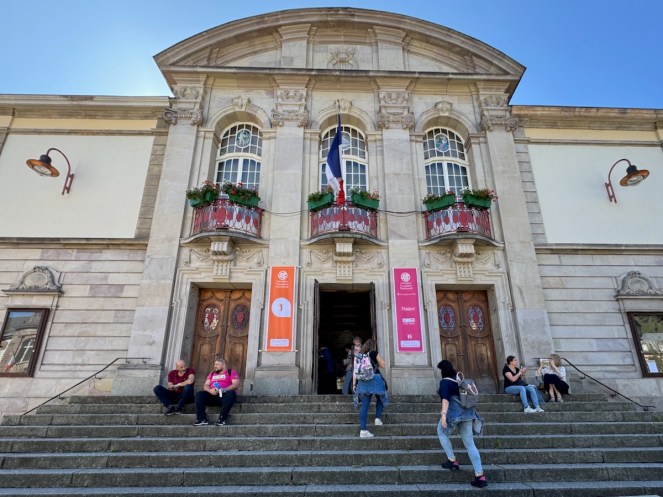
As always, in many places there are reminders of the Great War (WWII) like a tank in the park which we passed by as we walked to get our rental car. We picked that up early on Thursday morning, September 18th, the day the quilt show started, and drove past the castle in the first photo into the Val D’Argent, stopping for some breakfast croissants on the way (it *is* France, after all!).
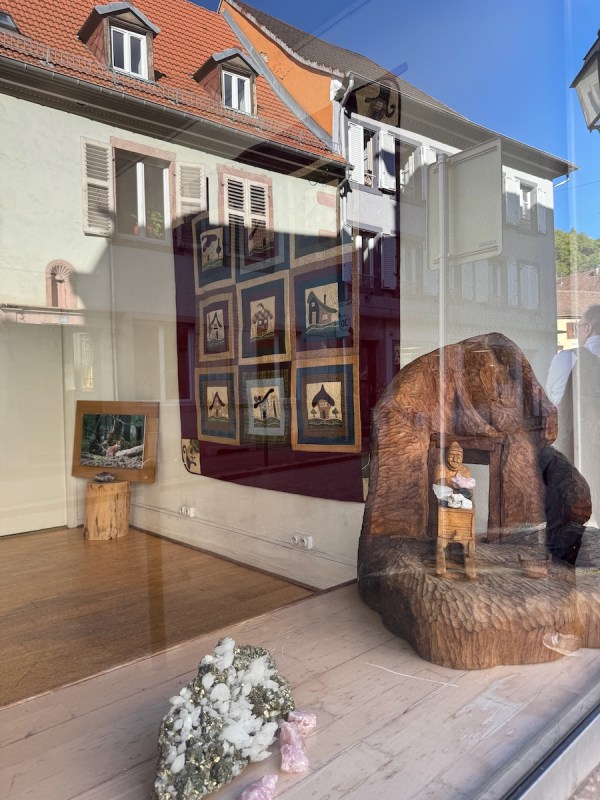
After being caught in the traffic, we parked near this very old building (1912), picked up our tickets and walked up into the town, seeing store windows all decorated up with quilts (I know it’s hard to see):
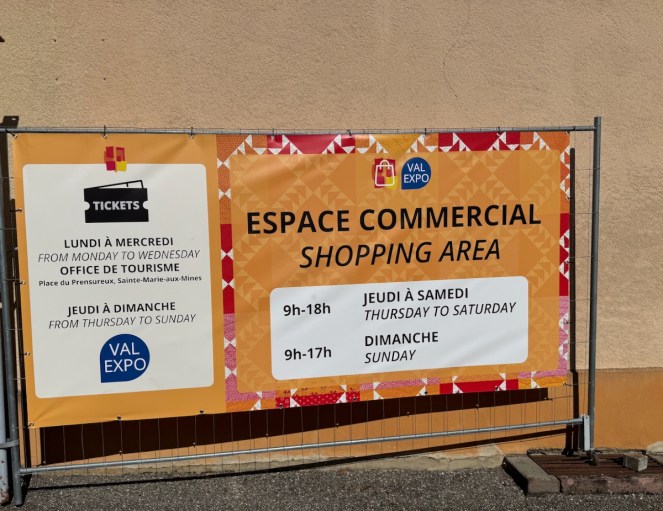
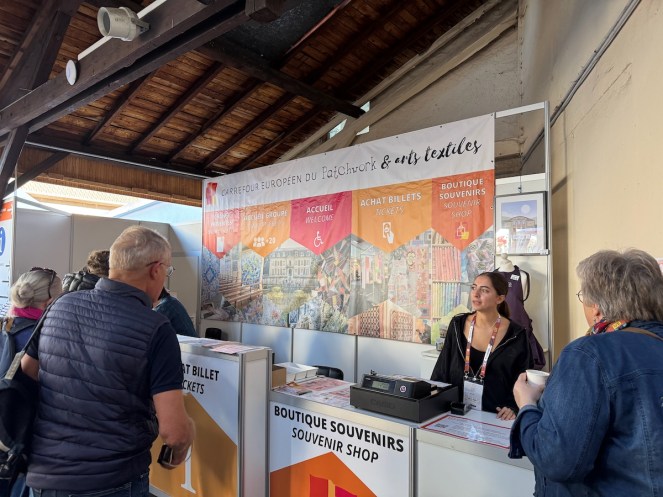
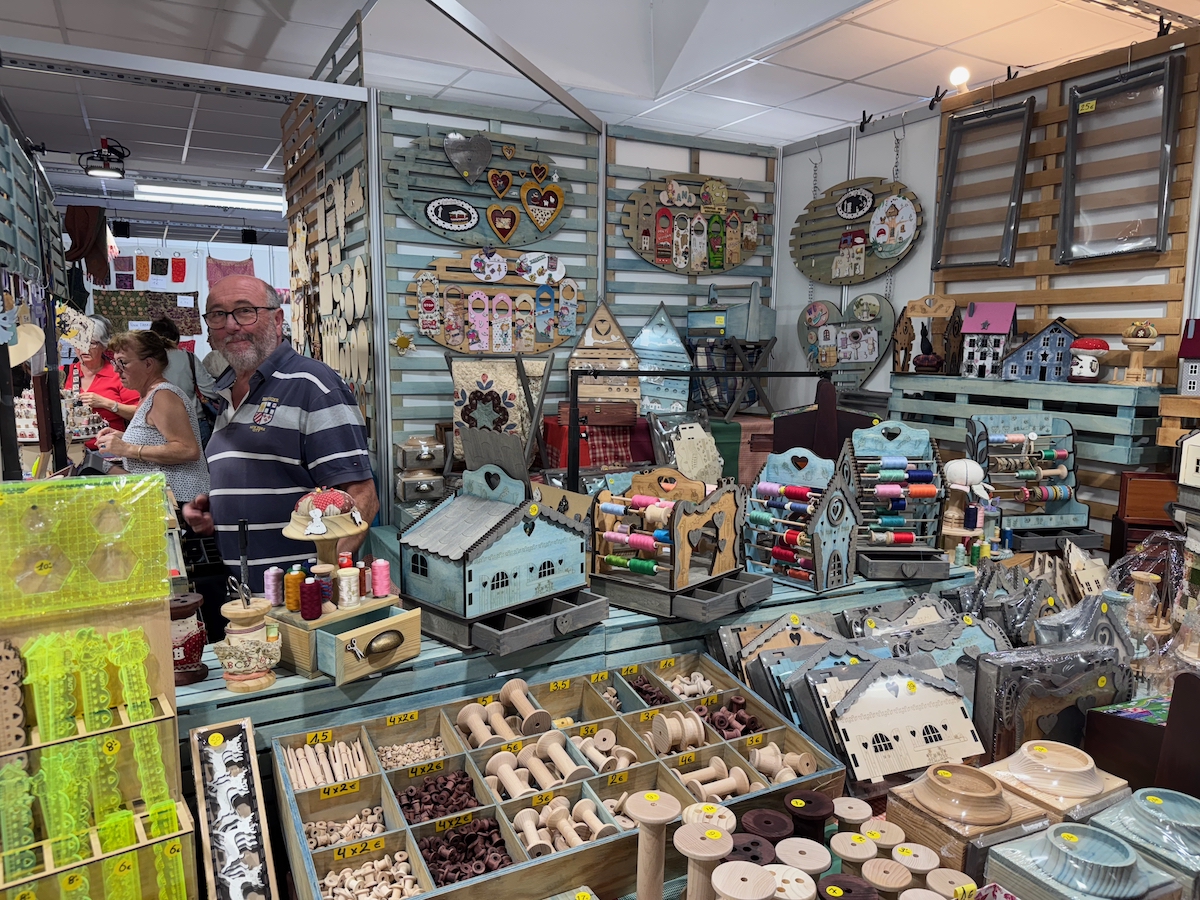
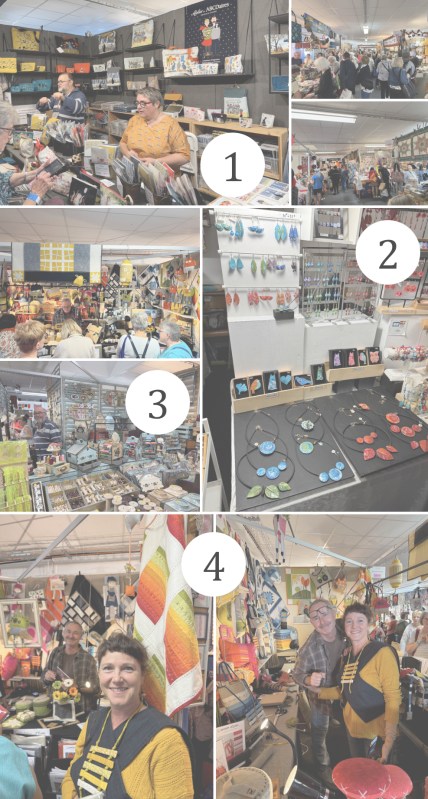
Espace Commercial (Shopping and Vendors)
I knew what I wanted to do first: Shopping Area.
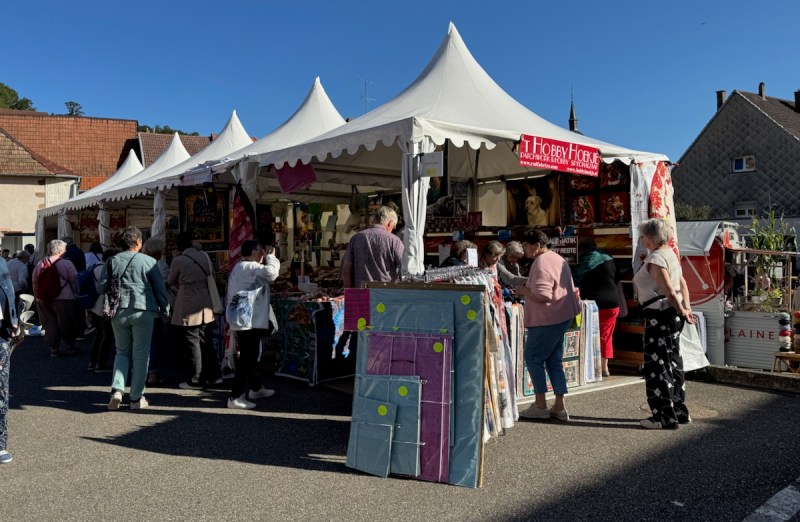
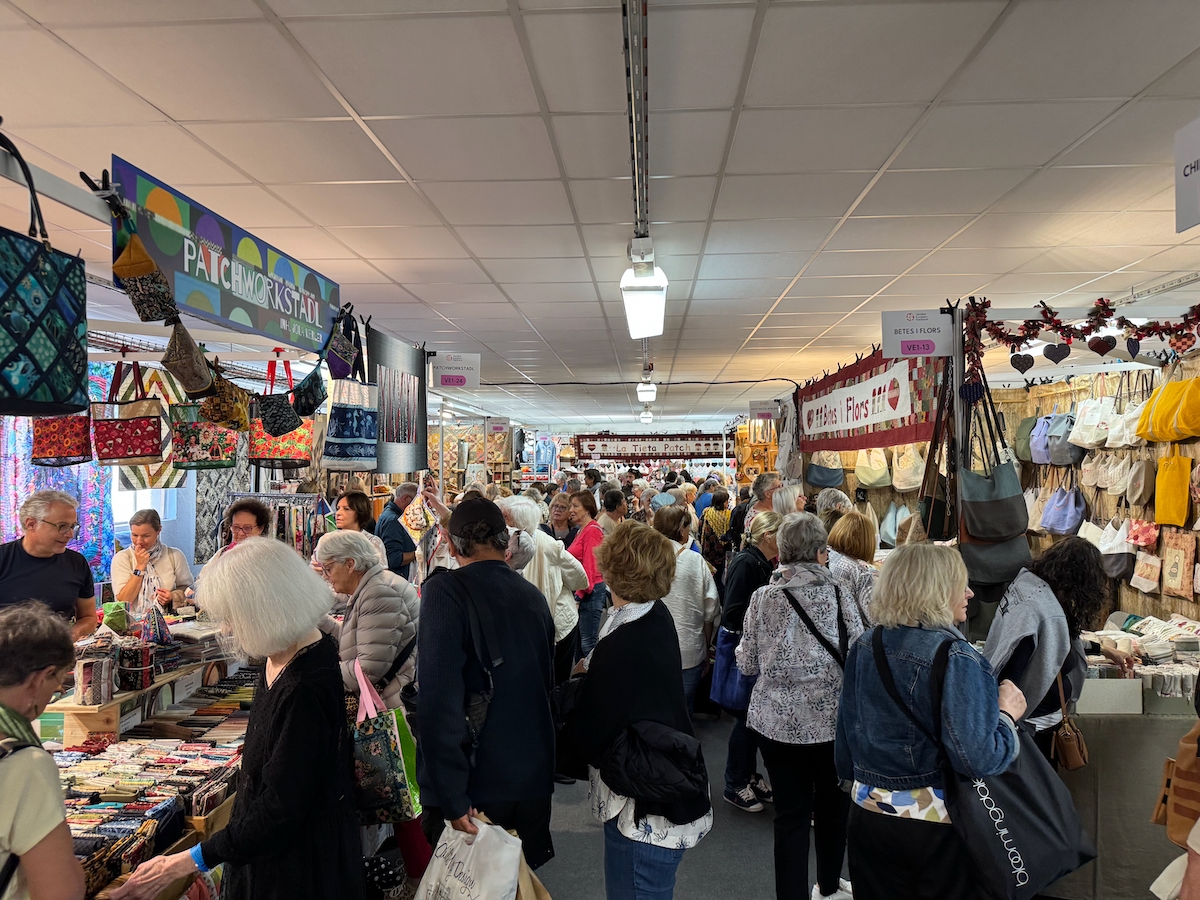
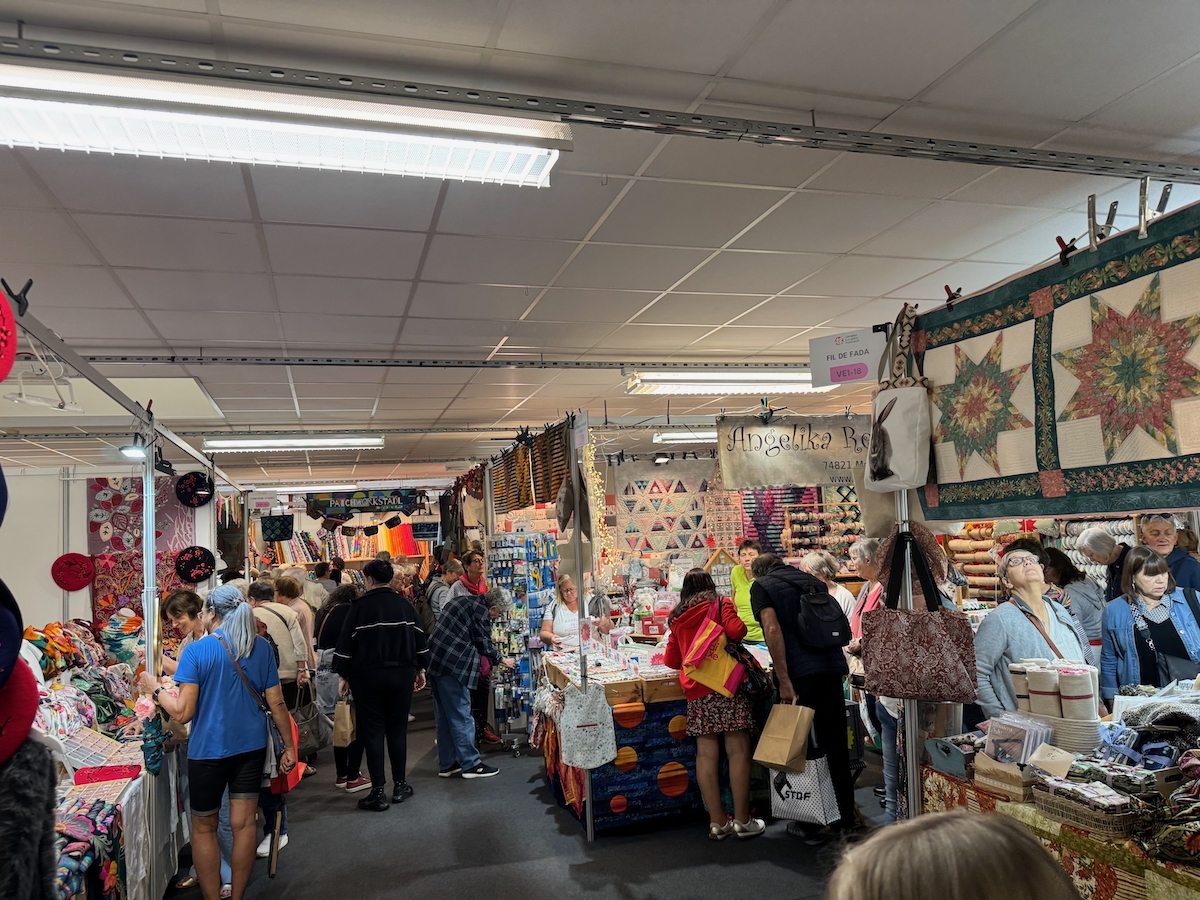
Vendor tents are set up along the pathway to the souvenir stand:
Stickers, pen, exhibit book…they don’t have a bag this year, so in we go to the Espace Commercial.
Click to enlarge any photo.
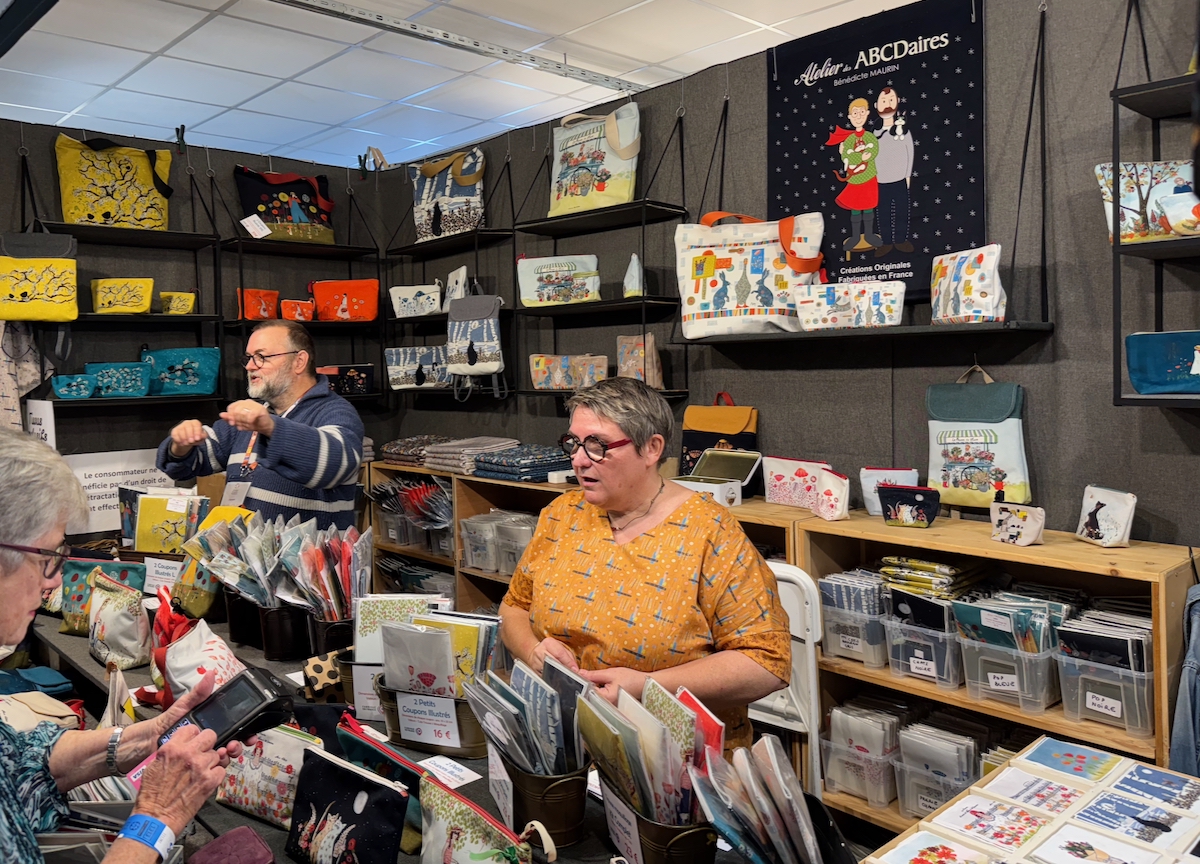
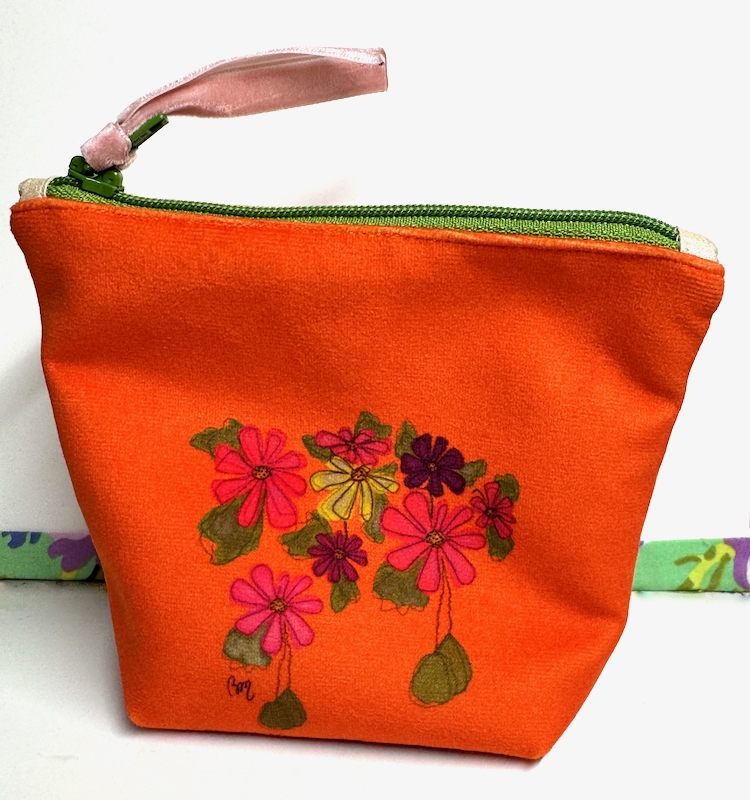
1-My favorite bag place: ABCDaires. I’ve already made the little orange bag in the far corner (see below).
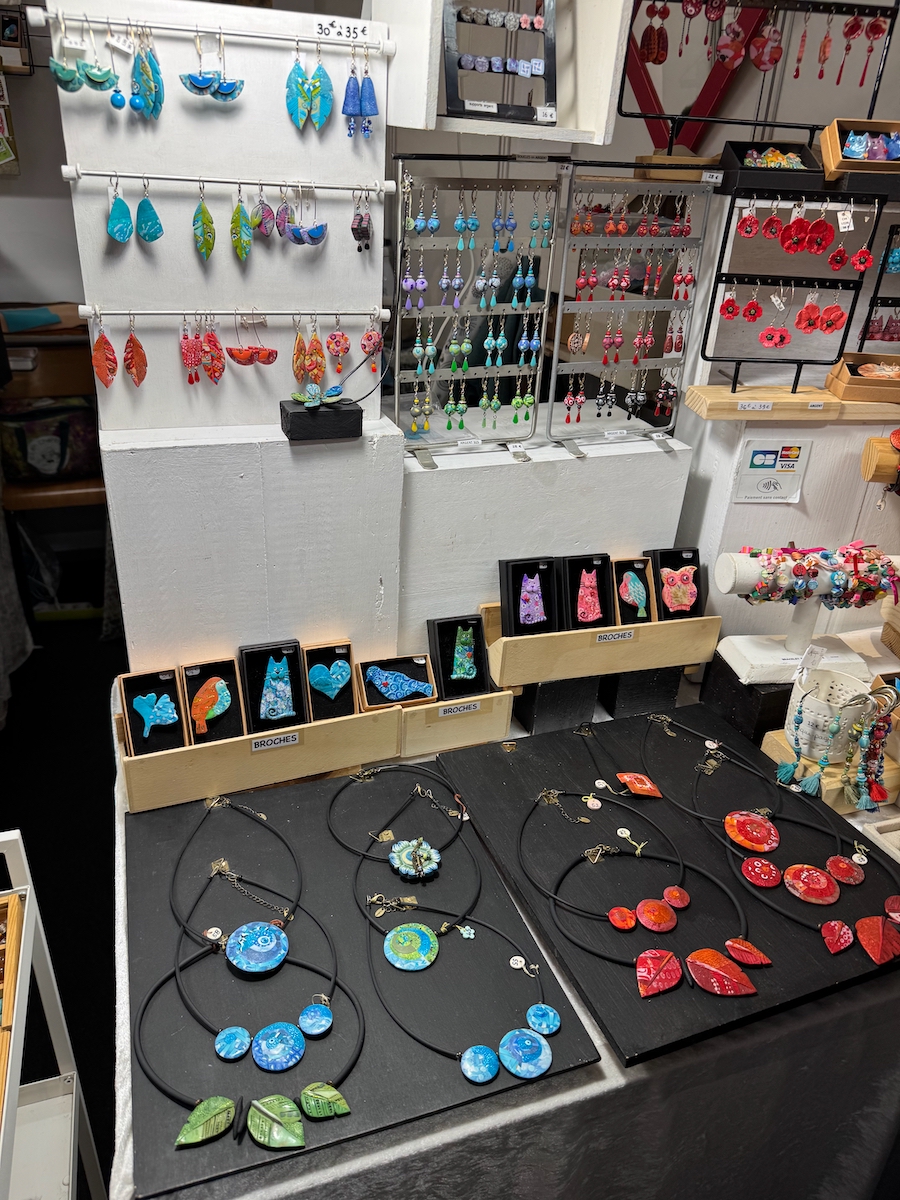
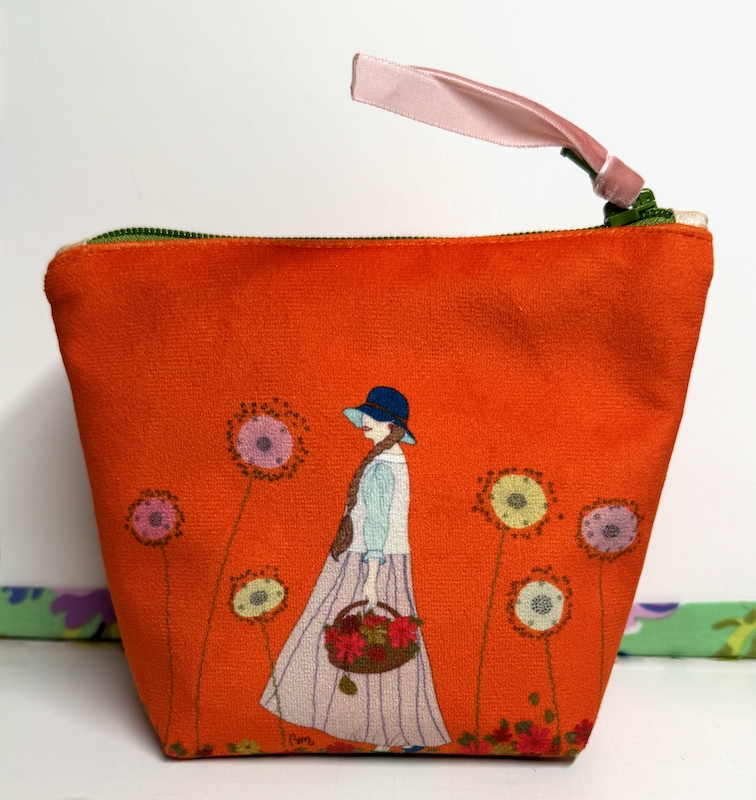
2- Christine, from Chifonie Studio has really lovely jewelry, made from art clay. She also has lots of buttons, and fun decorative pins.
3- Torneria Germans Castels sells wooden things from Germany. This booth had so many cute wooden buttons and fixings.
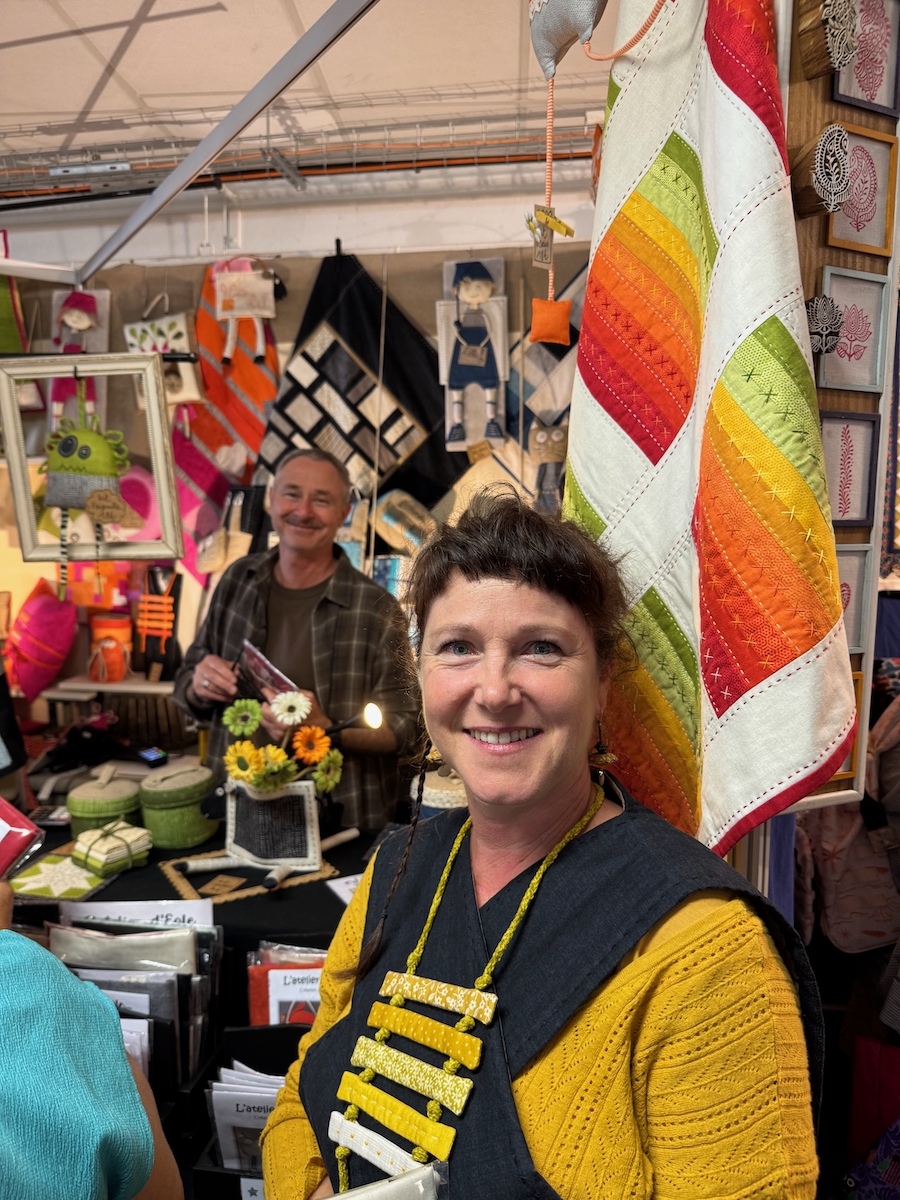
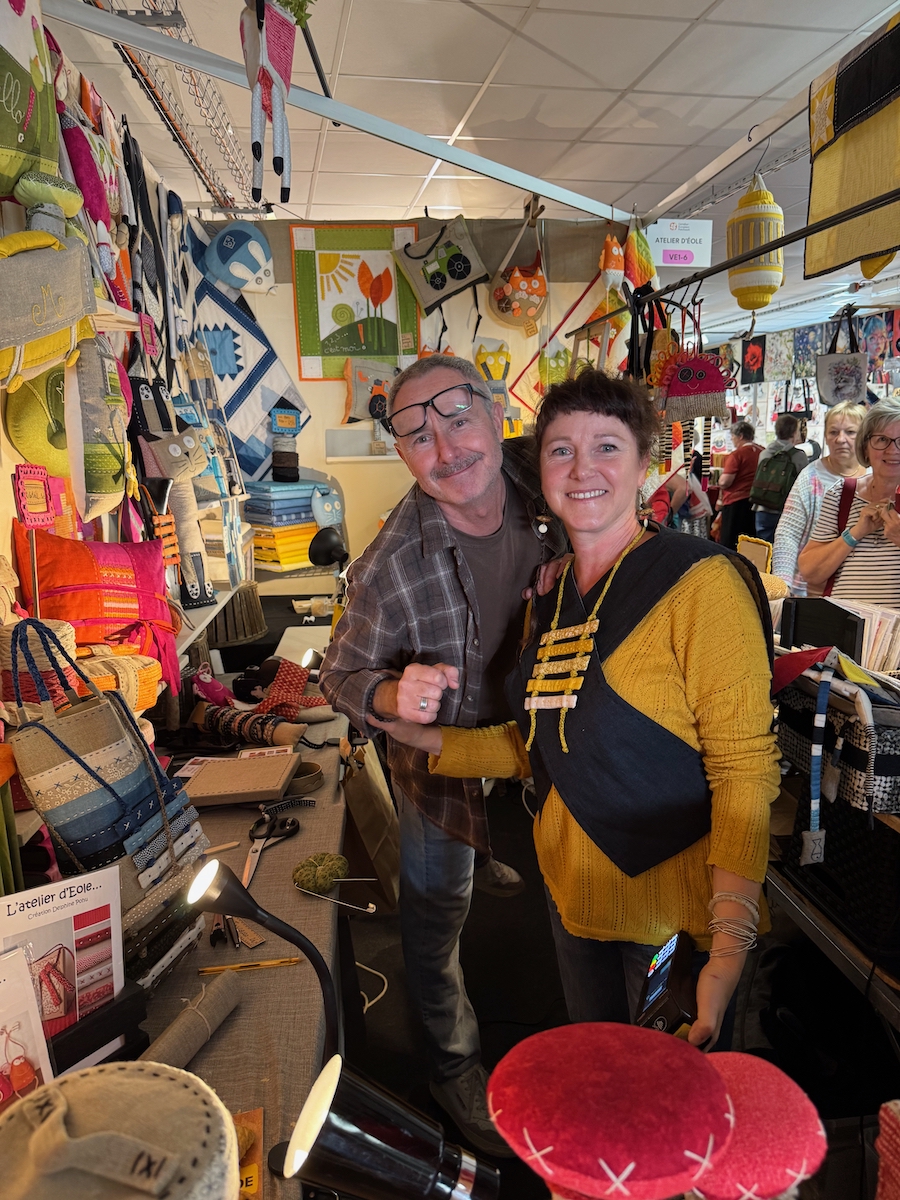
4- Le Atelier D’Eoie had so many cute things in their booth (they were so friendly, I took two photos of them). I bought a kit for a stuffed animal and a small quilt.
The other photos are crowd shots; I only took photos where I had permission. Here’s the thing: could I have found some of these things in the US? Possible. But I hadn’t ever seen them before and loved how European everything was (duh) and it — as Marie Kondo would say — sparked joy. (And I just love those orange pouches!)
I also loved the booksellers, and I bought a book in French, because why not? Last year I made a purse from a Japanese book, translated into French and it came out just fine. If you click on that link, you can also see a pouch made from the kits from ABCDaires.
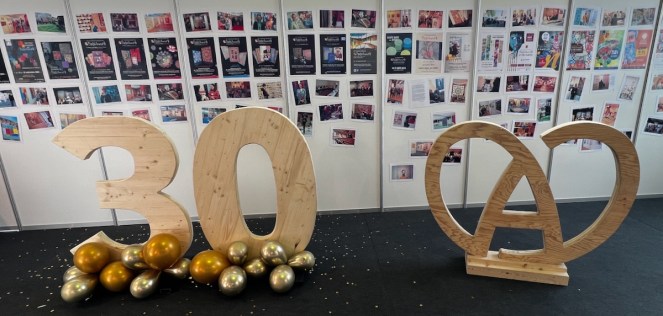
On the side of the Espace Commercial, they had these two wooden cutouts: the one of the left celebrating thirty years of the Carrefour Patchwork Show, and the one on the right, a figure that denotes the Alsace region, and is seen everywhere. Okay. To the quilts!
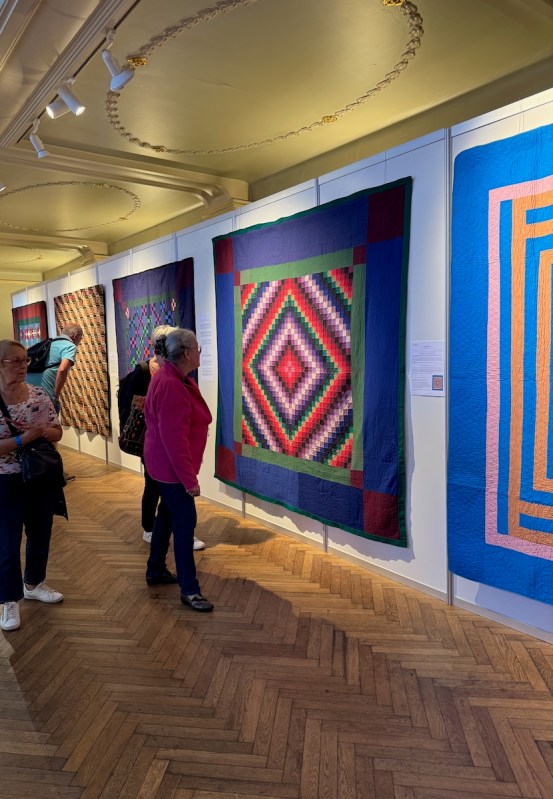
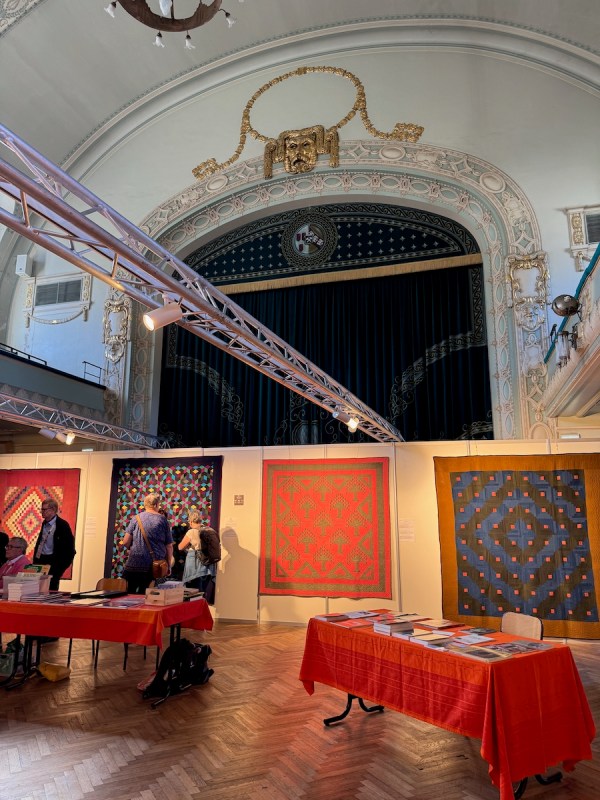
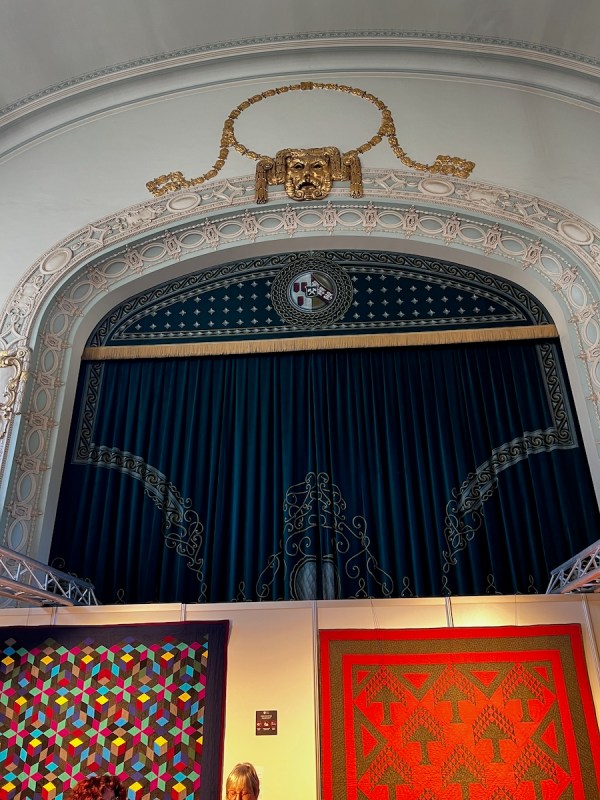
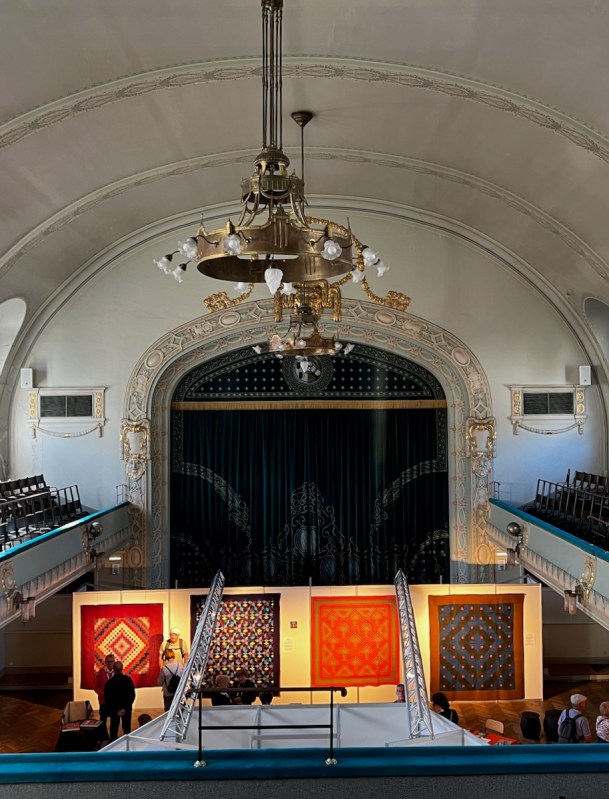
Venue 1: Theater in Sainte Marie-aux-Mines
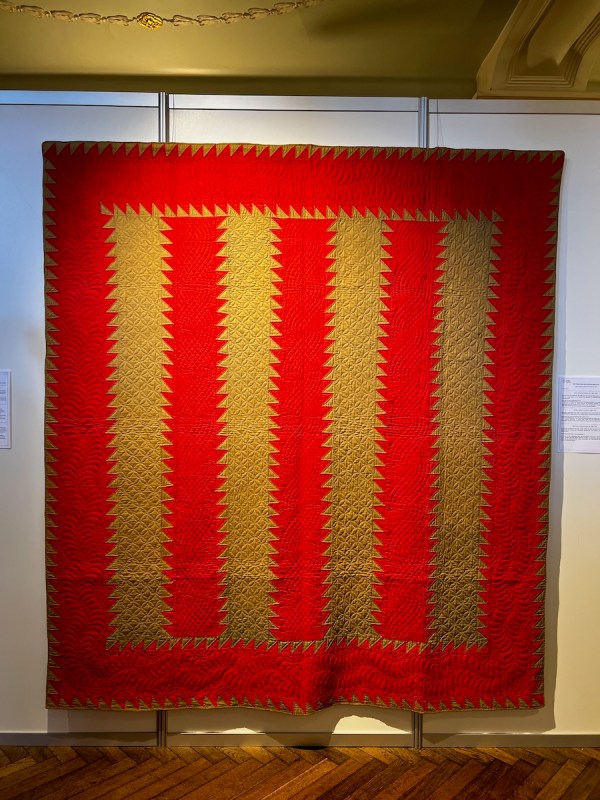
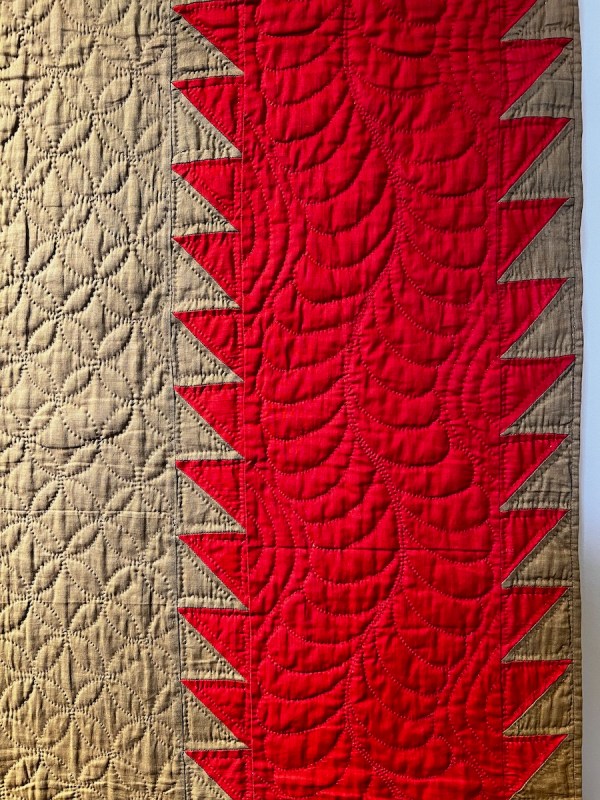
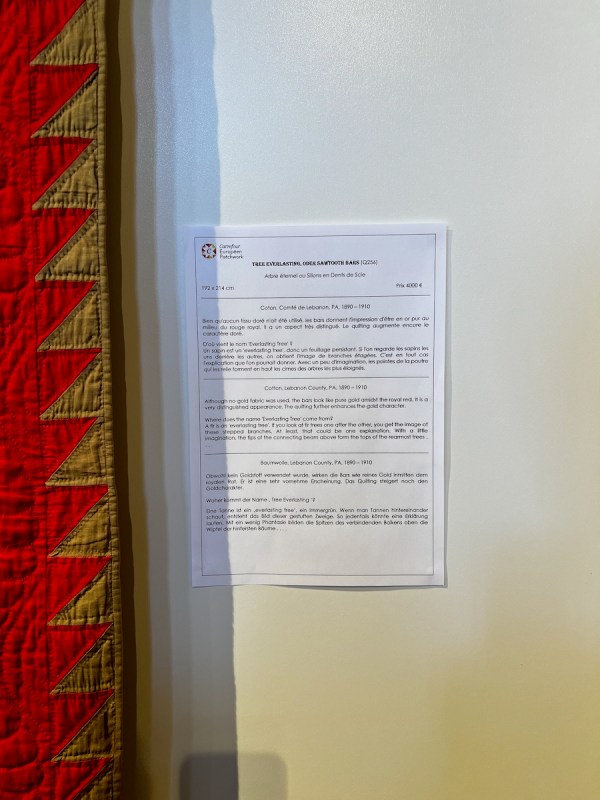
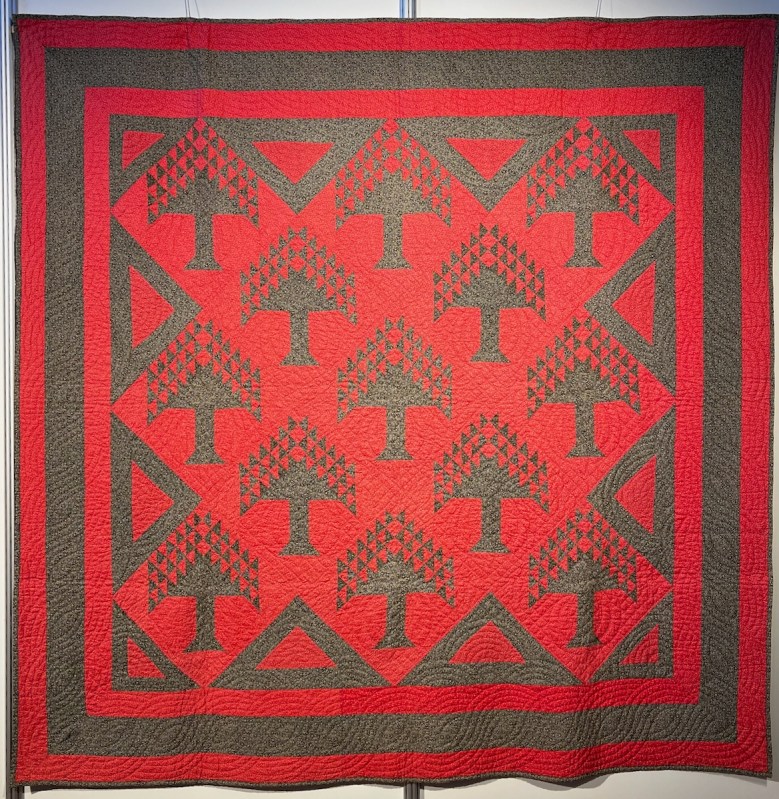
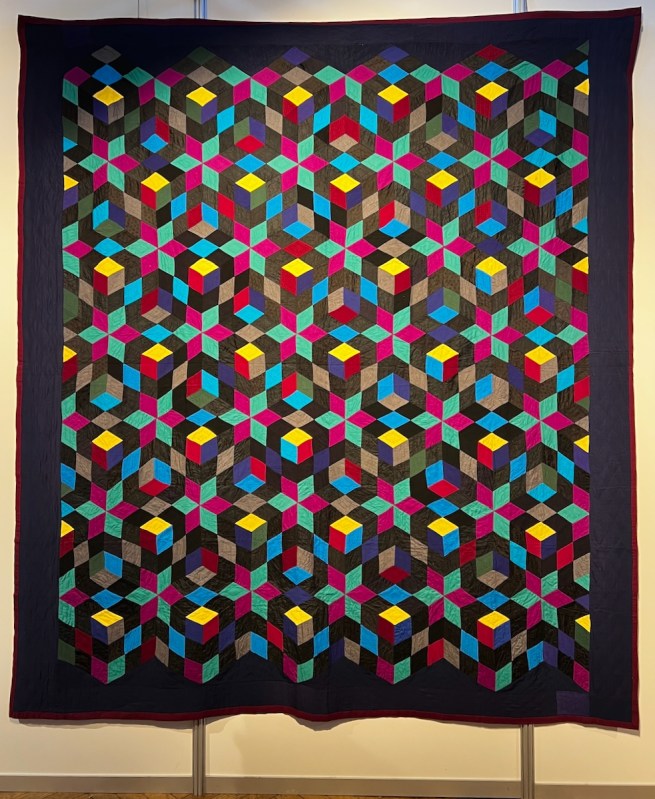
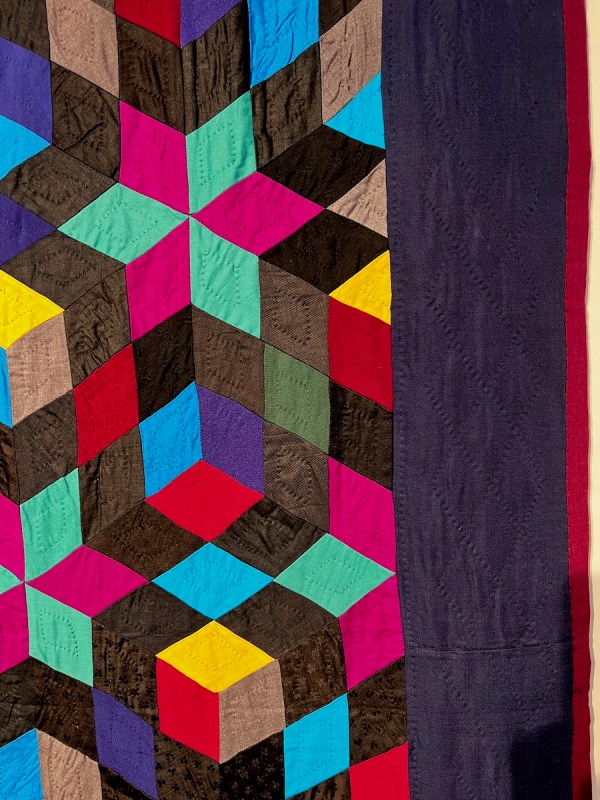
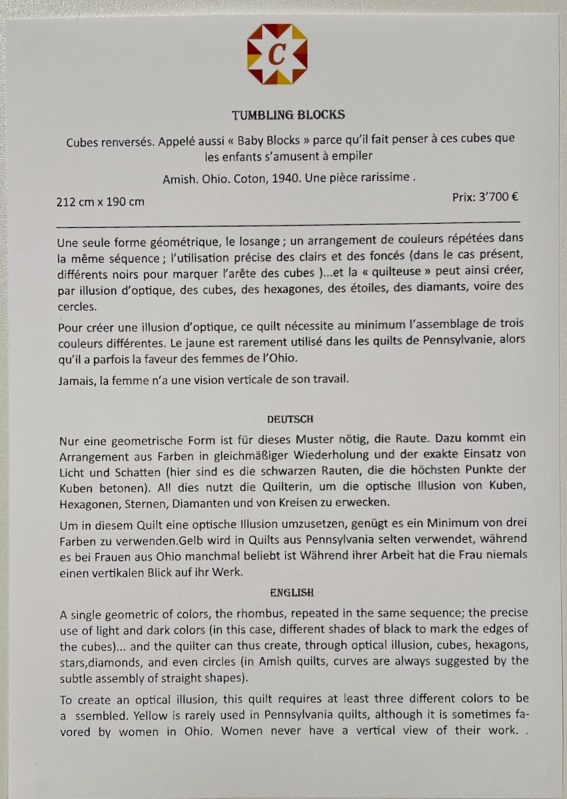
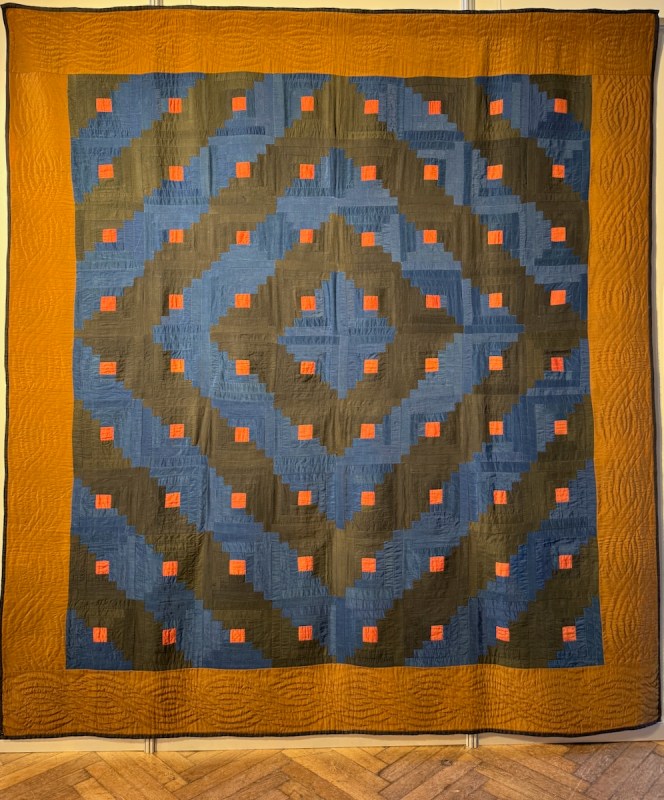
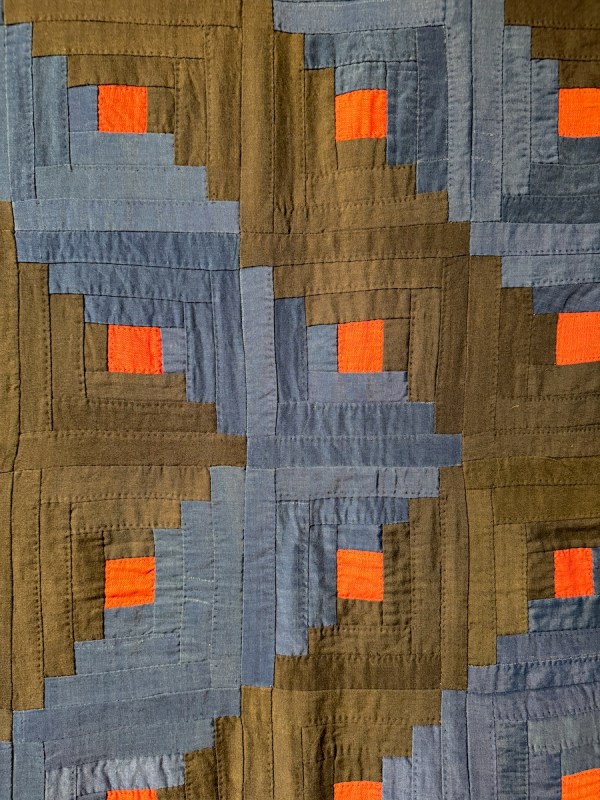
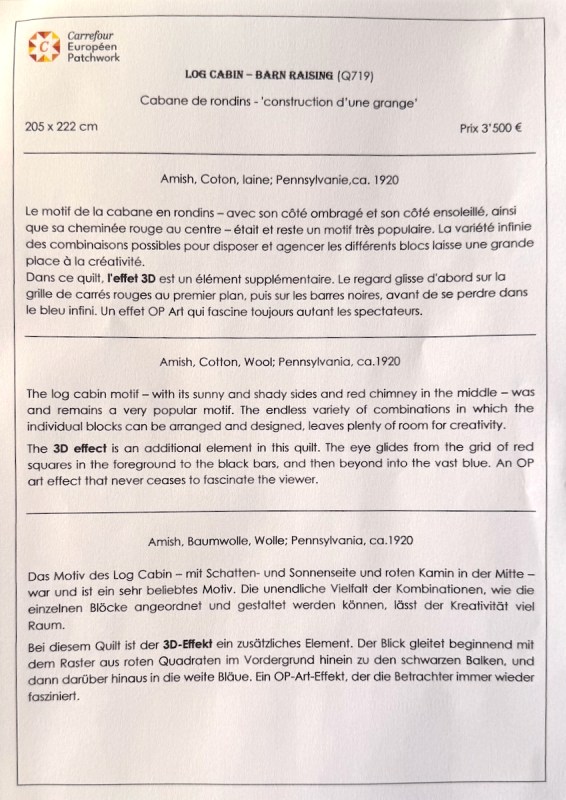
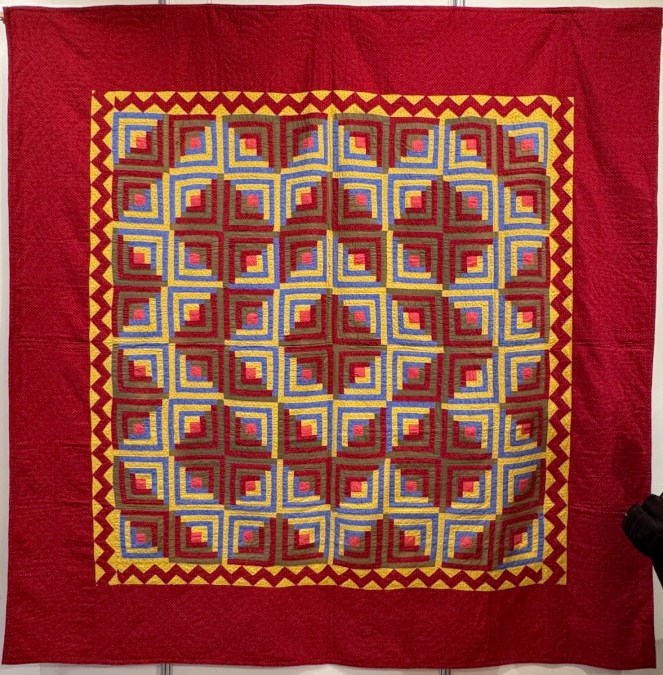
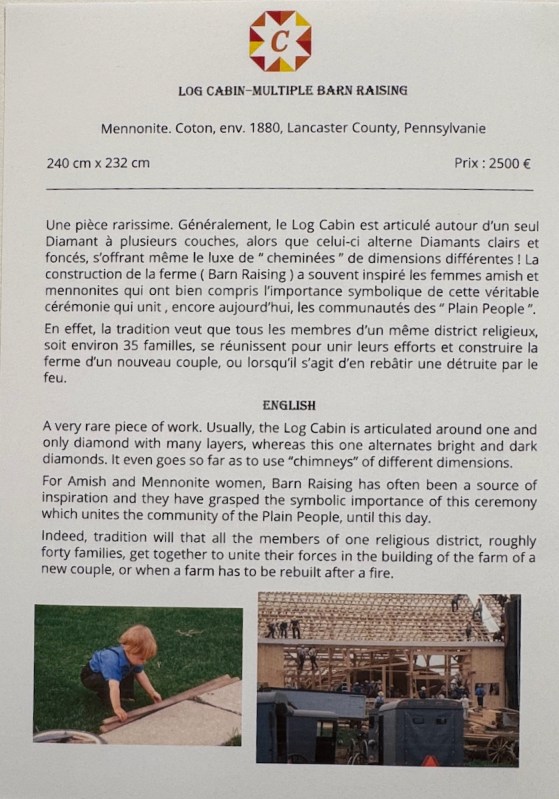
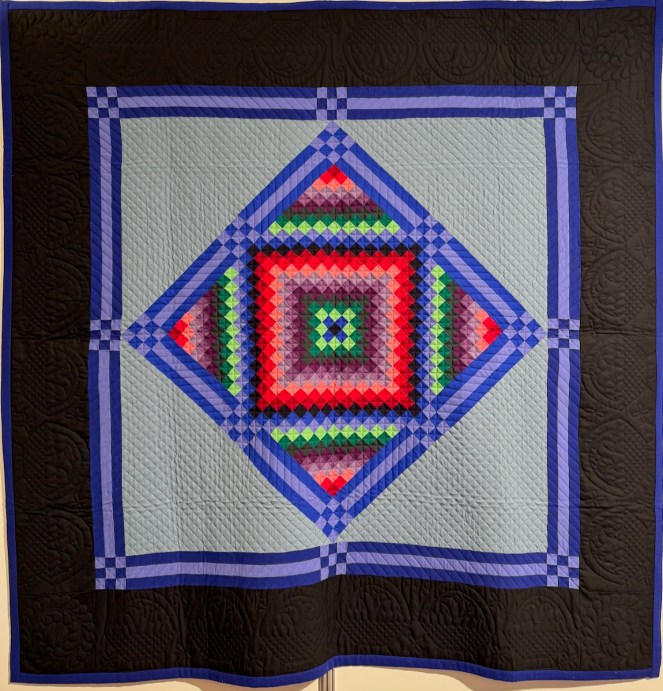
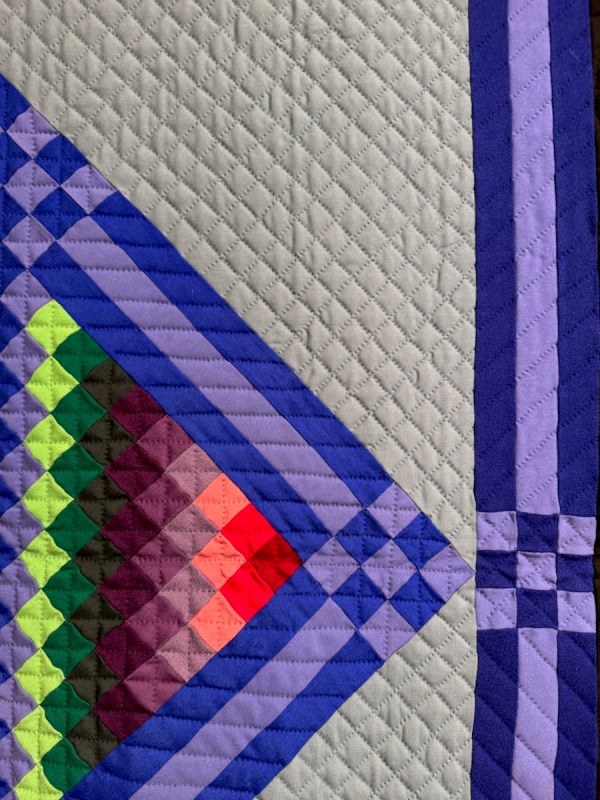
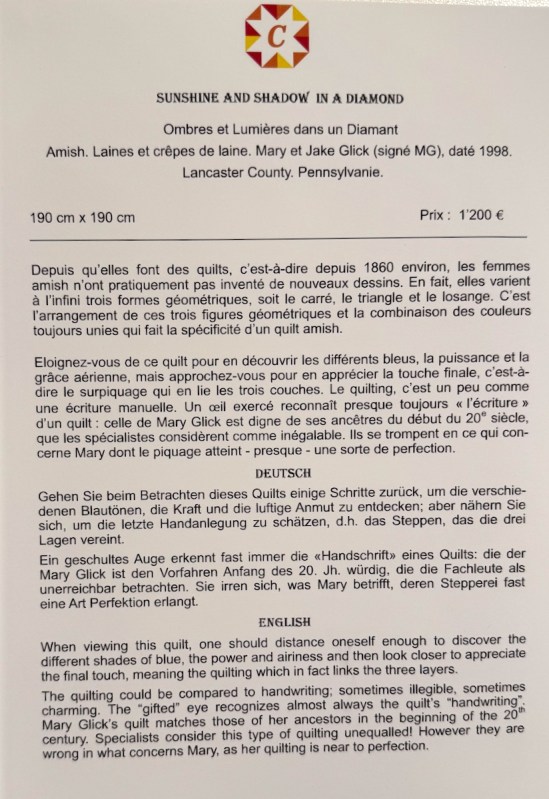
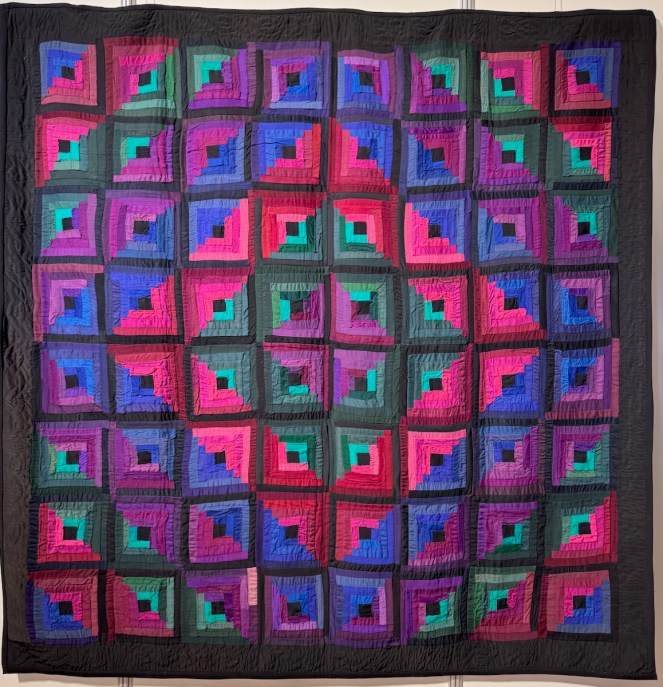
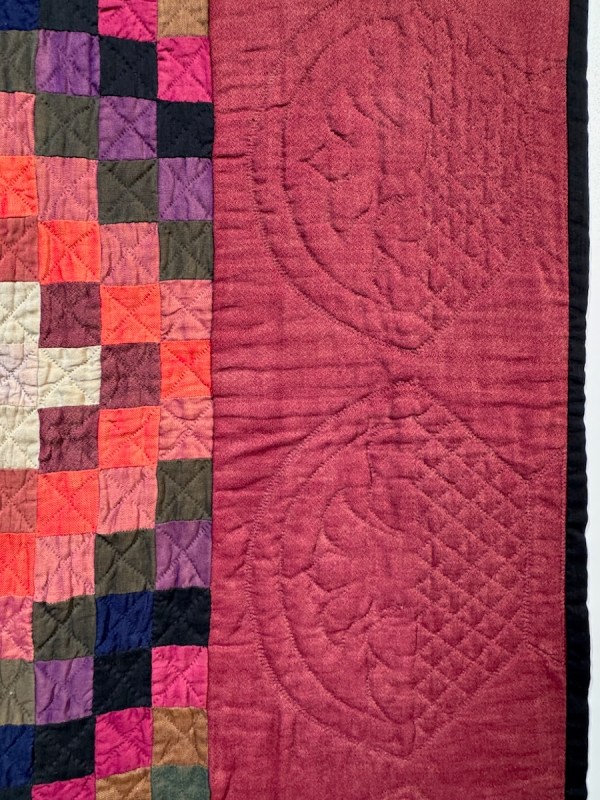
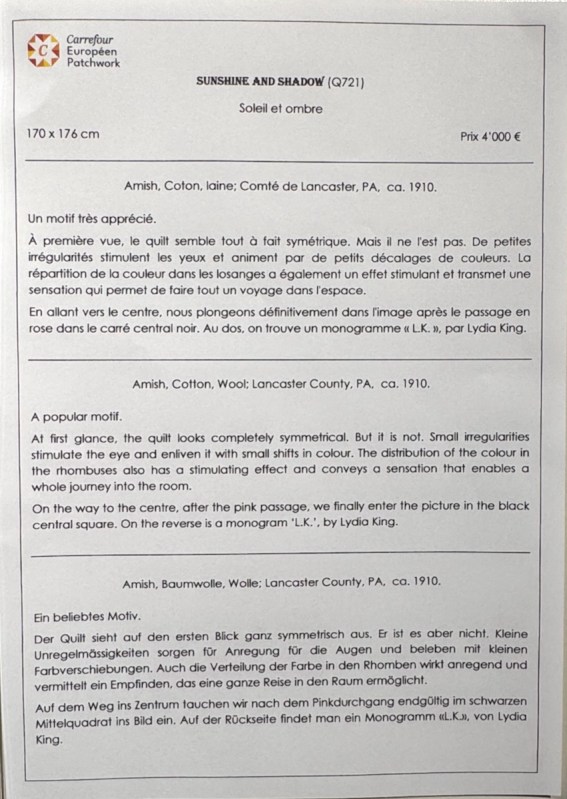
In case I didn’t mention it, the main town is Sainte Marie-aux-Mines, and that is where we will start. This year, it was all on the bottom floor and the display was traditional, Amish quilts.
The Carrefour organizers bring in scaffolding and partitions to hang the quilts, as it really is set in an old theater. Below is a series of photographs; click to enlarge. I did try to get title cards for every quilt.
Click to enlarge any photo.
Now a slide show. Click on arrows to advance; unfortunately, you cannot click to enlarge the slideshow photos.
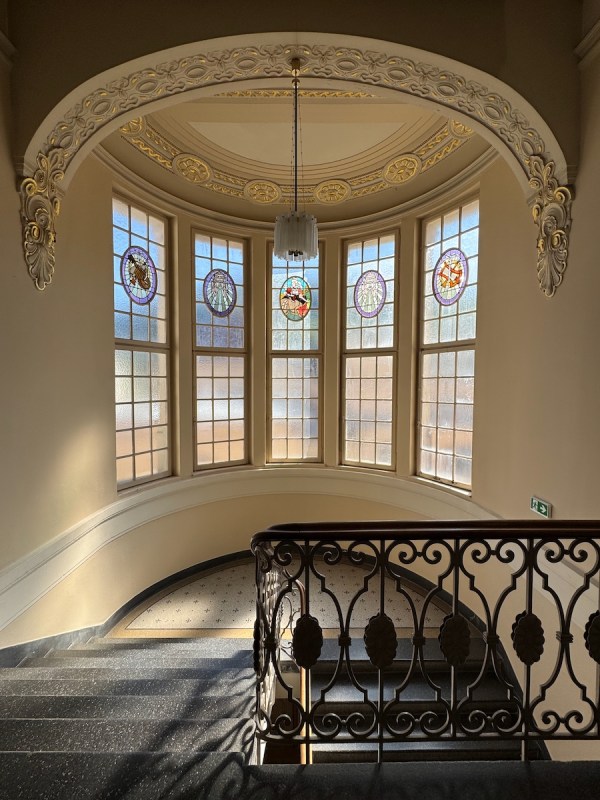
After we finished with the downstairs, we went up…we love this staircase!
Peeking through the glass in the locked doors of the balcony, my husband took this photo of the exhibit below.
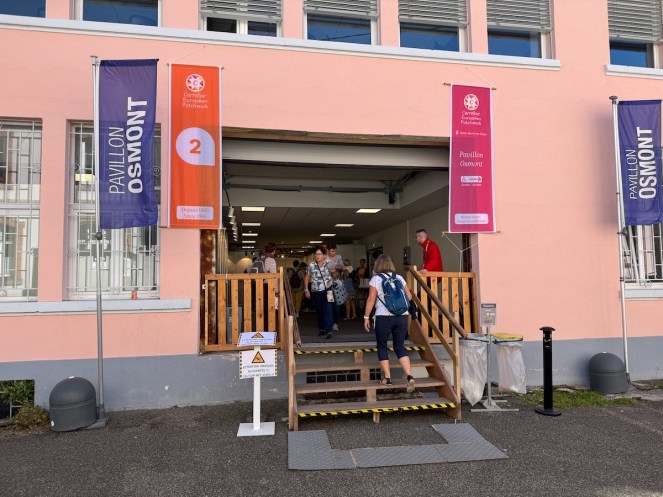
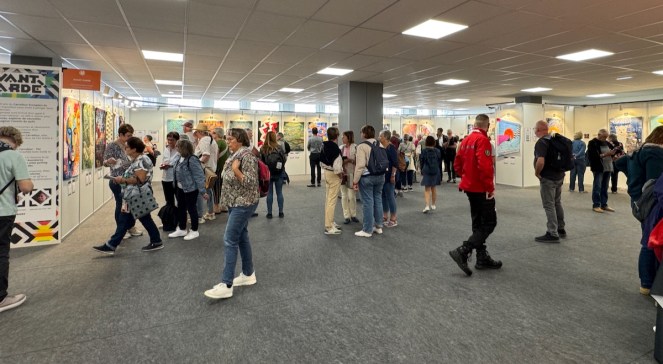
Venue 2: Osmont Pavilion
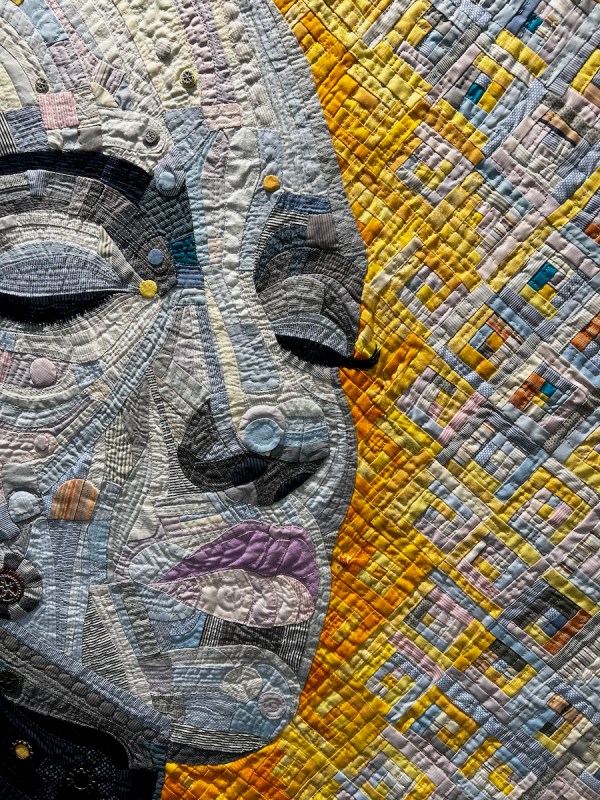
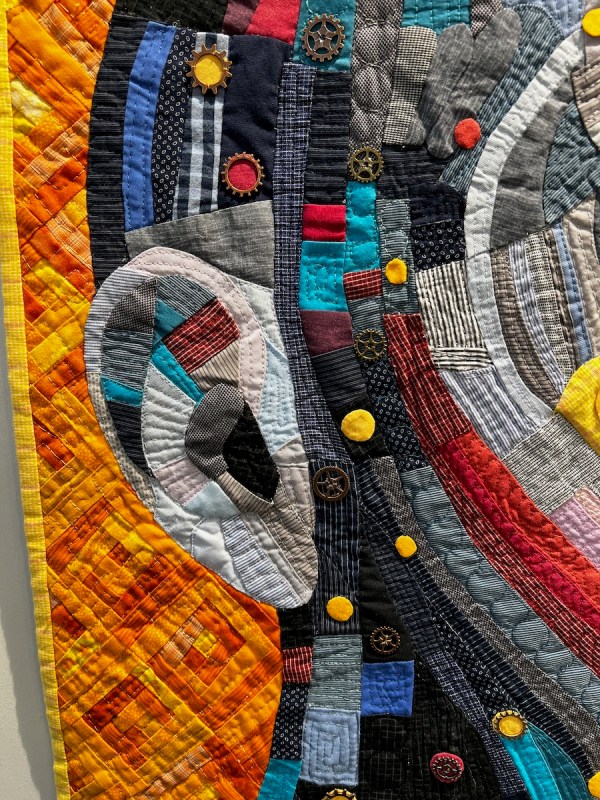
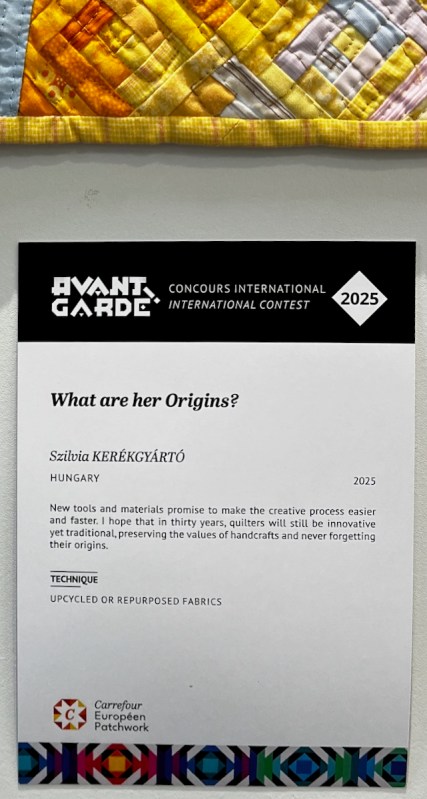
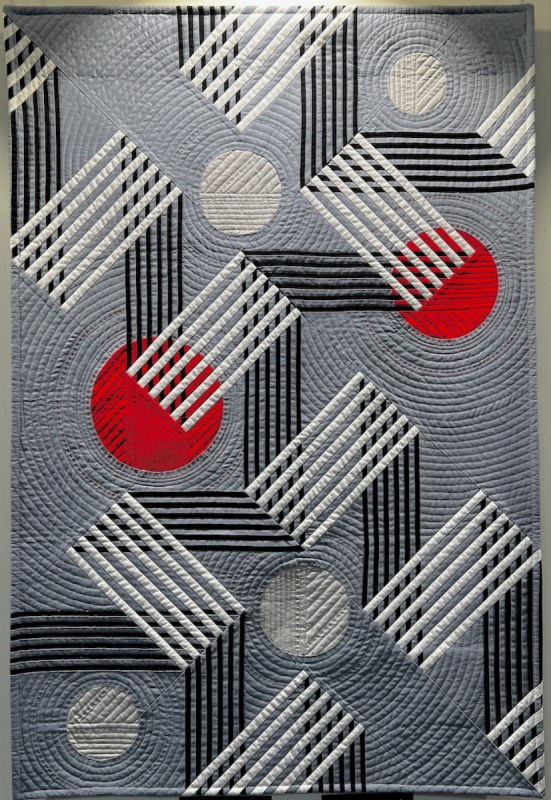
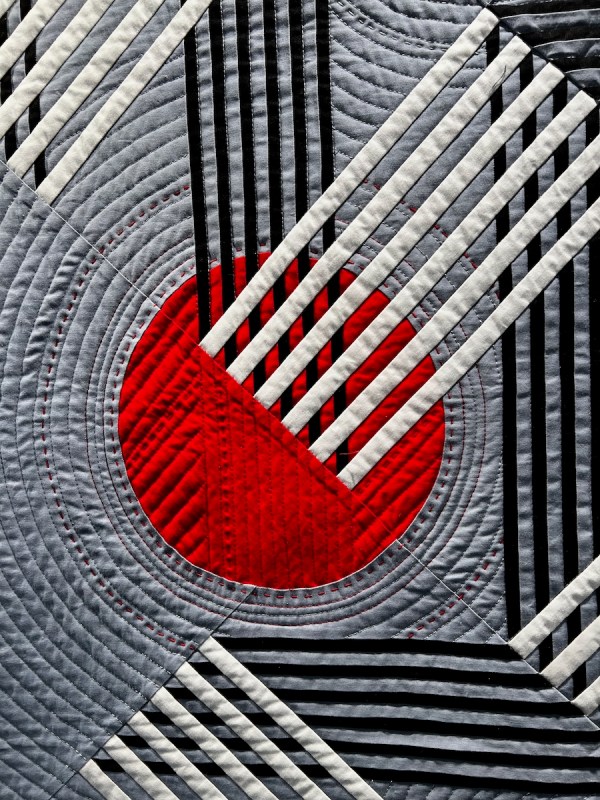
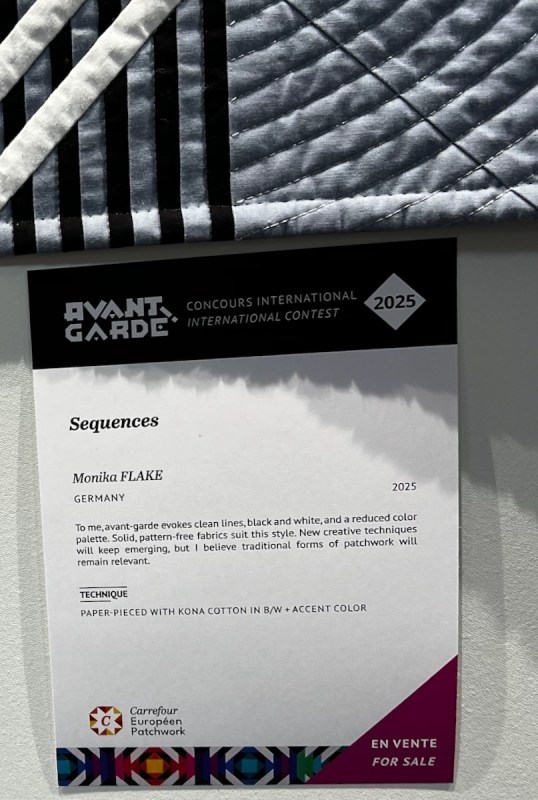
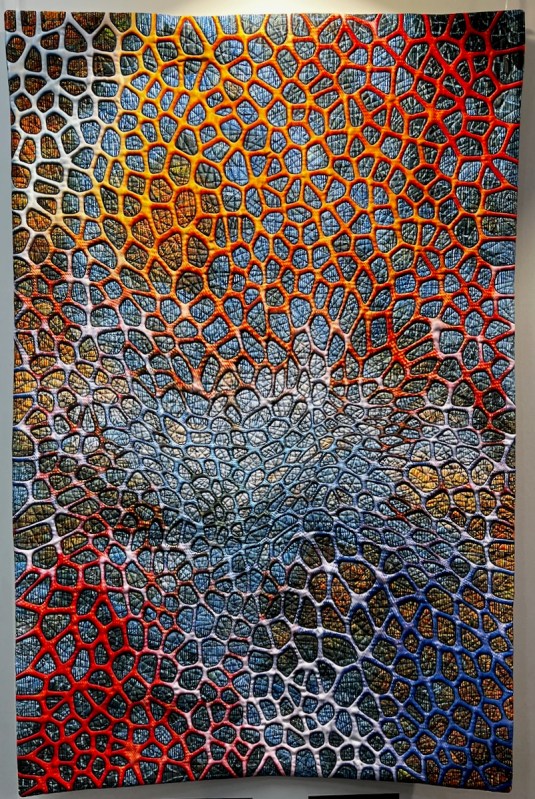
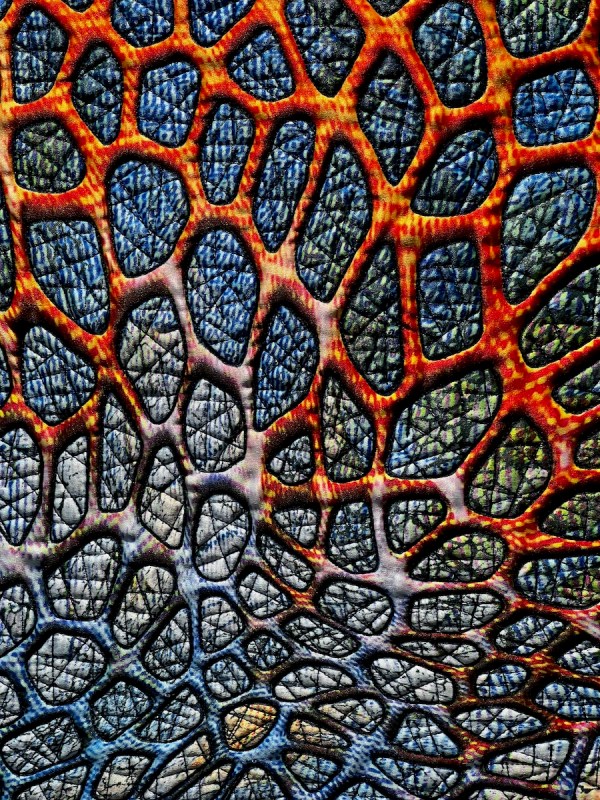
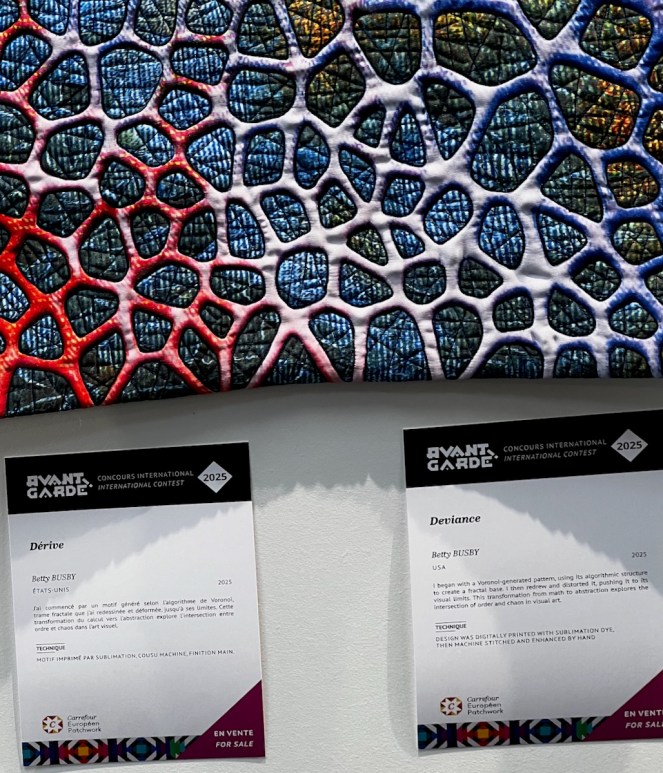
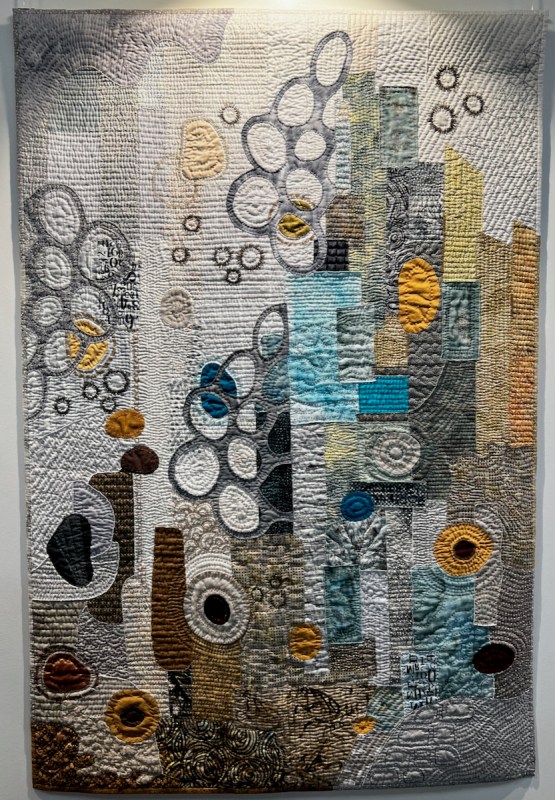
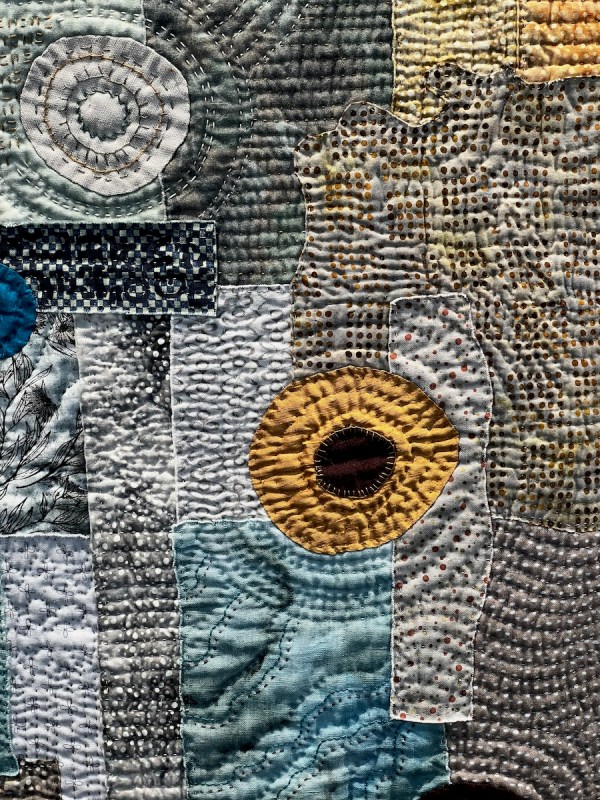
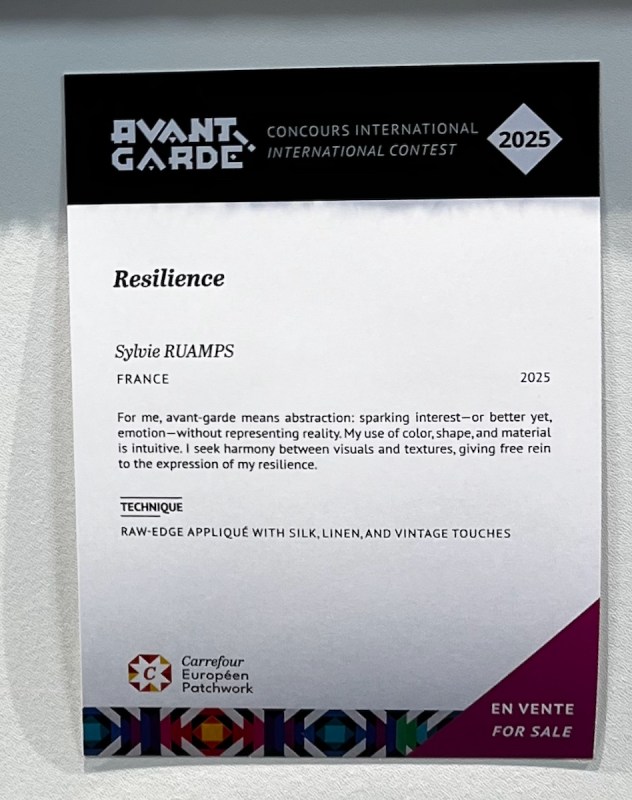
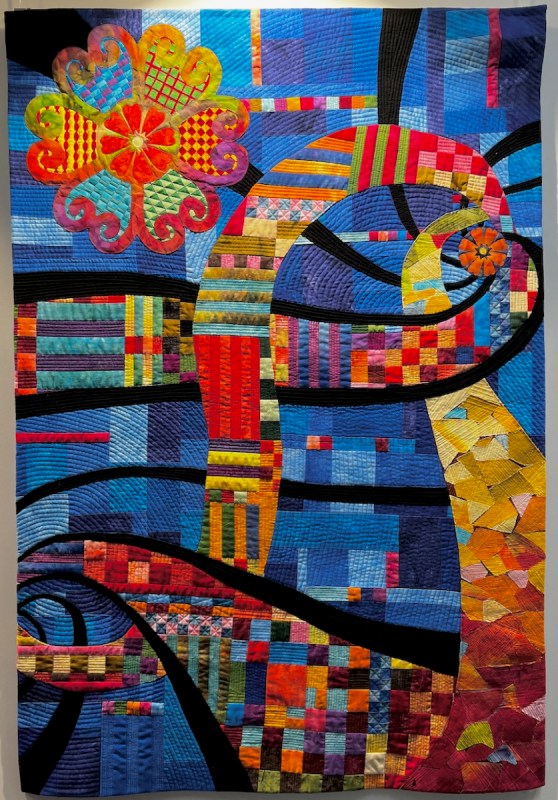
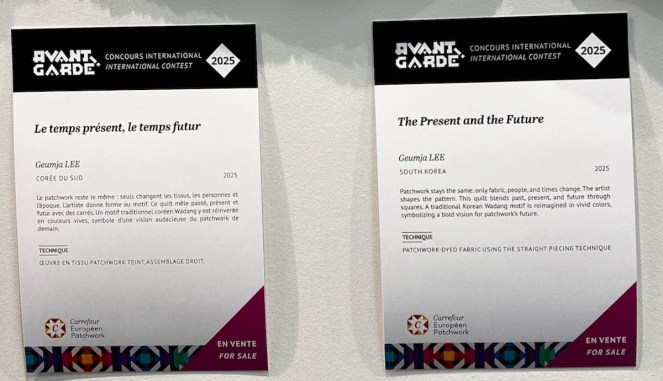
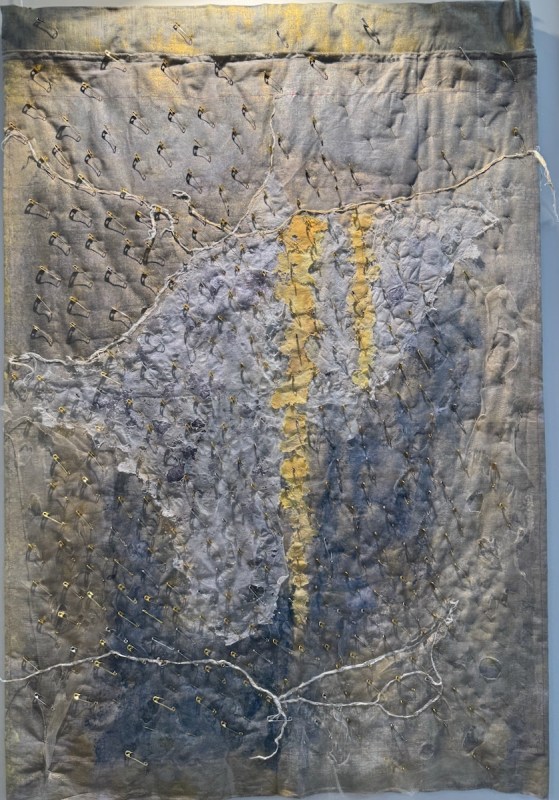
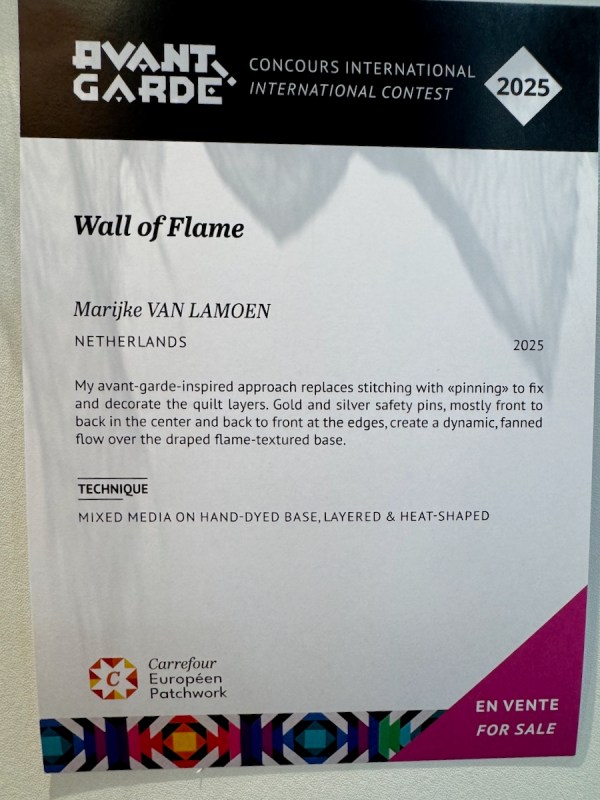
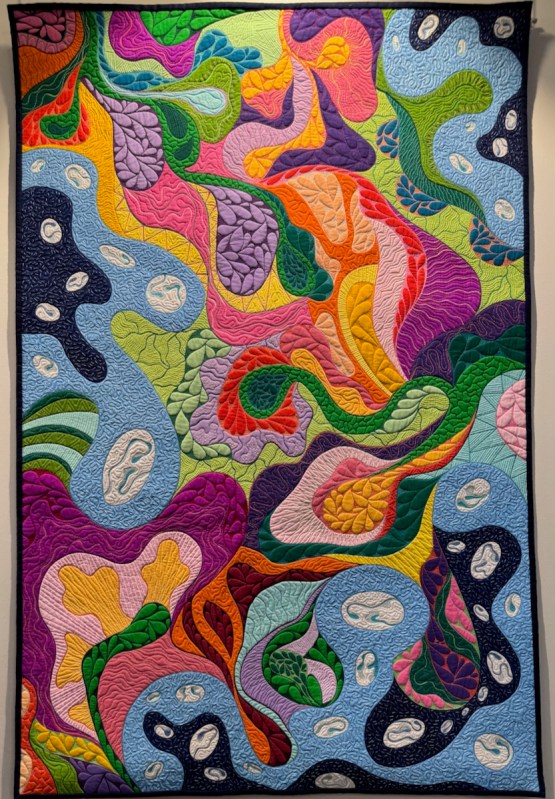
The section of the Pavillion where the quilts are hung is one large space, and the quilts “divide” it up. The contest theme this year was Avant Garde, and here is a slide show, with title cards. (Click on arrows to advance; unfortunately, you cannot click to enlarge the slideshow photos.)
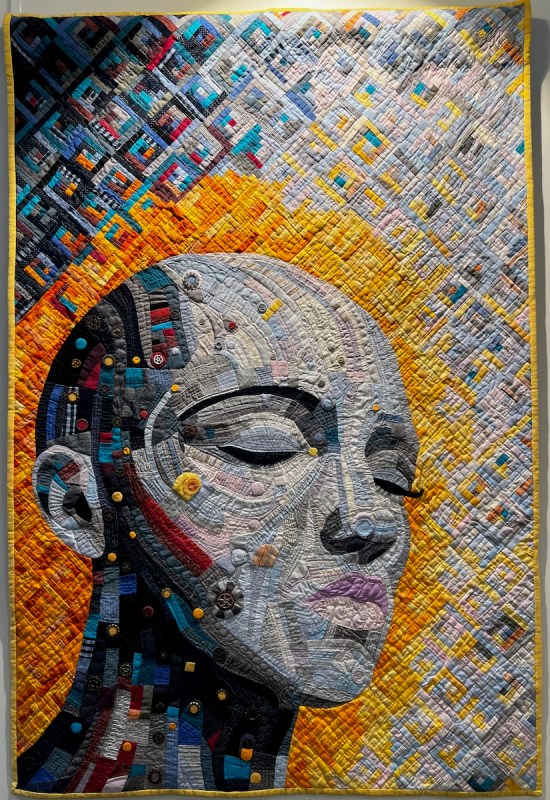
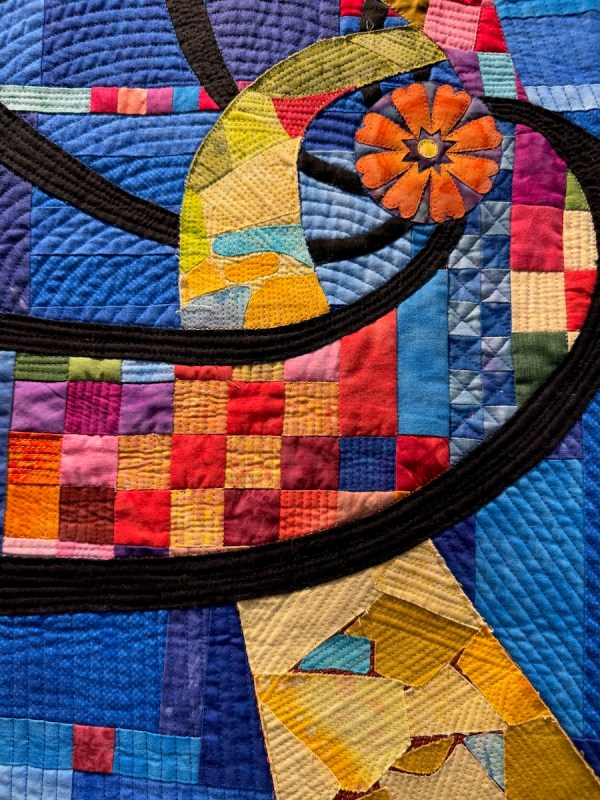
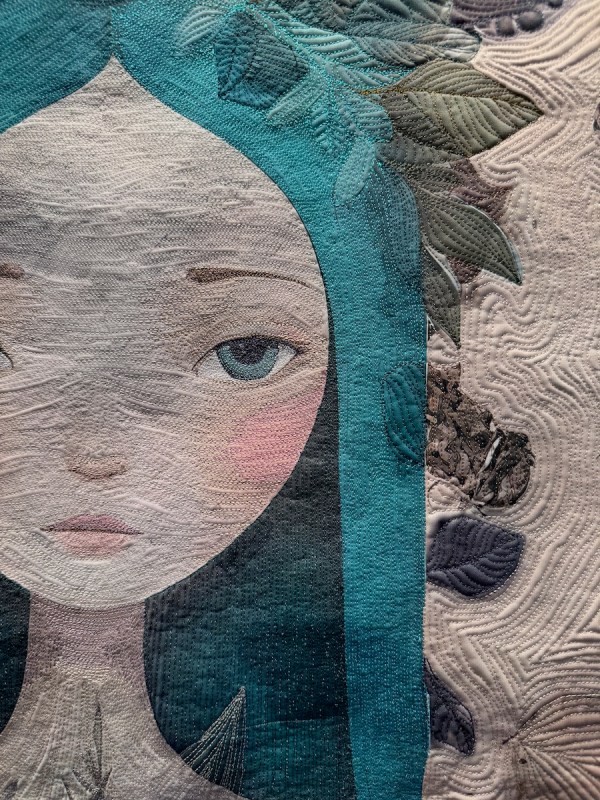
We’ll see more of Tania Tanti’s work in another post, as she was a featured artist, but I wanted to say that nothing on this quilt is pieced. She starts with a white piece of cloth and paints her shapes, then quilts them. Details below; click to enlarge.
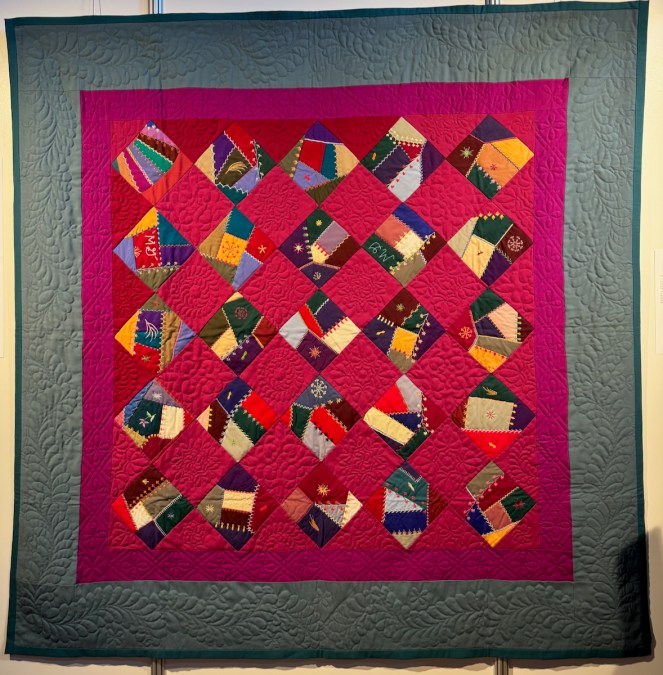
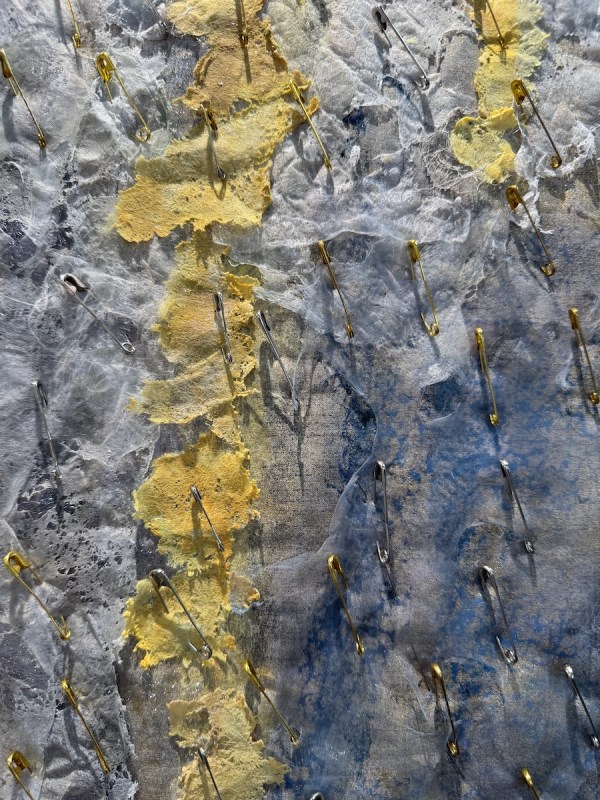
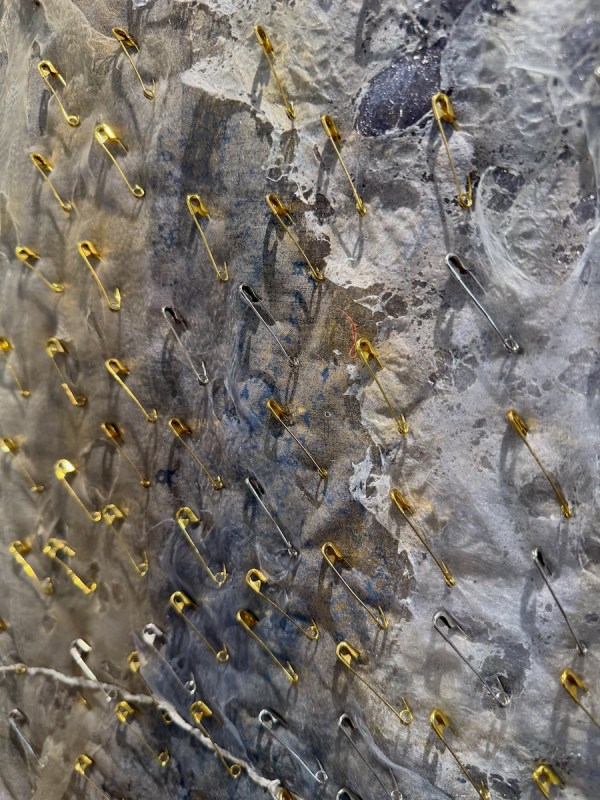
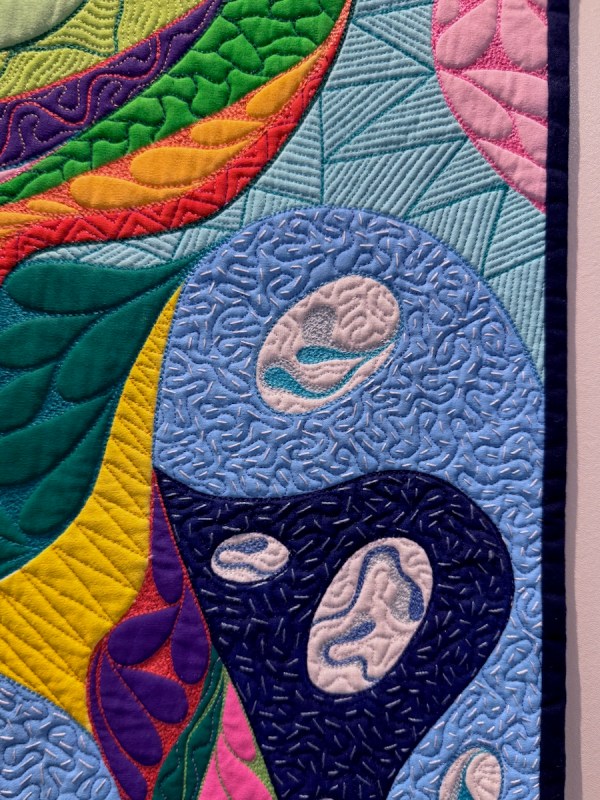
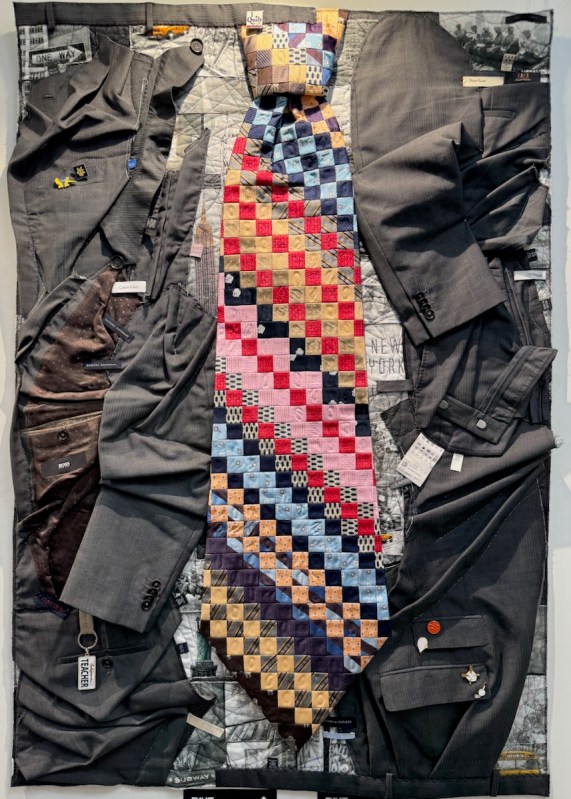
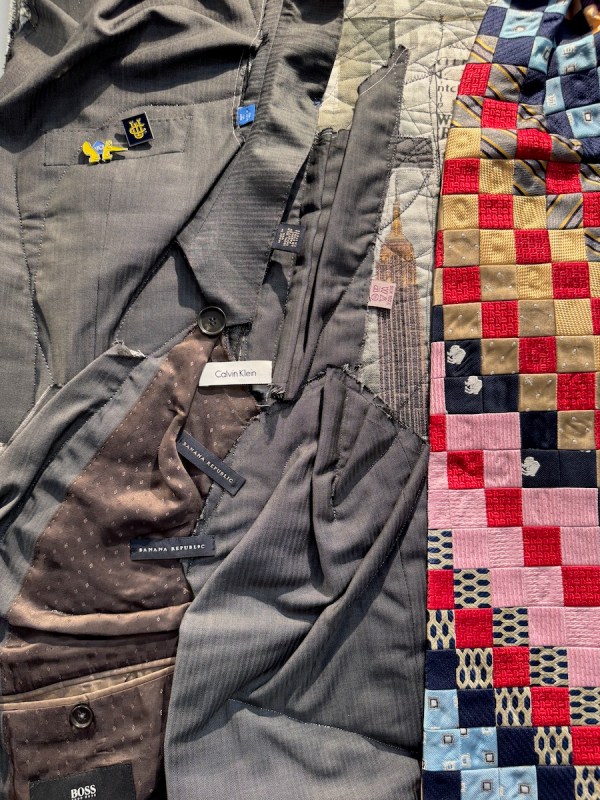
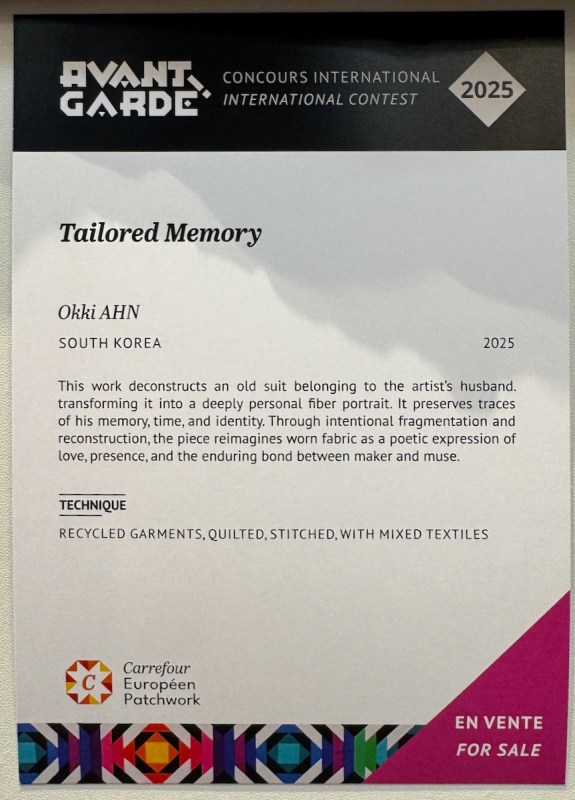
I found this one to be intriguing, and moving, as it is a tribute to her husband.
I showed you the cut-out close-up first, then the total quilt.
(I did mean to put all these in the slideshow: technical difficulties!)
The quilting on this was so close together, and it sculpted the cloth, moving the eye over the surface.
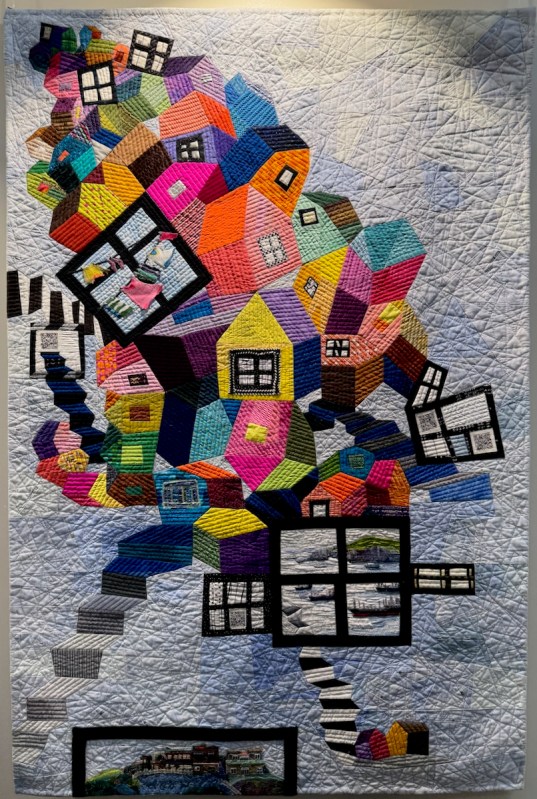
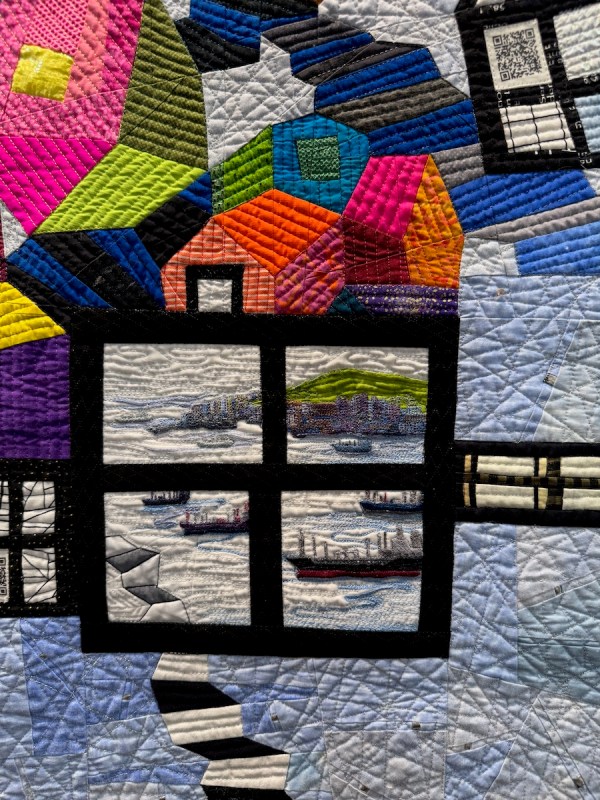
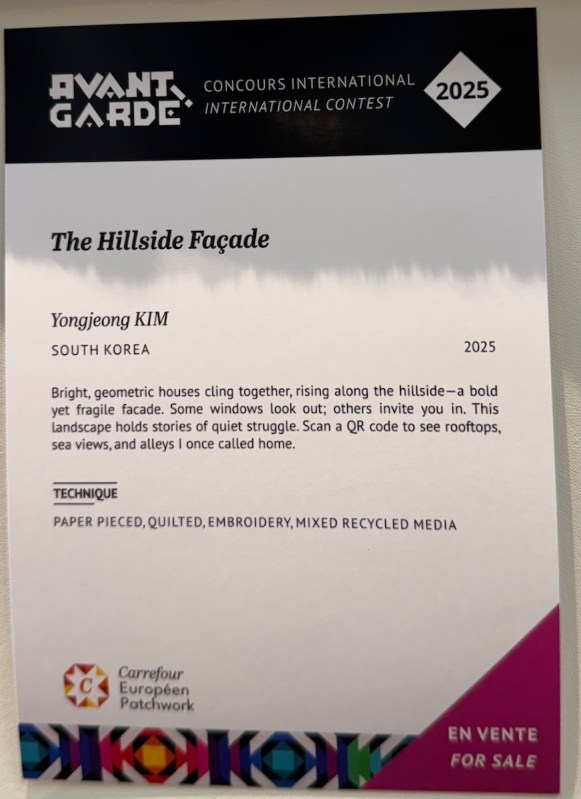
A tumble of houses, a view to the landscape.
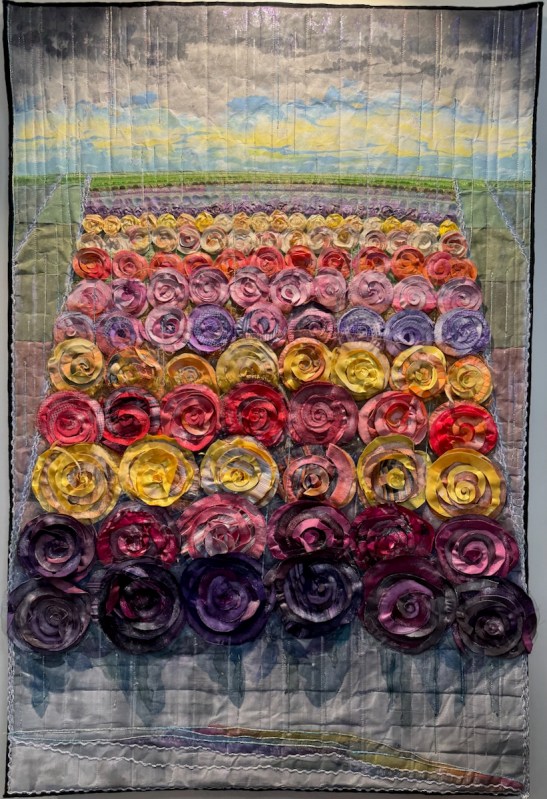
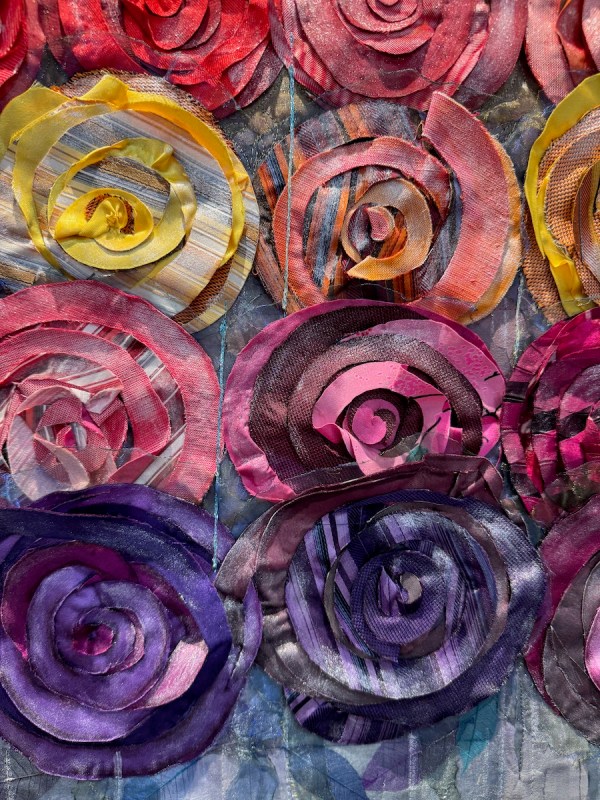
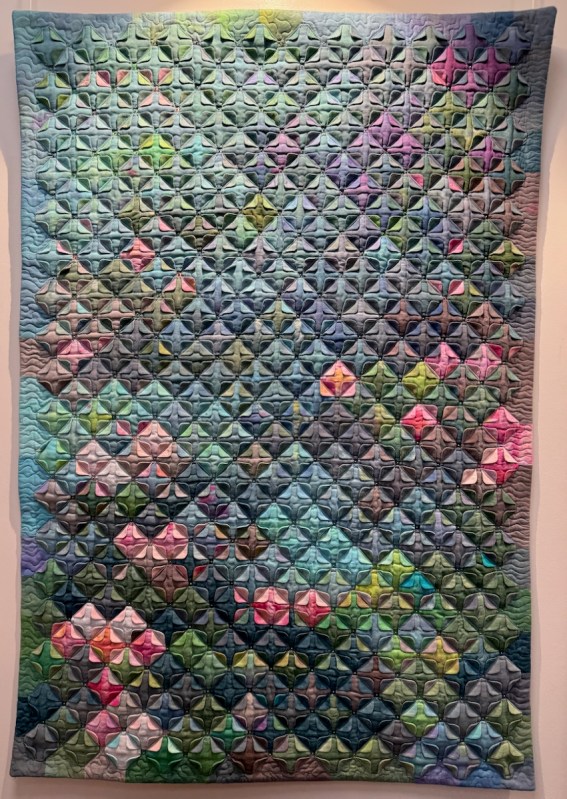
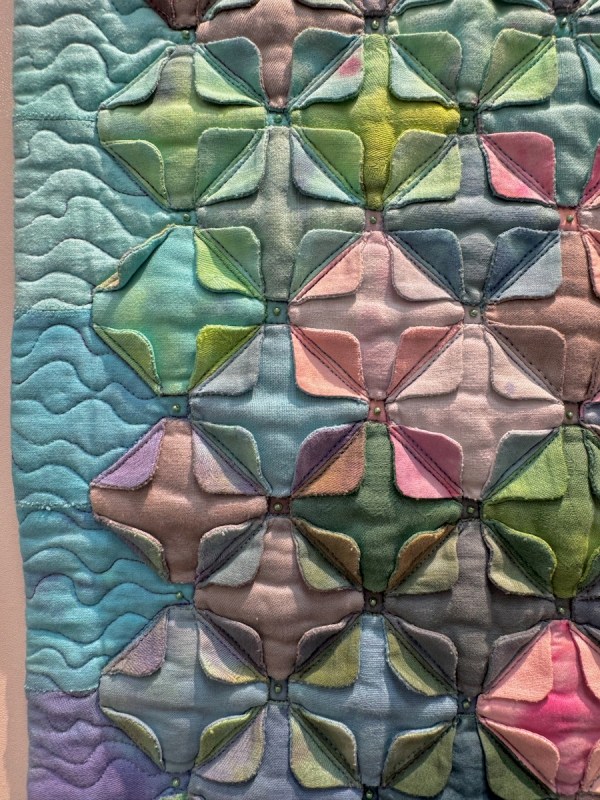
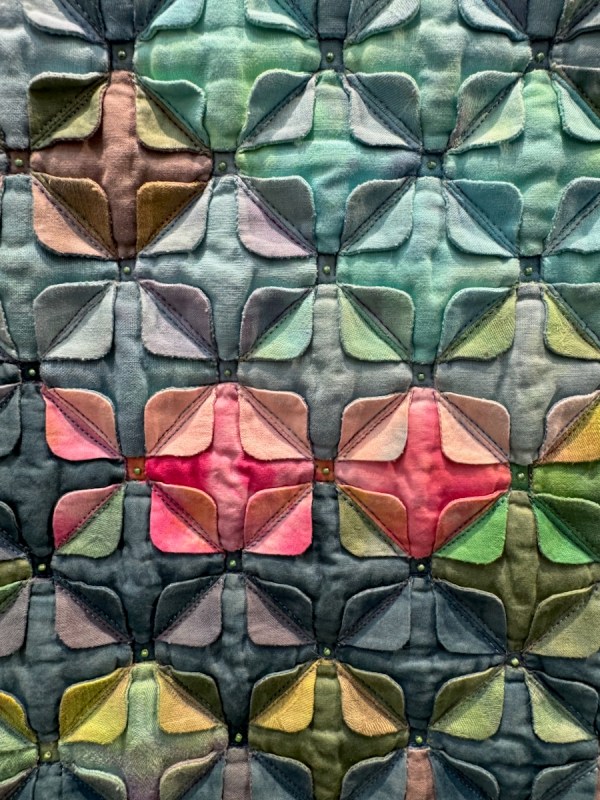
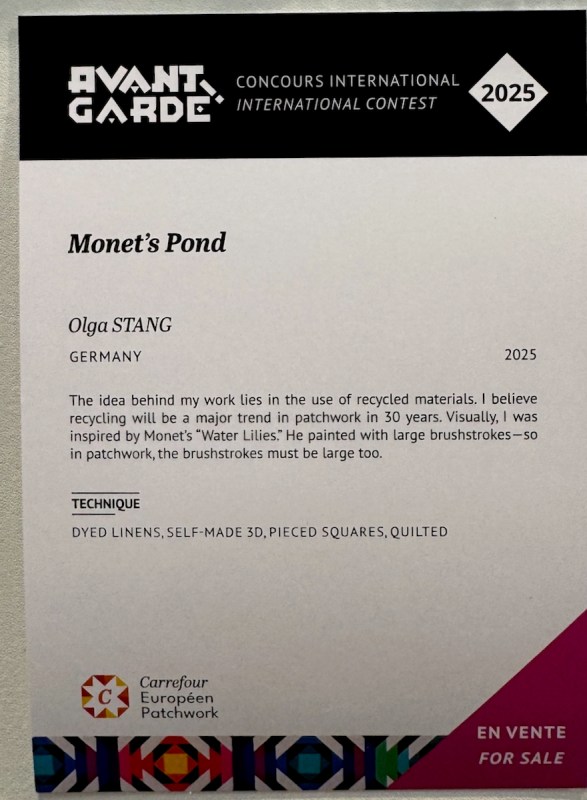
Olga Stang’s work, Monet’s Pond, intrigued me, because of the construction of all those little two-sided squares.
Then they look to have been laid on another cloth, and folded to mimic petals, or vegetation on the Monet’s lily pond. Tiny beads are placed at the intersections.
She believes we’ll all be doing more recycling in the future, and if it turns out like this, it will be a good goal.
As always, I owe a lot of these photographs, as well as the ability to take this trip, to my husband Dave; I’m most grateful to him. There are two more exhibits in this venue, but that will be on the next posting about Carrefour. I’m just now starting to process, to revisit the photographs, to think about my visit. Watch for the next one!
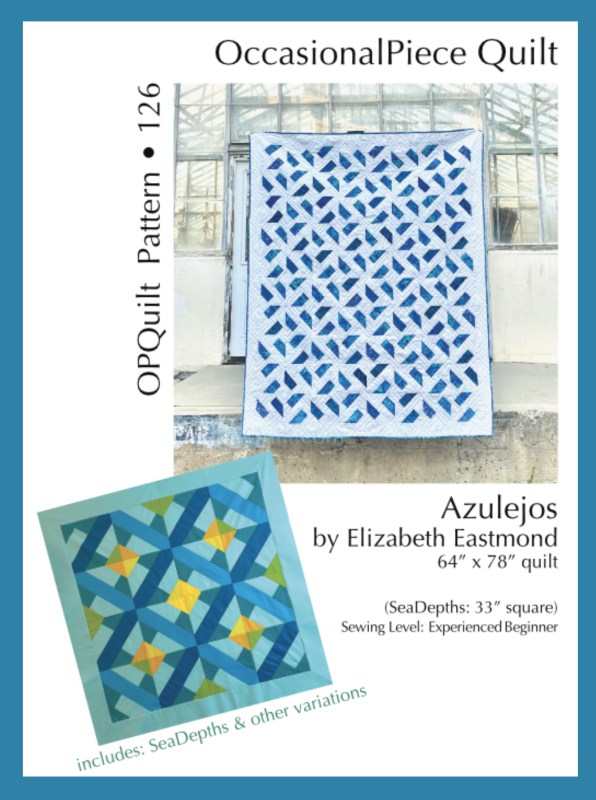
2) a need to make a quick quilt, which Azulejos is, and…
3) After the Great Computer Debacle and File Deletion Tragedy, I’ve been trying to put back together my pattern files, and Azulejos was the first one I finished. So I needed to test it out, and…
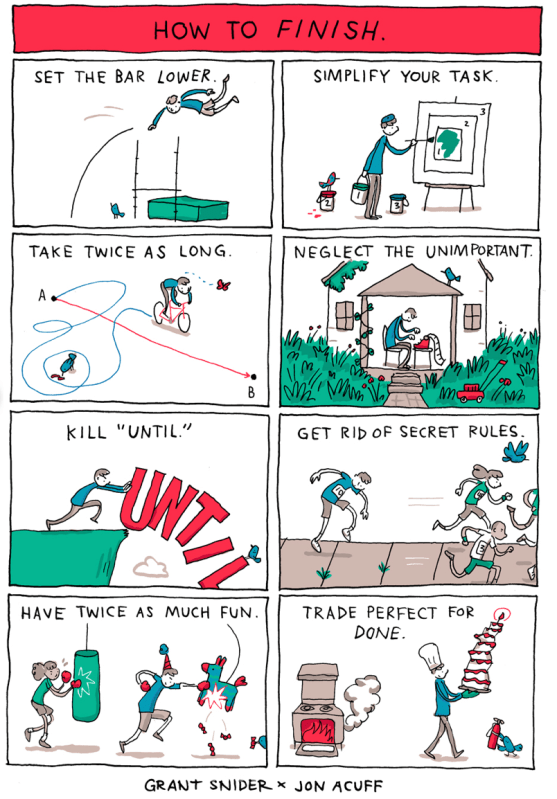
4) This cartoon from one of my favorites (Grant Snider) and a collaborator (Jon Acuff), and…
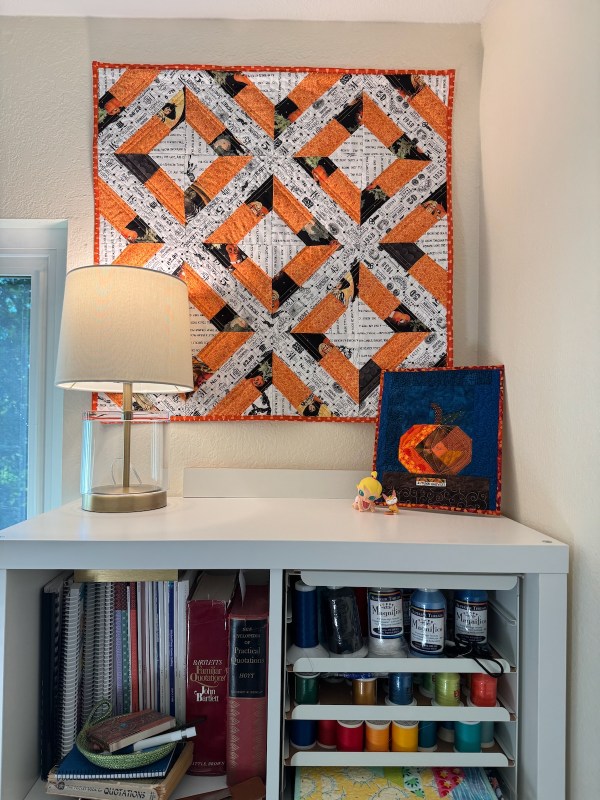
5) Realizing that I still had the 4th of July redwhiteblue quilt above this cupboard and now it was the orangeblackwhite season.
This is how it came together in two days (click to enlarge any photo below):
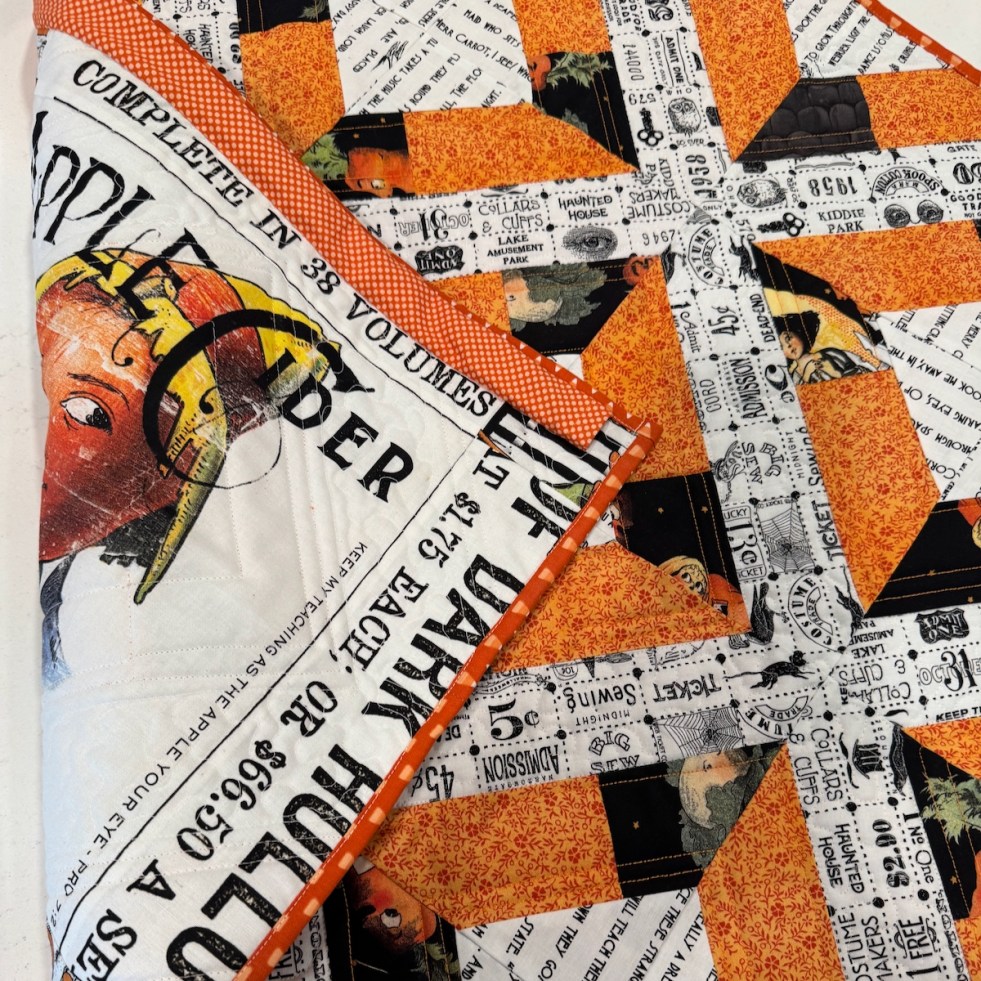
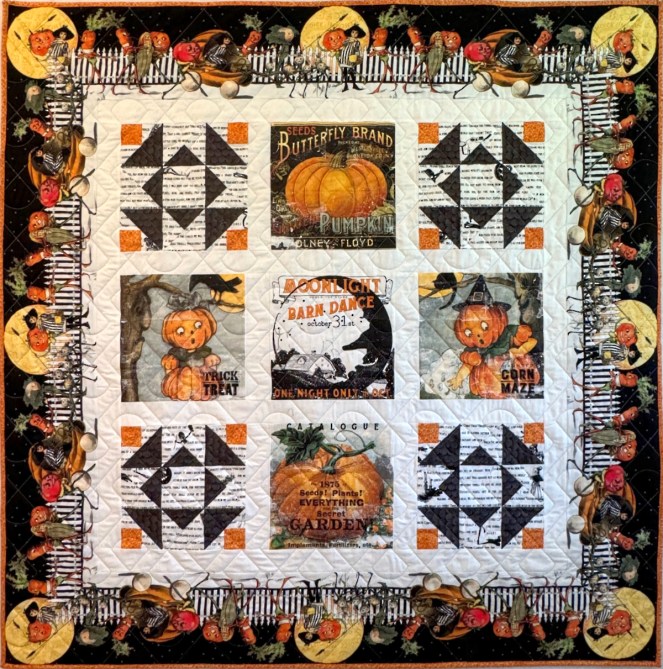
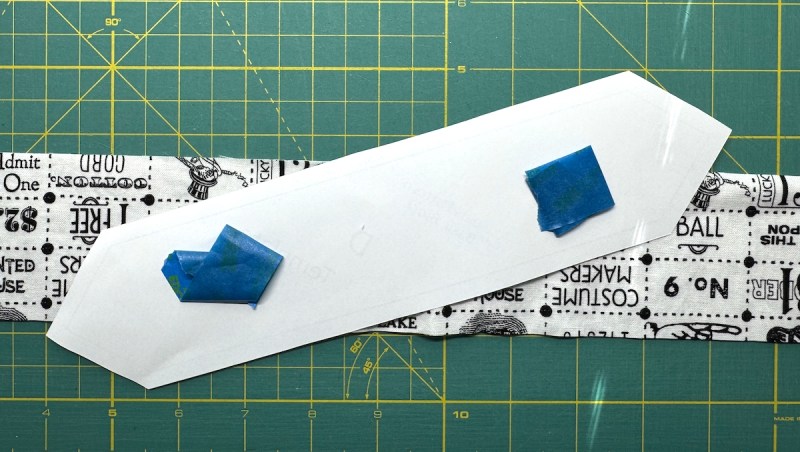
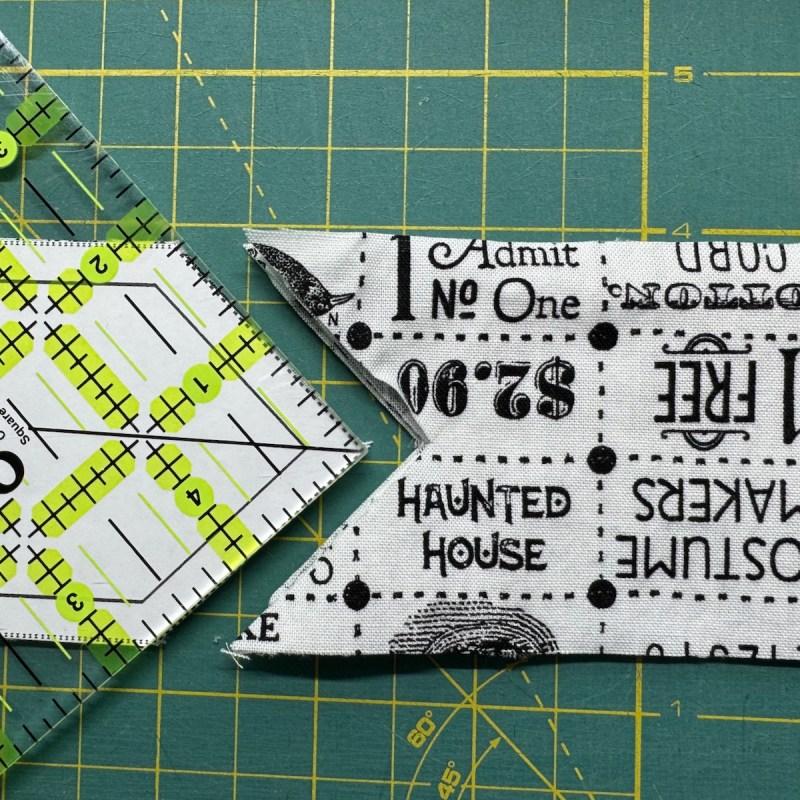
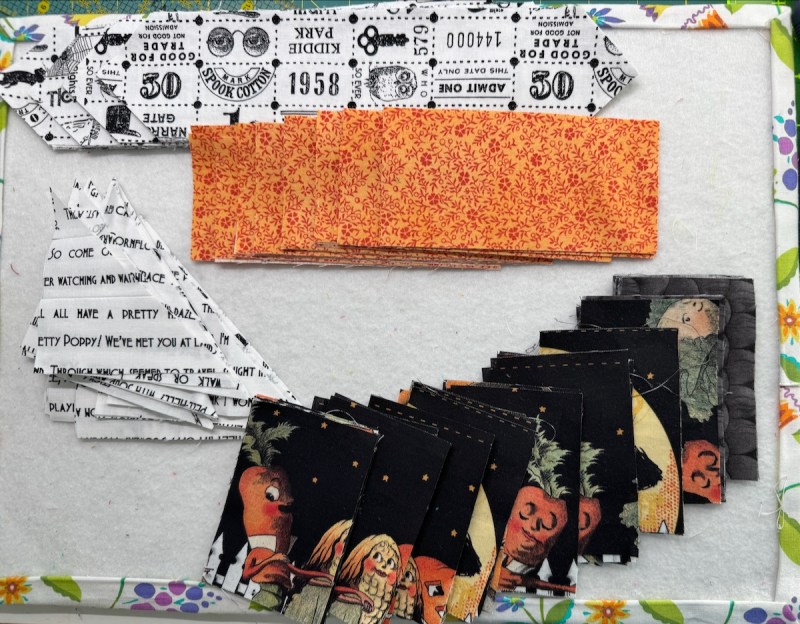
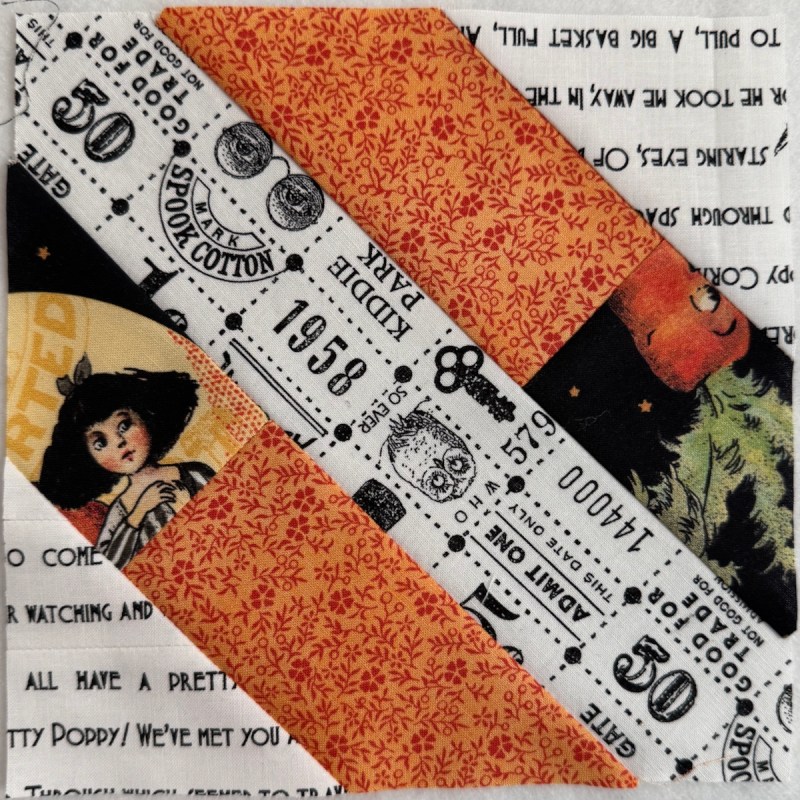
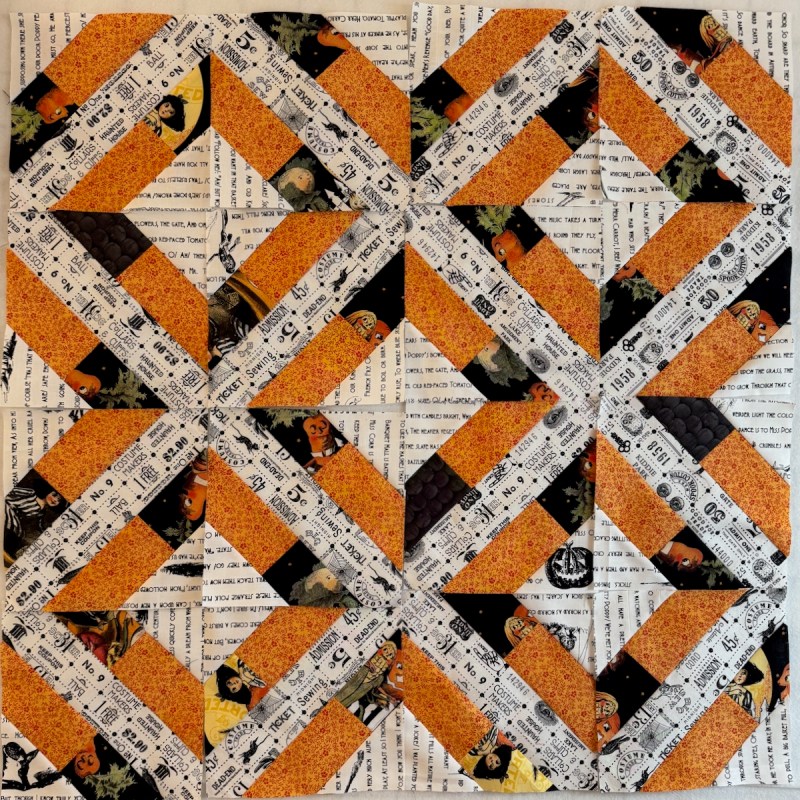
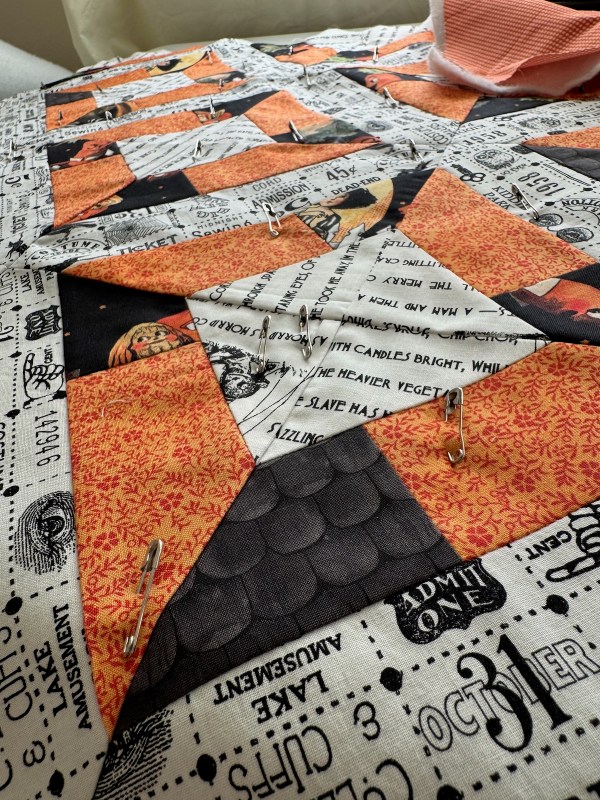
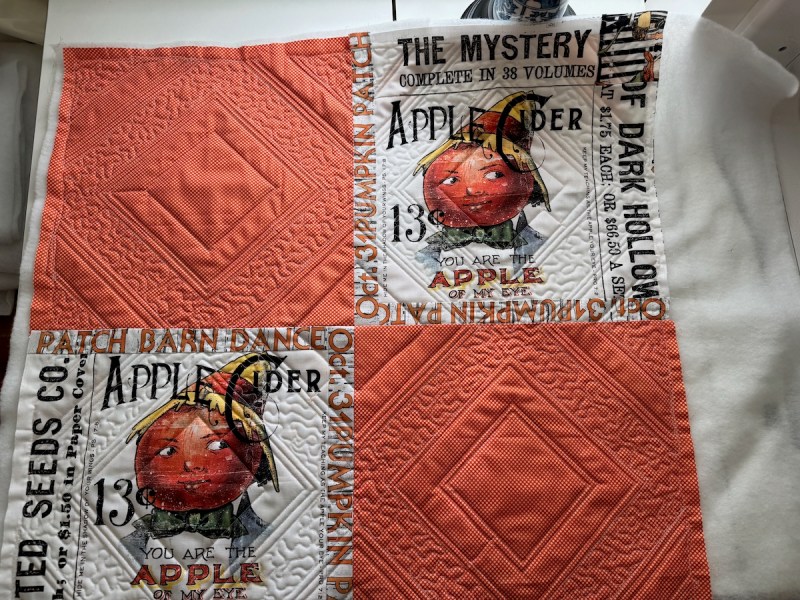
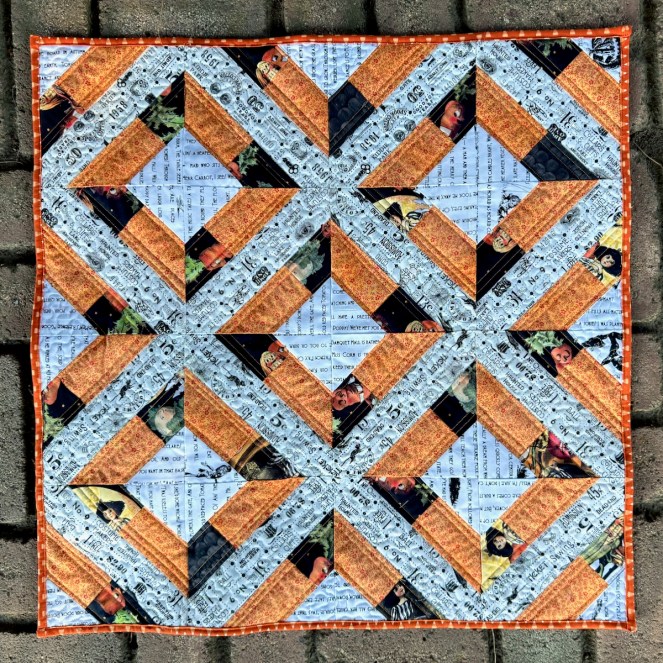
I kept the quilting simple. On the back were two leftover panel blocks from the original kitted Halloween Quilt, along with some rando orange dot fabric from the stash. I used the bits we’d cut off to border the panels, so they’d be large enough. And since this pattern — while quick and easy — calls for a template, I put tape on the back so it won’t move around, then I use a ruler to help in the cutting.
Quilt #308 | Halloween Mini-quilt | approximately 28″ square.
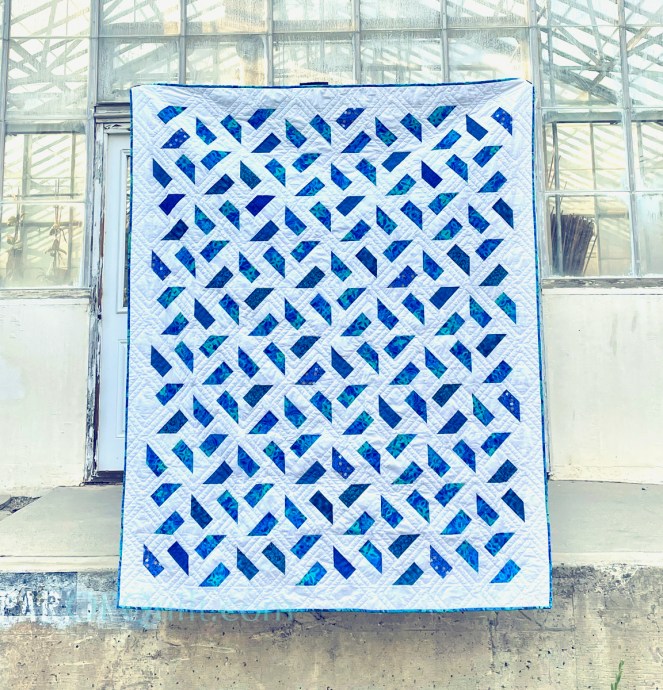
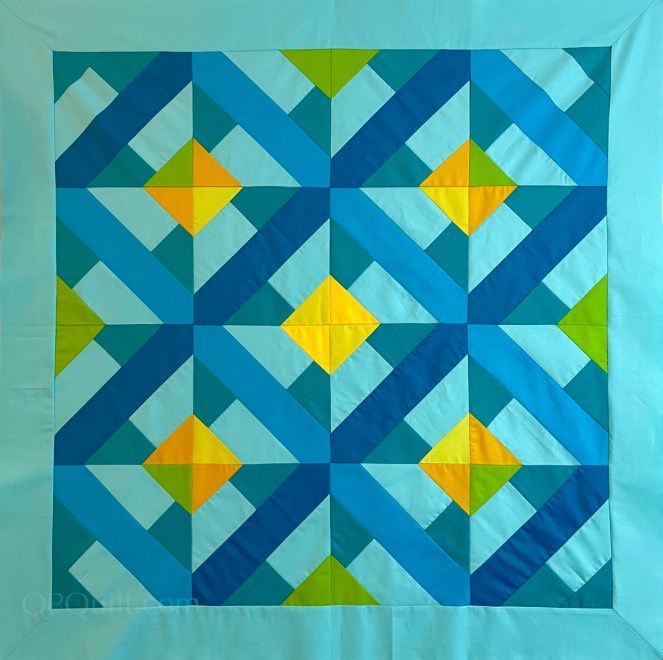
This is still one of my favorite versions of this pattern: SeaDepths. I have one more version to try, a deep blue and cheddar combo. Some of this is that I realize that every corner of my room holds the promise of a project/quilt-to-be. I’d been saving the scraps since last year and the bag kept kicking around the edges. GONE! I have been saving the deep blue/cheddar fabrics since 2019. They are washed, and stacked, ready to go next week. And yes, I threw away the scraps from the scraps, as there was so little left.
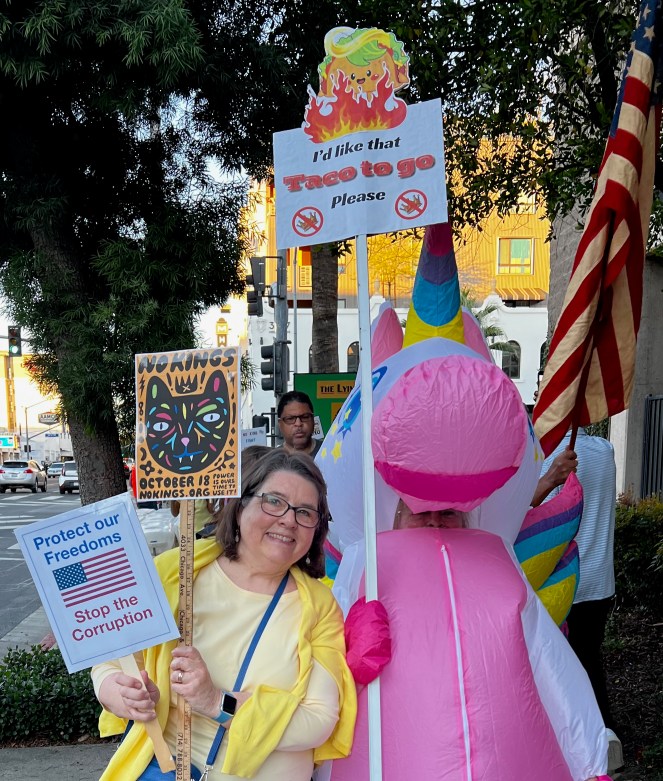
You know I wouldn’t want to miss America’s throwing itself a party. One of my signs was a cat print-out from Martha Rich’s art (used with permission), and the other sign was my husband’s (Protect Our Freedoms) with the wording he chose. We both wore yellow, as did others.
Bravo to all the unicorns who came out to walk and gather. Lots of flags, lots of good will and as I noted in my Instagram post, we detoured into the Korean chicken place mid-way. It was delicious. Then back to the march. Then home.
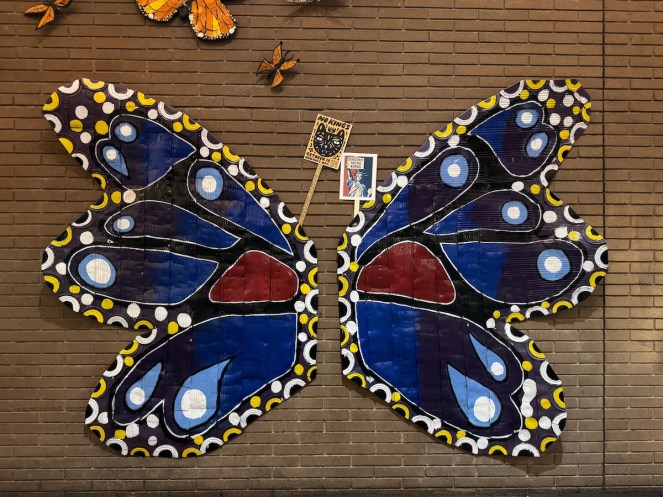
Our signs posed together in the Butterfly Alley, near the gathering.
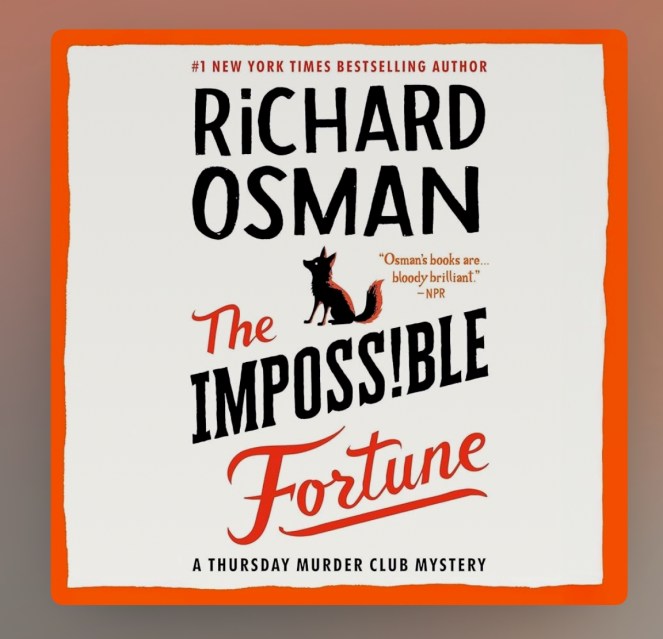
Started the latest Thursday Murder Club listen: The Impossible Fortune.
How does he come up with these plot lines? I am really loving this.
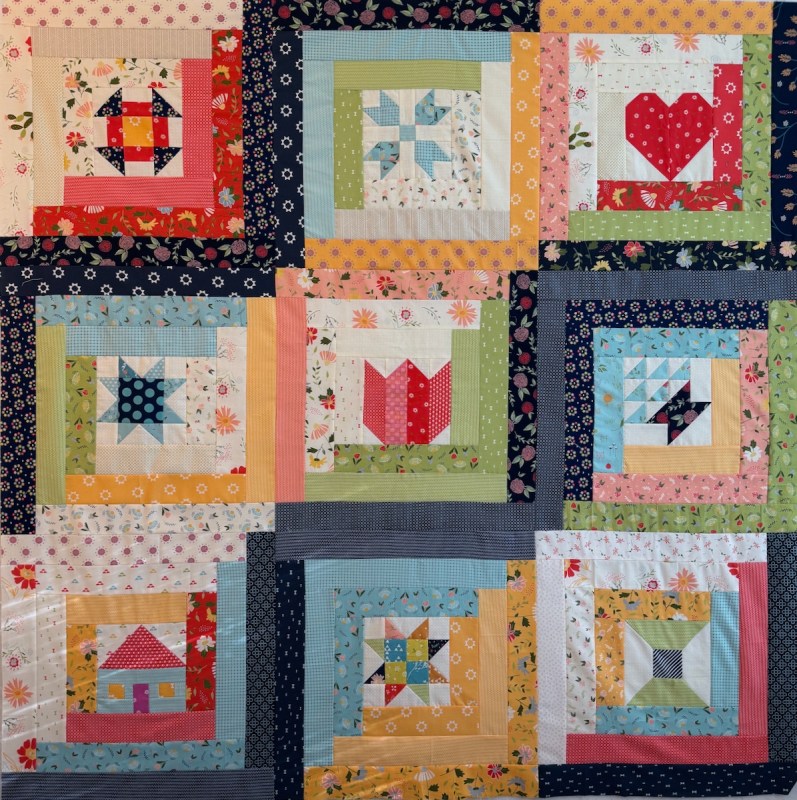
Even though there are technically three more blocks to this A Quilting Life 2025 Block of the Month Quilt, I’ve using Grant Snider’s advice #6 — getting rid of rules — and calling it done here. It’s been a fun project and hats off to Sherri for her creativity and for sharing these free blocks with us. Now to figure out a border, and get it quilted.
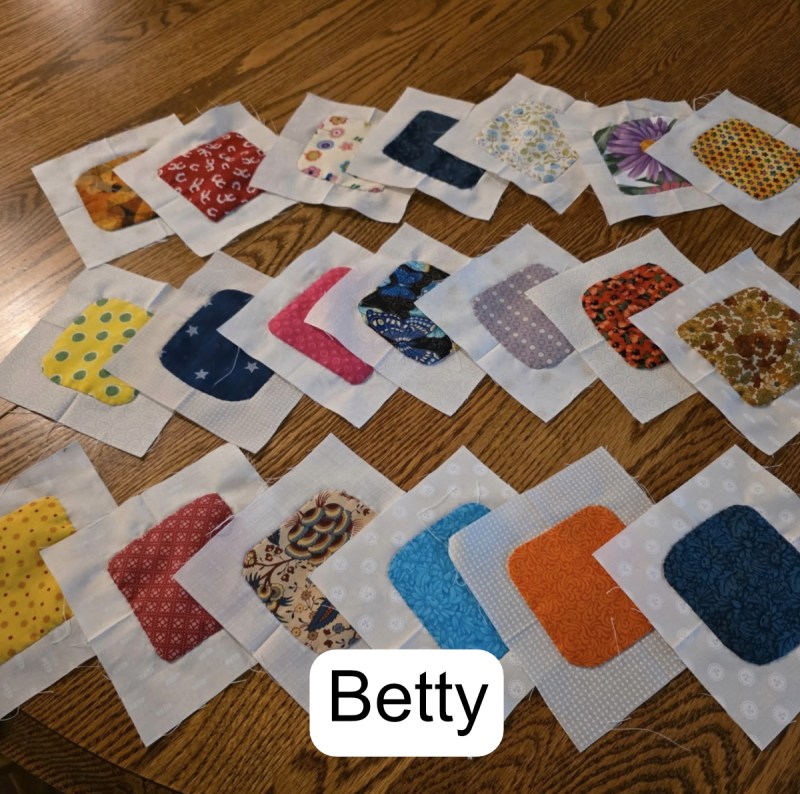
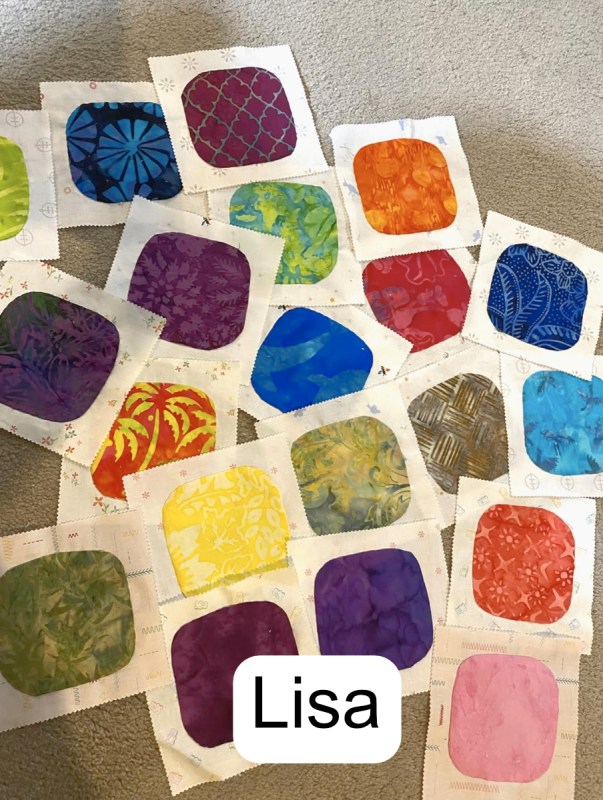
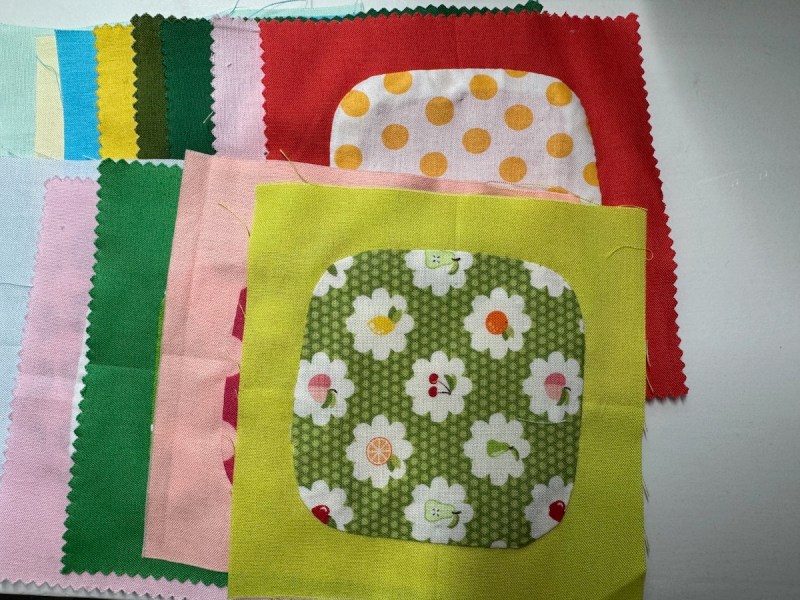
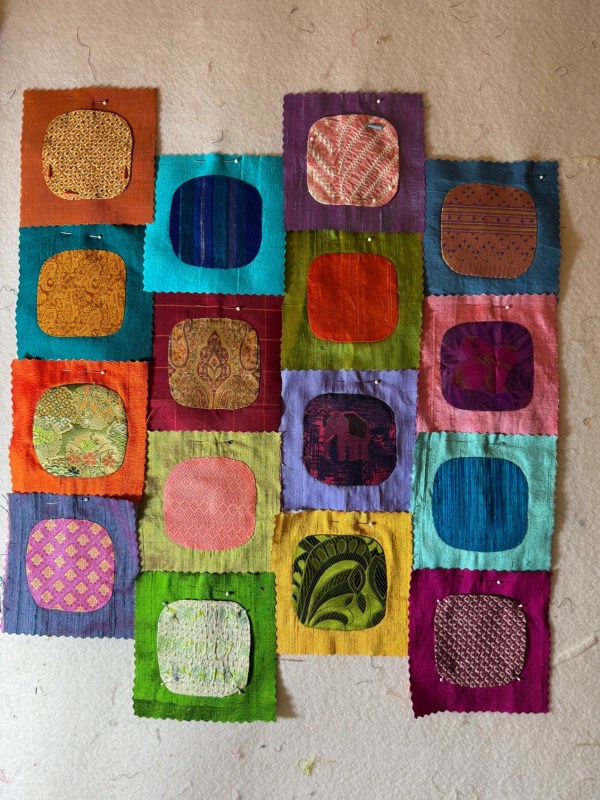
Finally, Squircles will finish this edition of This and That for October 2025. The hashtag we’re using — #backtosquircle — showed up with two more squircle makers: Lisa and Betty, both from the mountain west.
Mine are on the above left, and Gladi has some that are shown on the above right, out of beautiful brocades and silks.
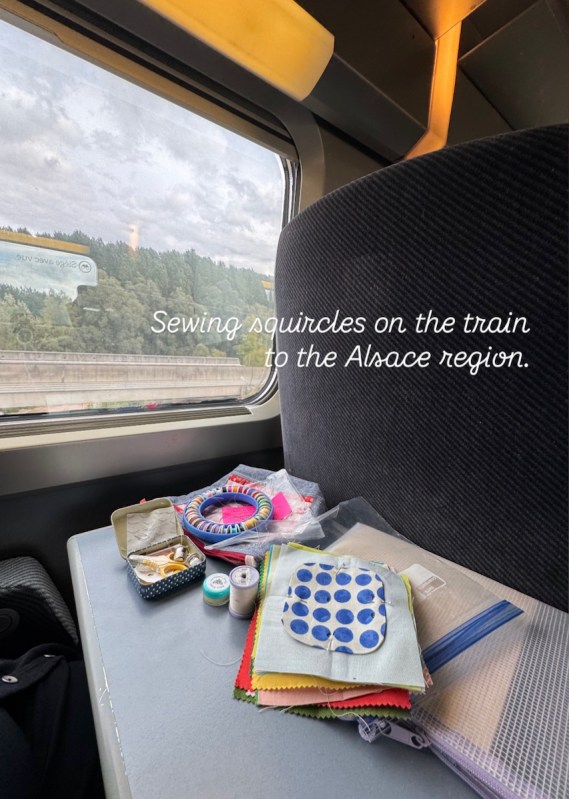
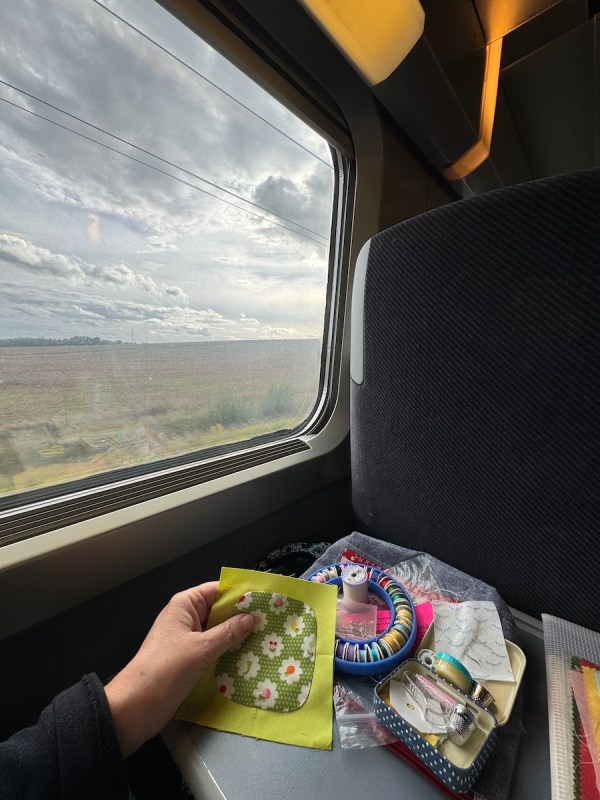
On the train to Strasbourg.
On the train to Colmar. I must admit that I looked out the windows a lot.
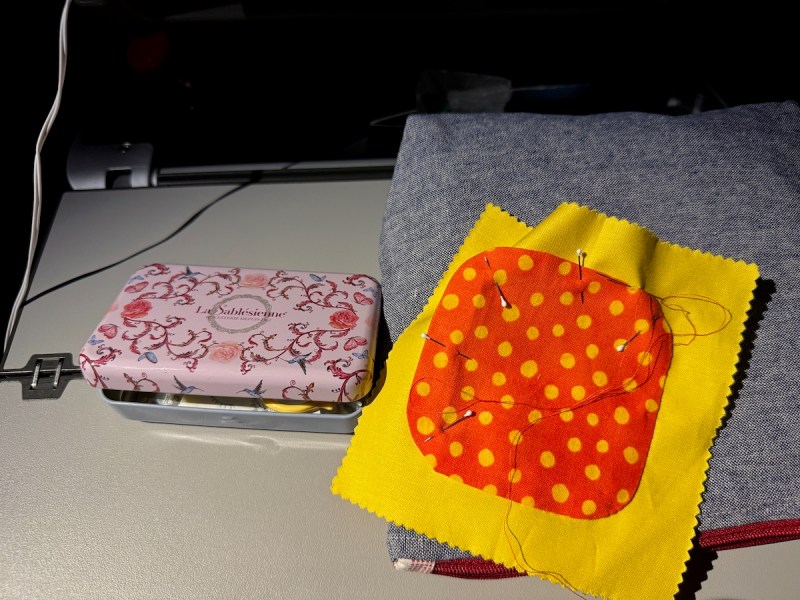
Now, with a new sewing box, courtesy of a run through Le Grande epicerie in Paris (where I purchased some cookies just.for.the.tin), this is me stitching in the airplane on the way home. In the dark (again). Why do we never put up our window screens anymore to see the miracle of flying through the air? Nevermind. #screensrule
I’m almost to 60 squircles finished, one-third of the way there. Keep stitching, keep stitching!
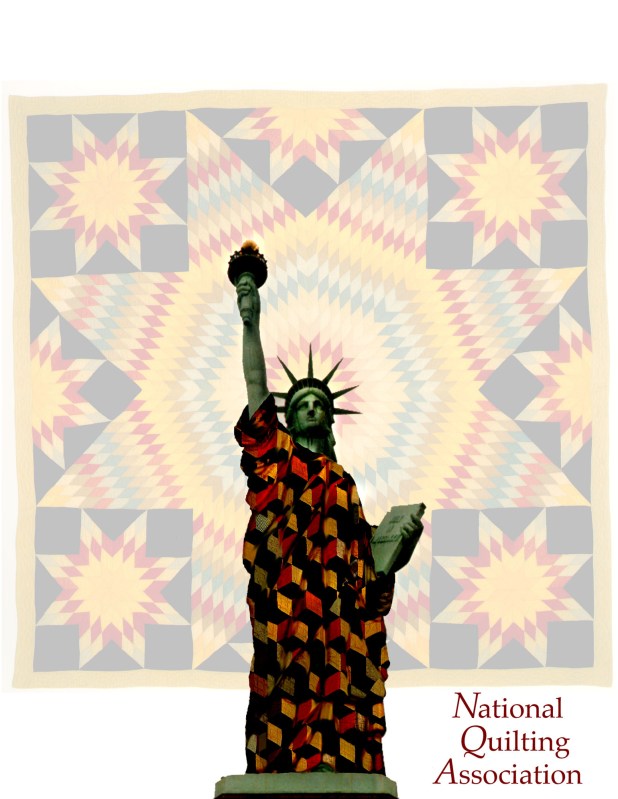
Backside of my husband’s sign. As I was working on this, and having just been in Colmar, the town in France where the creator of the Statue of Liberty lived, I realized I didn’t know what was written on the book she holds. So I looked it up: the date of our Declaration of Independence from the king of Britain. I thought it was a good motif for Saturday.
From an old homework assignment in my Digital Art class. (They were all amused that I would use a quilt.)
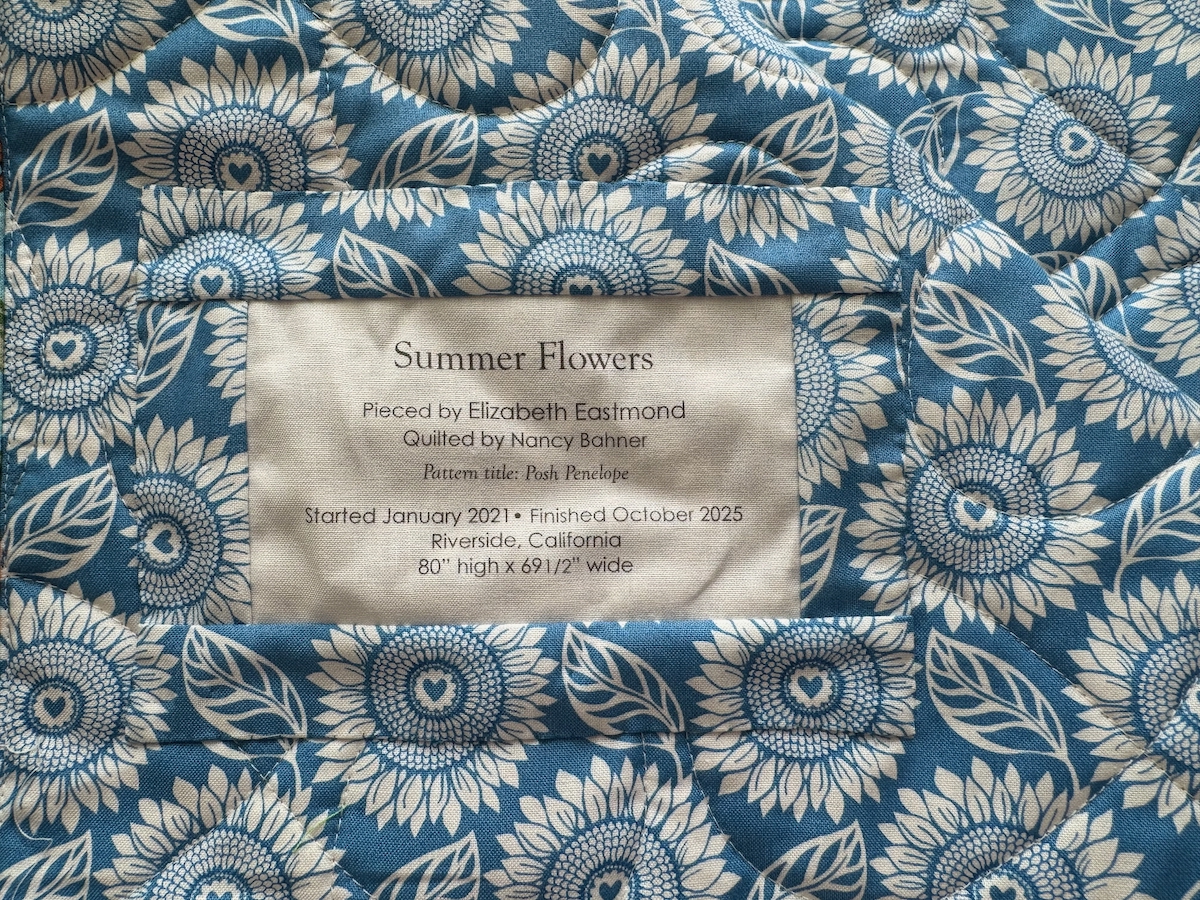
The title of this quilt pattern is Posh Penelope, and as one commenter said, “That is a name that needs to be changed.” So I did.
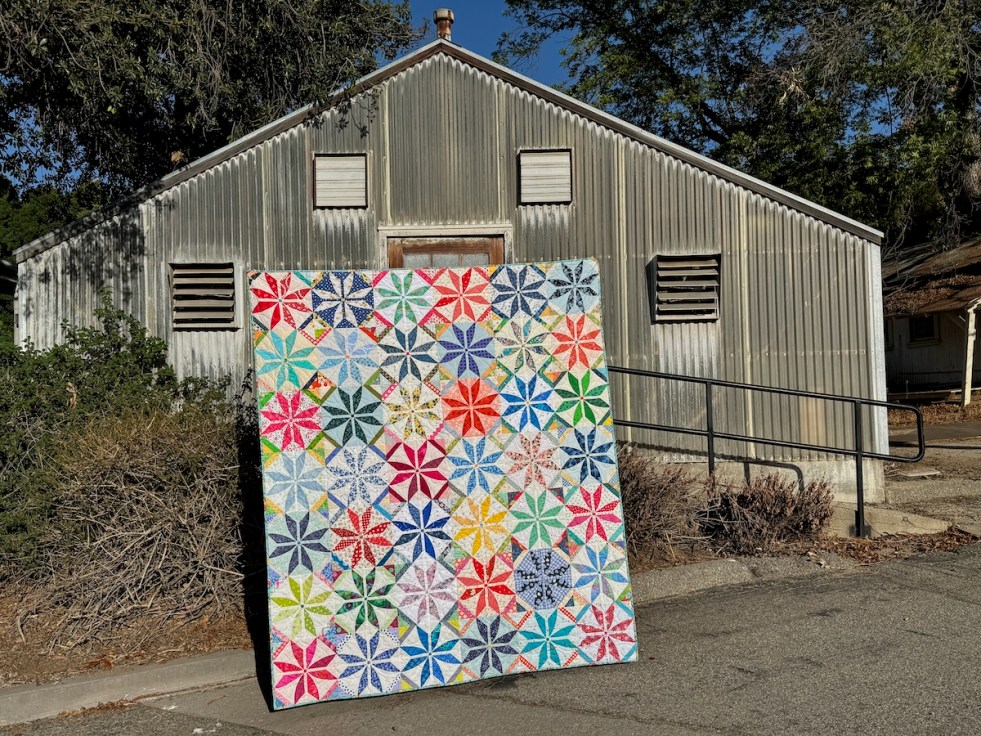
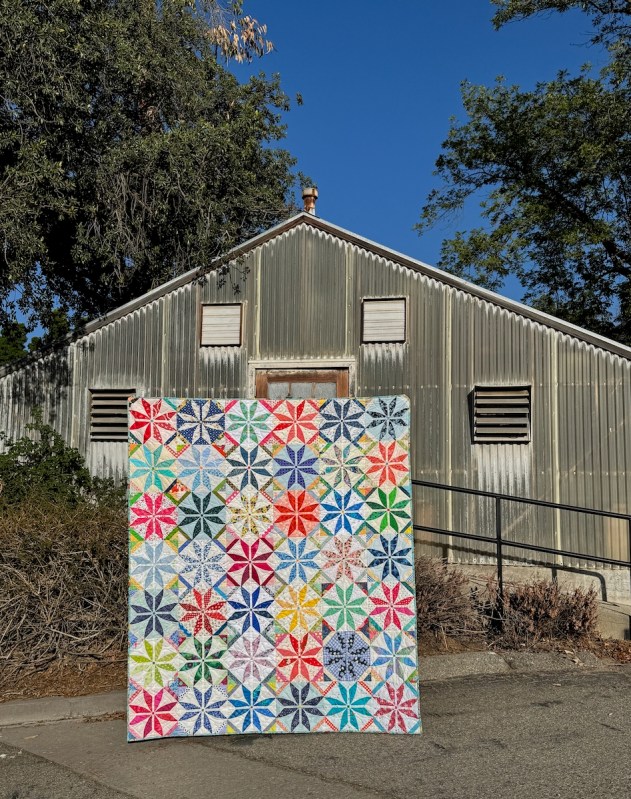
Summer Flowers is quilt #307 and measures 80″ tall by 69 1/2″ wide.
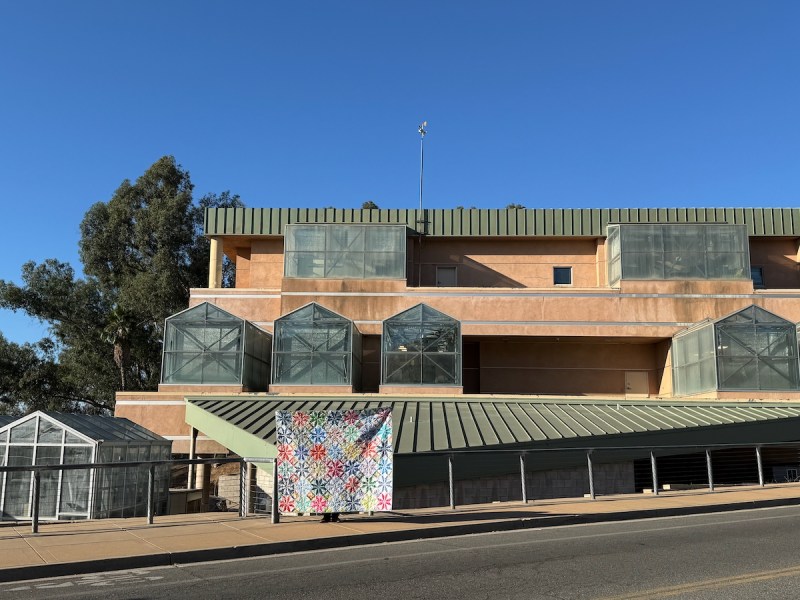
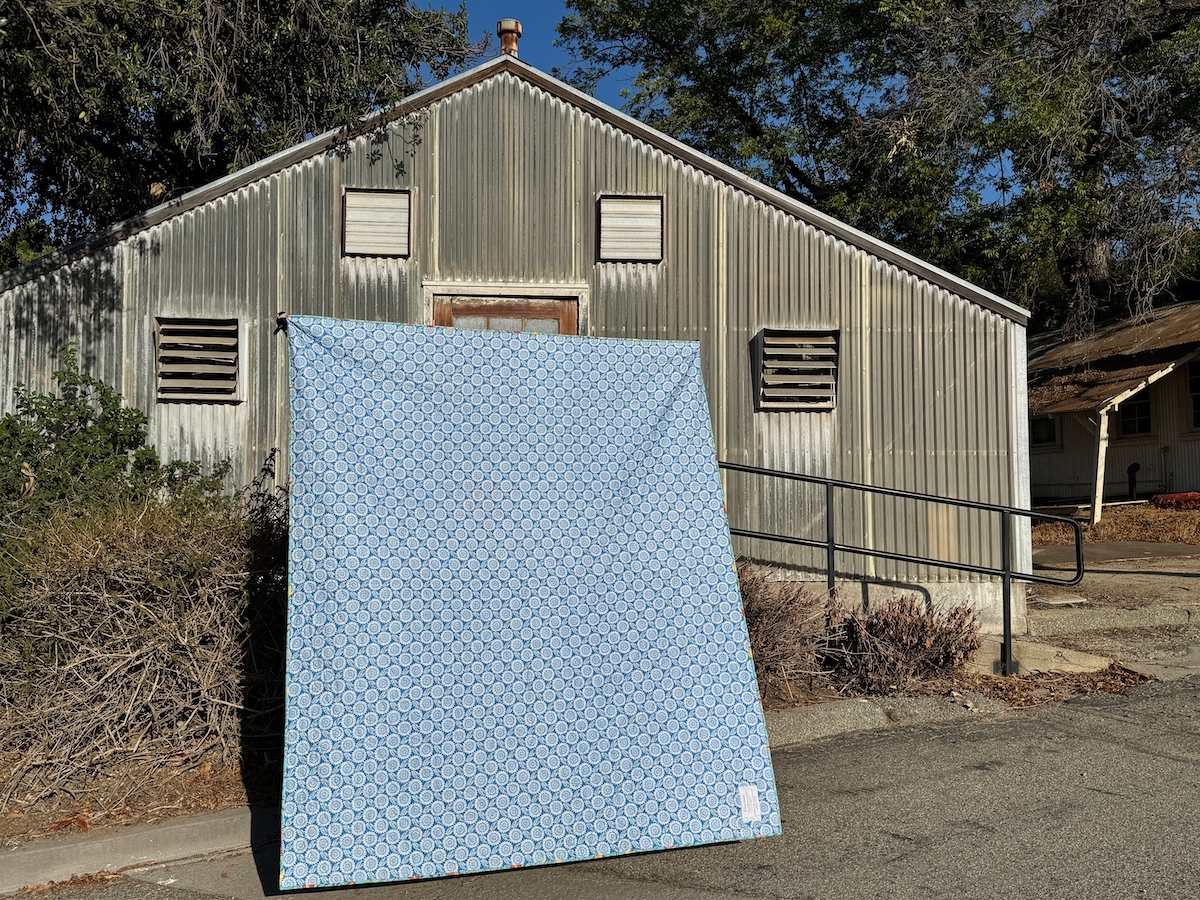
At first we tried this building for the photographs (click to enlarge). Love the building, but it’s not really working. And I had my QHH (Quilt Holding Husband) grab it by the side. Whoops! (This is how I knew the label was sewn on sideways.)
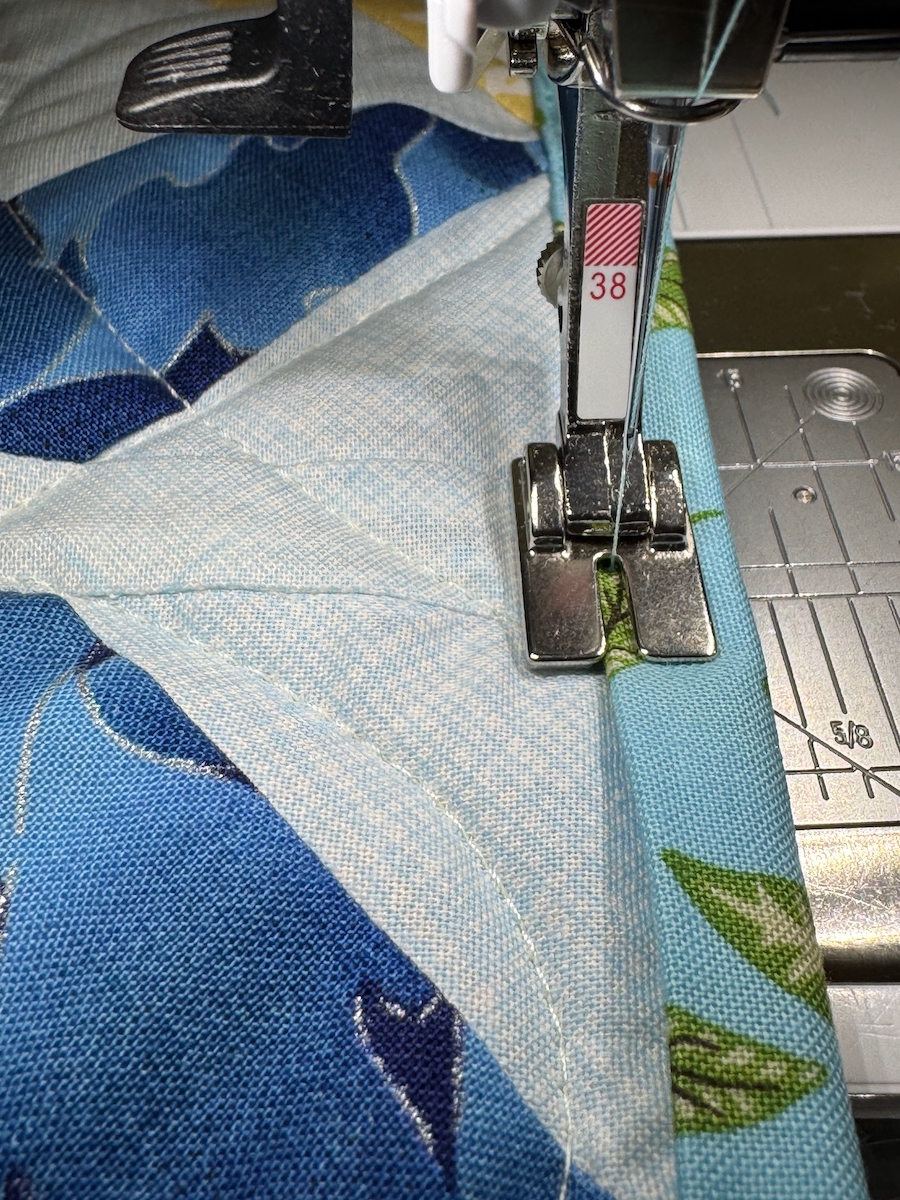
It only took me seven pieces of fabric to audition for the binding, and I sewed it on by machine. There are times when you just have to get it done.
We got the direction correct on this photo. Even though I sewed the label on the wrong way, I’m not changing it. So, this is finished!
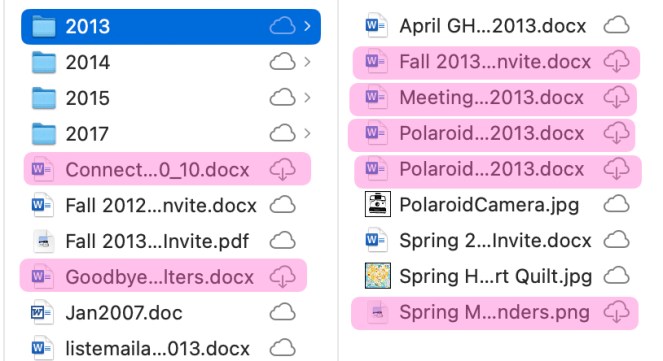
You are all aware, no doubt, of the corrupted digital files saga in my life (see the highlighted pink, above.) After multiple calls to Tech Support, I have resigned myself to the fact that all the files with little down-arrows are pretty much gone, and these date from last month to way back into my history of making little digital files.
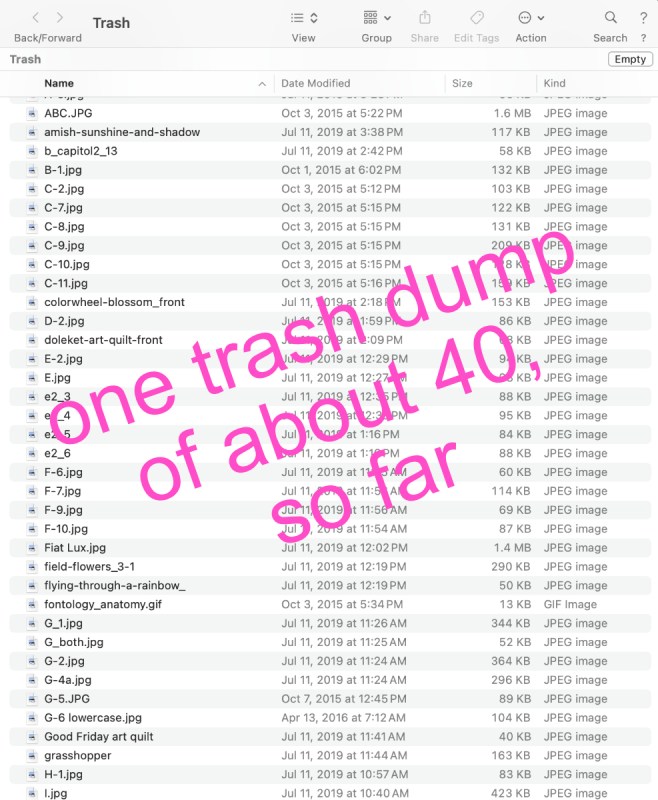
So when I’m on Low Energy (lately, that’s been a lot), I sit and go through them, dumping them one-by-one, then when the trash on my computer gets filled up, I dump them. Gone. Never to be seen again.
It looks like I’m fully in the Age of Subtraction, my Dad would say. For years I created and compiled and wrote. Now I’m dumping all that unceremoniously. I lost about half of my journal files. The ones I could recover, like when I had four teenagers in the house, were hard to read, frankly. They were filled with sturm und drang (aka “storm and stress”), and nobody wants to remember that time of life. Reading backwards into my life has triggered some realizations.
One: I chose well in deciding to be someone who makes things, if that can be a choice. I have donated dresses I made long ago, but they served their purpose and maybe someone, somewhere is walking around in them. My family now runs when they see me coming, but I have managed to give away quilts, too. That work lives on until it doesn’t, but at least I won’t have to be the one dumping them in the trash.
Two: I also chose well when I decided to chronicle my life in writing, which is a choice. You are perhaps used to my public-facing writing from reading this blog, but I have come to learn that personal writing is something done just for yourself. That in this kind of writing, we struggle on the page to capture an event, and to write it for our future selves, or for our families, if they don’t throw it all in the trash (just trying to be realistic here). And now that I’m way beyond the baby-toddler-children-teenager stage, I’m glad I have some writings to remind me of how busy a mother of one (or few) can be. I’m glad I have some written evidence of that to which I gave several decades of my life.
Three: Taking photos has surpassed the writing. Is it because we always have our phones on us? When I first started shooting photos of my life as a young mother, it would take three months to use up one roll of 24 shots of film. That was by design, as film was a cost, and developing was a cost, and I was always broke. Now we can capture 24 images on a walk around the park in the morning and compile thousands of photos in our digital drives. Interestingly, I didn’t lose any photographs in this Great Subtraction, as they were not part of the save-to-drive-that-may-have-been-corrupted-which-was-then-uploaded-to-the-cloud-which-was-probably-a-faulty-process-in-itself.
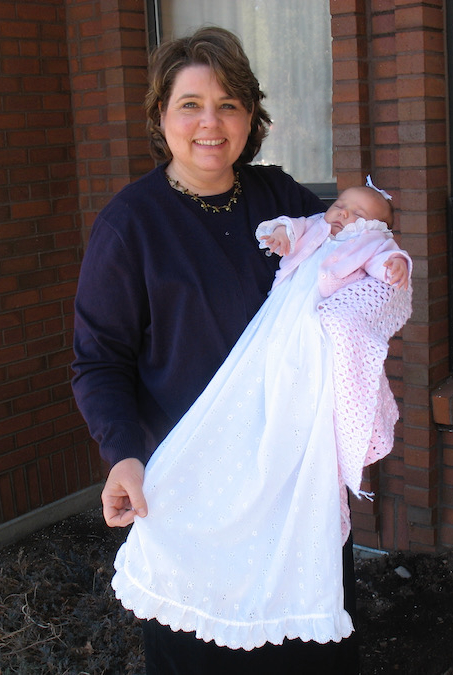
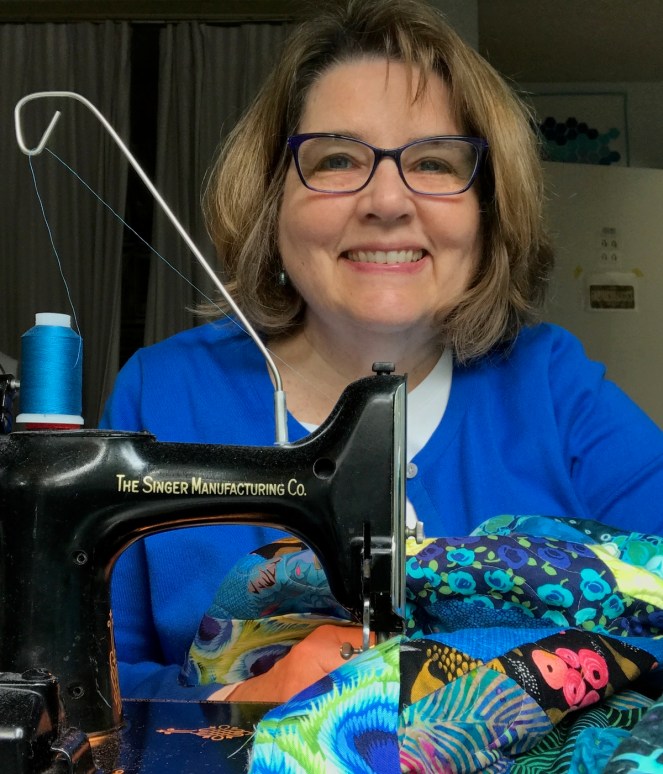
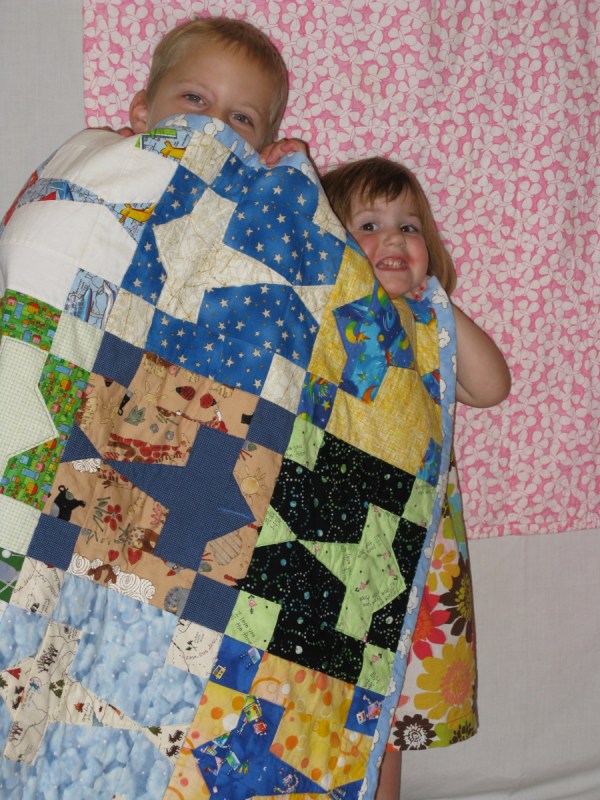
Two grandchildren with a quilt
Four, and last: Quilts last. Scrubbing the house doesn’t. Laundry doesn’t. Our digital lives won’t. Our real lives will someday end and fade away, but a grandchild or someone who is the recipient of our charitable work can wrap themself in a quilt and know that someone’s hands made this, a transfer of self via cloth and stitches.