300 Quilts · New York Beauties

New York Beauties • Block 12 • Hopeful

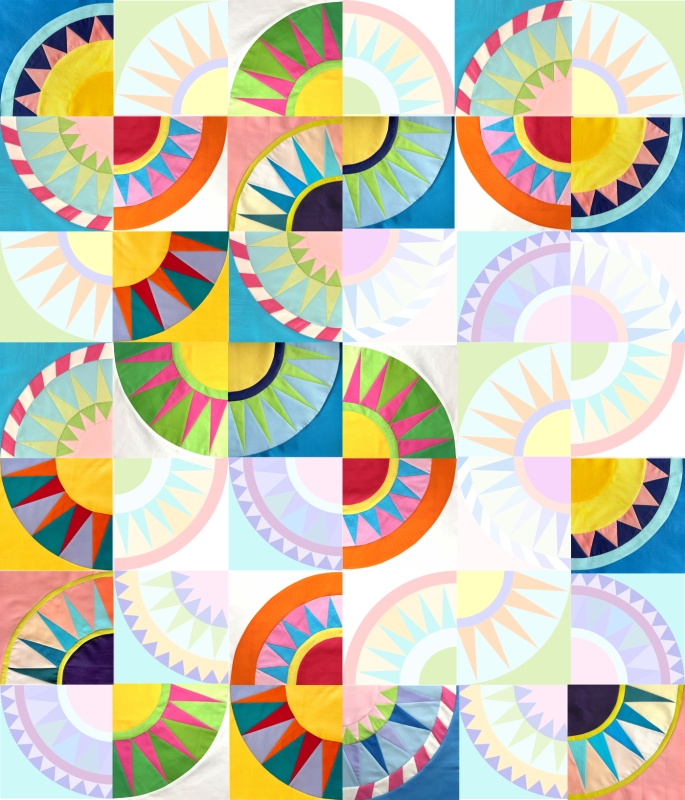
Are we there yet? millions of traveling children must have asked, as the miles piled up. And maybe you are asking if we are done yet with these New York Beauties blocks. Not yet, the happy mother from the seat said. Or maybe after traveling in the arid West with no air conditioning, she wasn’t quite so happy. My sister, Susan Rugh, wrote this book about the golden age of traveling across America — all of us in cars, but probably no seat belts. I love showing off her work (available here).

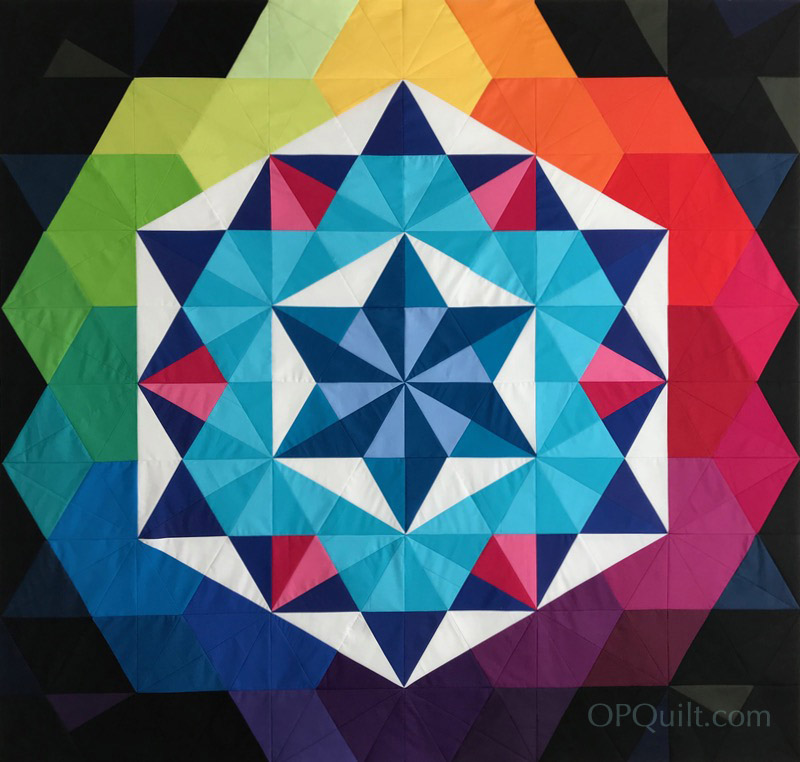
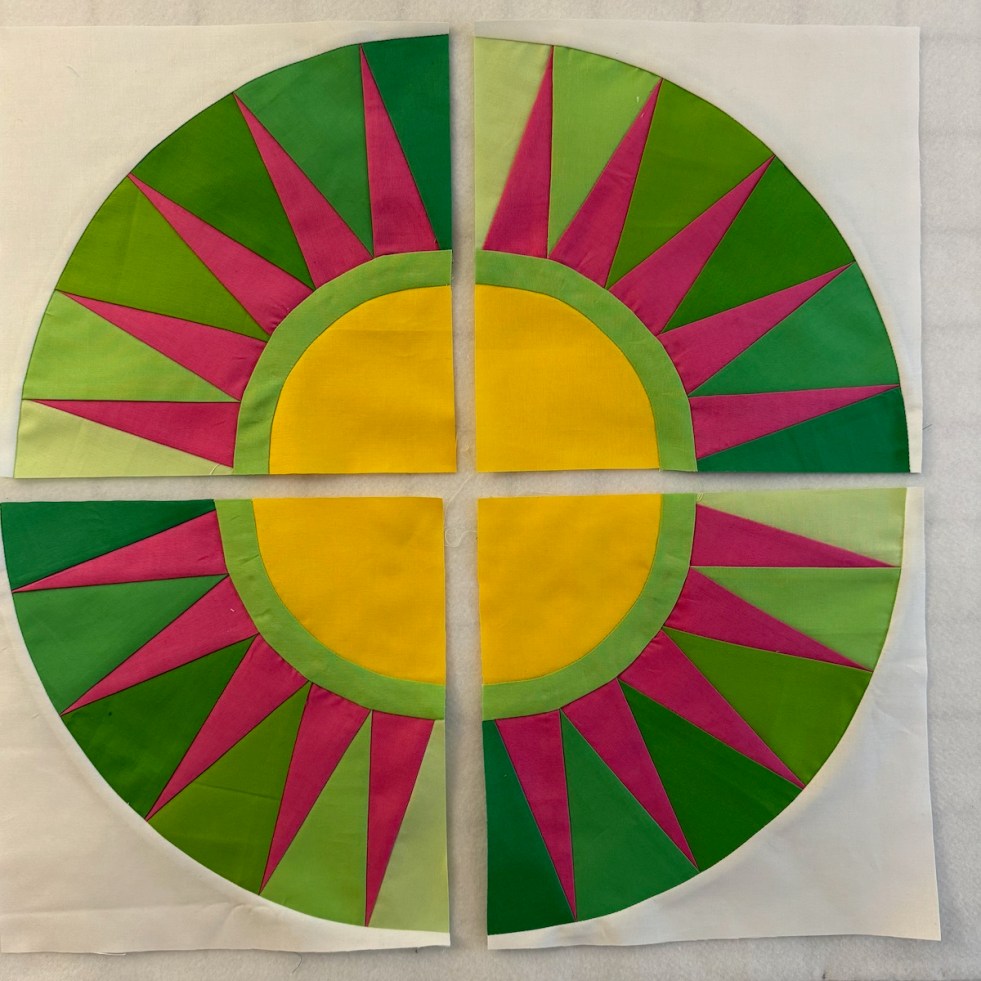
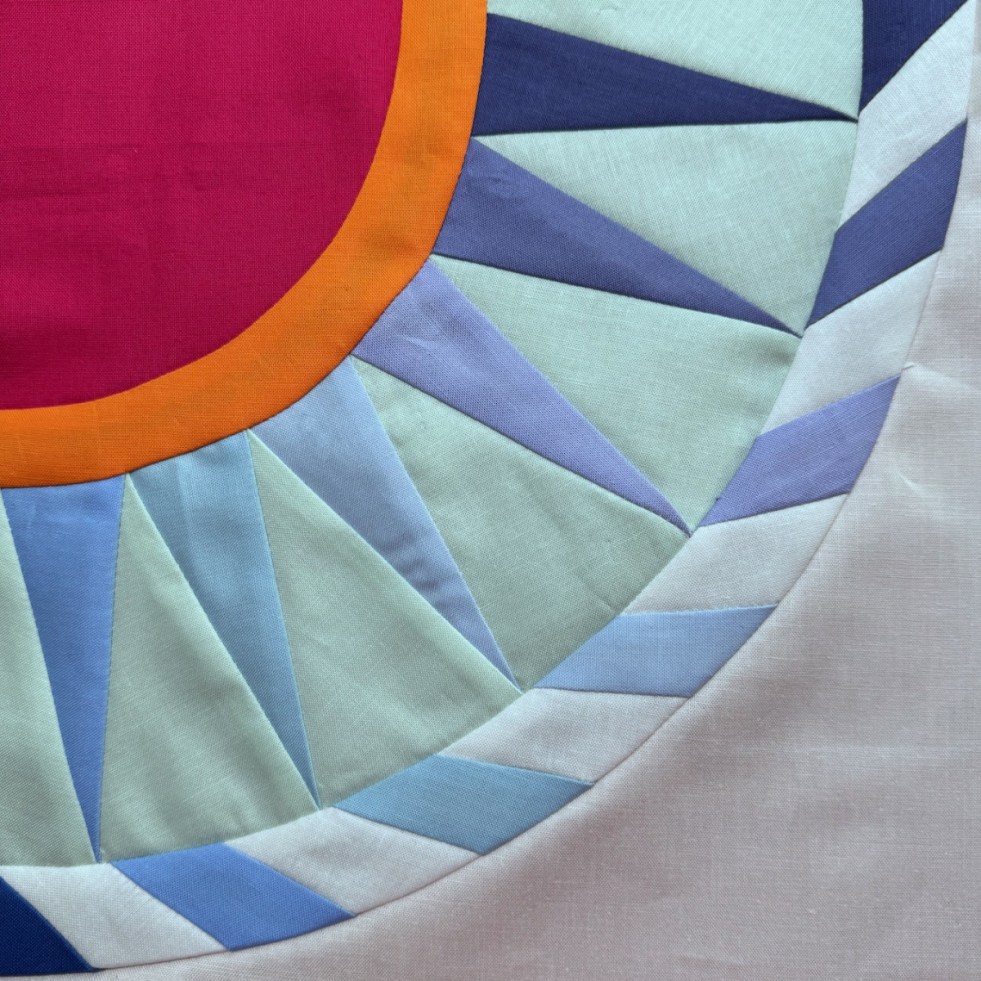
The schedule of our blocks is up on this page, and we are getting there. Really we are. But I chose to do a more intricate one this time around, which leaves mostly easier blocks at the end. Actually, Hopeful, is one of my more favorite blocks, as I like the twisting effect around one of the outer bands. And that red sun-like center is actually not quite so red, but most cameras struggle to photograph red colors, if you hadn’t noticed.

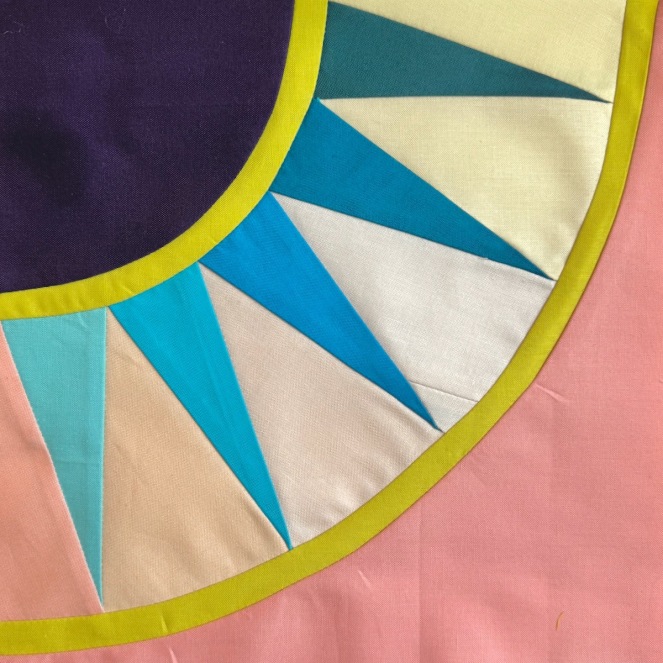
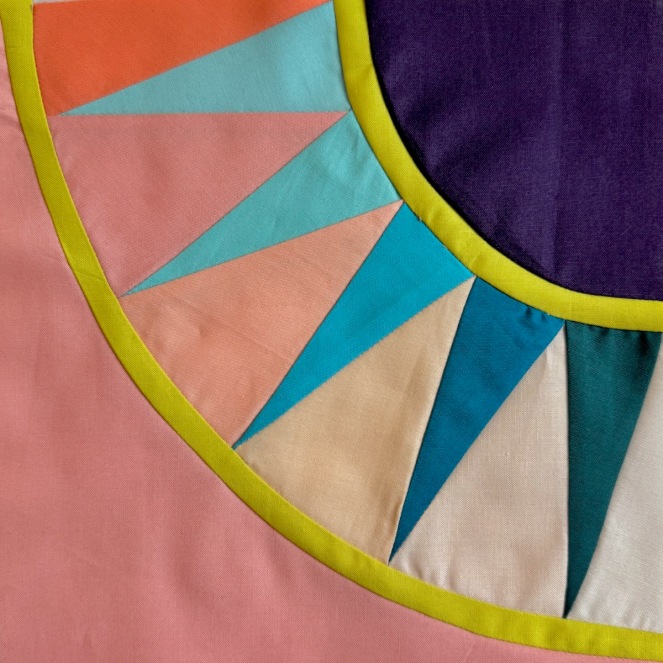
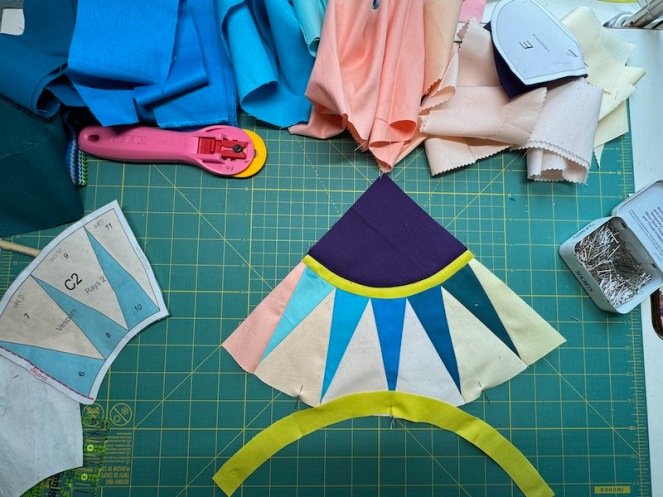
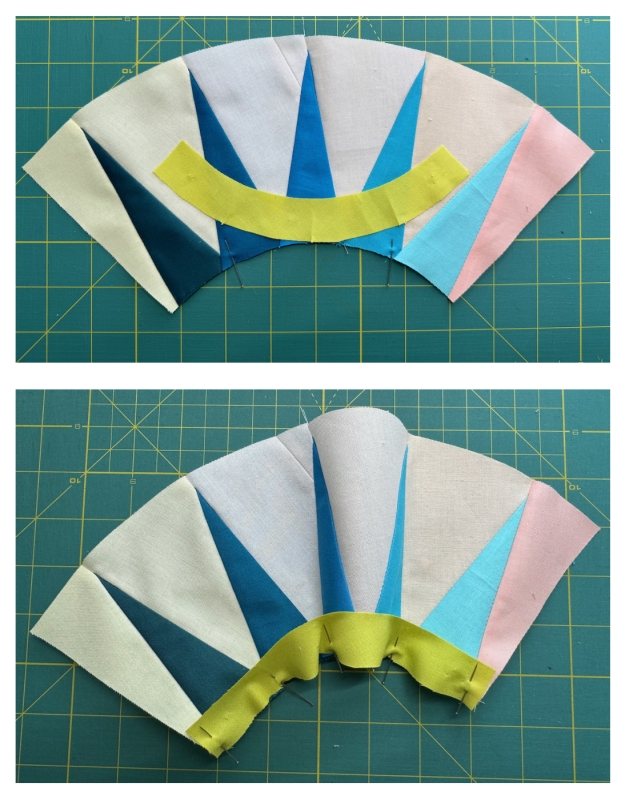
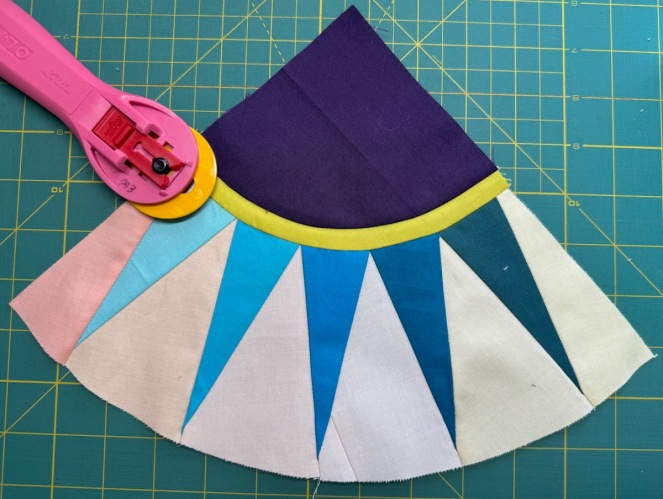
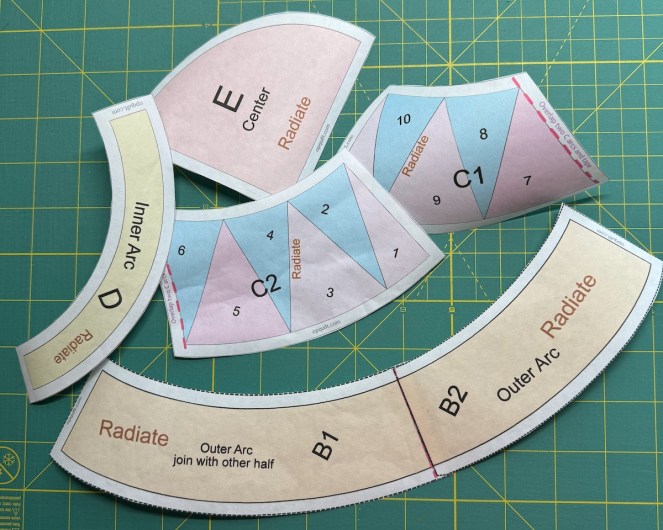
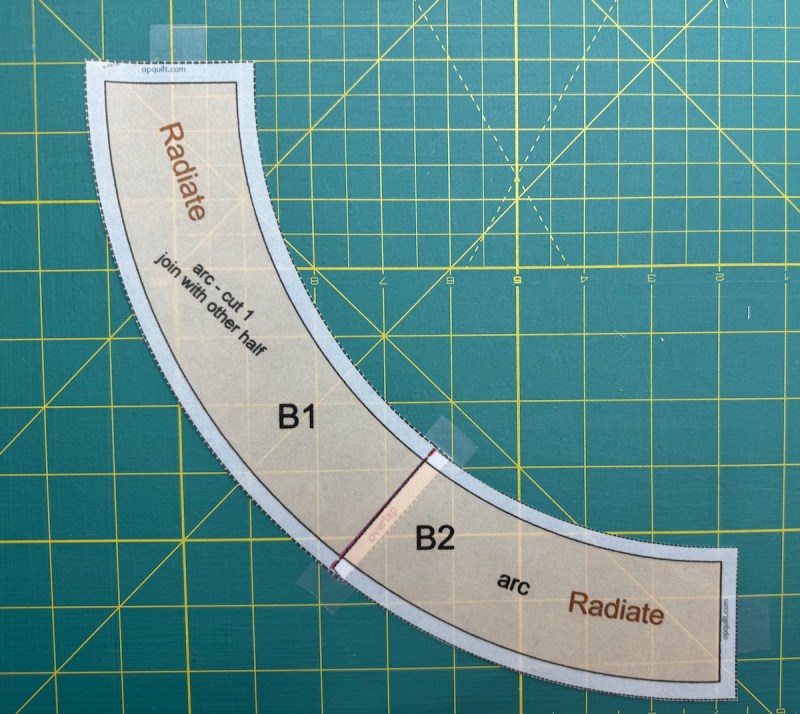
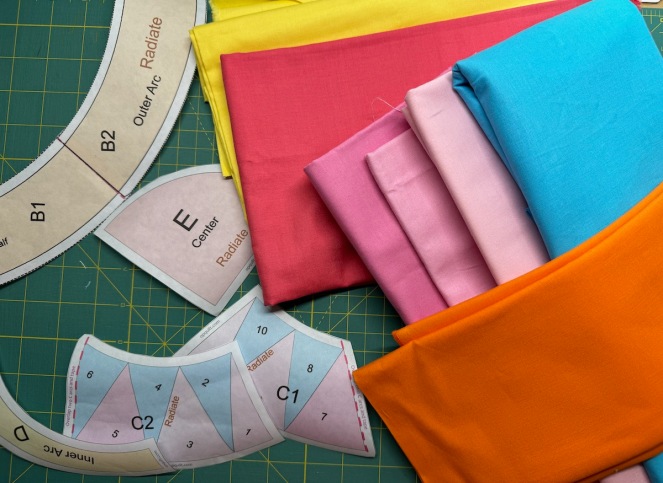
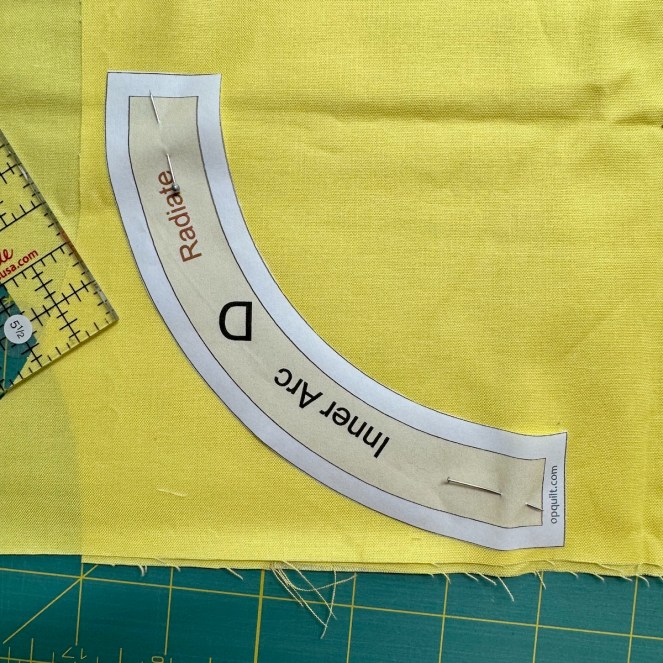
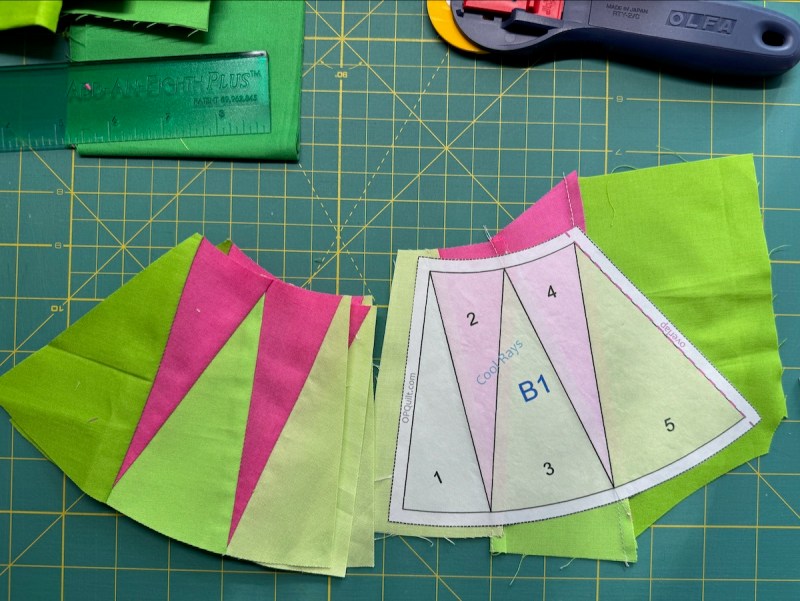
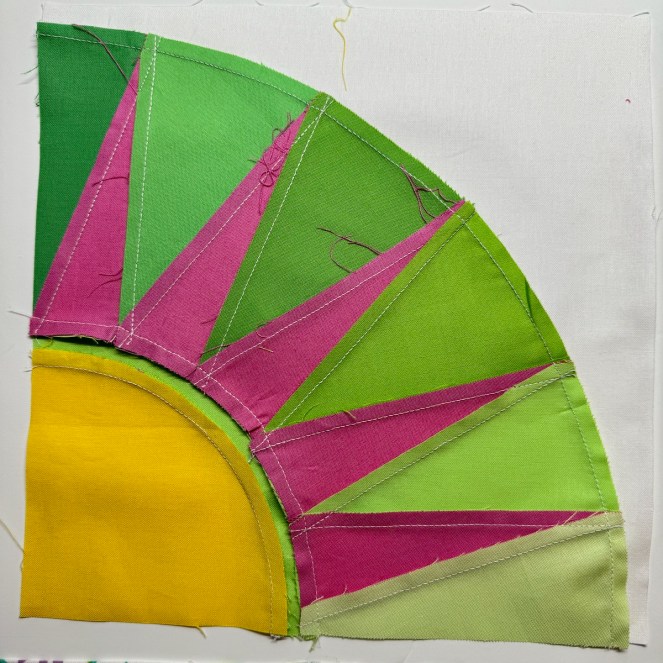
I like to start with building the semi-circles of rays. This post will give you tips and tricks for making this this block (pattern available here). Cut out around the outer black dashed lines, and then figure out your colors. You can see my penciled-in numbers on the rays (C1 and C2 have a soft green background; B1 and B2 have a white background, so no numbering there).

This girl watches over all my Foundation Paper Piecing. I learned in a class from Verushka Zarate (she is coming to Road 2025!) and I made this girl in that class. Underneath her you can see I’ve clipped swatches and numbered them, from 1 to 7, and then I went a little further and cut ray shapes (I only need three of each) and pinned them below. You can pin a length of fabric underneath, if you don’t want to cut a shape of fabric.

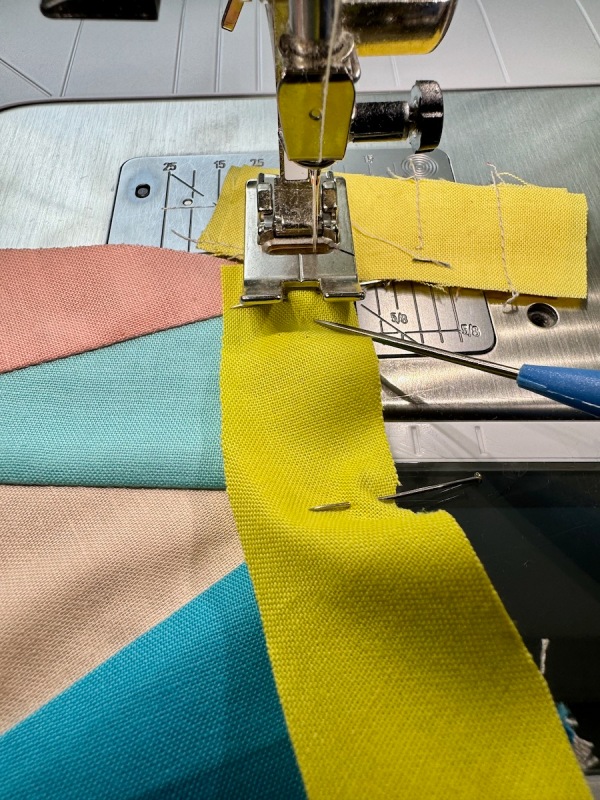
Take time to fold them both on the line, and then reverse direction on the line (hope that makes sense).

I iron down the first bit, then lay the second fabric underneath, making sure to keep the fold like this for a second. I’m checking to make sure that Section 8 will fit on the underneath white fabric. It will.

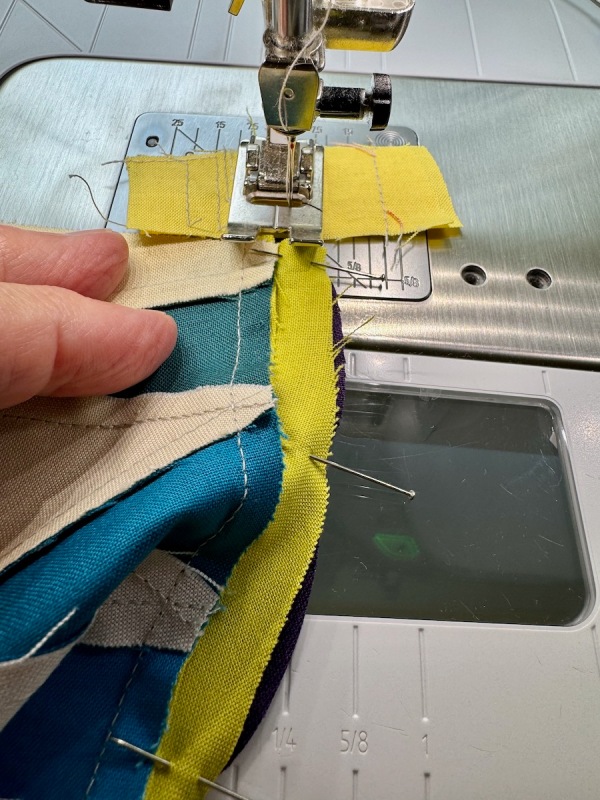
I sewed that, trimmed it, pressed it, and now moving on to Section 9, again making sure that the blue behind is as large as the next section.

Reminder: stitch along the folded edge of the freezer paper.

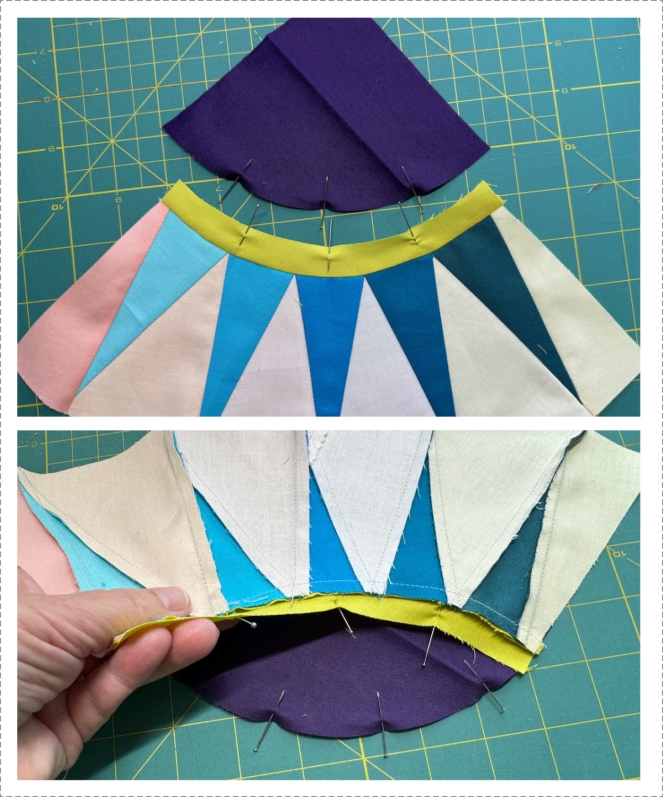
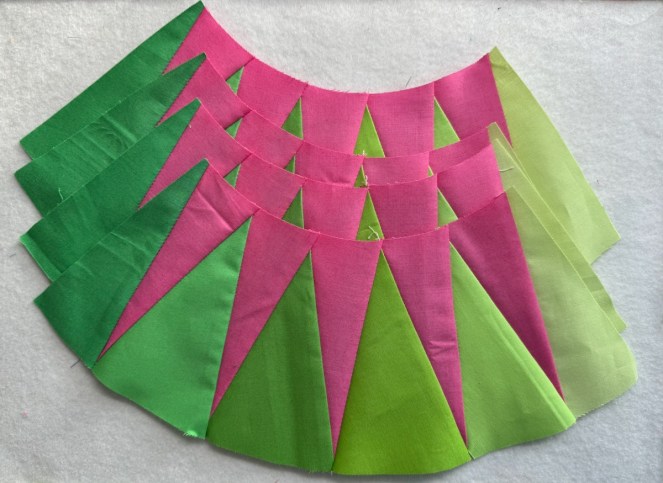
Here I’m doing the larger rays, and the same process is the same: fold back the freezer paper so you can see the needed shape. I went ahead cut some ray shapes the needed size before I started, but I most often will just put a hunk of fabric back there.

I usually sew a couple of these sections at a time.

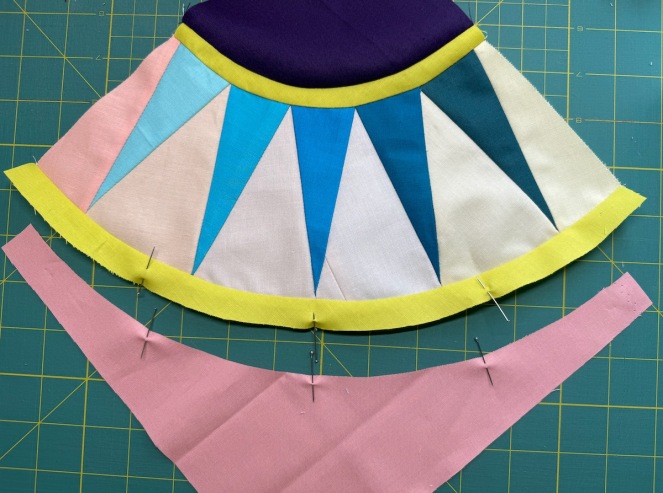
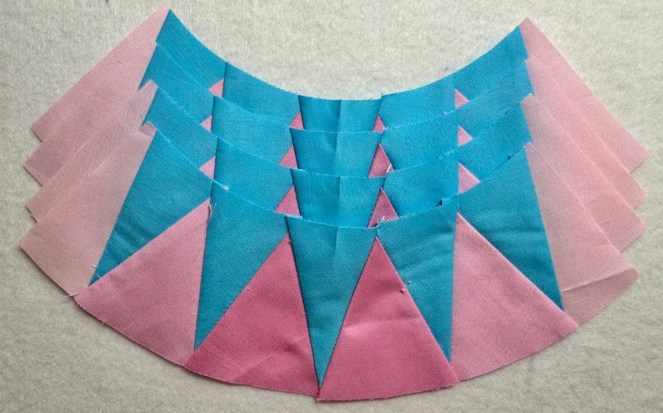
With all the sections sewn (1) they look kind of globby, but trimming them up (2) makes them look neat. I’m prepping in image 3 to join them together, carefully and s l o w l y pulling back the freezer paper. If you rip it off quickly, you are liable to pop your seams. Pin the units together (4) and you are rolling.

Yeah. Whoops.

I used the wrong color. Those who read this blog know that I would probably just leave it, as in the final quilt, it won’t be noticed. But leaving it now…on the first block…while you all are watching? No.

I picked the section apart and cut an exact replica in the correct fabric, weird angles and all.

Better.

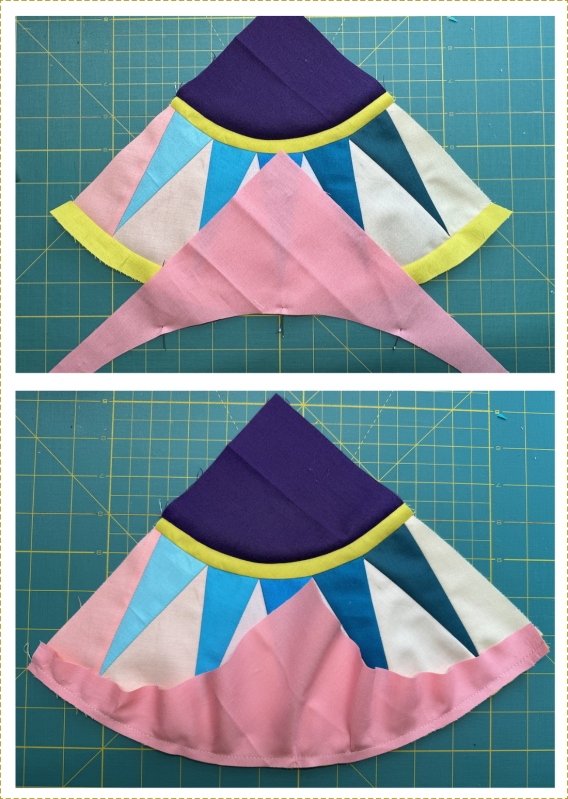
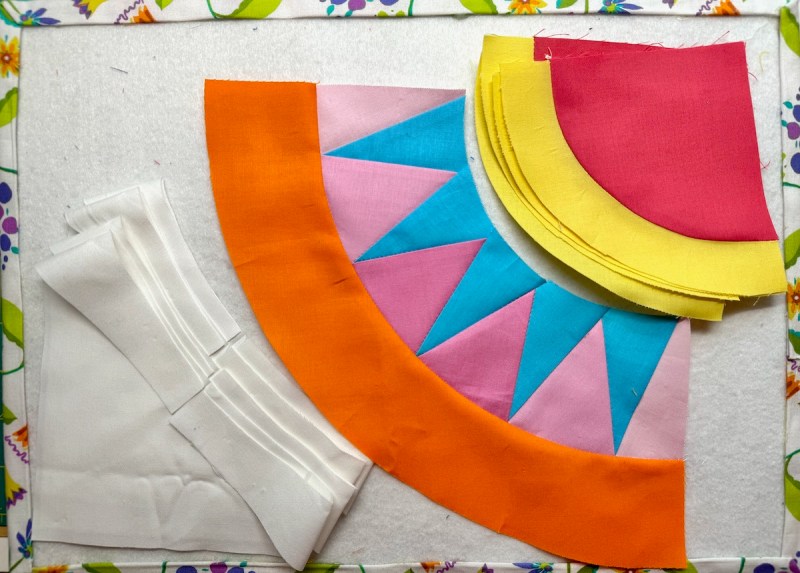
And with that, block 12, Hopeful, is completed. Please make three.

There are many more tricks for freezer paper sewing on the other blog posts about these blocks. You can find them listed in order on my New York Beauties page, above. Apparently I’m supposed to make two of these blocks in June; I guess I got in a rush. One more is coming and it’s Block 5: Blooming.

And yes, you are allowed to second-guess yourself on your colors, but you are not encouraged to get stuck. I’d probably make that center sun part a little pinker, than redder, but as you can see in the image below…it’s really just fine.

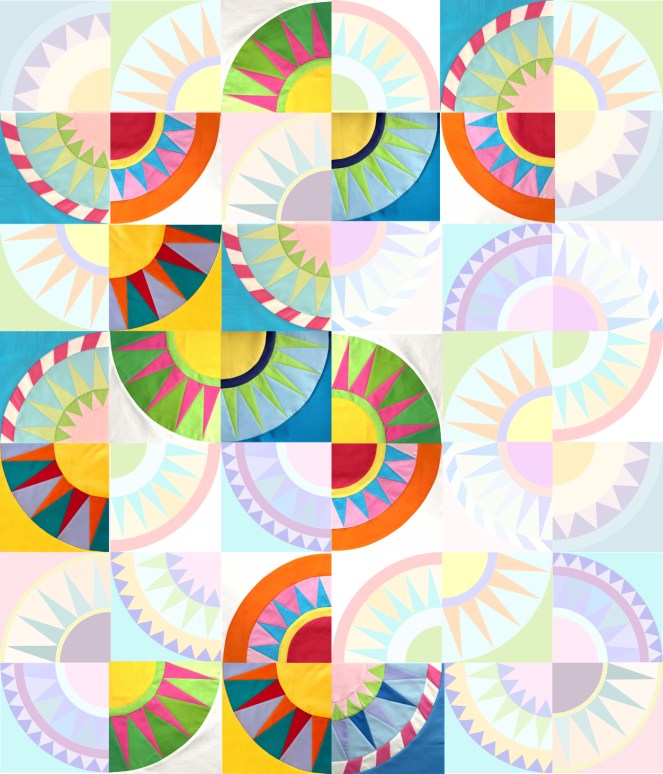
Eight blocks finished.
Four to go.
And one bonus, if you want to make one.

New York Beauties
New York Beauties · Something to Think About

Vespers, NYBeauties Block 10

Is it a hard-to-make block? Not at all.

But it kinda broke my brain a little.

This picture illustrates my vexation. On the left, and using the color swatches in the top row, is Version 1 of this block. Not happy with how the ombre effect worked out, I tried Version 2 of this block (on the right), using the color swatches in the bottom row. So, first, color broke my brain.

Color

I’d envisioned this block to be a representation of that time in the evening when everything is settling down, with glowing shades of pink and yellow and deeply colored purple. On the left in the background of the rays, you can see that range of hues goes just so far. Then there is a huge color jump from the light pinks to that dark coral at the far left. Likewise in Version 2 on the right, there is a progression from soft yellows to corals and pinks, then another color jump at the end. I faced that sort of thing ages ago when I made Annularity. I ended up making two of these quilts:

Do you spot the anomaly in color? It’s at the very bottom, the warm-lavender diamond just to the left of center. That quilt went to Paintbrush Studio, because it was made from their first drop of their solids line. In the version on the right, made for myself, I pulled the exact blue-lavender color from another solids line that I needed to make the transition flow smoothly.

This is because we live in a world with limitations. And fabric colors, especially in solids, are one of those things. The fabric line, my favorite — Painter’s Palette by Paintbrush Studios — has since fixed that awkward color jump and they now have a perfect blue-lavender.

But now there’s a jump in the pinky coral tones. But I’m really giving this fabric line a workout: I’m creating color in my Affinity Designer program, using sliders and sampling colors from photos to get the exact color that I want in my designs. But the fabric manufacturers are working with cloth, dye, finishes, and budgets and no, they can’t make every color. (This is why I believe some people dye their own fabrics — just to get that precise color they want. But I decided long ago not to go down that road.) If this really bugs me, I may just buy it from another line, but I will be sure to prewash it twice to try and mimic what I have (both for colorfastness — the PPSolids are incredibly colorfast) and to shrink up the weave a little (PPSolids have a tight weave with a nice hand, or feel, to the cloth). Who am I kidding? I’ll just use what I’ve got.

Technique

And the other reason I was struggling is technique, or “how I sewed it.” In that Version 1, above, if you use your critical eye you can see that the narrow green band seems more “lumpy” that the one on the right. When I was majoring in Clothing and Textiles at Brigham Young University (a major no longer offered), we had to make a wool suit. Our teacher had worked in the industry and precision was her specialty. I resewed the lower front corner of my jacket with its sloping curve from center front to hem probably four times, but in the end she still gave me a B. She wrote on my grading sheet that she knew I worked hard on it, but it still wasn’t as smooth as needed.

It wasn’t necessarily my skillset that wasn’t up to succeeding, it was my technique. I needed to slow down. We all are familiar with this feeling when we finish the center of a quilt and then its borders. Borders? And we throw on just something, and then it’s quilting, and then it’s the binding, which apparently many people don’t like. They just want to Be Done.

So I slowed way down in my sewing of the narrow bands on the Version 2 block. Pressing carefully, using a different order of construction, improving my technique as I went.

This is not a hard block. So choose your colors carefully, use your best techniques in sewing, and it will go well. That’s all I wanted to say on this, but I do include my tips and tricks for the block and sewing it together below.

This is what my cutting table usually looks like, however I crop out the mess when I post photos, to keep the distraction level down. There’s a free pattern for Block One in my PayHip shop, where you can also pick up the patterns for all the blocks. Don’t forget to look at the other posts about this quilt, all found on the Master New York Beauties page.

Thanks for reading, and good luck with your colors and technique, in whatever you are stitching–

Tips and Tricks for Block 10: Vespers

Many other of the New York Beauties posts give you specific instructions on how to make that ray section; feel free to look at them for more help. We now pick it up after the parts are ready to be assembled. Please read all the way through before beginning.

Arrange the pieces so you’ll pin the INSIDE curve of the rays to the OUTSIDE edge of the narrow curved band. The Cereus block (9) discusses this. Divide the ray section and the small upper band into four sections, marking with pins, or finger pressing. Pin.

Sew a scrap, and at the edge, line up the two pieces to sew. I use a clay tool (the handle is nice and big) but you can also use a stiletto. Keeping the right-hand edges aligned, S L O W L Y stitch 1/4-inch away from the edge, easing in the fullness as you go. Remove pins as you go. To be truthful, It’s easier to put the concave on the bottom (the curving-out piece), but I think I flipped it for this photograph. The post on Cereus shows what I mean.

Press the band away from the rays.

Now we’ll attach the corner quarter-circle. Again, divide the edge into fourths. And made sure you are sewing the INSIDE edge of the narrow curved band to the outside curved edge of the quarter-circle.

All pinned up. The purple (convex side) will be placed next to the feed dogs:

Again, I use a scrap to get started. I nudge those two edges on the right together with my clay tool and sew in a quarter-inch seam, slowly.

I like dimension in my blocks, so that seam is pressed under the quarter-circle. (I’m sure you’ve noticed the pieced wedge in the center. My order from Keepsake Quilting hadn’t arrived when I was making this sample.)

Readying the next joining: outer narrow band to the lower edge of the rays.

Preparing the last seam: narrow band to outside corner. All those curved edges have bias, with the grain on the outer edges because I cut them like this:

All finished. In every step I took my time, keeping a good technique and not rushing.

Trimming is keeping several balls in the air at once, juggling them all.

  • First thing to check: your center. Make sure that diagonal line is as close to center of that center ray as you can get.
  • Next, go for the bright green arrows, seeing if you can get the outer edge of that band as close to 9 1/4″ as you can. On both sides.
  • Last, and only if you can, the bright blue arrows are asking you to see if the inner narrow band measurements are the same. Or similar.

Then trim off the excess. I designed the pattern so you would have some “play” on that outer edge.

Okay, that’s all for this block. Make 3. Will I use both blocks? Probably. In our lively quilt, I don’t think anyone will object:

I put them both up in our progress chart, and they are fine. This is all to say that if you make one and want to make a shift in colors of the same block, it will be fine. There’s another double-colored block up there now!

New York Beauties · Patterns by Elizabeth of OPQuilt

Radiate • New York Beauties Block 3

Radiate: “emit (energy, especially light or heat) in the form of rays or waves” (from the Oxford Dictionary) — OR — “(of a feeling or quality) emanate clearly from, as in “leadership and confidence radiate from her” — OR — “(of an animal or plant group) evolve into a variety of forms adapted to new situations or ways of life” (apparently so rare of a definition, I can’t find any examples). And with the movie Oppenheimer earning an Oscar award for Best Picture, I suppose we can also think about radioactivity radiating out from the fusion bomb, set off in New Mexico years ago. But I really think of the sun on a hot summery day, warming you as the cool ocean breezes surround you on a beach. Pick your beach.

Cut out, ready to go. But first! a tip on getting the alignment on that B1/B2 piece:

Left Photo: Using a gridded cutting mat, tape the tip of the B1 piece, using a line on the mat to keep it horizontally straight. Then sort of lining up the center “seam,” align the B2 piece as well with a line on your mat, keeping that edge vertical. Tape.
Right Photo: Trying not to shift the pieces, tape the center seam, extending the tape. Carefully remove from the cutting board and fold the center-seam tape to the back. Cut off, remove, or fold back the edge pieces of tape (Big Decisions).

I lay out my colors and then get going. For this set of rays, I again wanted a gradation of color, but chose to do two stronger rays in the middle background, fading to the sides. You’ll see.

For pieces like this Inner Arc, I don’t iron it down, but instead treat it like a paper pattern piece. Again, your choice. Do try to align the outer edges on either grain (crosswise or straight-of-grain), letting the curve be on the bias. Having that bias makes for easier seaming when you sew the parts together.

First two sections of rays sewn up.

Trimmed, and papers removed. I find it easier to not pop seams, if I peel back the papers from the top edge (smaller curvature) of the rays. Now you can see the two center background rays in the middle are the same, fading to the sides. That’s also why I wrote 3s and 2s and 1s on the freezer paper — just to keep straight which fabric I was using.

Road Trip Rest Stop: admire your work.

I fold the arc in half, and with the tip of my iron, press in a 1/4″ mark, showing me the centers. You could also just put a pin there, or a small pencil mark.

Sewing the units together in steps.

Happy Dancing Number Bears are still here, but here’s our fifth block, finished! It’s really beginning to add up, isn’t it?

Status Report: five blocks finished. When I made this, I was amused to see that the right-hand side of this digital quilt was sort of empty. Of course, that will change, and I may re-arrange the blocks as I want to, when I get them all finished.

A word paragraph paragraphs about fabrics and colors and quilting: While I use Painters Palette solids by Paintbrush Studio, and that’s what my color numbers are on my Preview Page on the pattern (Preview Page is a free download), you may have a wide range of colors in other solids from other manufacturers. Use what you have and what you like. Change up my colors completely. Make them in prints or whatever. Enjoy making, and seeing your little bits of sunshine grow on your design wall, or design floor, or design bed.

We have to bend quilting to our will, to our situations and circumstances, in order to enjoy what we do.

Yes, I do use Trim-an-Quarter/Eighth rulers, but I also use a regular see-through ruler. Yes, I like freezer paper currently, but if you like the regular way of FPP (foundation paper-piecing), do that. Mary, of Zippy Quilts, sent me a link to another quilter who combines the two in this video. I’m so grateful for all you quilters and your interests and your worlds. You fly through rainbows and bring back jewels for me to think about and to use. If you are sewing along and making New York Beauties, tag me on Instagram (@occasionalpiecequilt or #newyorkbeautiesquilt) or send me a photo to my email (opquilt@gmail.com).

Radiate as you go, in order to freak out any one nearby–

New York Beauties · Patterns by Elizabeth of OPQuilt

Cool Rays • New York Beauties Block 2

After leaping around the line-up, we return to Block #2, but instead of the more traditional sew-it-in-rip-it-out, it’s made with freezer paper. Apparently this method is the hot new tutorial/class/method, and you could do a search to find a class if you want, but I still think that first block I did with freezer paper will help you get started. And more tips are on the second block I tried, too.

The Bizness: Since I’ve had this quilt in mind for a few whiles, the whole gamut is grouped together under the New York Beauties tab, above, and that’s where I’ll put most things. The pattern, however, resides at my pattern shop, as does the free handout that lists all the colors of Painters Palette that I used (it’s called the “Preview” on my pattern).

For Cool Rays, I decided to do a gradation of color (popularly called “ombré” these days) in the background behind the rays, so I picked out a range of greens, trying to keep the color changes smooth and in the same color family (a more yellowy-green than a bluey-green).

I used the method of trimming a sheet of freezer paper (off the roll) to about 8 1/4″ by 10 3/4″ and taping it to a piece of cardstick, or equivalent heavier paper. Then I sent it through my color printer, using the rear feeder for a glide path that doesn’t ask the paper to double-back on itself. Cut the pieces out, and you are ready to go. I can get five uses out of one pattern-printed-on-freezer paper, but for this block you only make four.

Hand-crease on all the lines, working from the printed side, then re-crease them from the back.

Keep trimming those seam allowances to slightly less than 1/4-inch. Again, refer to the blog posts linked above for a more detailed step-by-step version of how to use freezer paper.

Trim around the completed section, around the freezer-paper pattern. You’ll be left with four stacks of rays. Seam them together, matching up the red dashed lines. It helps me to line them up in the way they’ll go (on the right).

After using the tip of my iron to press in the marks of where to line up my pieces, I lay them out.

Pinned and ready to sew.

I pressed away from the light center quarter-circle on this one. On other blocks, I’ve pressed the seam allowances toward the circle, for more definition from the front. Experiment with what you like.

And By The Way Department: I’m so tired of that argument about pressing seams open or pressing seams closed — I just saw it again on another website, and I’m like Leave.It.Alone. There is no right or wrong, but only personal preference. Unless you are making for a group, or in a Bee and the Queen Bee wants it a certain way. Then do it her way.

All four blocks done! Now that I look at them like this, I wish I had swapped two of the greens. Sigh. I can’t even imagine remaking it just for that. The quilt will be fine.

All four blocks with my line of Number Bears, made for when toddlers lived here and I had to keep them quiet in church. The bears all snap together. The guys on the left have “casts” made out of more felt, as one of my kids ripped their hands off with too vigorous effort on the unsnapping of the colorful conga line. (This was in the those old days of mending and repairing.) This hangs around my sewing room, because I can’t bear to get rid of it. My youngest is old now, but I still keep it.

Progress so far. We’ve been making a block about every other week, so far, but the upcoming Eclipse may throw us off.

This website has an interactive link that really zooms in to show granular detail of how many minutes it will show totality in your location. After having done the Annular Eclipse in Utah last year, I know how quickly 4 minutes can pass while you are looking at this marvel. Maybe that’s why I’m doing this quilt? Because it looks like the sun in some ways? I do know that’s why I named the blocks the way I did.

And here’s what I like seeing the best: Status Report, with four blocks finished. The list is on the main New York Beauties page.

Happy Sewing!