Maybe there is more of the magical
in the idea of a door than in the door
itself. It’s always a matter of going
through into something else. But
while some doors lead to cathedrals
arching up overhead like stormy skies
and some to sumptuous auditoriums
and some to caves of nuclear monsters
most just yield a bathroom or a closet.
Still, the image of a door is liminal,
passing from one place into another
one state to the other, boundaries
and promises and threats. Inside
to outside, light into dark, dark into
light, cold into warm, known into
strange, safe into terror, wind
into stillness, silence into noise
or music. We slice our life into
segments by rituals, each a door
to a presumed new phase. We see
ourselves progressing from room
to room perhaps dragging our toys
along until the last door opens
and we pass at last into was.
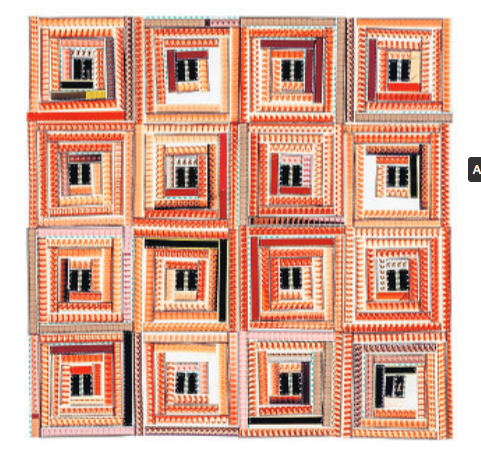
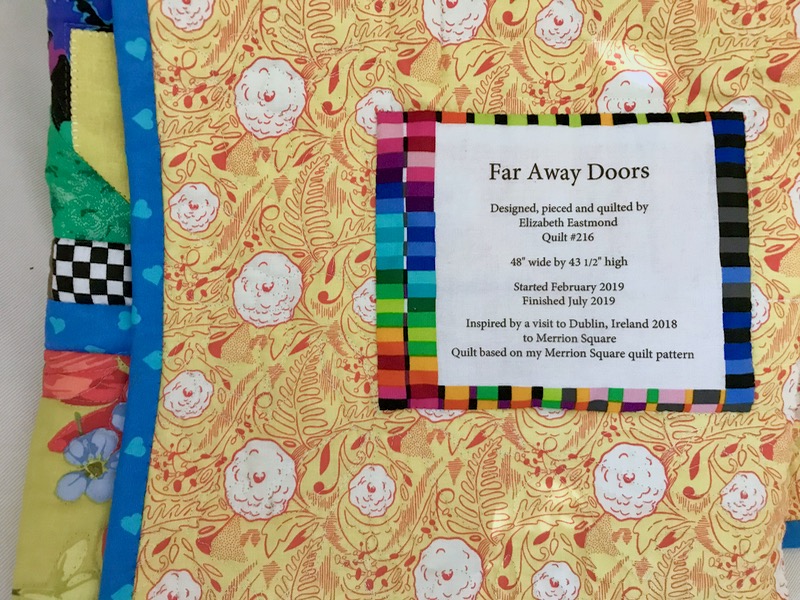
Far Away Doors
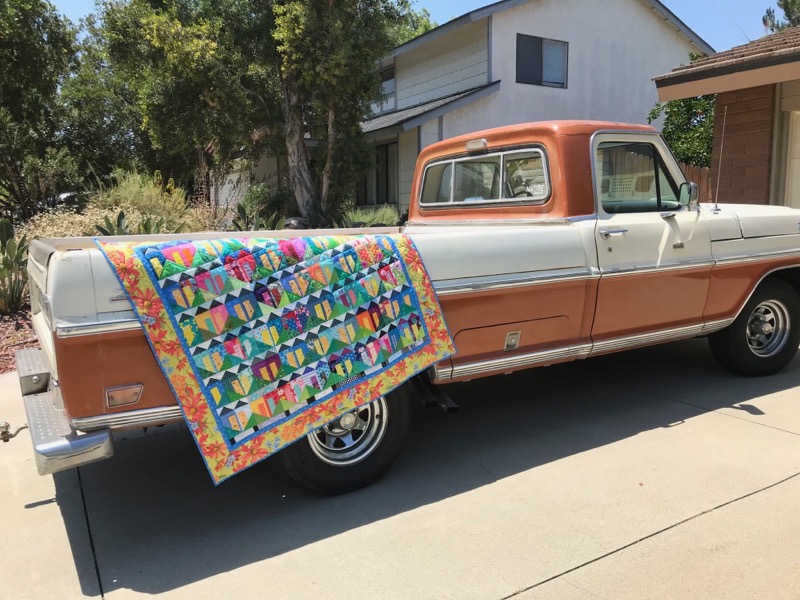
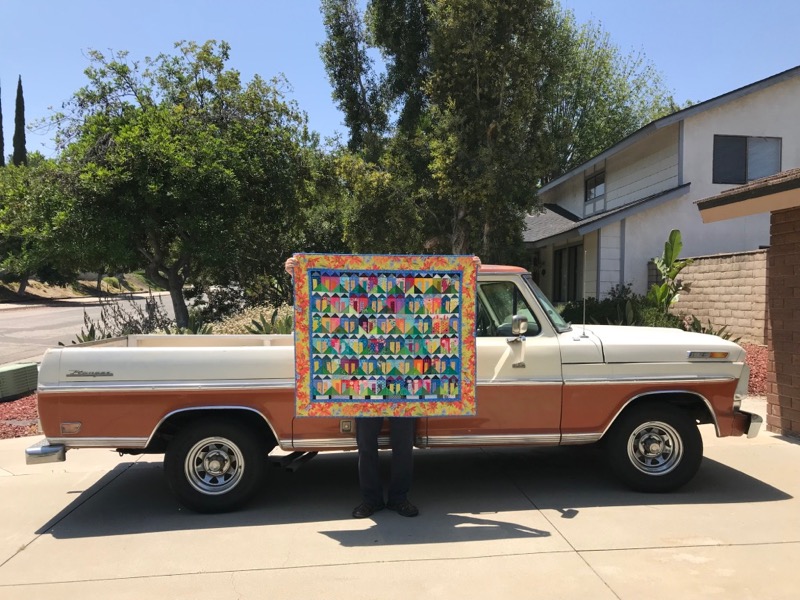
Quilt No. 216 • 49 1/2″ wide by 43 1/2″ tall
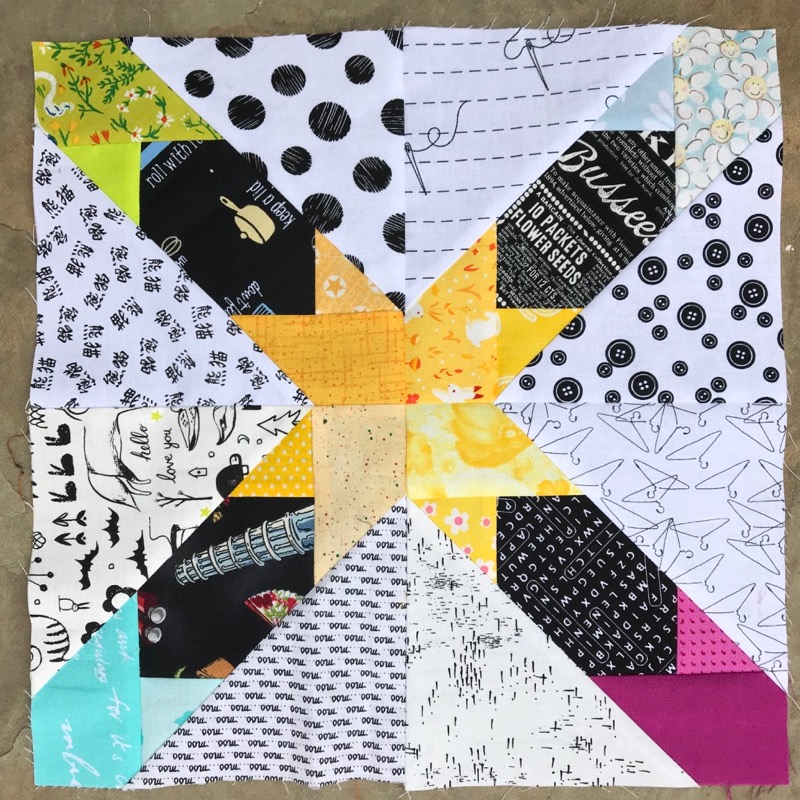
Some blocks sent to me by the Gridsters Bee
Finished!
I originally named it “Home-keeping Hearts” but that was just its milk name as it had just been born and I was in a cheezy mood of Hearts and Deep Meanings and All That. Marge Piercy said it best about doors, even quilty ones inspired by far away doors from Dublin, Ireland:
“the image of a door is liminal, / passing from one place into another / one state to the other, boundaries // and promises and threats. Inside / to outside, light into dark, dark into / light, cold into warm, known into / strange, safe into terror, wind // into stillness, silence into noise / or music.”
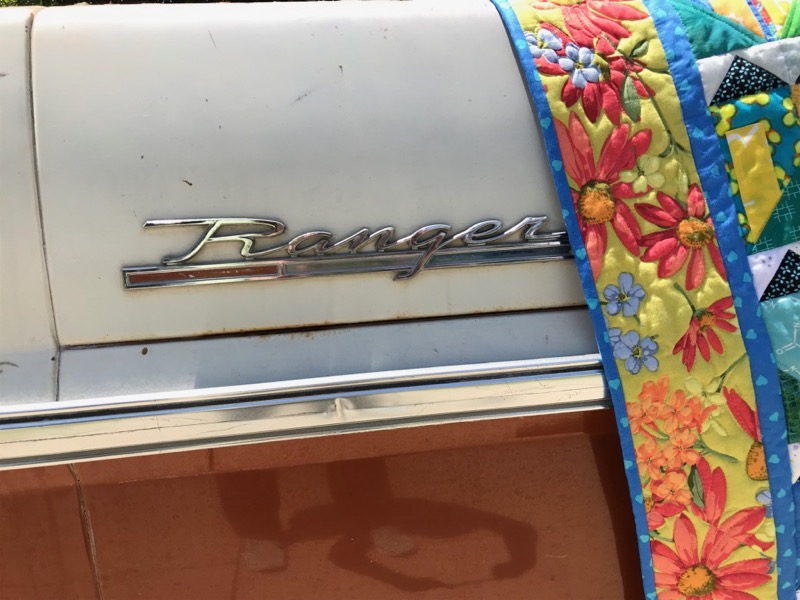
The photograph on the truck? It went like this: on our way to get some Vietnamese bùn châ for lunch, we trekked down to our newest neighbors’ home to ask if we could please pose the quilt on their cool car, and so I knocked on their door and it opened to a crying baby in the other room and a smiling baby in his father’s arms and good-natured parents, owners of a new-to-them truck and the mother’s name was Genesis and the father’s name was Nate and we introduced ourselves and they said yes, of course, and then they headed back inside because it was about a hundred degrees outside, as they smiled and waved and shut the door behind them, the lovely music of a home with a young family and a Ford Ranger just made for quilt posing.
And so, this variation of Merrion Square is finished. I pass out the how-to sheet as a freebie when people take my Merrion Square classes, so hopefully you’ll be in one soon. Check my schedule to see if there’s a workshop near you.
And finally, many thanks to all who entered the giveaway for the ruler. The winner has been notified by email and I’ll get the ruler off to her this week. I am leaving the post up because there are so many great responses to my question. You are all a significantly talented and experienced group of quilters — thank you for your ruler advice!
Mary, of NeedledMom, chose this block for her June turn as Queen Bee of the Gridsters. Originally found on Wombat Quilts website as a free illustration, I redrew the block to Mary’s specified 6-inch (finished) size. Four of these blocks are put together to make Mary’s larger 12-inch block.
You’ll need four copies to make one 12-inch block, as shown below:
sketch I made to keep the colors organized
Notice there are FIVE colors per Mary’s larger block. Four corners have the same color, which when sewn together make that center star. But in looking at the way she designed it, the colors are to be distributed throughout the quilt. You can see her initial thinking about this version on this blog post (where you’ll also get a glimpse into her gardens and cooking. I love reading her blog).
Just a peek–download below.
Mary gave me permission to post the chart she drew up to keep her ideas straight. You can download this as a PDF:Mary’s Chart_ June Gridster Bee
You can see that she’s diagrammed the main stars (in the center), and the secondary stars in the corners. We Gridsters each chose two blocks, identifying our choices using her coding on the sides and are now sending them to her.
Four of us got together to do the last block of 2017 for Afton, of Quilting Mod.
She’d asked that we do a cake from Patty Sloniger’s pattern (for Michael Miller Fabrics), and Afton mapped out our plan of which stand for which cake. I had a different cake from Lisa, Leisa and Simone, but our stands were all the same. Luckily.
The quilter who made the cake on the left was the first to finish, but whoops…she had to redo the cake stand.
One of us had to leave early to pick up kids, so I don’t have that quilter’s block, but here are three of the cake blocks finished. In all the fun, I never took a photo of my block by itself, but I’m the stacked layer cake on the lower right. The pattern went together without too much drama, and we shipped them off to Afton. That’s the end of the Gridster Bee for 2017, but we’re gearing up and are all ready to go for 2018.
This is the last sew day for all of us together, as Lisa (in blue sweater) has moved away to another state. She and I started our little quilt group of twenty years, and it is odd not to see her around, or to be able to pop up and borrow some fabric (she lived close to me). I wish her all the best in her new home, and hope she finds lots of quilters to hang out with!
Here’s the block I made for the July Gridster Bee, for Carol. It was a fun make, made easy by this tutorial from Sara Noda. (She also has a blog post on her completed flag quilt.)
I also dragged out my hexagon quilt, and got started again. Here is Rosette #7, isolated (above), and below as it looks sewn into the quilt. I took the blocks and quilt rosettes with me on our recent family trip — since we had a lot of driving time — and was able to get the rosettes sewn together and one more completed.
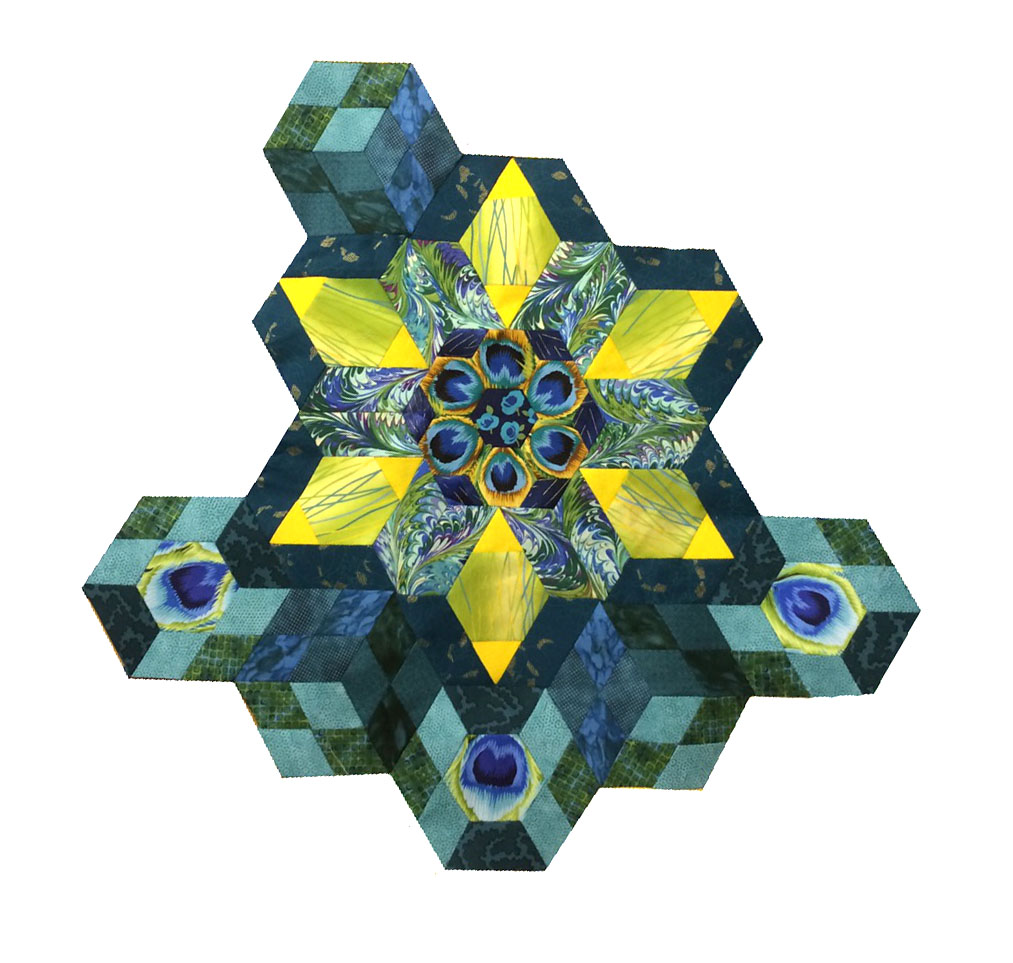
I’ve totally revamped Rosette #8, because frankly, everyone on the Facebook page was having real troubles with it, so I thought I would have a go at creating my own hexie arrangement. I’m choosing fabrics for it now.
I also picked my classes for Road to California 2018 (above)…
…and my classes for QuiltCon 2018, too. Anyone else going? Are we in the same classes?
And in case you think you only need fabric to create quilt patters, Sabrina Gschwandertner acquired a collection of old instructional films on the textile arts and has been creating quilt works of art. I will spare you the mumbo-jumbo about quilting from the LA Times, but here’s the article if you want to read it.
(PS Ignore the random “A” up on the right side)
I actually wanted to see the movies, after reading about her and seeing images of her work. Now it is lost forever. Will we feel that way about the millions of YouTube videos? I doubt it. There is something about the tangible presence of film being cut up, the scarcity of that resource being destroyed to begin again. But I do like looking at her works. If you are in LA, the article has info about how to see this in the gallery, but the show closes soon.
And today is six months since my shoulder surgery. I’ve seen the surgeon for the last time, finished my formal PT. Now just the challenge of walking, getting back into some semblance of shape after sitting around, and doing the PT exercises on my own.
LASTLY, thanks to all who entered the OPQuilt Summer Book Giveaway (snazzy title, don’t you think?).
Here’s another:
Amy Friend’s Intentional Piecing, a look at using fussy-cutting to make spectacular quilts. She has a range of stellar projects, plus some fun paper-piecing designs to sew into various quilts and hand-mades. It’s signed by the author.
Again–leave a comment letting me know if you are interested in receiving this book in the giveaway. I’ll notify the winner by email.
Update: Roxanne was our winner from the last giveaway. Thanks again for all who entered!
I am the Queen Bee this month for the Gridsters Bee, and thought and thought and thought of what I could do. I happened on this design while surfing the blogs, and something about it just made me smile. Since I am one month post-op on my interminable rotator cuff repair recovery, I realize that it’s probably because I just needed some happy-cheery-goofy-fun in my life.
Yes, I made the tutorial and wrote it all up before I went in to surgery, perhaps anticipating the need for something happy-cheery-goofy-fun. To start us off, here’s something to get you in the mood for making my block this month (stop it about 3:00):
For those of you who can’t see the link, it’s from the movie Babe, The Gallant Pig, completing his “sheep” trials. (Go to the blog if you want to see it.)
Yep. Somehow little piggies have gotten in my heart and under my skin and I want a whole quilt of them, although I may add a barn or tree to break things up. I first found them on Gayle’s blog, Mangofeet, where it says she is a bonafide farmer. She found them on Sally’s blog, The Object of Design, which is where I found a tutorial for littler guys. And I found Gayle, by following a link from Bonnie Hunter’s Quiltville’s Linky Party for her En Provence mystery quilt. Connections everywhere!
Before I leave all the attributions, please visit Sally’s tutorial page, where she has other tutorials for bunnies and fish and all sorts of creatures.
But mine are slightly different, both in size and in style, so I wrote up atutorial for what I want. Since they are small, I’d like you to make me two, if you wouldn’t mind. I used Gayle’s post for inspiration (also look *here.*). To make it easier on yourself, make them both the same, but if you get adventurous, it’s okay to flip the orientation of the piglets, or make one going up and one coming down. But really, keep it simple so you aren’t calling me names in the middle of this process.
Again, while Sally has a tutorial (linked above) and she is the designer of this block, I changed up a few things (like the dimensions), so please follow along and make my piglet according to my tutorial. The piggies are all scrappy, but I do need:
sky–a consistent low-volume or “background–no need to make them the same fabric, but the do need to be the same lightness: pale blue, cream, white, tan, low-volume with grey/tan/etc. prints. Avoid prints with too dark of text or design so that it throws it to a muddy tonality. Some background prints are fun and will make the quilt more sparkly. It’s okay to mix up the borders, but I’d probably stick to the same fabric around the piglet.
body–a medium value fabric: small print or geometric, floral, Kaffe, but avoid fabrics that look “splotchy” when cut this small (such as cutting a giant polka dot in half)–generally anything in your stash. Have fun. Make me some colorful piglets.
ears, feet, snout–a darker-toned fabric that stands out from the body fabric
tail–embroidery floss/Perle cotton to match your piglet, to embroider the tail. Pattern is not given for this, but below are some piglet tail ideas. Please use a back stitch. More info in the tutorial.
Gayle showed hers on a tilting grassy hill, which I like quite well, so that’s what I’m asking you to make for me. Copious amounts of photography and images and text follow, but really it isn’t too hard. The following directions yield one piggie, so cut everything out double, out of two different piles of scrappiness.
Lastly, I follow standard print journalism standards: the caption in UNDERNEATH the image (MQG had theirs backwards on their award-winners page and I was so confused!)
Cut the background (sky).
Cut the body fabric.
Cut the accent pieces of snout, ear and feet.
Step one is to snowball body fabric onto the background fabric, using the 2- 1/2″ square pieces of background and the 1 -1/2″ square pieces of body fabric. Then the last snowball is a double: use one 2- 1/2″ square of accent fabric and snowball on one 1 -1/2″ square of background and one 1- 1/2″ square of body fabric. Press the snowball corners to the dark side, and trim after pressing. With the double-snowball, you’ll press one square’s seam allowance toward the accent fabric and the other toward the body fabric.
Step two is to gather the other pieces together: Line up the 1 -1/2″ x 4″ pieces in body and background, AND the 1- 1/2″ x 3″ pieces in body and accent. Place on the front accent piece (snout) and the back background piece on the large body piece (lowest piece).
Step three: sew the strips together and then press to the dark side on the top one. I don’t care which way you press the bottom one, but I went towards the dark as well.
Now cut those strips in half. Exactly. The top strip set (A) will yield two with body and background fabric that will measure 2″ across. The bottom set (B) will yield body and accent fabric that will measure 1 1/2″ across.
Step Five is to lay them all out. If you were going to make a reverse-direction pig, you’d need to fiddle with that ear (double-snowball) piece to sew that up differently, otherwise, everything else is the same/can be moved around. (See second pig at the end.)
Sew the top row together, then the middle and yes…sew the bottom row of pieces together. Pressing instructions are in a minute, but generally press towards the dark. PLEASE DO NOT PRESS THE SEAMS OPEN.
Babe!!! Babe!!
This is how I pressed the seams. I just realized I pressed the legs the wrong way. Oh well. Either way is fine, but just not open. [NOTE: I show it correctly in the second pig, at the end.]
Time to tilt this little guy. Start by sewing on a 2- 1/2″ strip of ground–can be green for grass, or flowery for a meadow, or brown for forest floor or purple for Outer Space. It just has to have contrast to the background and side strips.
Sew on three side strips, by FIRST sewing on the top, then the two sides, all 2 -1/2″ wide strips.
UPDATE FOR MY BEE MEMBERS:
Please do not trim. After sewing on borders, just send untrimmed, untilted.
Now back to our regular programming.
Now to cut. Please check the areas in those red circles to make sure you are leaving 1/4″ seam allowances (one above the line, one below the line). Lay your ruler with the edge along the black line, above. Cut.
Now lay a square ruler at the bottom (newly cut) edge. Now play with the adjacent side it a bit, making sure to leave that 1/4″ in the circled area. Cut.
Now think about it as a beginning rectangle. Turn the piglet 1/4 turn clockwise so that the newly cut green line is at the bottom of the mat and the black line is to your left. Measure over 7 3/4″ from the black line; cut.
Measure 9 1/4″ up from the green line; cut.
Tilt the pig back to a proper vertical and it should look like this:
The piglet’s rectangle will measure as shown above: 7-3/4″ high by 9-1/4″ wide..
Again, this is the most important corner when you cut for the tilt. It’s so the ground will look merged together when seamed.
I made you an overlay, if you are nervous. Download the PDF file: piglet-tilt-overlay1 and print it out on vellum paper, or make a template out of this (too much trouble, I think). It will help you get the right angles.
Please print it at 100% or you will again find yourself cursing.
If you are really truly too nervous to cut this pig, send it back to me untrimmed and when I get better, I’ll be happy to trim it up.
Now let’s add the pigtail. Draw on a squiggle, originating from the pig’s backside edge. My drawn line is really faint, above because I don’t want to have to figure out how to get the pencil off. Sometimes I’ve just eyeballed it. Sometimes I’ve just scratched it in. See the picture at the top of the post for pigtail ideas.
Tie a knot in your perle cotton (I used size 8, but 5 or 12 is fine, too) and bring it out at the fold, at the beginning of your drawn line, hiding the knot in the seam.
Take one stitch (#1) and then skip a stitch, coming out as shown in the photo on the left. Now put your needle in the same hole as where you came out on your starting stitch (#2) and backtrack and stitch that empty place, which will put you on the road to backstitching the piglet’s tail on.
Insert the needle in the last stitch and pull it to the wrong side.
On the wrong side, weave your thread down from the top , then make a knot (below) by making a loop and drawing your needle through it. Continue weaving your thread for one or two more stitches, then cut it off.
Okay, let’s do it again, but with the pig flipped to the other side.
You can see how the ear needs the double-snowballed corners switched.
And the back, showing the pressing, this time with the correct pressing for the legs.
You have to think on this step: do you want your piggie going uphill? Or downhill?
I voted for downhill since I already have an uphill.
Here’s how I laid my ruler, keeping an eye on those 1/4-inch seam allowances.
Now you can see how I use my square ruler to find the next edge.
It’s really straight, even though the photo doesn’t look like it.
I put the ruler on as I described above, and worked it until I had the correct measurements of 7-3/4″ by 9-1/4.” I ended up trimming off a slice of a previous cut to get those dimensions. Then I do the tail.
Here they are together, but not sewn together.
That’ll do, Pig.
Thank you everyone! I look forward to a whole farmyard of little piggies, running around my design wall. While I attribute all these ideas to two very fine quilters: Gayle, of Mangofeet (she is hilarious to read) and Sally of The Objects of Design (who has made a stunner of an En Provence Mystery Quilt), all the photographs and instructions above are my own. Please do visit their blogs to see all the fun piglets that are running around there.
When I say the grid, you probably think of something like the image above: a rendition of the electrical grid in the United States.
Or you might think of a street grid, or the computer grid, or any other type of connected web.
I also think of the grid we use in making our quilts. Above is my example of a regular grid, using a 9-patch variant. This style of quilt — that of using repeated blocks set in a grid — didn’t become popular until the 1840s, as earlier quilts were more whole-cloth, medallion, or broderie perse styles.
The name of our Gridster Bee is a nod to the idea of the grid, and since I’ve had some non-sewing time, I did some research about the grid, finding its origin in the way that text was laid out on the printed page. (Note: Where the quotes are unattributed, I could find no source for them.)
This method of intersecting lines and angles, known as the Van de Graaf canon and used medievally, was popularized by Jan Tschichold in his books discussing classical book design, and became the standard for book layout. You can see the proportions at work in the magazine layout (above) on the right.
Some myths about the grid:
Grids are a design trend
Grids impede creativity
Grids are confining, and can only be used for certain designs
The grid is a static, even, regular subdivision of the surface both vertically and horizontally
There are all types of recognizable grids, such as those above, and in the images below:
Patricia Walker Rusk’s Sunset Gardenspencil cubbies in a shop in SwitzerlandBullseye by Vicki RuebelUpward Modbility by Stephanie RuyleChrista Watson’s Square in a SquareLisbon Subway TilesCindy Wiens’ Delta BreezeThree versions of my Neighborhood Quilt, by my students
(more designs from Spain and Lisbon)
Velda Bowen’s Fractured Rainbow
(circular grid used, both above and in combo with a regular grid, just below)
(A diagonal grid, both in Shutty’s and Van Orman’s quilts) )
Tesselation by Jenn Van OrmanStephanie Ruyle’s Embers
I love the grid, as ultimately, the function of the grid is to help determine and define proportion, such as the last two quilts, which seem to have some unseen glue holding them together. That’s why some quilts that seem to use no grid at all can either make us shake our heads in confusion, or can capture our gaze.
And that’s why we’re the Gridsters — not just those in the bee — but all of us in the quilt world.
And a little bit of news.
I wake up everyday and see this:
On some of my harder days, it has crossed my mind that I won’t ever sit there again, happily stitching away, and I feel so far away from the quilting world that I love. Cue the tears and the Sturm und Drang. And then I received this:
Guess the universe doesn’t want me to give up yet. (If you’ll be there at Quilt Festival-Chicago, please take a photo of my quilt, and tag me on IG [occasionalpiecequilt].) And I was also asked by our guild, The Raincross Quilt Guild, to present a Trunk Show on May 16th. I’m pretty excited about this, and have been working on my program notes.
So…guess I’ll be a good girl and keep all my Physical Therapy appointments so I can get back to quilting.