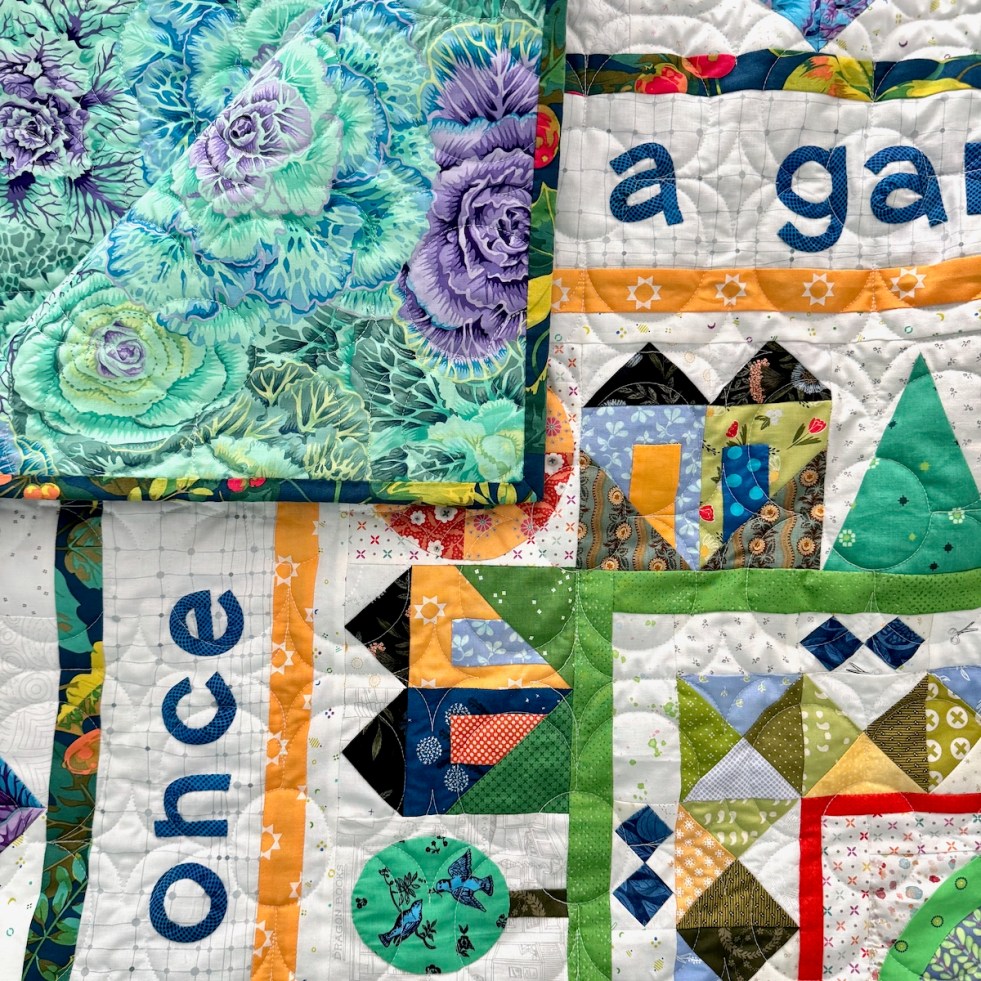
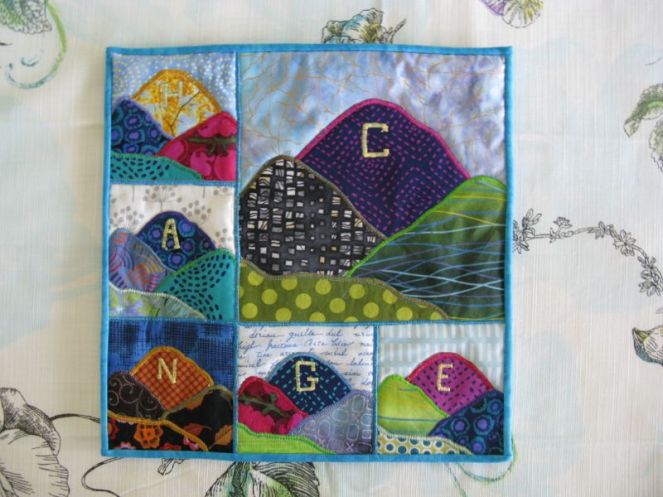
One Sunday morning, mulling over the stunning news from the day before, I drove to church along a residential road. I had a view of the low mountain range in my city, the hills turned verdant green from the winter rains. The sun was bright and clear, the sight was glorious. A favorite hymn was playing as the choir sang “This earth was once a garden place, With all her glories common.”
The song finished, I went into church, but the idea of a place so beautiful and fresh lingered.
I wrote in my journal that night: “All day I couldn’t help but think about Eden, and how much we mortals seem to have missed the boat. To live with ‘glories common’ would be the best….I thought then — realized then — that perhaps it was I who was below my best abilities in bringing about ‘all glories common.’ “
I paused, reflecting: the best of the earth, the most beautiful flowers, the clearest streams and tallest mountains — our glories. Shared all together, without rancor, viciousness, greed, cruelty and just plain old revenge and stubbornness. It felt like too big of a task; I closed my journal and went to bed.
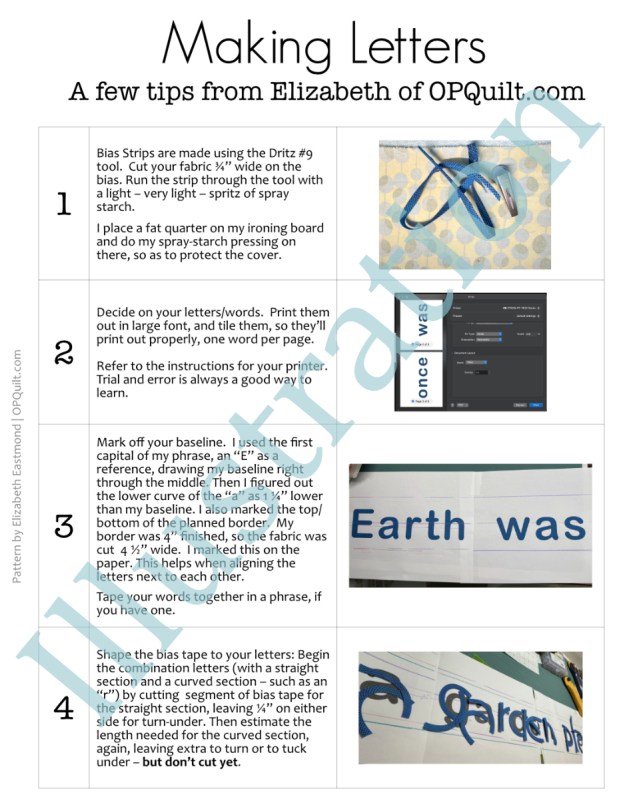
With this experience as backdrop, I sat in the quilting room the next morning, trying to tackle one of the prompts in the Stay At Home Round Robin. I knew I wanted to figure out how to write those words of the hymn, and to let this quilt be a garden quilt, a reminder that I could bring about my own version of Eden in pieces, in bits, in my best moments. I struggled with the “how to” of the words, working it out letter by letter. Many times I was discouraged. With encouragement from friends and from my always-supportive husband, I finally finished and pinned the word borders up around the existing quilt.
Then I looked at the center: it didn’t work at all. So I took that out, went to remake a new one but couldn’t find the pattern. So I drafted up my own, remade the center and carried on. (There’s a metaphor here somewhere, I think.)
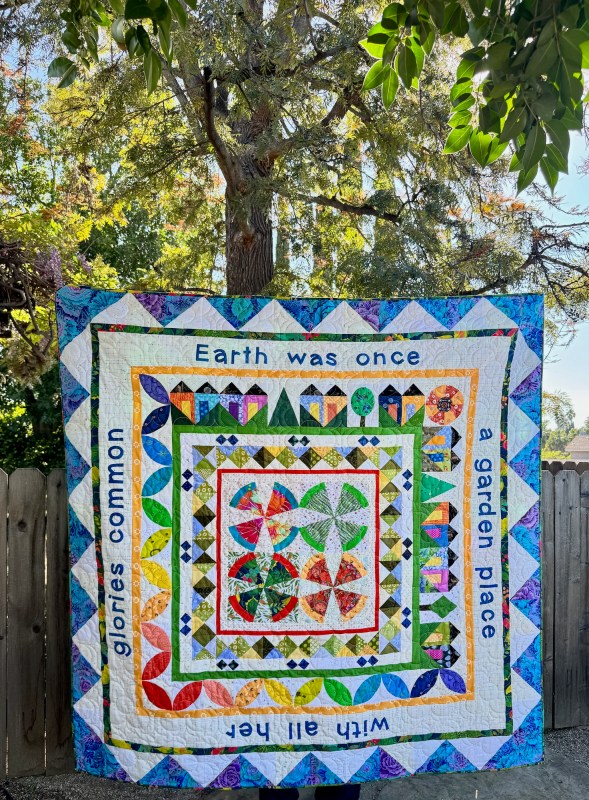
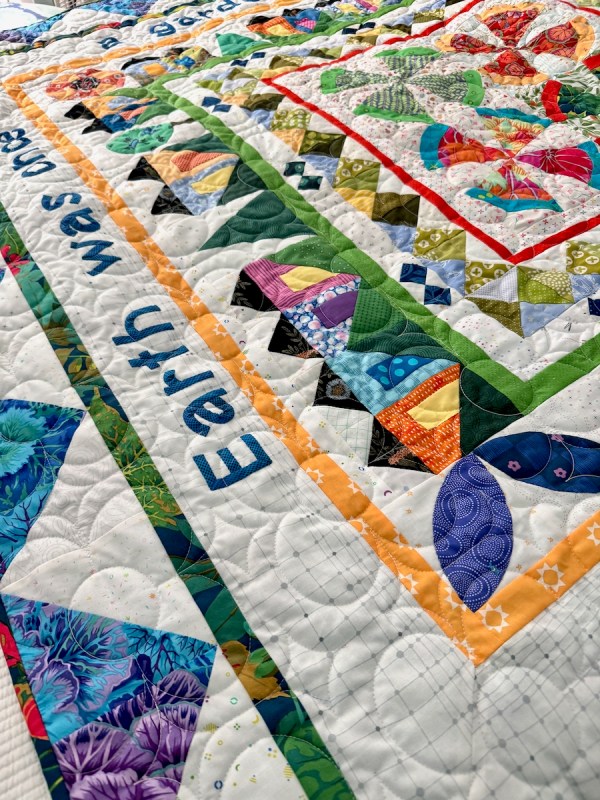
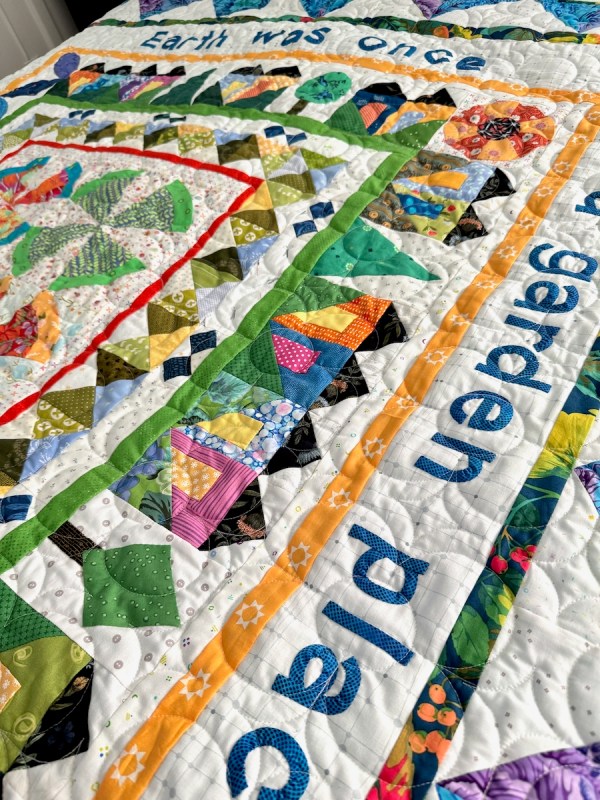
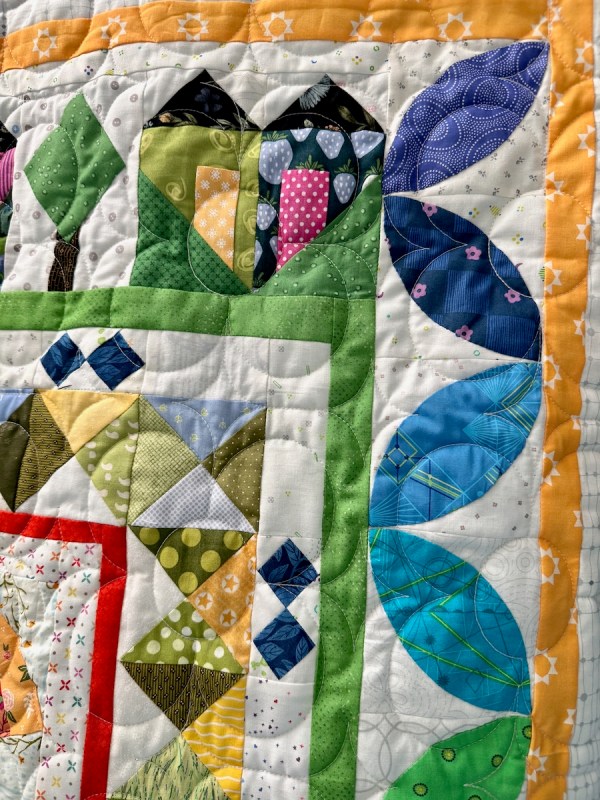
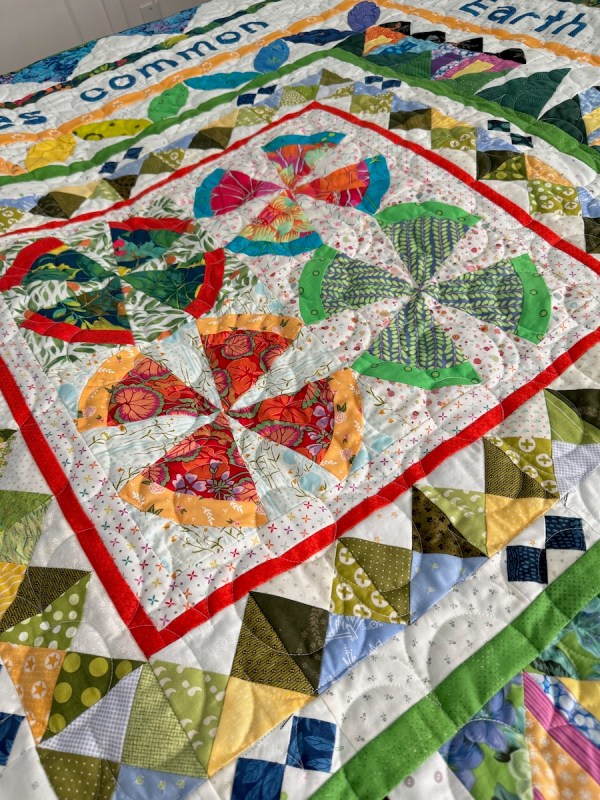
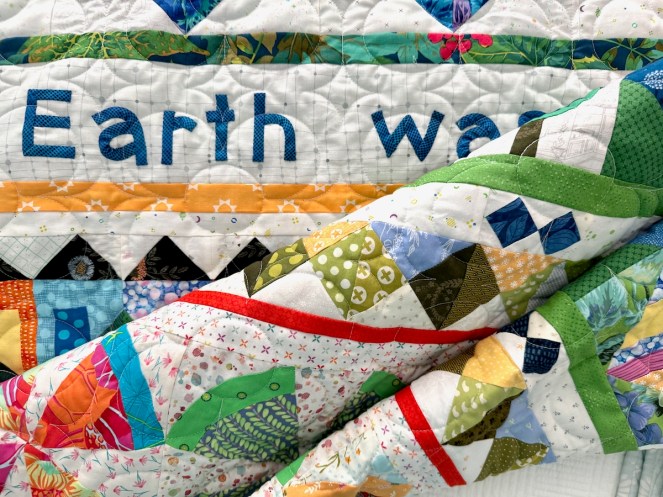
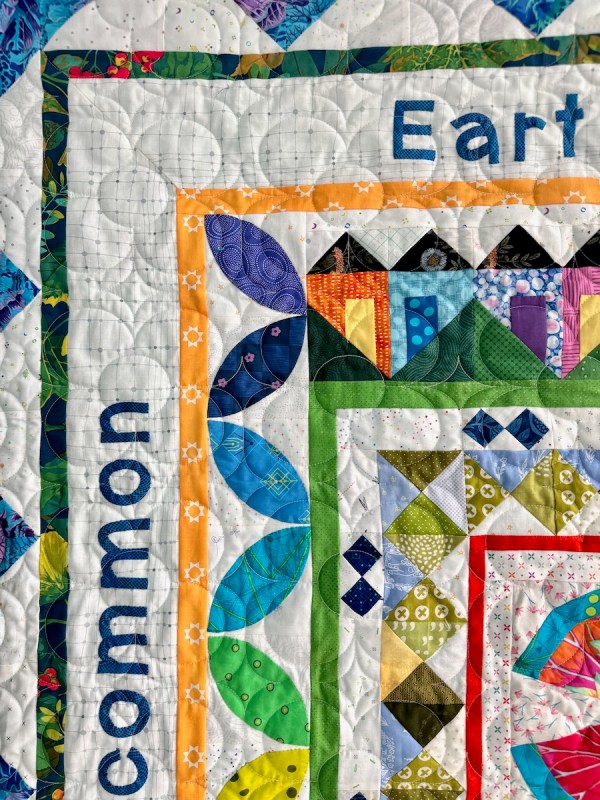
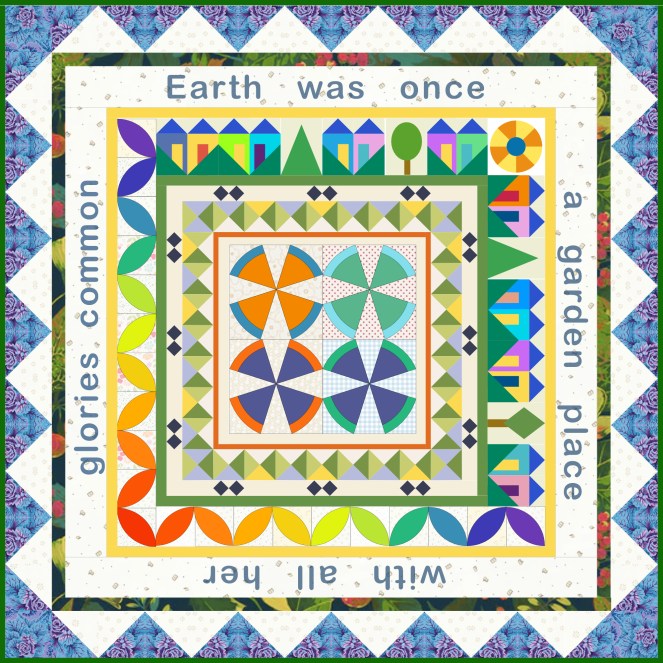
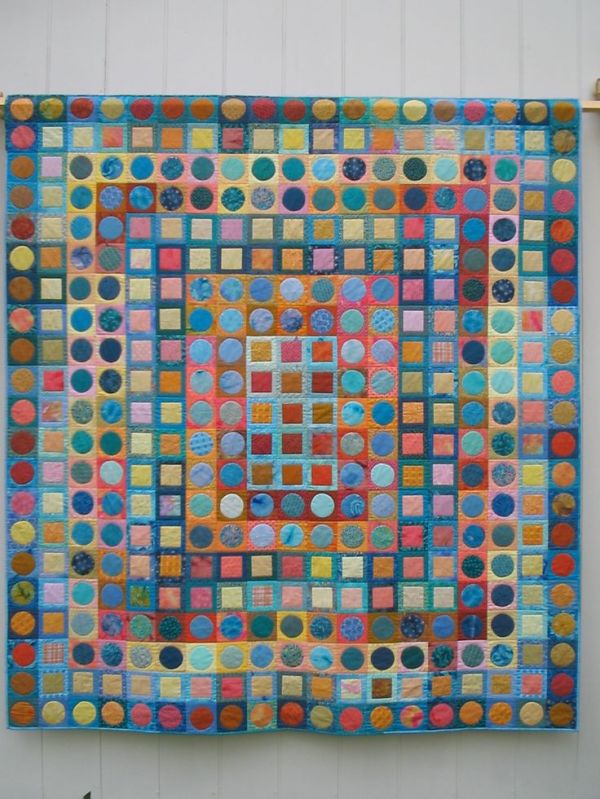
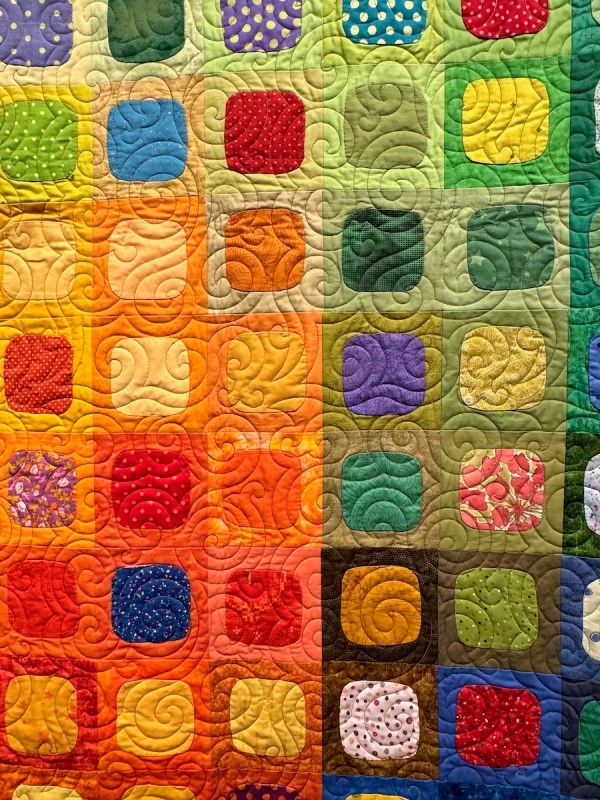
So here it is: Earth Was Once A Garden Place. And it can be again, day by day, moment by moment, with gallons of forgiveness, bushels of forbearance, and volumes of truth and charity. It’s that dailiness that can be the hardest: to not cuss out the driver who cut you off, to be more patient with those you live with, to speak up when necessary and to find stamina to do the hard tasks in our lives. I often turn to quilting to have a respite, as well as to be a part of a community of others who are exercising their creativity, planting their seeds, growing their quilts and creations.
Over time, working steadily at the task, we may yet find a way to have our glories common–
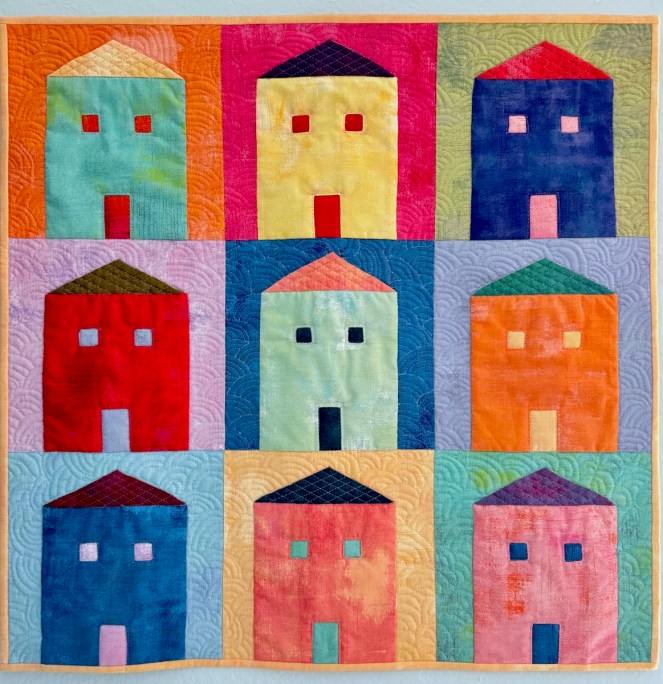
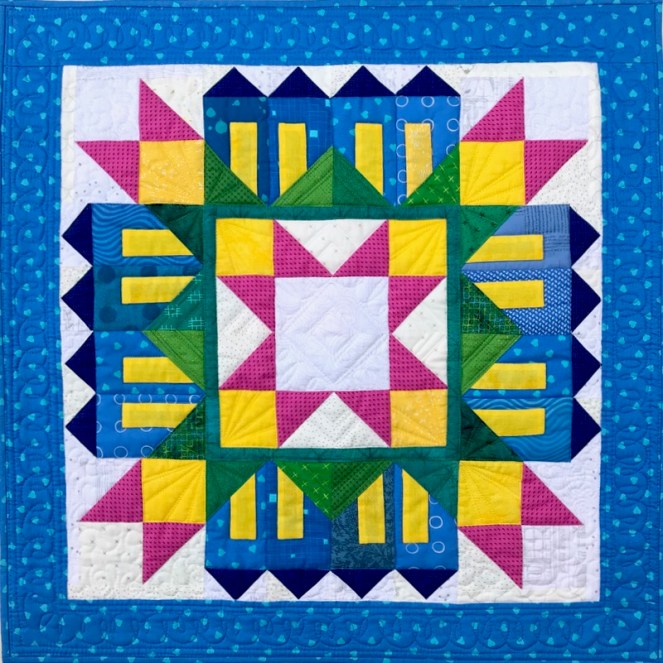
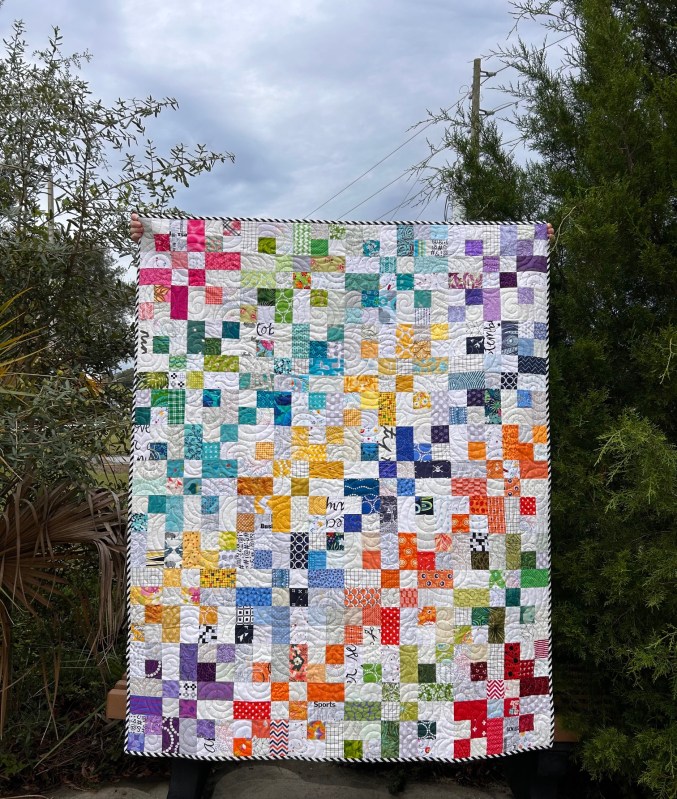
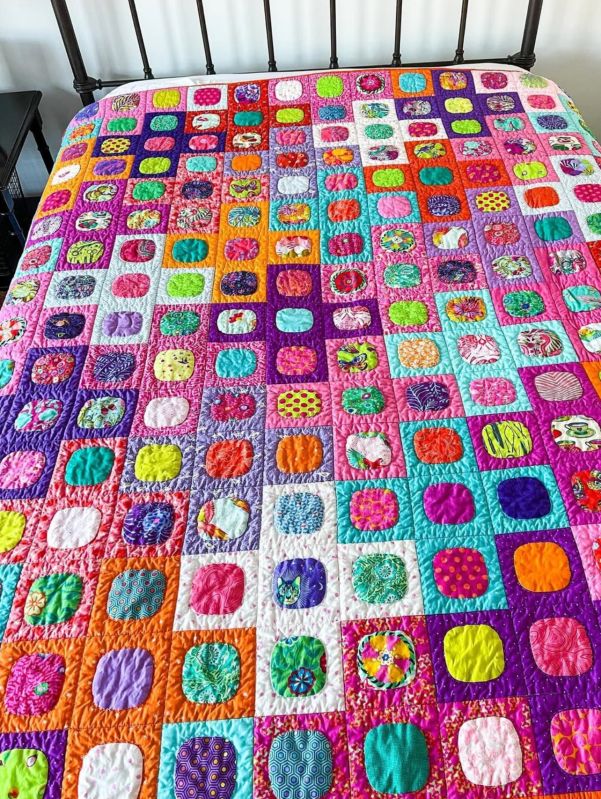
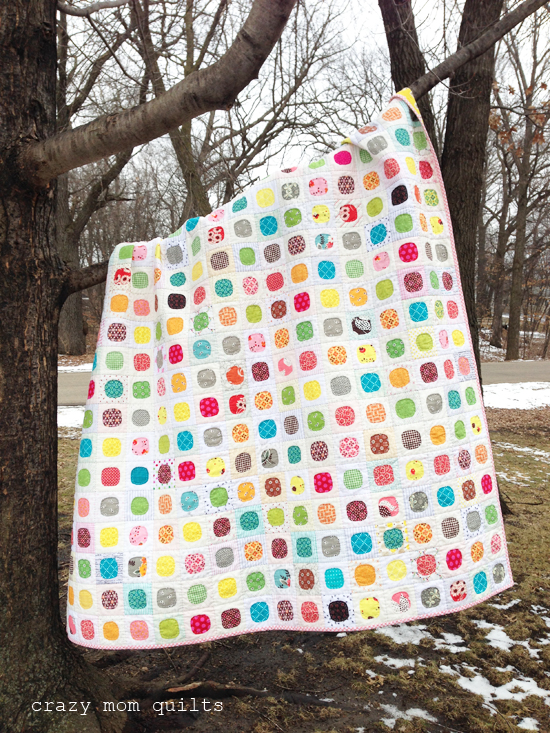
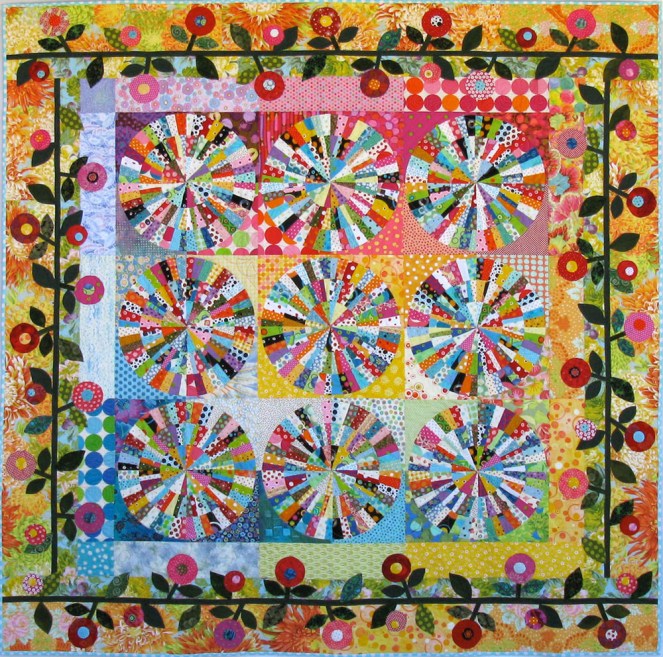
Earth Was Once a Garden Place Greatest Hits
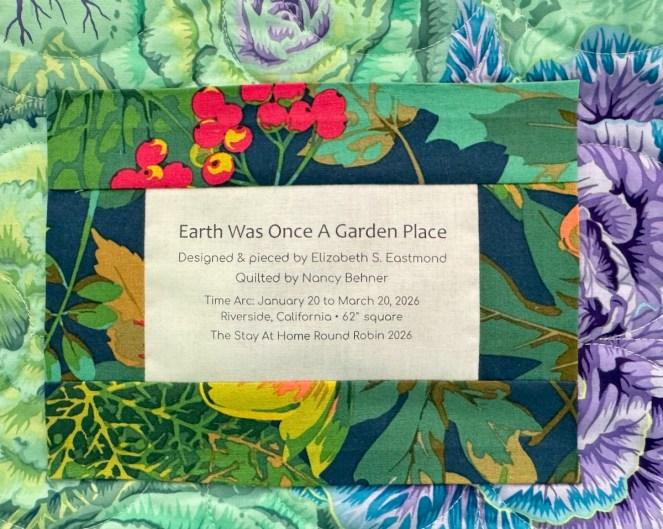
First, a huge thank you to the co-hosts of the SAHRR for 2026 (names and links at end of post). It was wonderful! The final Link-Up Party of all the participants’ quilts can be viewed *here.*
This is the SAHRR 2026 Final Quilt. I’ve revised and cleaned-up the free tip sheets I made for this journey, plus a couple more new ones for the final quilt. Click to download. Please do not copy or digitally distribute, but send anyone who wants one to this website to get their own. (NOTE: The tip sheets will live here on this post; the earlier versions will soon be removed.)
We love to make landscape quilts. We love to make pictures of our pets, our people. We love to use traditional blocks as well as fly far away from our roots and use modern blocks.
But where has it gone? I came across Nic’s blog (from NZ) and they mentioned that so many blogs had shut down or stopped publishing. Recently I was updating my Reading Library (at the very bottom of this blog: just scroll, scroll, scroll and you’ll get there). I had to create a category called Sadly, in Hiatus. I keep their links because I know what treasures are in their blogs, and what great conversations are to be found, and interesting stories to be told, so feel free to stroll that (now, quieter) neighborhood, too. Yes, there are some Instagram pages in the Reading Library from friends who don’t maintain websites and blogs. If you know of a good quilty blog (maybe yours?) that should be there, leave me a comment at the end of this post.
I could mention something wonderful about every blog on my list, both those on hiatus and those that are active, so I don’t really want to single anyone out, but I will credit Flourishing Palms from Linda Hungerford as an inspiration for a quilt on my 2026 Want To do List:
And Yvonne’s Quilting Jetgirl has just tempted me with the SAHRR project, first seen on Janine’s blog, Rainbow Hare, last year. And I also have the Plaidish quilt, from Erica’s Kitchen Table Quilting on the list. I’ve signed up for a few of her QALs, but they always hit at a bad time, but this quilt is sort of her signature quilt. You had a link last week to Gladi’s blog, always with some mention of the seasons. Mary, of Zippy Quilts, always has great ideas of what to do with my orphan blocks…I could go on and on, but I’ll stop here.
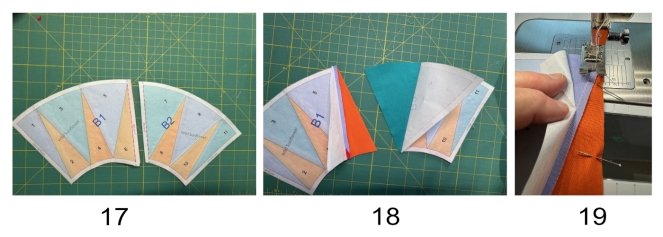
I also keep a category called Mercantile, with some more commercial blogs on it. You’ll also find there are some clothing pattern sites and sources for fabrics, as my sister Susan got me more into sewing recently.
What Inspires When the Spark is Gone is a category of frequently updated links, that I read for inspiration when the doldrums hit, or the sew-jo is missing.
I’ve also asked for recommendations of blogs, and a reader sent forward a vote for Debbie’s A Quilter’s Table, which I’ve read for years, too. We used to be in a couple of bees together, and in strolling through Debbie’s blog, I found this:
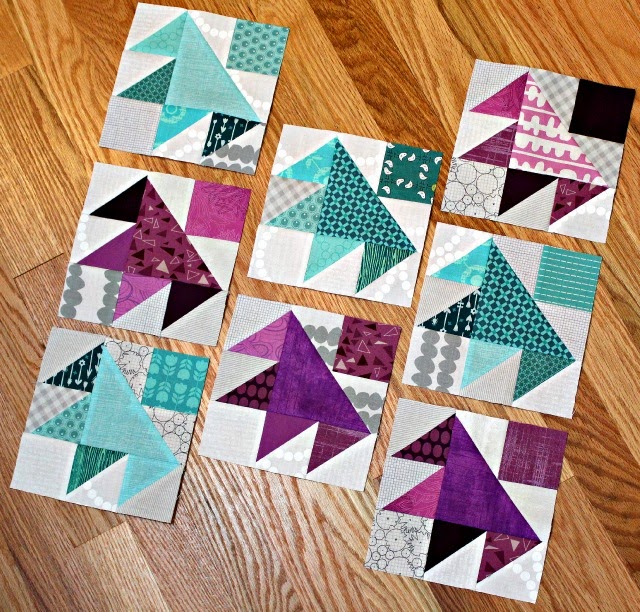
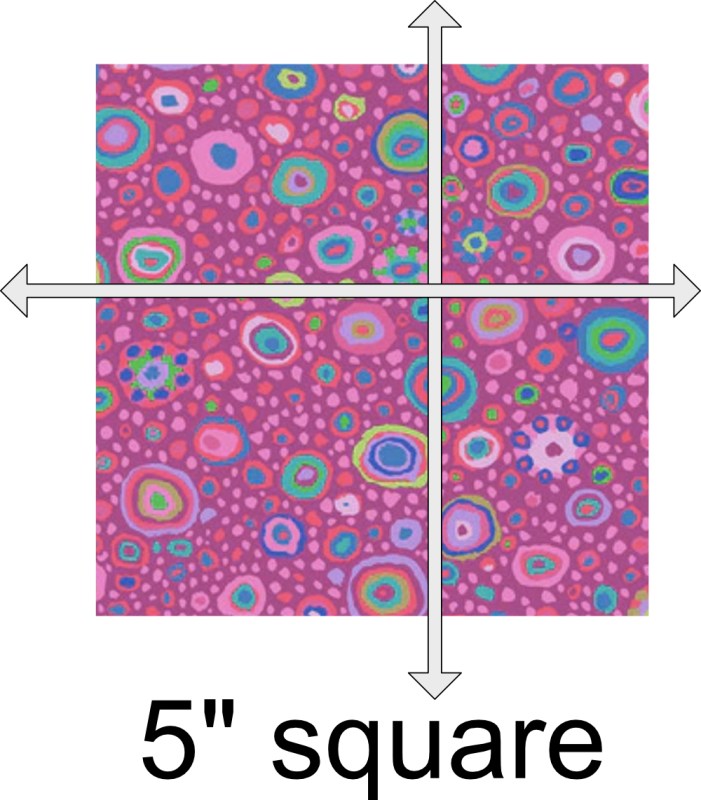
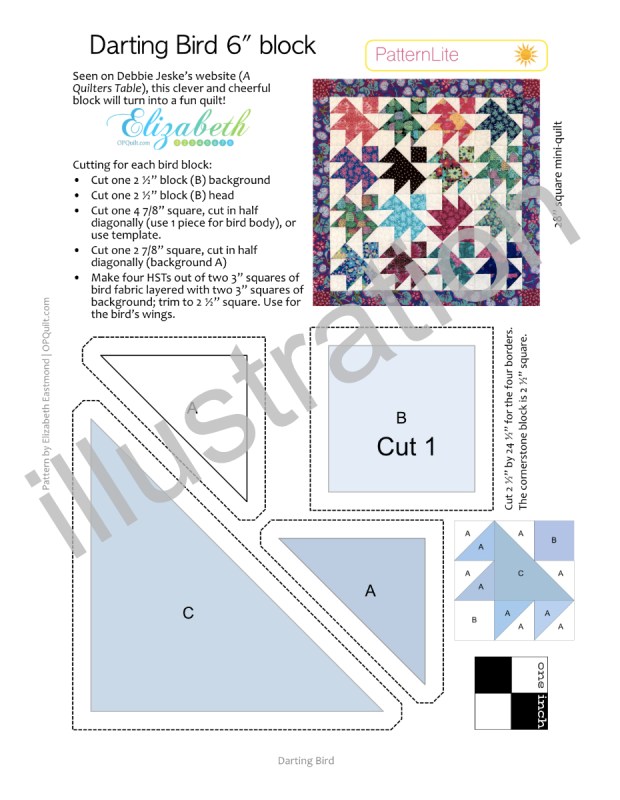
And good news, all these little birds all came from one Charm Pack (5″squares). Here’s some cutting tips:
From the charm pack, choose 16 prints you like, and then find their duplicates. Divide them into two equal piles. From the first pile, cut the block in half diagonally, making two triangles. Put one set aside, and from the other, cut the birds’ heads, as shown. You can discard the triangles on the side, or save them for another use. Now pick up the pile with the matching fabrics.
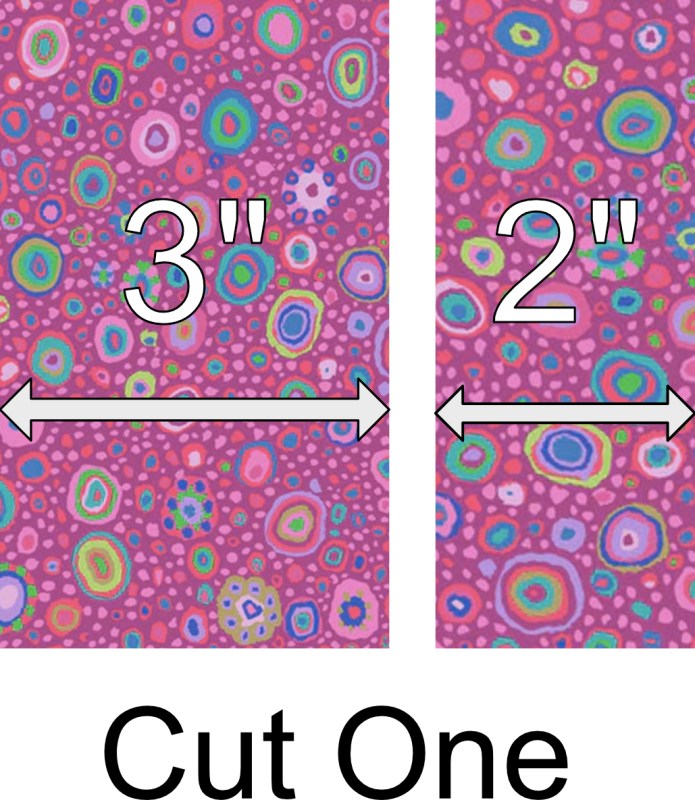
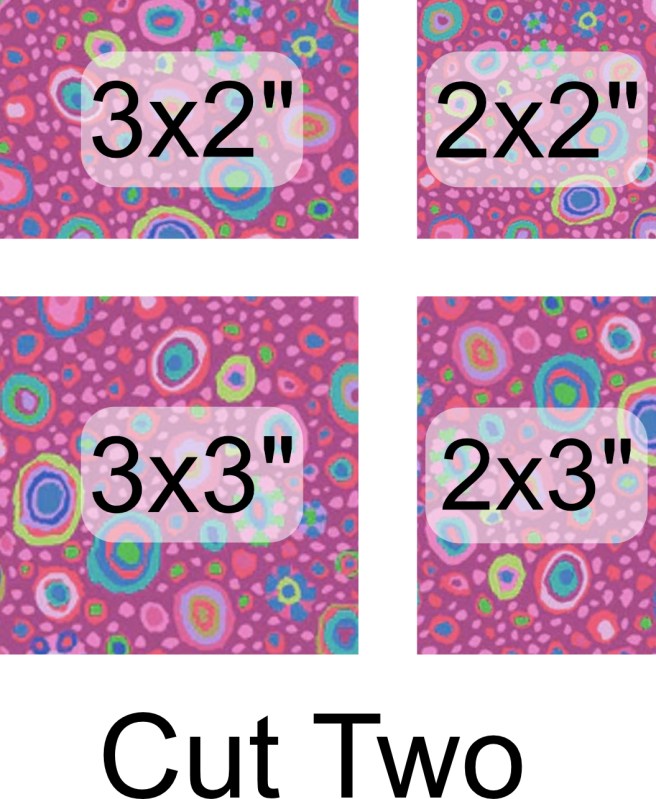
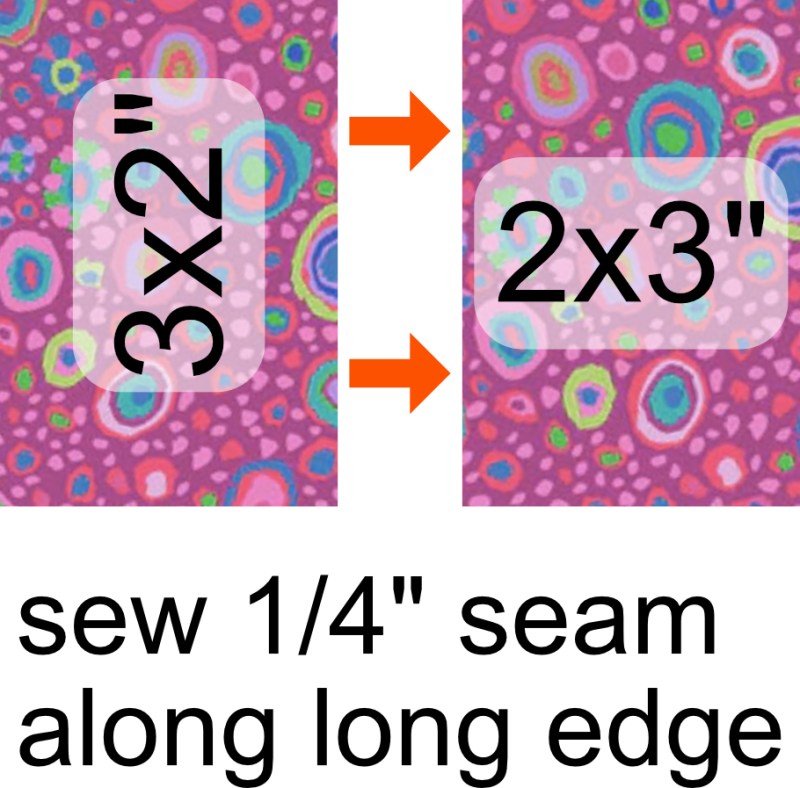
You’ll make two cuts in through each five-inch square. Make the first cut but don’t move them. Then make the second cut, so you’ll have four bits. Keep the 3″x3″ block. Discard the 2′ x 2″ block, or save for your scrap box.
Then sew along the long edge of the 2″ x 3″ blocks to make a larger patch; trim to 3″ square. Or, just do what I do:
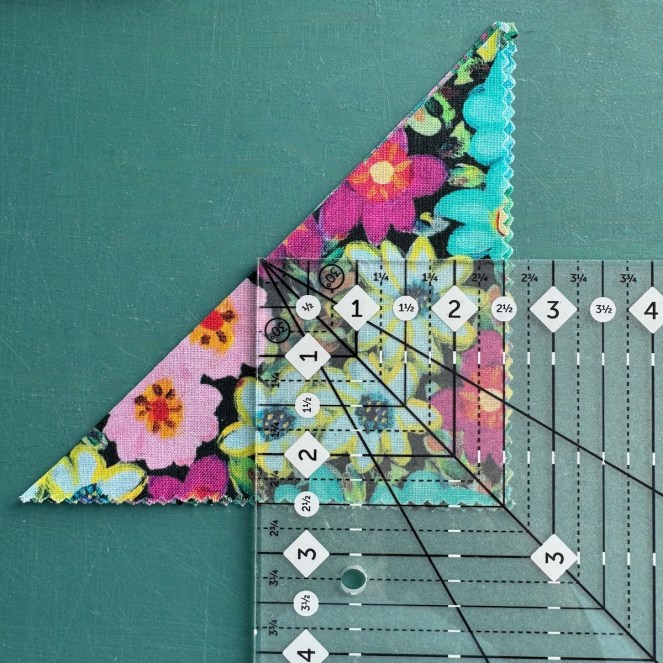
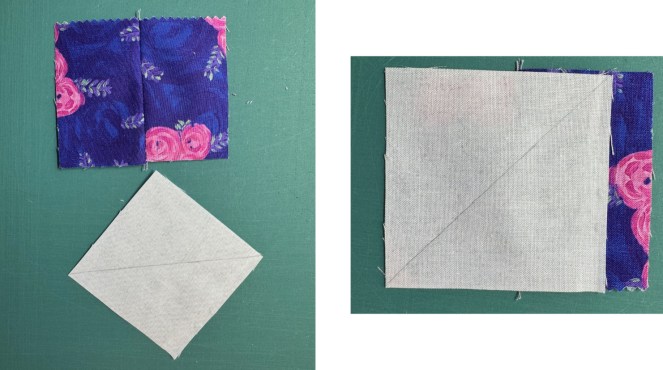
Draw a line diagonally across one of your background squares. Plop it on top of the extended square. Stitch on either side of the line, 1/4″ away from the line, then trim off the edge, and cut on the line. Standard HST-procedure except for that blob on the right. Then press to the dark side, then trim to 2 1/2″ square. You’ll need four of these per bird.
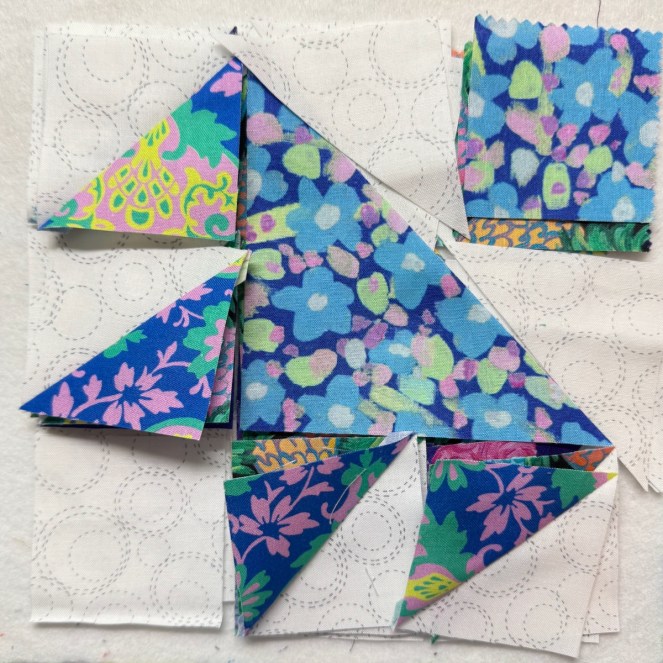
I’ve stacked up a few pieces before I start batch-sewing.
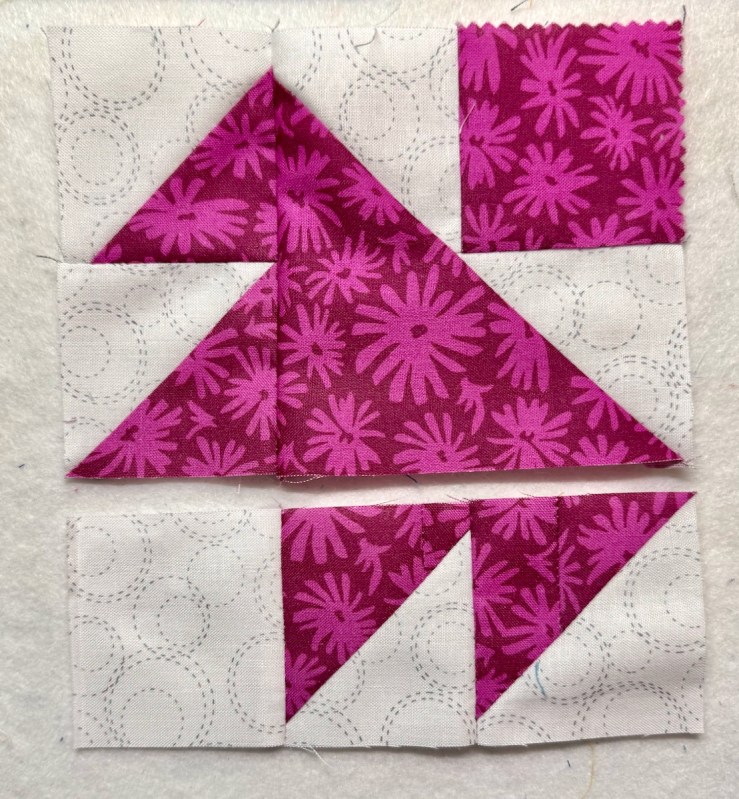
Sew the triangles on either side of the head, then sew to the body. Press, then trim to 4 1/2″ square.
Sew two HSTs together, then two more. Sew the first set to the body. Sew the second set to the white square in the lower left. Stitch everything together. (See photos, above.)
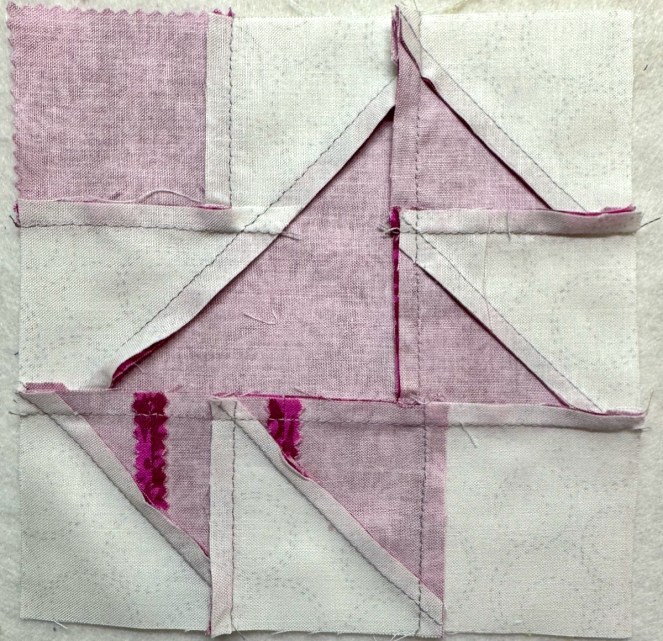
Two Reminders: • Trim the body/head square to 4 1/2″ and then, after assembling, • trim the whole block to 6 1/2″, please.
This is what it looks like from the back. On most of them I put one seamed HST in each wing-set, but here I have them both on one side. Now take your sixteen blocks and have fun arranging them.
Working Title: His Eye is on the Sparrow. It’s 24″ square, with two-inch borders and cornerstones. I’d been thinking about someone I know who has been having a rough go. I mean, we all take turns at that wheel, but now it was their turn. I had tried turning the darkest bird, but it was too much and too obvious. The pink sparrow, the one we all don’t notice all the time and who is quite possibly having the toughest time, is the one we need to keep our eye on.
I was able to cut and sew this thing in no time flat. I have a huge project I’m about to tackle and maybe I just needed a little something to get my sewing warmed up? I had fun making it, and hope you enjoy it.
I’ve read some take a Slow January, but this month we threw away the 50-year old workbench in the garage, and bought one of those fancy new rolling ones. We’ve cleared out lots of junk, and my car is loaded for a trip to the hazardous waste facility–who knew what we could accumulate in paint and pesticides over all this time! Happily, we found a new Fixit Guy, and he’s helping us with replacing switches and light fixtures, drywalling and painting. I think it will all be done by the 31st.
But this coming week is Road to California! Even though it is a national quilt show, it’s also our “local” quilt show — only 35 minutes from my house on a good LA freeway day. I’ll be going up several times to see the quilts, find out what the vendors brought, hang out with friends, and then it will all be over for another year. So, no. January is never slow around here, but we do hibernate in the dead of summer. At that point, I’ll be inside with with the A/C on (set to a responsible temperature) and sewing away. But for us Southern Californians, we play our January away!
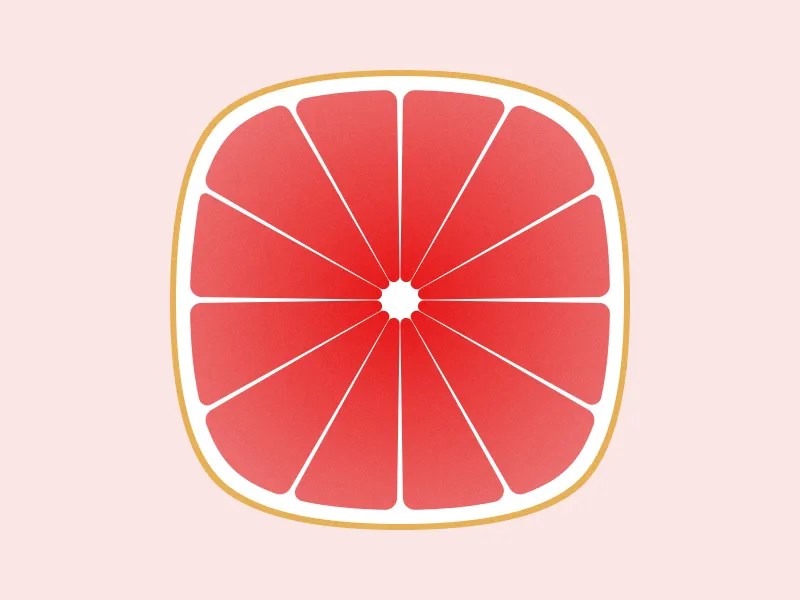
You knew this was coming, right? After you saw that last post about squircles, I’ll bet you knew I’d go hunting and fall down a rabbit hole. You are very perceptive.
This is a squircle grapefruit from designer Tai Tan. I found it on Dribble, which is also a website I didn’t know about before.
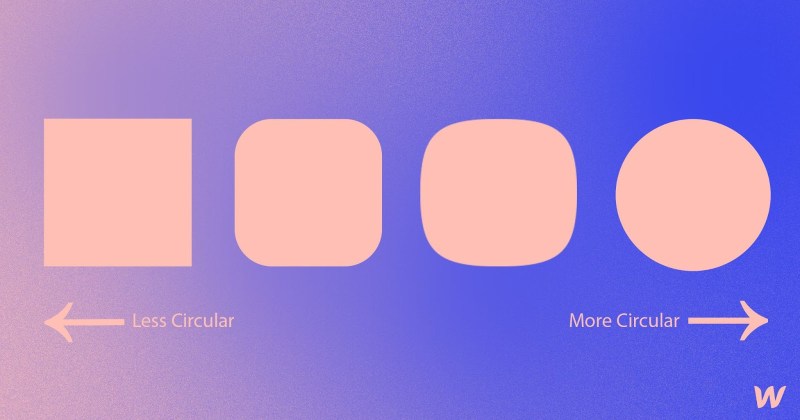
A squircle is not a rounded square, apparently. There is some design technique that can explain it, and it has to do with the flat edges. In a rounded square there are flat edges. In a squircle, they may LOOK flat, but they are every-so-slightly rounded (from here). John Uttley also has a nice grid of squircles to admire, and here’s more to see if you want.
Lisa, my quilty friend in the previous post, was as happy as I was with these quilts, so we thought we cook up a project. It went like this: 1st idea: make blocks and swap 2nd idea: swap backgrounds but still do your own appliqué 3rd idea: set up a challenge to do *so many* each month, and check in with each other.
Third time’s the charm. We’re doing a Squircle Challenge. So I went looking and besides the designers, I found some quilters:
Marla Varner’s blog, Penny Lane, feels like the OG.
I did an image search and was able to source this image to Zippy Quilts, my friend Mary’s blog. This quilt alternated squares on squares, and squircles on squares. It was made by Carolyn Brown.
Last quilt I found was from Amanda Jean Nyberg’s website, and she calls it “dot your i’s quilt.” This is different because of the low-value backgrounds.
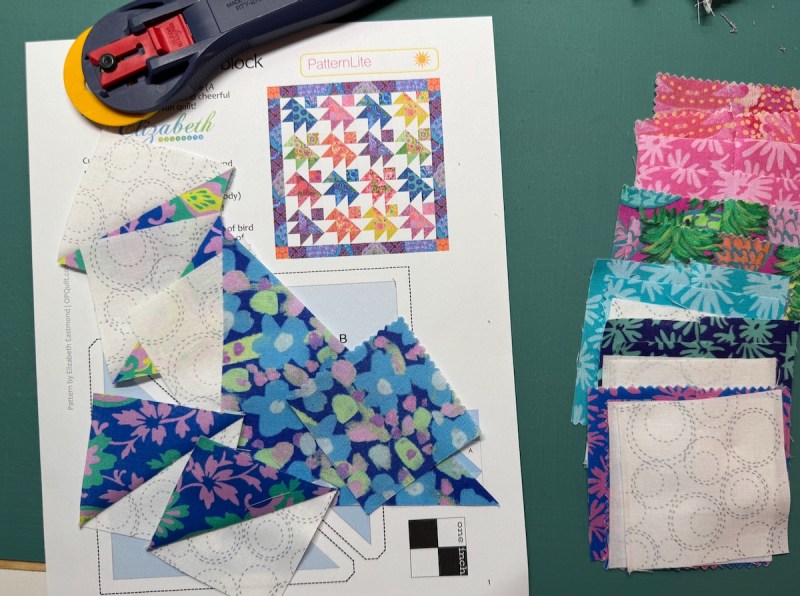
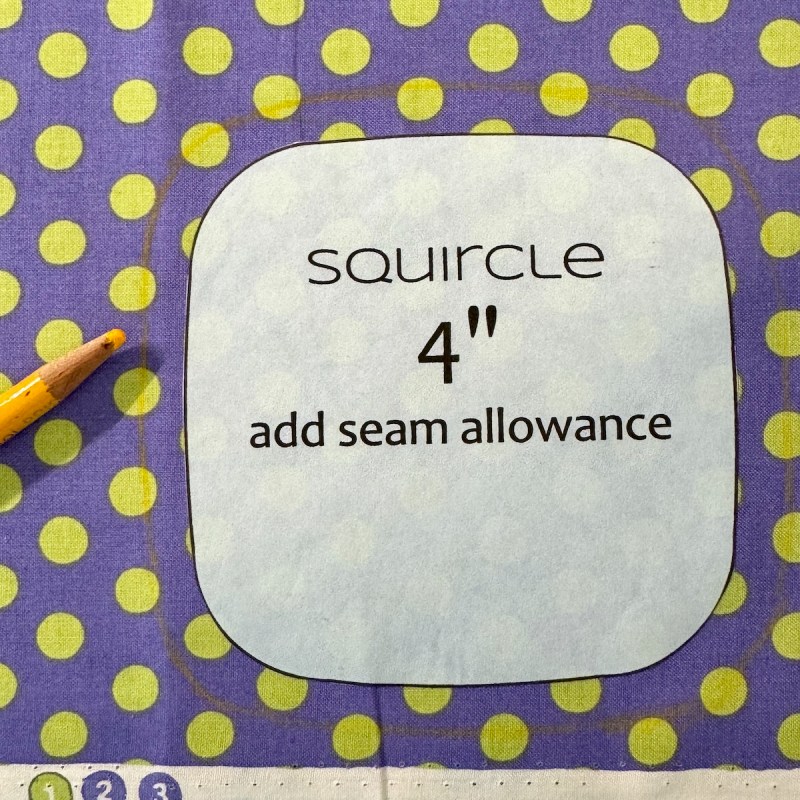
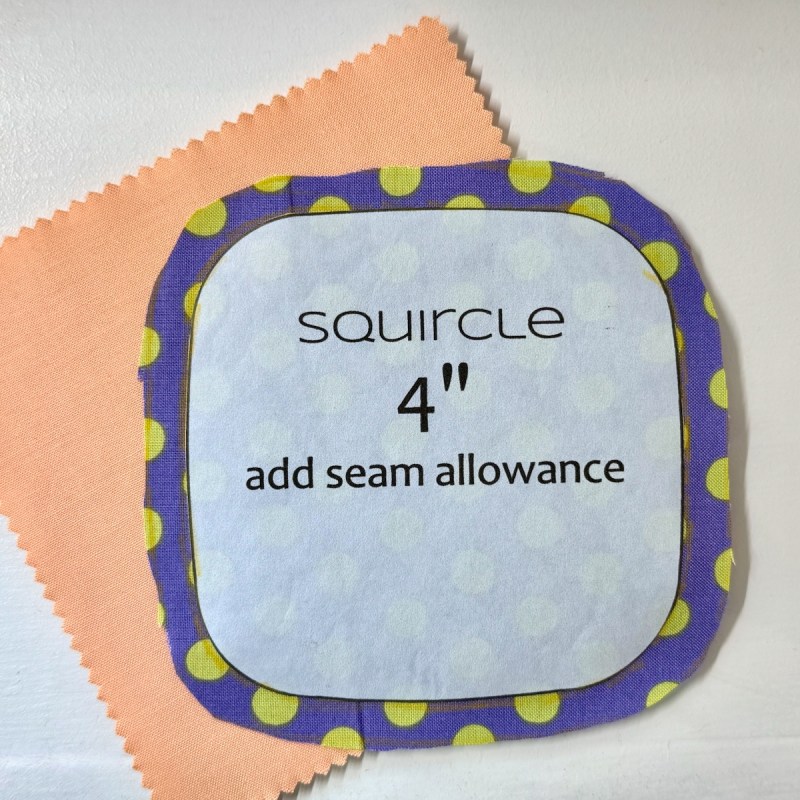
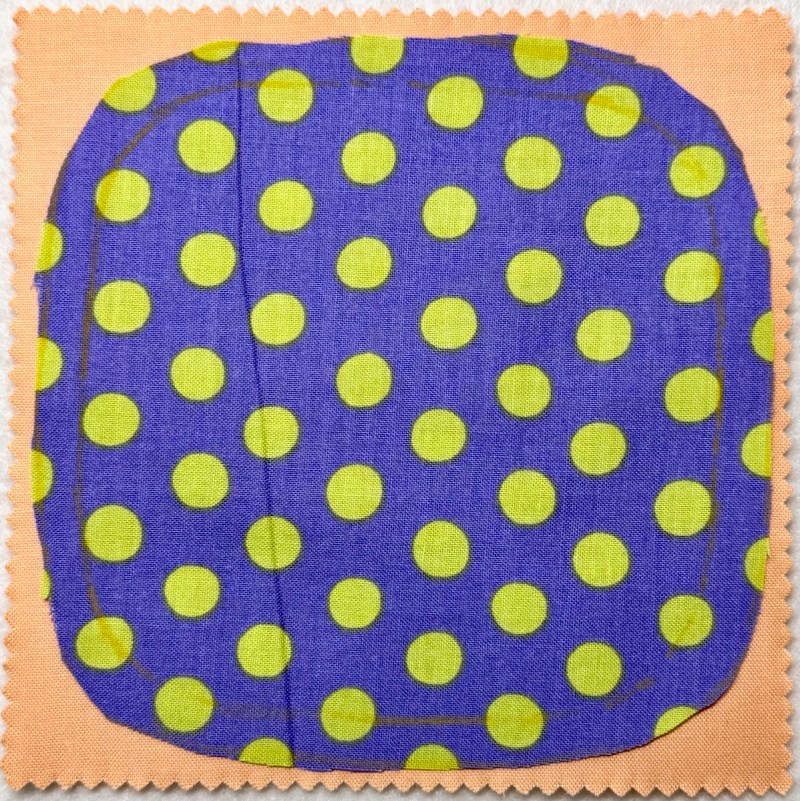
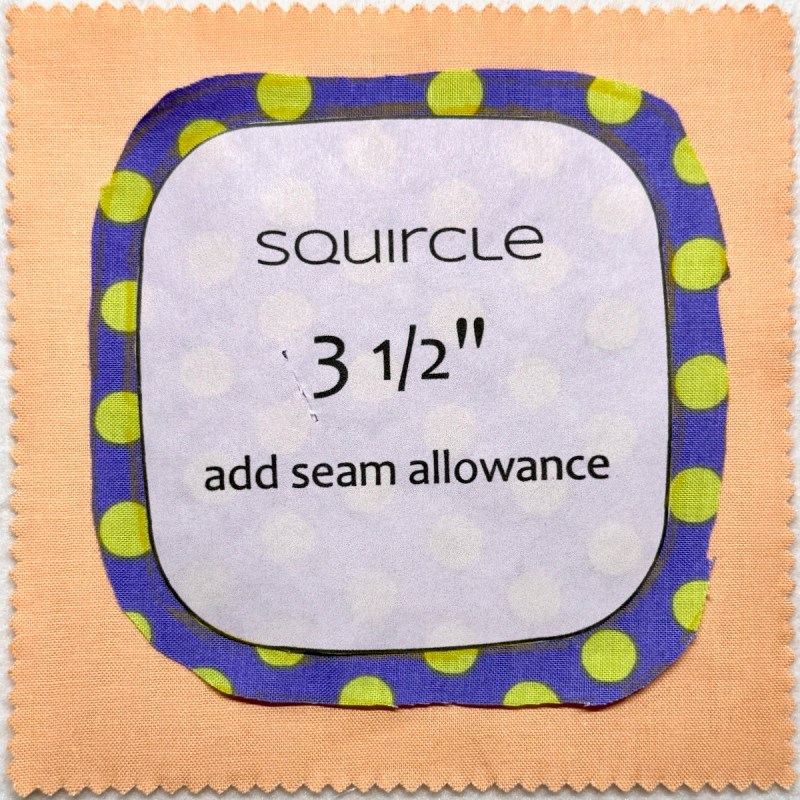
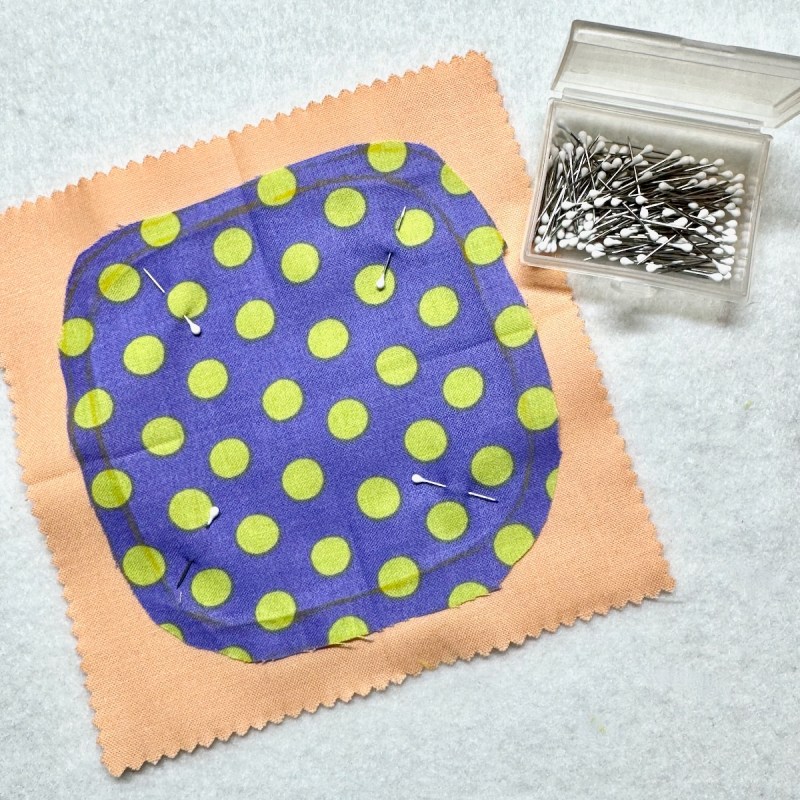
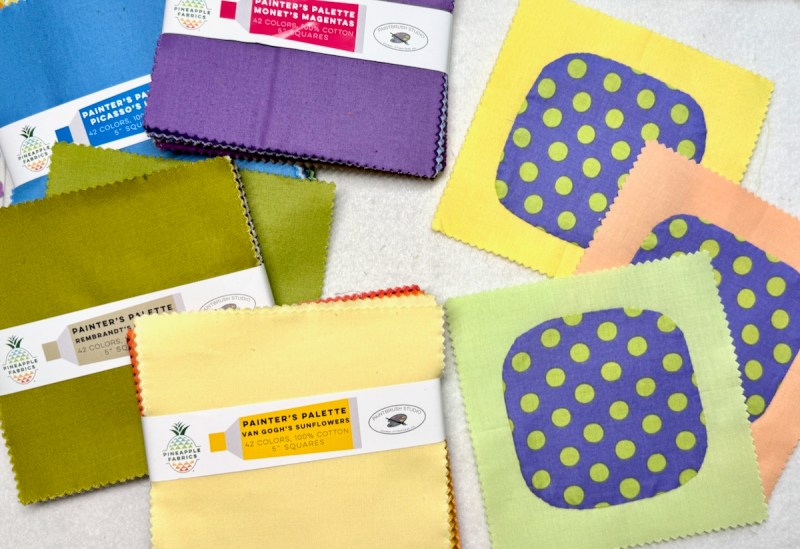
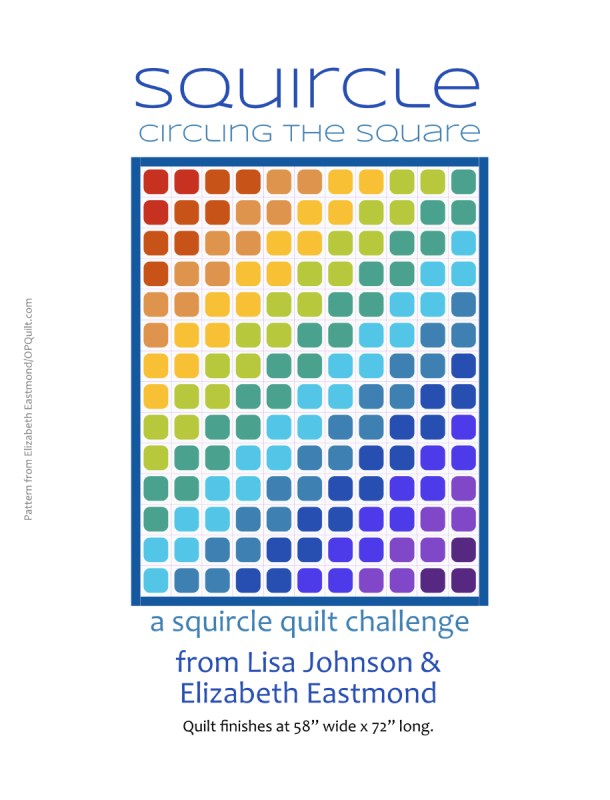
So here’s the story. I started the PatternLite with using a 5″ block (5 1/2″ with seam allowance) and that’s the first one in the pattern. But then in my stash box, way in the back of the closet, I found a stack of Charm Squares in Painter’s Palette Solids, my favorite brand. The 4″ squircle just looked too crowded.
So I redrew the squircle, to be more squircle-y, with slightly rounded sides. Then I resized it to fit — making it a 3 1/2″ (finished) size. That seemed to fit the backgrounds much better. So you have two sizes and two shapes in the free pattern.
I spotted my purple/lime green polka dot fabric at the top of this photo of Machelle Preston’s quilt, in the current Springville Quilt Show (see previous post).
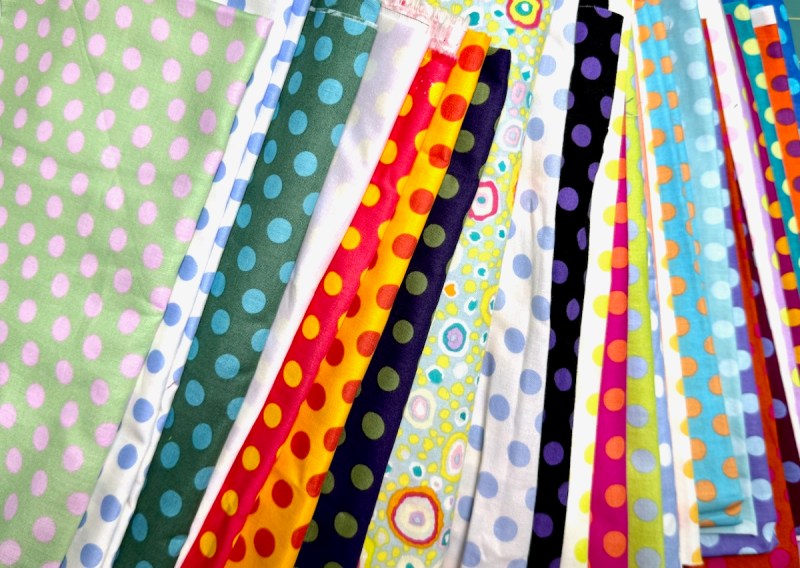
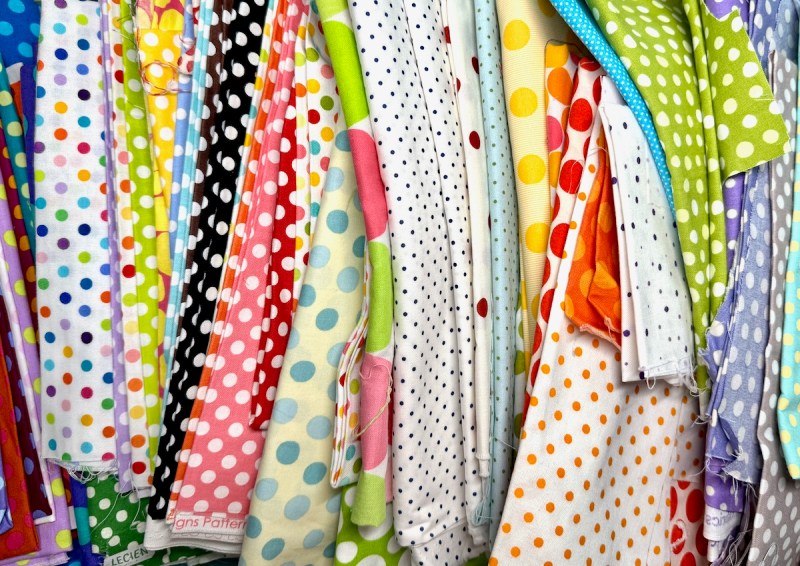
I have been hoarding collecting polka dots for years now. This is why: Come A-Round, from earlier in my making (Quilt #90).
However…I noticed that I seem to have plenty more dotty fabrics, so why not use them again, borrowing Machelle’s idea?
So here are the first three, courtesy of one of those sleepless nights that come along once in a while (if you haven’t seen Melanie, you are missing out). Now I just have about 177 more to go, but don’t worry, in the pattern there are two sizes (the 5-inch requires fewer blocks), and a helpful chart so you don’t panic. Just tote this project around to doctor’s offices, pick it up while watching TV, or while you are hiding from your family in a quiet room.
Because we dreamed this collaboration up in August, and everyone’s going back to school, that’s our theme. Our hashtag is #backtosquircle, a play on Back To School. We have an easy schedule, for who needs more pressure in their lives? The drill:
choose your block size/quilt size
make a bunch
every 20 blocks made, post it up on Instagram with our hashtag #backtosquircle (if you use that social)
take it slowly!
Here’s your free 5-page Squircles handout. It has the templates for the 5″ blocks, for a 4″ block and some basic directions.
You know the usual: send your friends over here to download it, rather than making copies for them.
The Meaning of Round Corners (with this great line: “In interface design, the rounded rectangle is sometimes called “the happy rectangle”.) I can always use some more happy in my life.
This phrase intrigued me. It came from a podcast I listened to while out walking, so I’ve been thinking about what happens when we try to learn something new. Or lean away from “what we’ve always done.” Or have to hang out in the middle of a decision, not knowing the best way forward (the temptation is always to force it to a conclusion, apparently, limiting new possibilities). These ideas on uncertainty are from Maggie Jackson:
“Neuroscientists are beginning to unpack what happens in the brain at the uncertainty of the moment, when the realization that you don’t know that you’ve reached the limits of your knowledge instigate a number of neural changes. Your focus broadens and your brain becomes more receptive to new data and your working memory is bolstered. So this kind of rings a bell: you’re on your toes and that’s why uncertainty at that moment is a kind of wakefulness. In fact, Joseph Cable of the University of Pennsylvania said ‘that’s the moment when your brain is telling itself there’s something to be learned here.’ So by squandering that opportunity or retreating from that discomfort, we’re actually losing an opportunity to learn. Your old knowledge is no longer sufficient.” –Maggie Jackson on the podcast The Grey Area, with Sean Illing
So what does this have to do with quilting?
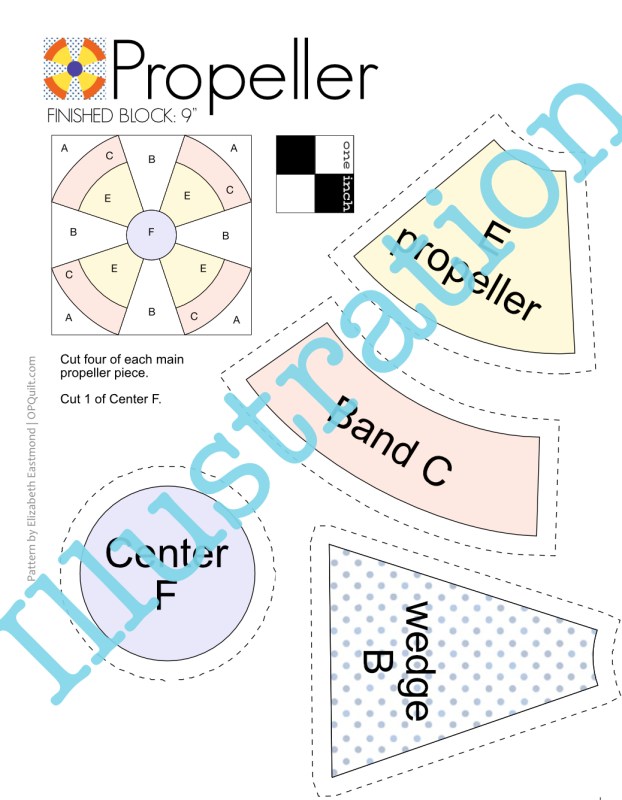
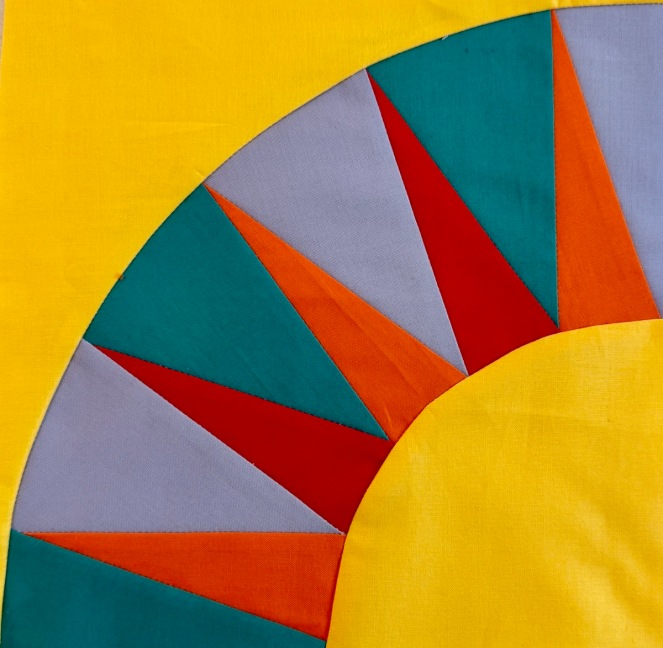
I recently finished up my pattern of the New York Beauties (more on that in a minute) and decided I wanted to make each block in the quilt in regular intervals, but many of those above are multiples of the same block. So I thought I’d test out using freezer paper, instead of my usual parchment paper, and see how I liked it. (Besides that, my regular 17 lb. parchment wasn’t being made anymore–only the 28 lb. Time for an update!)
And the verdict? I like it!
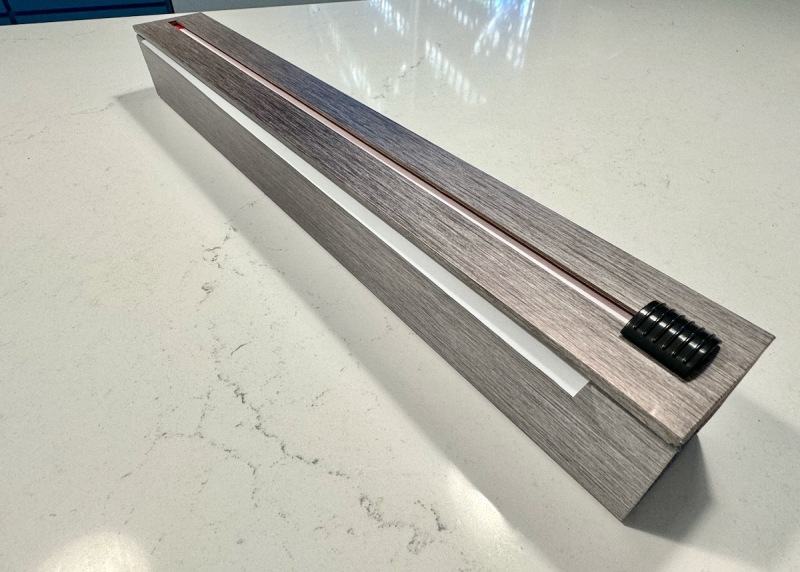
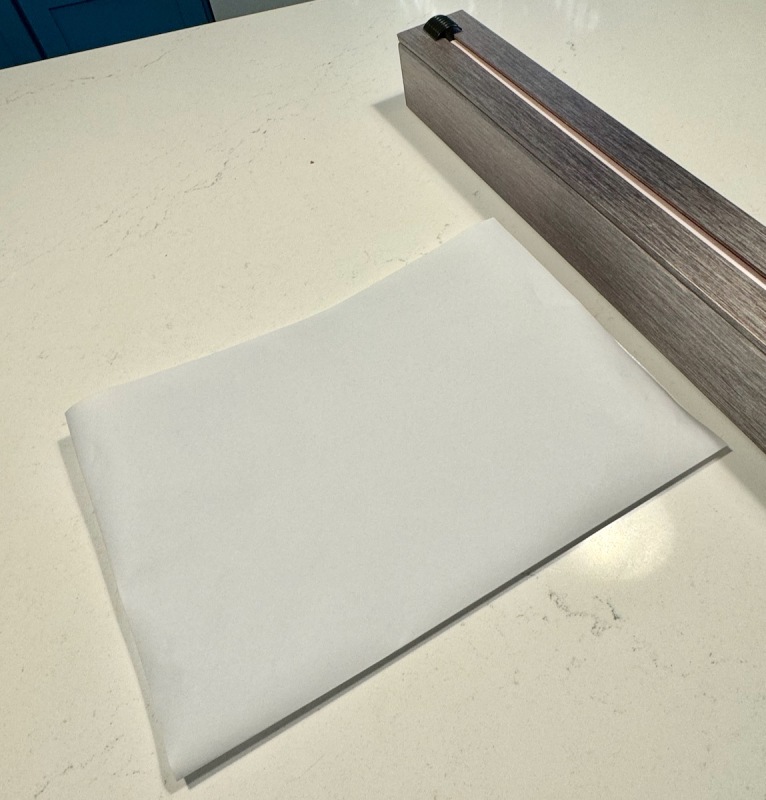
First, start with this: ChicWrap’s 18″ aluminum foil dispenser. It comes with foil, but I put that back in the kitchen, and slipped in my 18″ roll of freezer paper.
You don’t thread it through that slit, but instead, lift the lid, to set up the paper for cutting.
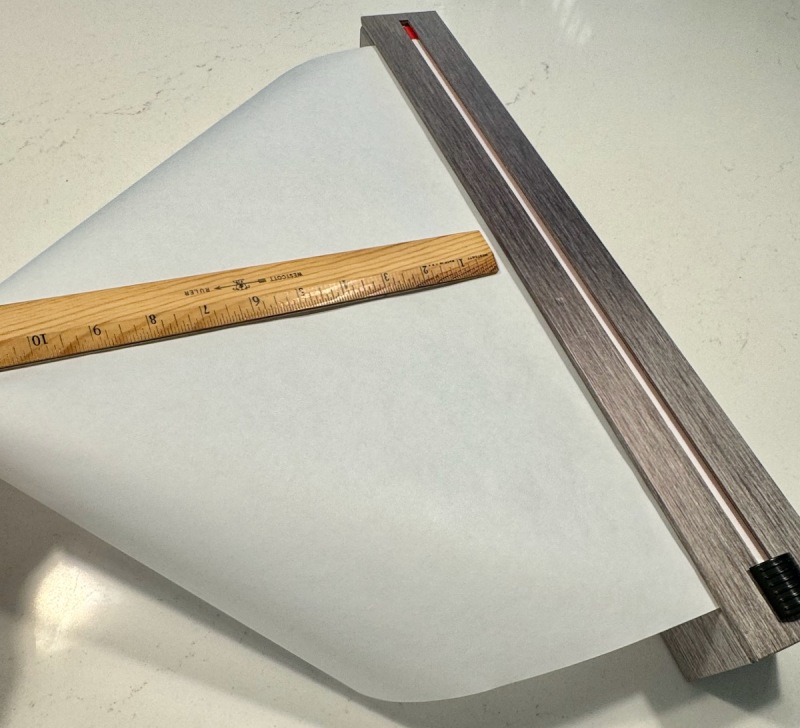
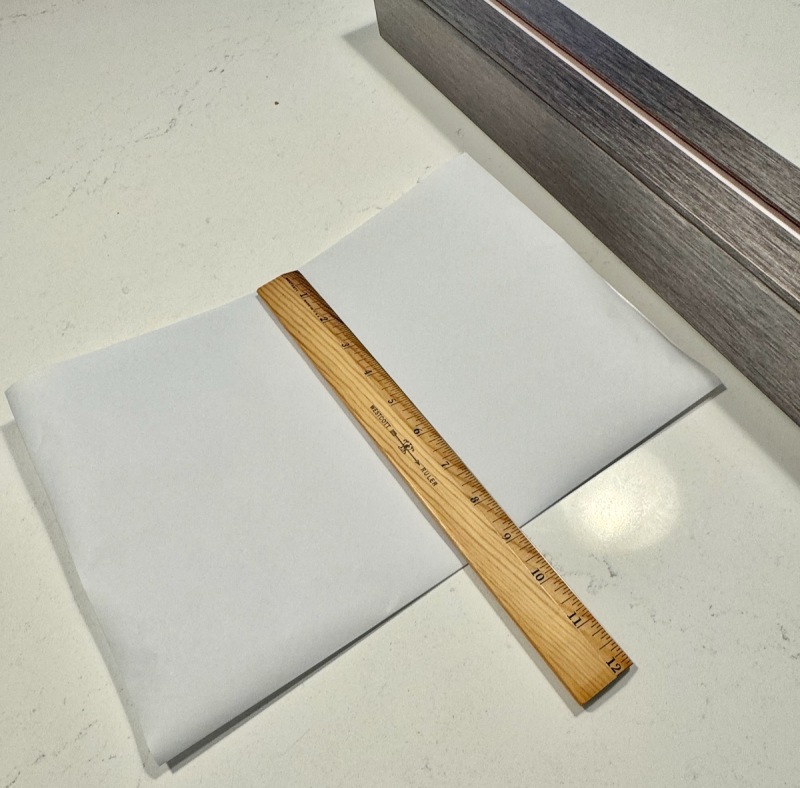
Pull it out so you have at least 11″ of length. Fold it in half (it will measure about 9″ in width), then take it to your cutting mat to trim it up to 8 1/2″ x 11.” Now you are ready to feed it through the printer. If you don’t have a printer that will allow you to feed it one sheet at a time, you can tape the freezer paper to a piece of heavier paper or cardstock (trim the freezer paper down to 8″ x 10 1/2″) and send that through.
I read about buying sheets of freezer paper already cut, but most of the commenters said it was no sturdier than the stuff we use from our rolls, so I just cut it from the roll, and went with it. After printing, I cut it out around the outlines of the piece I was using. You can experiment with this technique by downloading my free New York Beauties single pattern from PayHip:
Even though I’d already printed out all the regular parchment papers, my brain was saying “there’s something to be learned here.” So here we go:
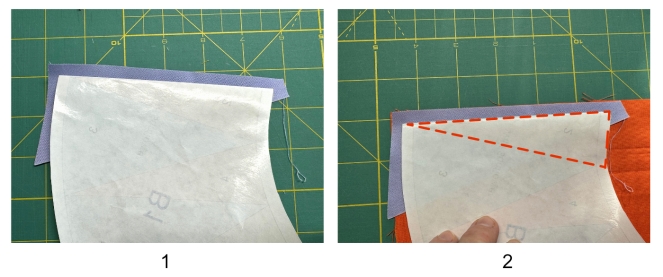
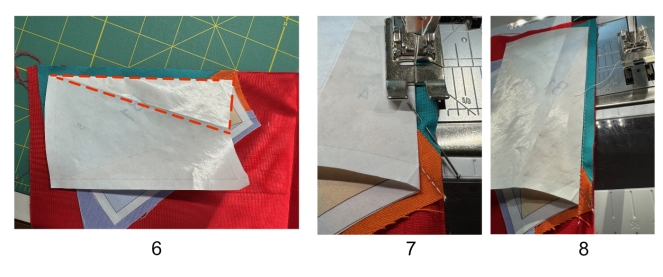
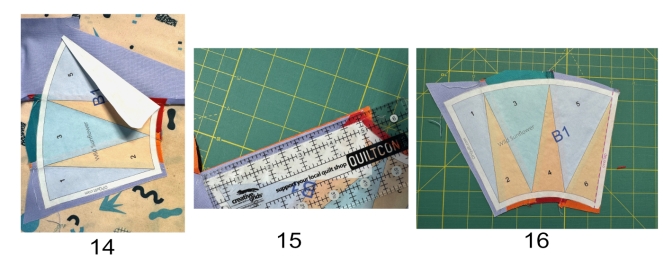
After cutting out your shape from the printed freezer paper, fold on the first line, and press just this section (Ray 1) to your first piece of fabric (picture 1: muted lavender). Then lay that on top of your second color (picture 2: orange).
Later on, I figured that I should make a crease on all the lines of my section, but for now, I digitally outlined the rays in orange dashes to help you see the shapes.
Make sure there is enough of your second fabric underneath your first fabric. Pin, or clip. Head to the sewing machine, and sew next to that folded edge.
Now to the ironing board. Press, smoothing the fabric away from the seam. Iron only on the next section (Ray 2). Fold back along the line between rays 2 and 3.
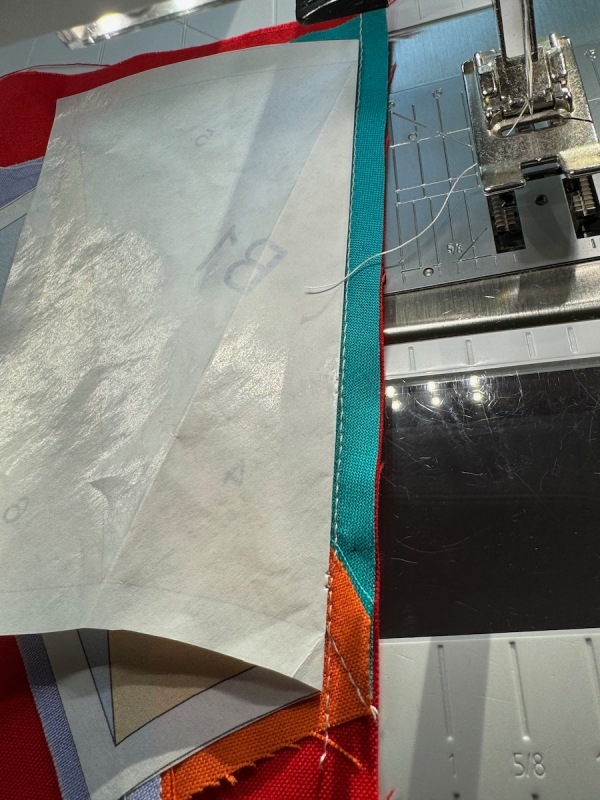
At the cutting board, align your ruler for a scant quarter-inch seam, and cut off the excess. If you need to trim at the end of the piece, open up your paper, so you know you aren’t going to cut off something you’ll need later on. Use the edge of the paper as a guide, but rough-cut off the extra. (See picture 12, below.)
Fold back alone the line between sections 2 and 3, revealing the shape of the next ray (shown here in dashed orange lines). Place on your third fabric (picture 5: blue-green). Stitch along that folded edge. Iron Section 3 paper onto the blue-green fabric, smoothing out the fabric underneath.
Fold on the line between sections 3 & 4 (Ray 4 shown here in orange dashed lines). Place until on next fabric (picture 6: tomato red).
Close-up of stitching
Again, stitch along folded edge, shown in pictures 7 & 8. You can also see how I pin — just in that seam allowance. Did all my fabrics have a straight edge, making it easy for me to align (as in picture 6)? No, not always. If not, I would place, trim…and then pin and sew.
You know the drill now: press just that section (Ray 4), then trim at the cutting table, as shown in picture 11.
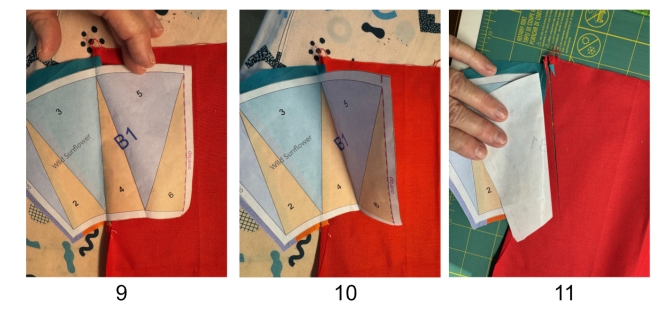
In picture 12, I show how I open up my paper, so I can cut off the excess at the base of the B1 section. Then I fold it back down and trim that scant quarter-inch at the crease of the paper (between Rays 4 and 5). In picture 13, I fold it back down, and lay it on the next fabric, using the shape of Ray 5 to check you have enough fabric. Those orange dashed lines are a visual guide: I do have enough. Stitch along the folded edge.
Yep–you know: press only the Ray 5 section of freezer paper onto your fabric. Back to the cutting mat to trim at a scant quarter-inch, then repeat with your final ray (picture 15: a happy orange for me). Press that freezer paper to your final ray. It should look sort of like the image in picture 16. Set aside, and start on B2.
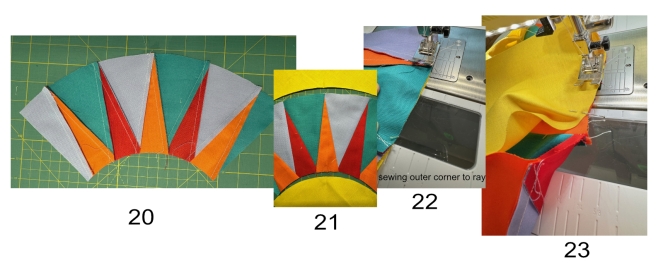
Following the numbers, and using the same technique, stitch all the rays for B2. Trim carefully around the edges of both, neat and clean (picture 17). Peel back the papers for those edge-rays with wrong sides together and pin, aligning lower and upper edges of B1 and B2. Take to sewing machine. I found I had to peel back even a little more. Stitch, then carefully peel off the freezer paper. When you take it to your ironing board, press that last seam the same direction as all the rest (you’ll figure it out).
Charging right ahead, press a center mark in the A Outer Corner, the B1/B2 piece, and the C Center. Don’t press down through the whole piece — just the tip of your iron is all that’s needed. Pin the outer edges of the A Outer Corner and the center marks, and head to the sewing machine.
In picture 22, I sewed the A Outer Corner to my rays, PUTTING THE LARGER OUTER CORNER TO THE BOTTOM. This is different than you usually see. Please take it slowly, no rushing, keep aligning as you go from pin to pin to pin (there are only three).
In picture 23, after putting in my three pins, I sewed the C Center to the rays, WITH THE RAYS TO THE FEED DOGS. Again, take it slowly, and keeping aligning the fabric. You can pull it toward you a little as you stitch, because those curves are bias. By elongating them (by stretching them out), it may help them to line up a little easier. But not a big pull, not a big tug. Little adjustments. You are the tug boat, getting that steamship into port — little by little. (Okay, enough bad metaphors.)
Press. Usually you are pressing away from the rays.
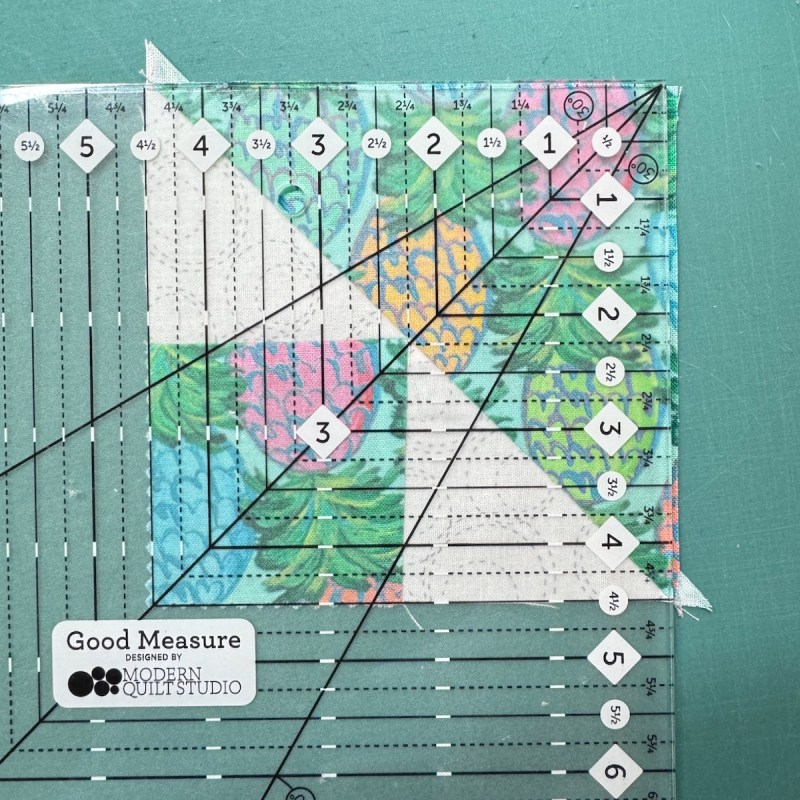
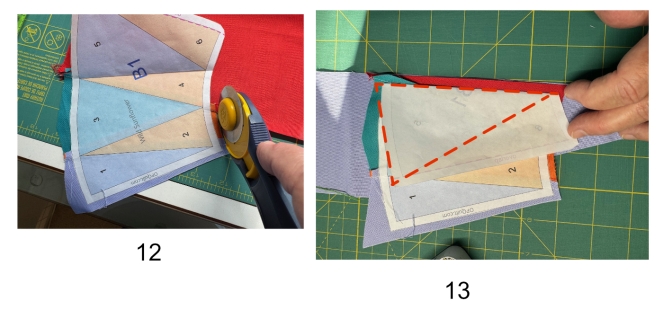
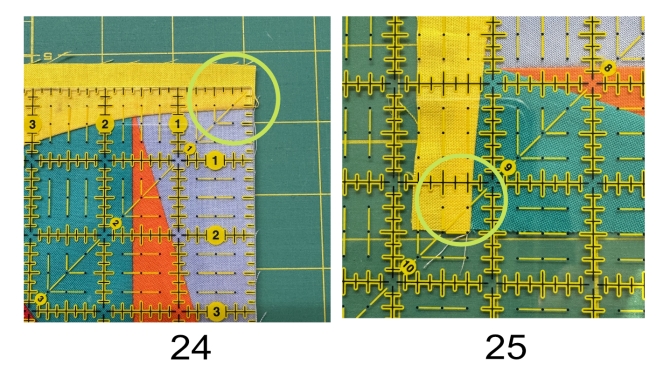
Now to trim up. I gave you extra on the A Outer Corner so if your block went askew, it wouldn’t be a tragedy (just another way I show my love to you in my patterns — I make the mistakes so you won’t have to). Align the corner of your ruler so the 1/4″ line is right at the Outer Corner fold, as show in picture 24.
Then check the opposite corner, lining that 9 1/4″ mark at the folded edge. It’s not rocket science, meaning that it most likely won’t be exact. Get as close as you can. Trim, then turn the block, lining up the 9 1/2″ line with the trimmed edge, and slice off whatever is left (not much on this side).
Done! Wild Sunflower block is complete. Now, if you are going for the full quilt, the pattern says to make a total of three. So will the freezer paper keep sticking?
Ray Two is finished, and I’m plowing again into Ray Three, and yep — it’s still sticking. For one of the blocks you make it five times. I’ll be interested to see how that goes. And overall, I felt like using this method is faster, always a plus.
Just like I used a weekly goal to help pull me out of my sewing slump last summer, I’ll be using these New York Beauties to get me going for this year. If you want to follow along, I have a coupon for you to use, if you want to purchase the pattern. (I’ll probably do this every two weeks, so don’t panic.)
Just head to my quilt pattern shop, and when you check out, type in this code (note the three capital letters at the beginning). You’ll get 20% off the pattern. It expires on Leap Day! (February 29)
All of this can be found on the Master New York Beauties page, on the tab above. When the coupon expires, I’ll take it down, but a listing of the blog posts will be linked there, if you want to refer to them.
What we ate for the Super Bowl (no, we did not watch it): Homemade Focaccia
Just before kick-off, Camryn and Landon (he, of Focaccia fame) stopped by to visit, then took off again to their Super Bowl party. Later that night, we blanked out by watching the movie Dune on Netflix, understanding about 60% of it. If you’ve seen it, what was your percentage?