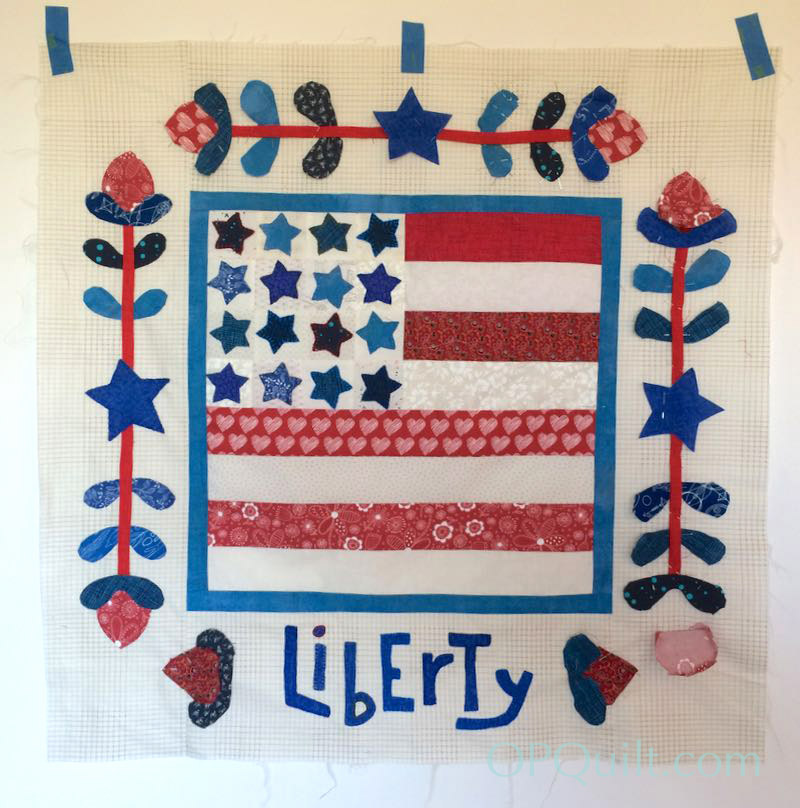
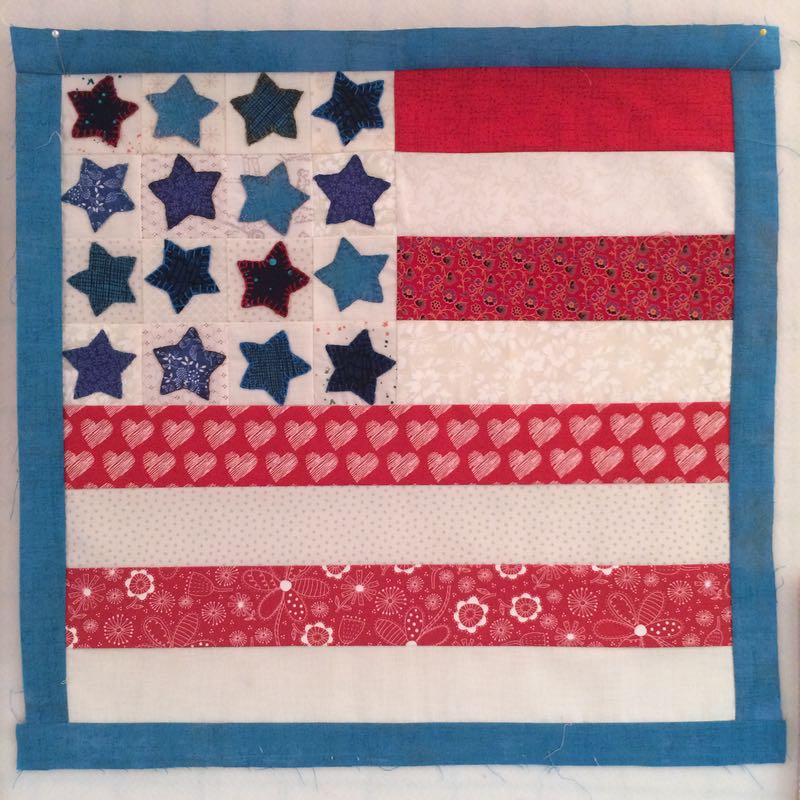
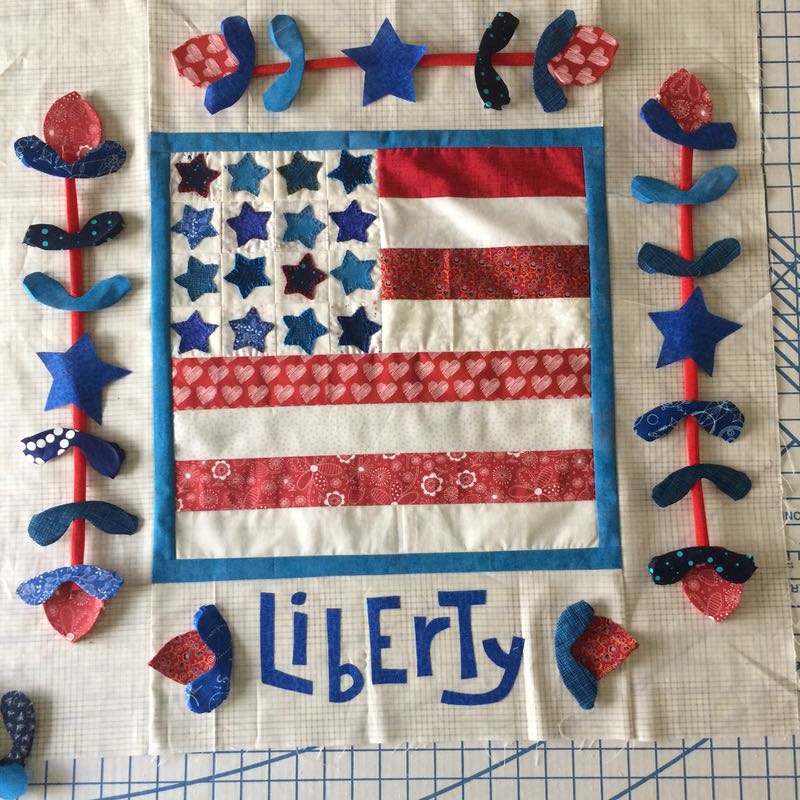
I’ve made some progress by getting the first (left) side sewn down.
It’s pretty wonky, but I’m leaving it as a testament to this wonky time in my life.
In my pain-killer-addled brain the day I mapped this out, I resorted to doing the freezer paper appliqué method, so everything looks pretty 3D-ish when laid out. In hindsight, I probably should have done it differently, but the quilt will still get done this way. Better to move forward, than to take too many steps back.
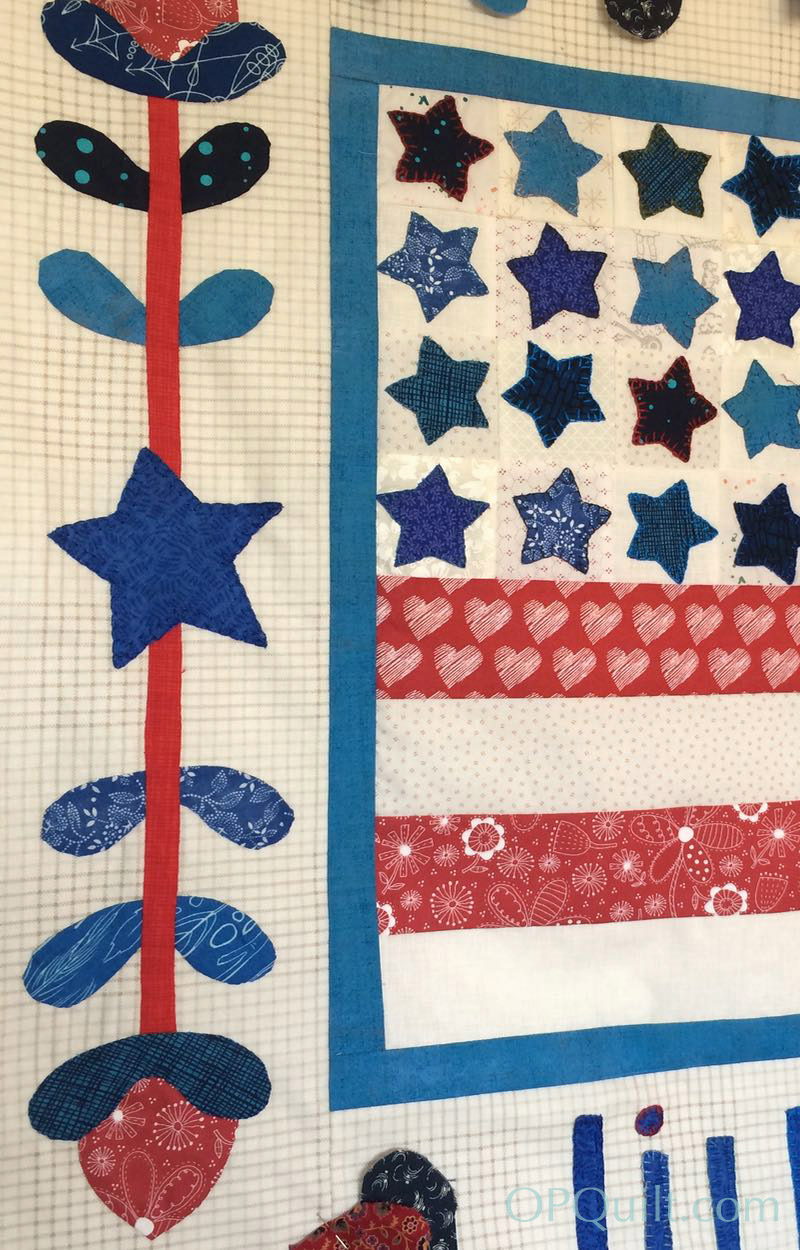
I have always wanted a patriotic mini-quilt, so before surgery, I prepped up these little stars, fused them down to 2 1/2″ squares of fabric and stitched them together in a block. I figured I could stitch on them while healing. I would use some of those pearl cottons I’d collected while doing Oh! Christmas Tree, and blanket stitch around the shapes.
The first day, all I could stitch was ten minutes. I came back to it a week later and over a few days, finished them up. Now what?
I taught my husband how to rotary cut, and we got some stripes together (short is 8-1/2″ x 2-1/2″; longer is 16-1/2″ long x 2-1/2″). I swapped out my big machine for my teeny Featherweight, and stitched them together, one-handed. At my first check-up the doctor gave me the go-ahead to do stitching, as long as I wore my sling, saying it would be “therapeutic.” Oh, yes.
Putting on these scissor-cut 1-1/4″ borders was not easy (finish at 3/4″). I’m so used to man-handling the fabric for speed, I’d forgotten how to slow-stitch, or slow-quilt, or whatever you want to call it. Before, I would grab the strip in front and in back and put some tension on it, floor my foot pedal, and force that fabric into place. Since I only have one hand available to help guide it through the machine, this wasn’t going to work.
Auditioning the next border, with the realization that there is no driving, either, so no running to the fabric store if I don’t like what I have. I scissor cut the borders, laid out the little mini quilt face-up on the ironing board, and gave it a good press and smoothed it out. Next I laid the border face-down on top, and again pressed it. Since I can’t force these pieces together, I have to coax them. I pinned them together in many places, and fed the seam slowly through the machine. Flattest border I ever put on, with no puckers anywhere.
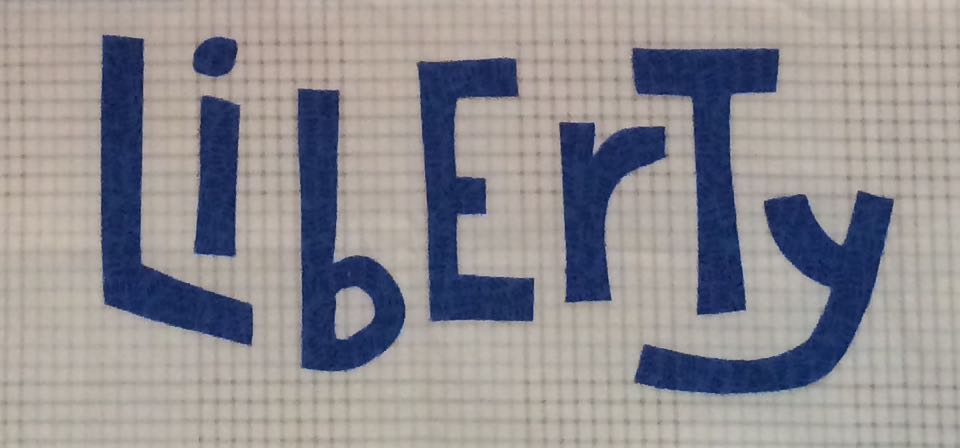
I had an old printout from the internet (couldn’t find the source when I went back to reference it) that had this word, so I drew two lines, 5″ apart, then another guideline 1″ inside the top and bottom and freehanded the letters. I fused them on to the quilt. They are about 5″ tall overall, as that outer border was 6″ scissor-cut.
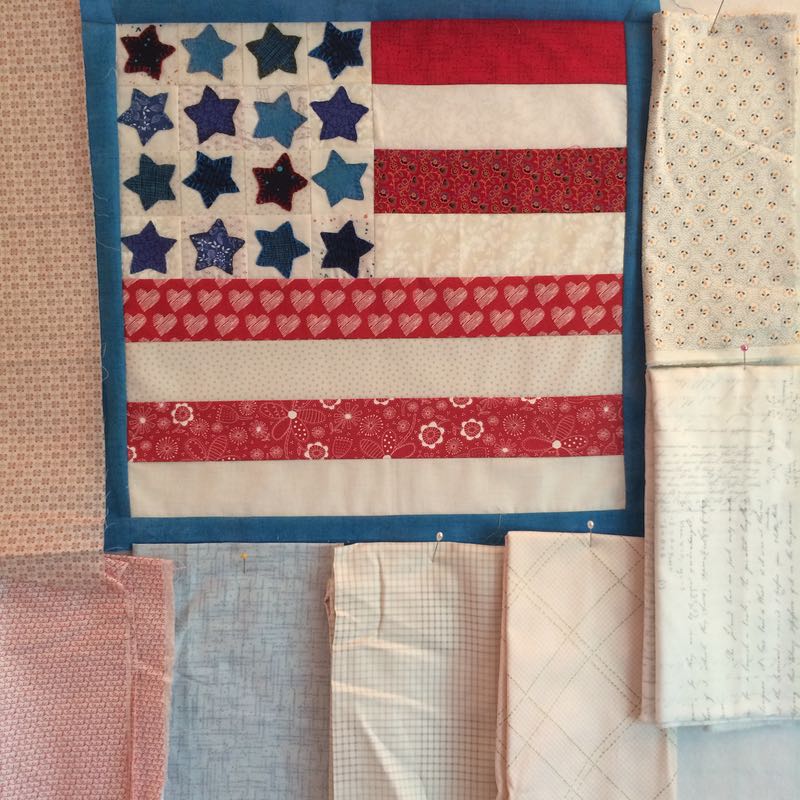
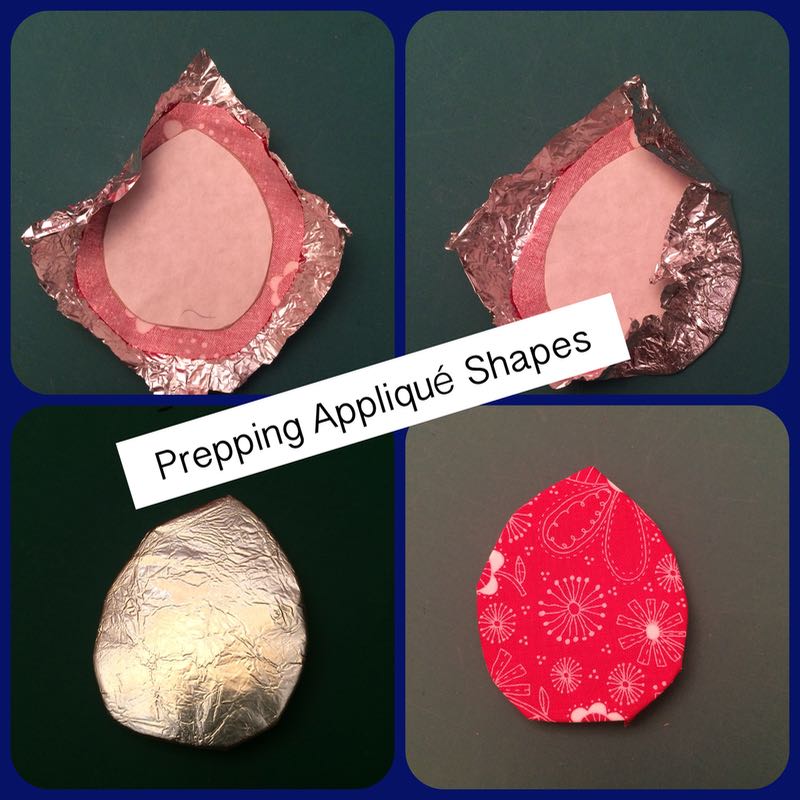
I sketched out a bud, figured out some leaves. I drew joined leaves, inspired by my love of samaras, or those joined helicopter seeds from maple trees, but also inspired by this photo [PDF of pattern shapes is at the end of this post]. Above, I am trying Sarah Fielke’s method of prepping up shapes for appliqué. It worked fairly well.
I laid out all the parts: leaves, byds (small and large), tubing for stems and more cut stars (on the pattern sheet), trying to decide if I like two leaf sets next to the word Liberty, or one. I’ll appliqué or blanket stitch down everything…then decide. Since I work in small segments of time, and ever so slowly, I might make my goal of July 4th. Here’s the pattern sheet in a PDF document: liberty-usa-quilt-bits Please be sure to set your printer’s settings to 100% so the large star will measure 3-1/4″ where noted. It contains: large flower bud (top and two sides), small flower bud (next to Liberty), joined leaf shape and the large star. You can either shrink this star for the 16 stars in the central star section, or look for a star online that will measure about 1-3/4″ to 2″ across.
My set-up is a pattern-cutting board laid out on the extra bed, a chair pulled up to it.
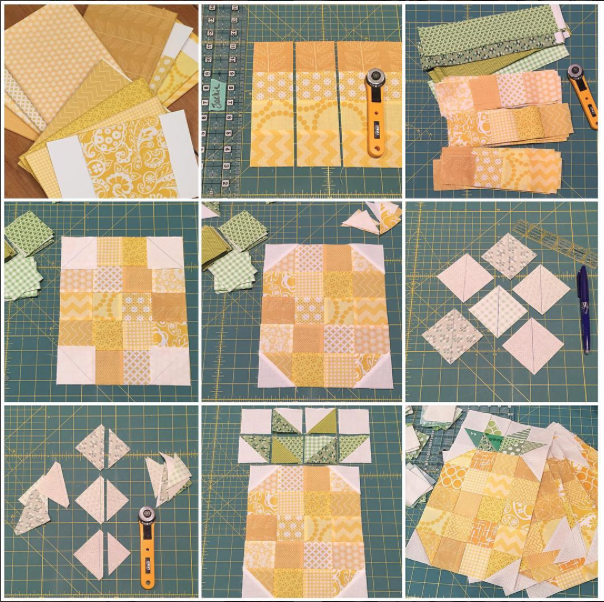
This month, Sherri, of A Quilting Life, is our Queen Bee and she’s asked us to make her pineapple blocks.
First step: make a mess of the sewing room pulling out greens to get the best ones. (It also helps with re-organizing my messy shelves.)
I downloaded the free pattern, and also pulled up the post from Sherri where she makes her block, so I could glean any tips she had when she made it.
She suggested we scroll through Jackie’s IG feed until we found the tutorial, which really helped me understand how we put these together (that’s a screen shot of her image above), as the pattern is a bit sketchy on details. It can be a bit confusing, but basically she is making enough for 18 pineapple blocks.
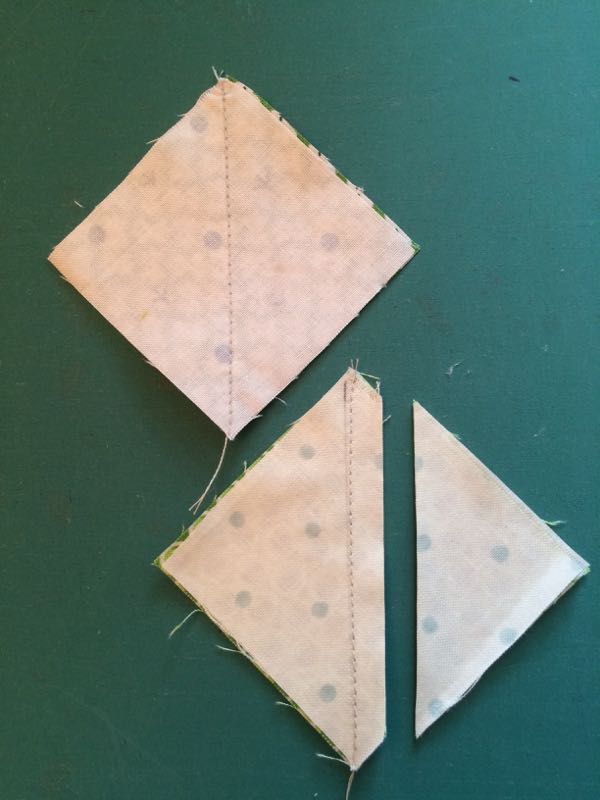
As promised, here’s a brief tutorial on how I like to make my #pineapplequilt blocks! The great part about these blocks is there is no wrong way to do them, and lots of right ways! 1️⃣ I like to pull yellows in sets of four so that I can strip piece my units to form the yellow body. You need 24 2-1/2″strips sewn into 6 groups of 4 to produce 18 pineapples. 2️⃣ After sewing my 6 strips of 4, I like to press them all one direction and then I subcut them at 2-1/2″. This helps to nest my seams when I construct the body of the pineapple. 3️⃣ I choose a variety of greens, along with my white background fabric, and subcut the number of 2-1/2″ blocks needed to make the corners and stem units. 4️⃣ Then, I draw a line corner to corner and I sew on the line on the white squares to create the white background pieces. (Kind of like making a snowball block) 5️⃣ Next, I trim 1/4″ from my seam and press my corners out. 6️⃣ To make your stem units you’ll want to make HST’s in whichever method you prefer to equal 2-1/2″ unfinished HST’s. 7️⃣ This quilt is great for using up scraps, and I generally have a lot of 2-1/2″ strips, so I make my HST’s from that size and sew corner to corner and then trim 1/4″ from my seam down the middle. There is more waste this way, but if it’s just scraps anyway, I’m ok with it! 8️⃣ Arrange your background squares and HST’s to form the stem shape, and sew those units to your pineapple body. 9️⃣ Ta-da! You’ve made a pineapple block!!! 🙌🏻🍍
Better to click on the Tutorial (above) and use that.
What confused me was that the pattern calls for cutting all the blocks the same size, different than what I would do if making half-square trianges (HST). After reading the IG tutorial, I see that Jackie sort of “snowballs” on the white corners, instead of making HSTs. She marks the line, and sews just to the side of it–to the seam allowance side. She then cuts off the excess. One advantage of this method: there are no dog ears to trim!
Yellows sewn: check. Green pineapple crown sewn: check.
One other difference in the construction of this block is that the low-volume white is added to the corners of the yellow block after it’s all sewn together, then sliced off and pressed.
Ta-Done!
And here it is with its signature block–with yellow on one corner and green on the other–albeit a bit blurry.
Elaine’s Quilt Block Quilt Shop in Salt Lake City had a swap of pineapple blocks–both in the yellow and in a range of colors. Unfortunately, they have now closed. I wish I’d grabbed more screen shots of all the pretty blocks!