Free Quilt Pattern · Quilts · Sewing · Tutorial

Elizabeth’s Project Folio–Part III (Bringing it Home)

Project Portfolio Filled_1

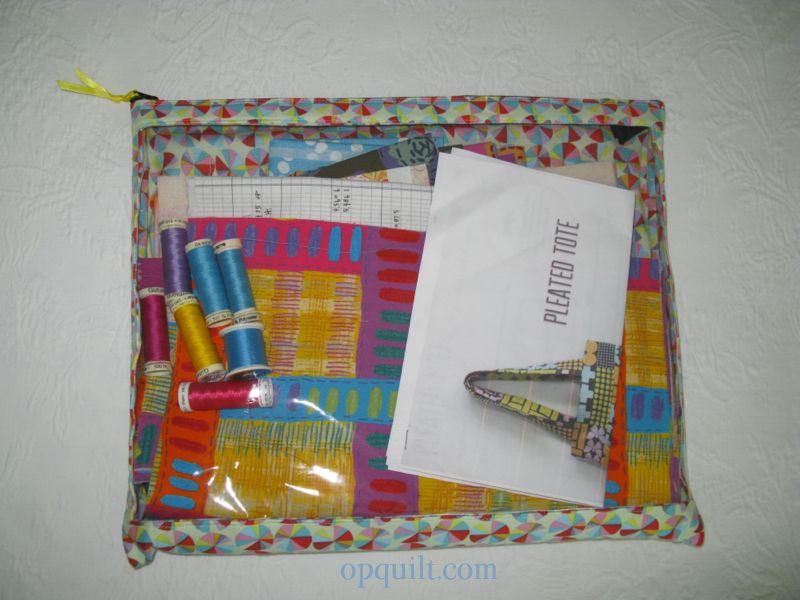
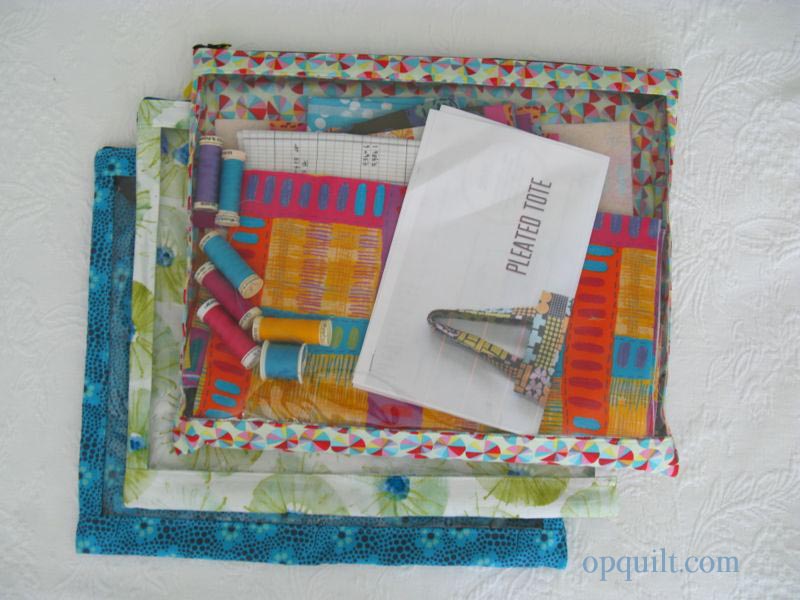
Elizabeth’s Project Folio, front and filled with my next project, a bag made of Keiko Goke fabric

Project Portfolio Filled_Back

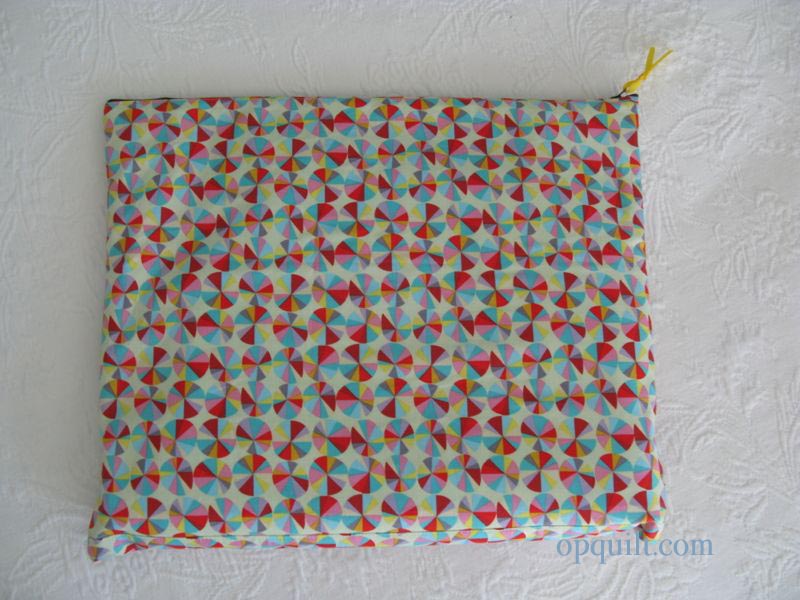
Elizabeth’s Project Folio, back

Project Portfolio Blue_opened

Elizabeth’s Project Folio, interior of blue folio

These are not only good for holding sewing projects they can also be used for:

• long car trips, holding each child’s stash of car junk
• teaching, corraling all the supplies for each lesson unit
• teaching, holding copied pages in place so they don’t go all over your bag
• errands–one for the Post Office, one holding grocery lists and coupons (you can make that one smaller by adjusting your dimensions), carrying swatches for decorating (one folio for each room you are working on)
• hand-sewing projects, such as cross-stitching a sampler
• knitting, as they are big enough to hold your needles, or needle-kit
• packing for a weekend away (one can hold lingerie, one your workout sweats, one can hold rolled-up T-shirts, etc.)

I’m sure you can think of others.  Send me a note telling me what you used yours for!

Finally, to thank you for your readership, I’m giving away the white flowered project folio to one of my followers or Bloglovin’/Feedly readers.  In your comment (at the end of this post), tell me what you’d use your portfolio for, and tell me how you follow me.  I’ll close this giveaway on early Monday morning (8/26), and send it off.

Project Portfolios in bag

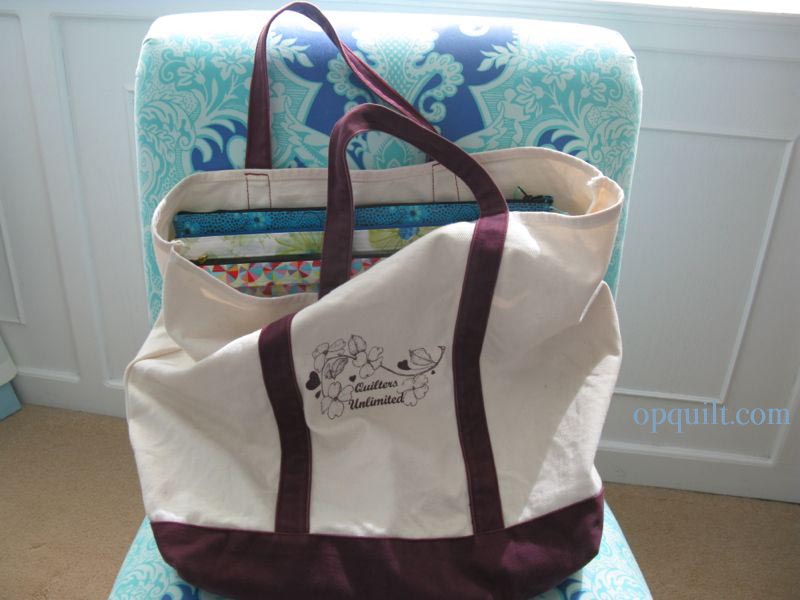
They fit in my tote bag easily.  Because one side is vinyl, you can see what’s in there quickly.  Because the other side is fabric, they don’t stick together and slide out without difficulty.

Reminder: All of these measure roughly 11 x 17.  You are more than welcome to make these for your own use, or sell them in a craft faire, but please please, don’t take any of my tutorial and copy it onto your blog.  Practice Friendly Attribution, if you please, by linking back here, if you would.  And please please don’t steal borrow my content to make your own pattern, and call it your own.

Okay, the folios are in the home stretch. Let’s bring ’em home!

If you are coming into this tutorial mid-way, see previous posts Part I and Part II.

STEP FOUR: Zipper

Zipper

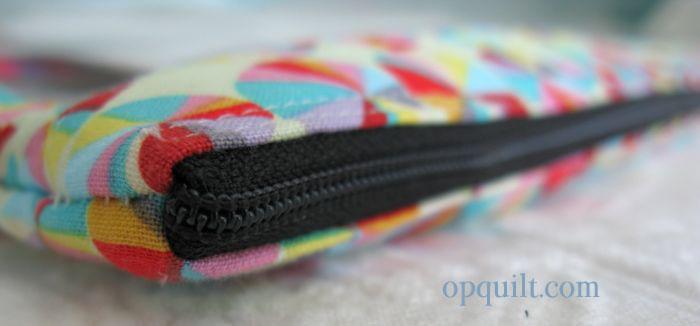
A zipper is made of two narrow pieces of tape (think of it as stiff fabric ) joined by an interesting plastic coil.  Usually these strips of fabric are hooked together at one end.  Years of no Home Economic Education has scared most sewers when it comes to zippers, but when you think about it as two strips of fabric that have to be sewn into a seam, tempers and anxiety seem to lower.  And when you get to sew the zipper in flat, like in this bag, things couldn’t be easier.  Note: Some of this tutorial is for beginners, so if you are experienced in zipper-putting-in, just scroll on down.

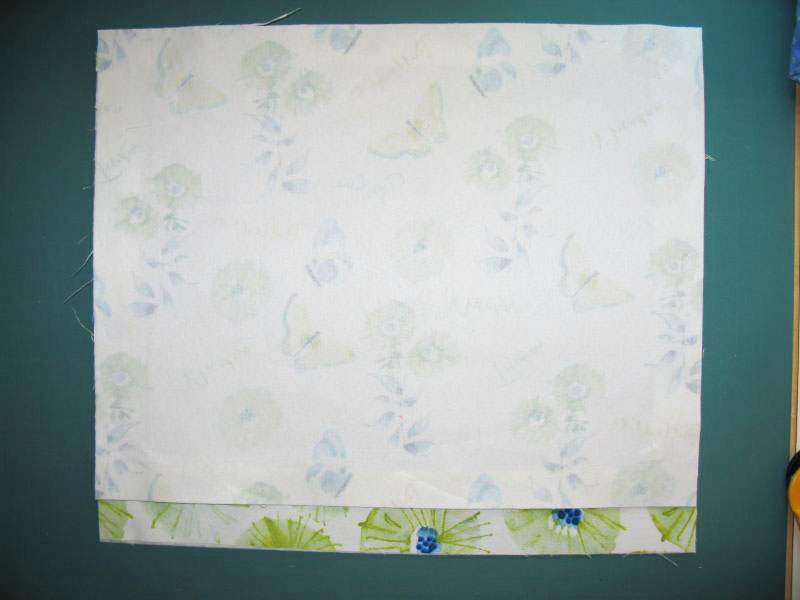
You’ll be stitching this to the interfaced backing piece.  Set aside the fabric lining for a later step.

14 Marking Zipper

(You see the vinyl front window laid on top of the backing in the above photo, but you’ll be sewing the zipper ONLY to the interfaced backing at this point.)

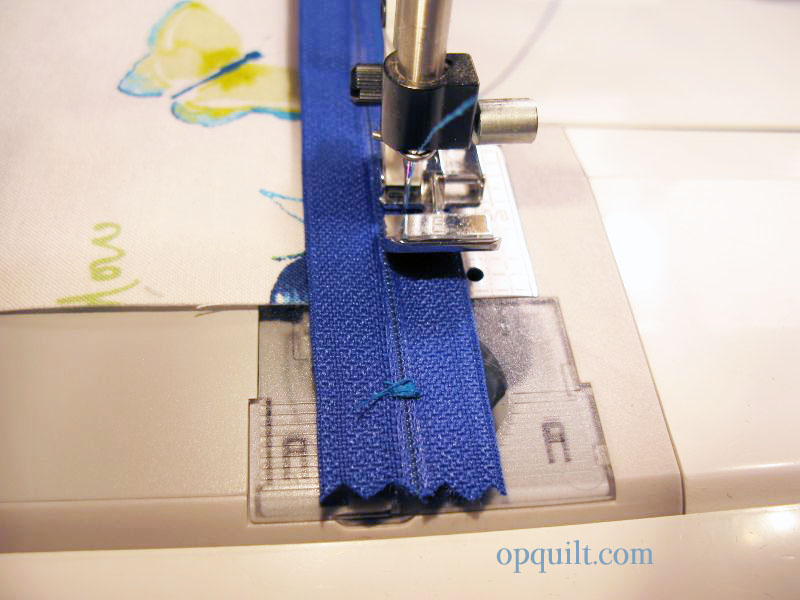
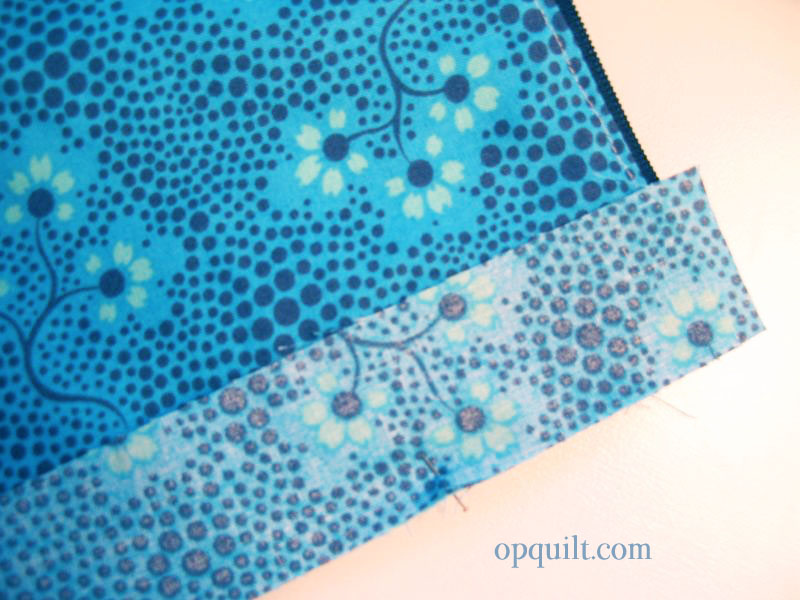
I usually buy zippers a little bigger than what I need, so if you have done the same, lay out your zipper along the 17″ longer edge of the project folio backing.  Put one pin 1/2″ in from the raw edge, and one pin 1/2″ away from the raw edge, as shown up above on the left.

14 Marking Zipper_2

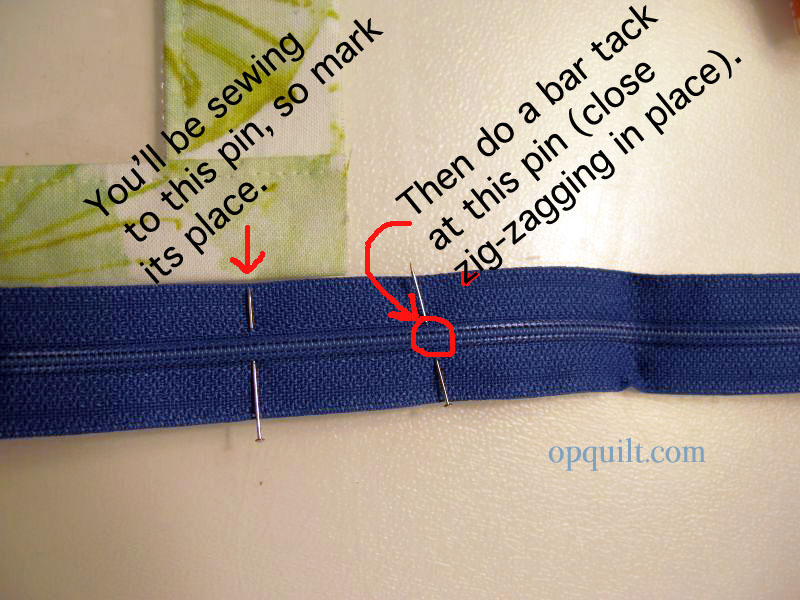
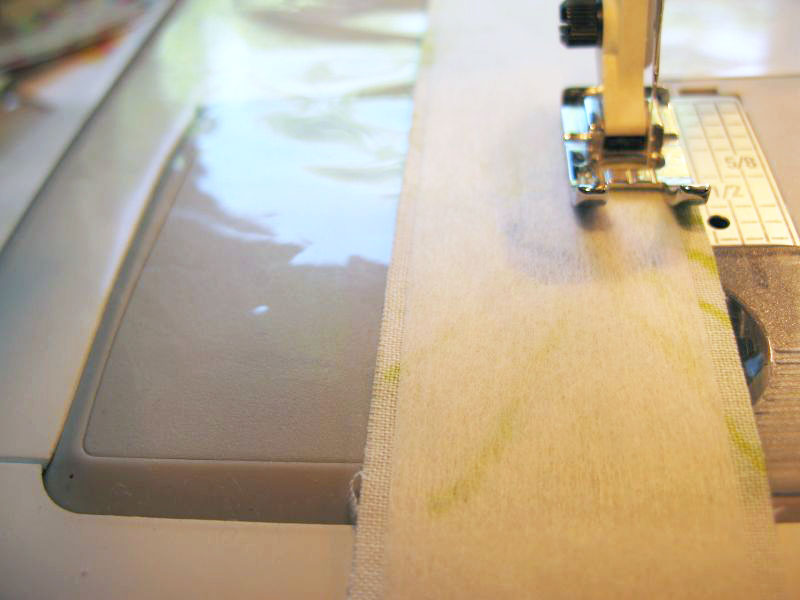
At the outer pin, you’ll be doing a bar tack, which is only a zig-zag stitch done in place.  Set your sewing machine for a wide zig-zag (so it will clear the zipper teeth), your stitch length to zero, and sew the bar tack in place.  Then about 1/2″ away from that towards the zipper stop, trim off the zipper tape.  If you are using a plastic zipper, you can cut right through it.  If you are using a metal zipper, snip the tape to the teeth, then kind of wiggle off the excess zipper tape.14 Marking Zipper_3

14 Zipper_1

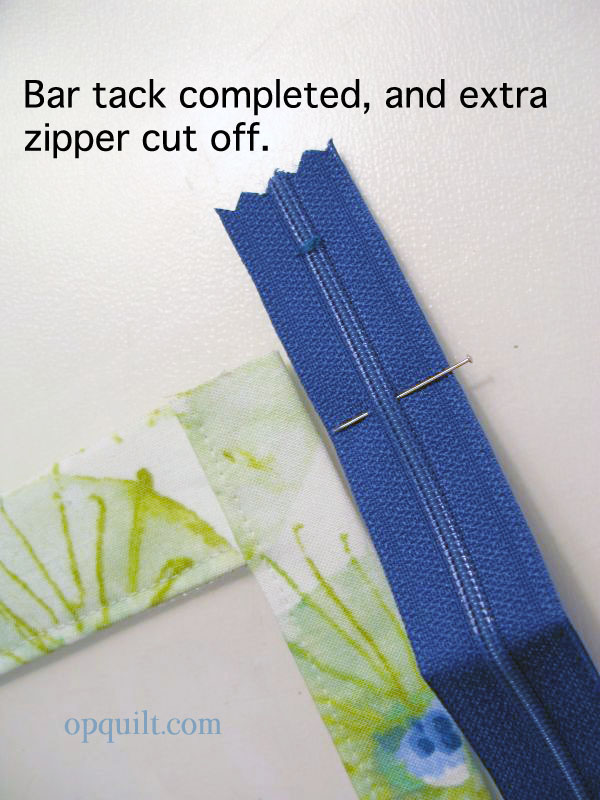
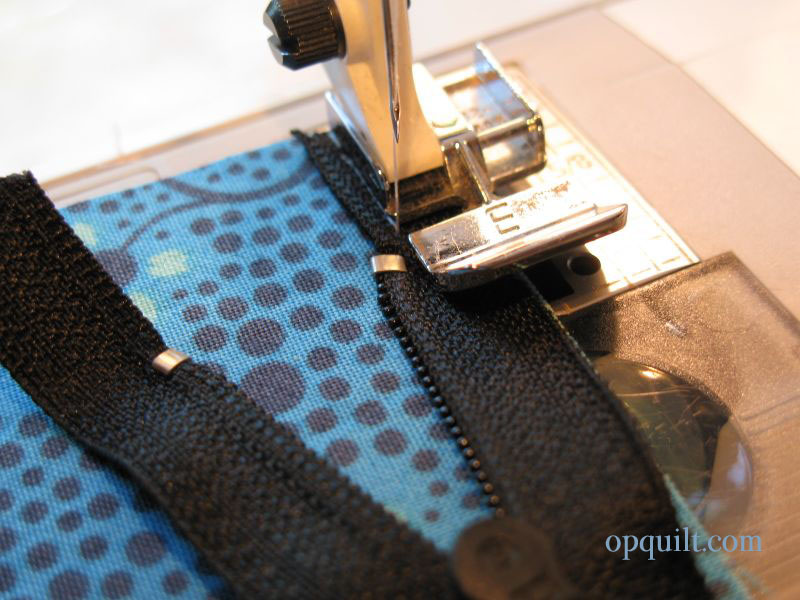
One of the challenges of zipper-sewing, is 1) sewing straight and 2) sewing close enough to the teeth, and 3) getting around that zipper pull.  Use a zipper foot (shown above) for the second, and the first?  Practice makes perfect, so don’t worry about it.  I’ll walk you through the third, below.

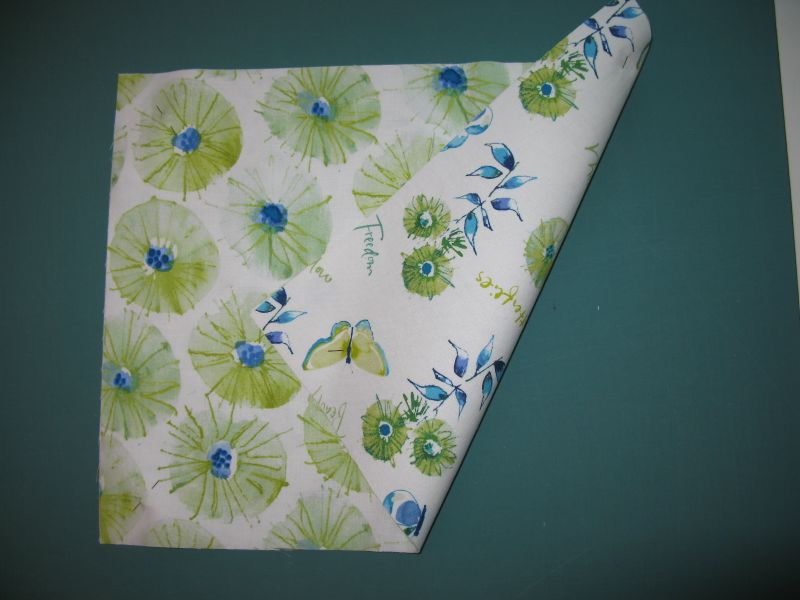
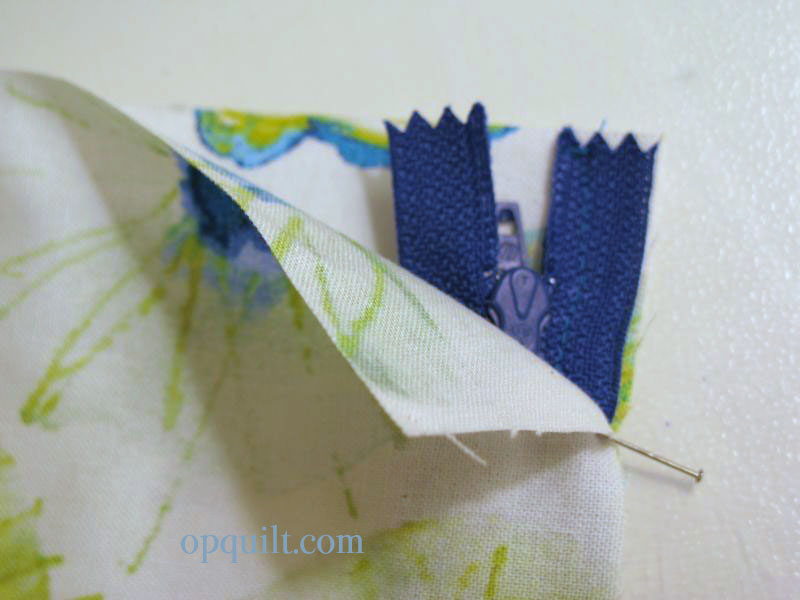
First, unzip the zipper for about 4 inches, then:

• lay the edge of the zipper tape even with the raw edges, as shown above,
• zipper FACE DOWN
• on the RIGHT SIDE of the interfaced back folio fabric
• along the 17″ side.

I align the outside long edge of the zipper with the raw edge in this application.  Stitch to the top stop (the silver metal piece), re-align the long edge of the tape with the outside edge and stitch for another couple of inches.

14 Zipper_2

Stop, and put the needle down into the fabric.  Then grab the zipper pull tab, and wiggle it past the needle and close the zipper.  Now you have unlimited easy access to sewing it down.

14 Zipper_3

Remember that inner pin, set 1/2″ in from the raw edge?  Sew to that spot.  You want to leave the last 1/2″ unseen.  I usually hit the stitch-in-place button on my sewing machine, but you can also backstitch to secure it.  Now you’ll be attaching the lining to the back–that piece of fabric that is the same size as the back.

14 Zipper Lining

Lay the lining for the back on the zipper.  The zipper is face down so the RIGHT SIDE of the fabric will be facing the WRONG SIDE of the zipper.  I pin the raw edges of the fabrics together in a few spots so I’m not scrambling as I sew.  You’ll be sewing from the OTHER side of things, along the already-stitched line, so FLIP over the assembly, as shown below.15 Zipper 2_1

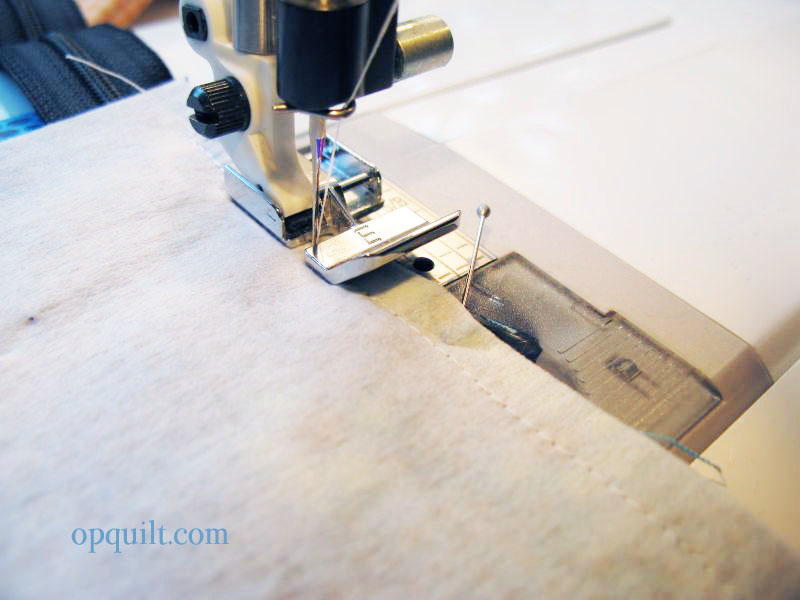
You’ll begin at the bottom edge of the sewn-in-zipper.  Remember to stay 1/2″ away from the raw edge as you begin.  Stitch along the already-stitched line until you get about three inches from the end.  Stop, and leave the needle in the fabric.  Reach inside and and slide the zipper pull tab down past your needle, wiggling it as you go by the needle, then continue stitching until the edge.

15 Zipper 2_2

Press both sides away from the zipper, then topstitch close to the edge, about 1/8″ away.

16 Zipper_1

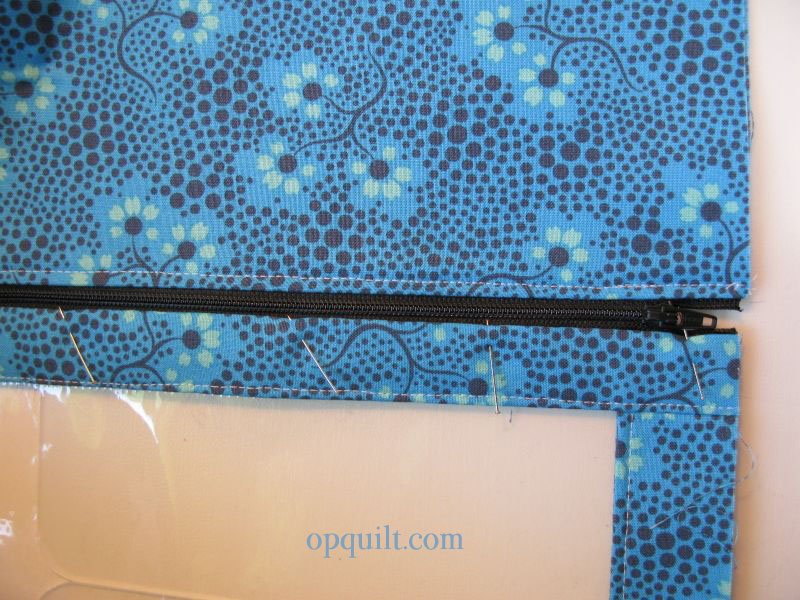
The other side is easier because you only have don’t have a lining to deal with.  The zipper is now flat, intalled on the back.  Working on a flat surface, line up the back with the front, aligning the side raw edges, as shown.  Place a few pins anchoring the zipper tape to the front upper edge of the front vinyl window.

16 Zipper_2

Slide the zipper pull tab down a couple of inches, and start stitching.  When you get close to the zipper pull tab, keep the needle in your fabric, and ease the pull tab past your needle, closing the zipper.  Continue stitching.  Remember to STOP stitching 1/2″ in from the other edge.

16 Zipper_3

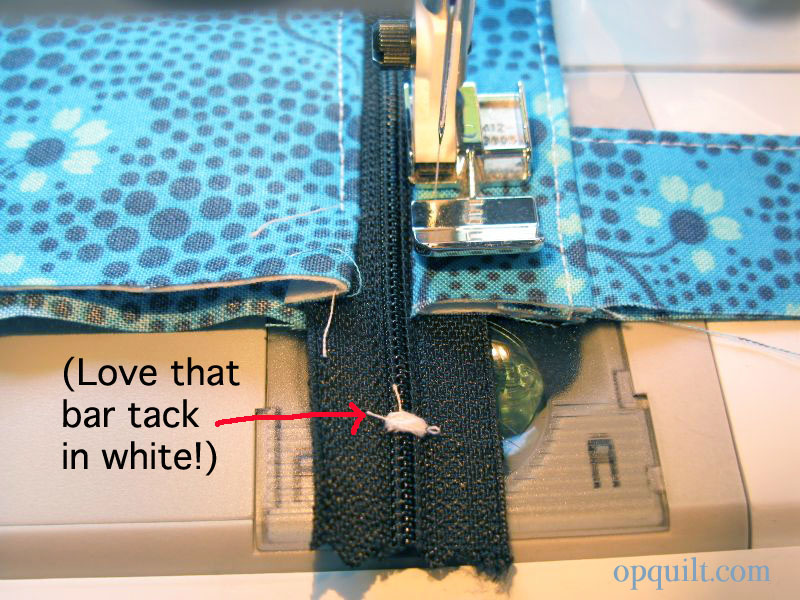
I was racing through making these, so you get to see my hideous white bar tack on my zipper in white thread.  No one is going to see this, so don’t worry.  But do notice that I stopped 1/2″ away from the side raw edges.

16 Zipper_4

Stitch alongside your first stitching line, about 1/8″ away.  Notice how both stop at the right place, above.  This second stitching will help anchor the zipper tape.  You can stitch 1/4″ away, if you like.

STEP FIVE: Bottom Edge Closure

17 Bottom Seam_1

Remember how the back of this thing is longer than the front vinyl window part?  You’ll now stitch them together.

First, treat the back two pieces as one, pinning them together at the lower edge.

Now, lifting aside the lining on that 2 1/2″ piece on the bottom of the vinyl window, pin the interfaced strip to the back of the folio, matching raw edges, along the 17″ dimension.  Another view is below.

17 Bottom Seam_3

This is taken from the vinyl window side, and you can see it gleaming there in the photo.  But again, you are sewing the interfaced strip along the lower vinyl window to the two pieces of the back, treating them as one piece.  Stitch in a 1/4″ seam, then press to one side, towards the front.

17 Bottom Seam _3

Fold down the loose piece, tucking the raw edge up to the inside, and pin in place, hiding that seam you just sewed.  You can sew this by hand, taking small stitches, or you can machine stitch this closed.

17 Bottom Seam_4

To do that, open up your nifty zipper all the way, and this will slide in right under your presser foot.  Stitch close to the folded edge, sewing it down.  Sorry it’s not such a great photo, but I’m confident you can figure it out.  (Or just sew the edge down by hand.)

With both the bottom seam and the zipper seam completed, your portfolio is now a tube.  Press that seam, keeping your iron away from the vinyl.

STEP SIX: Closing the Sides

19 Sewing Sides

Blurry Photo Apology!

Starting at the zipper edge, line up the sides, pinning occasionally, raw edges even.  The bottom seam will loop around towards the front, so don’t try to force it.  Stitch, then stitch again, 1/4″ inch away.

19 Sewing Sides_2

Trim.  This is a better photo, and you can see how the seams don’t match up to where you think they will at the bottom.  Just let them go where they want to.

18 Side Finish

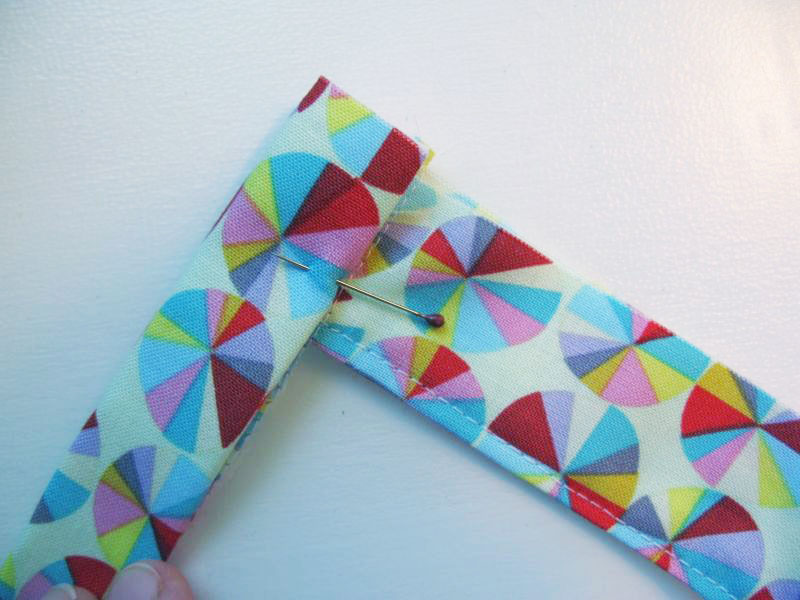
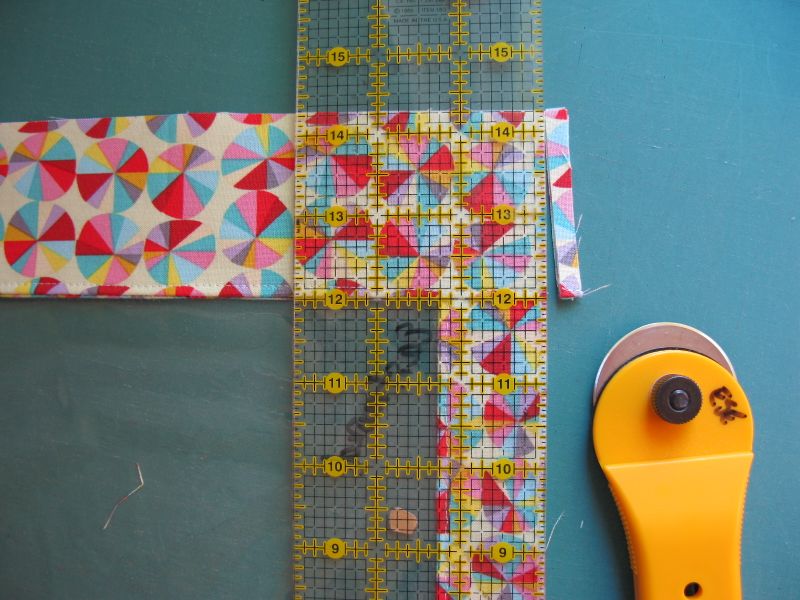
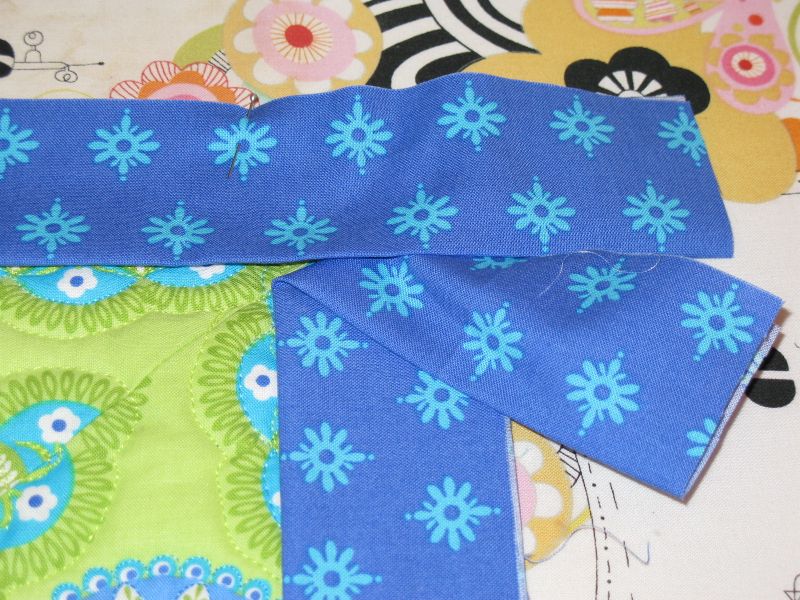
You can simply zig-zag those side seams to finish them, or make a simple binding.  Cut a piece of fabric about an  inch and 1/2″ wide and a bit longer than your sides (should be about 16 x 1.5″ in a perfect world).  Matching raw edges, sew the long side of the binding strip to the portfolio side seam.  You can pin it, and then flip it over to stitch over the previous stitching, like you did with the zipper, if you want.

18 Side Finish_1

Then fold the long raw edge in and fold the binding over the raw seam allowances.  Pin, as shown above, and below.

18 Side Finish_4

18 Side Finish_2

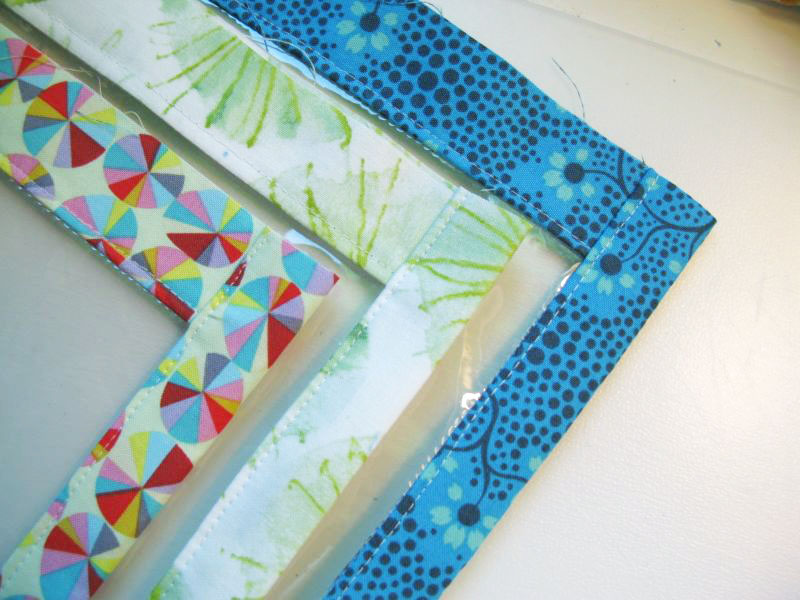
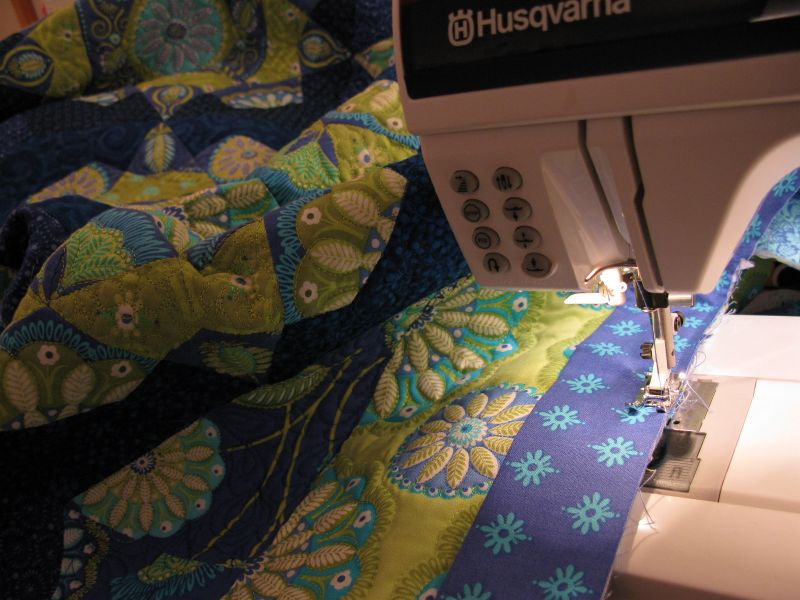
Stitch close to the folded edge, securing the binding in place.

18 Side Finish_6

Make sure you do not stitch the zipper into your seam.  Lift it up and out of the way.

18 Side Finish_5

Trim the binding even with the side seams, then zig-zag (overcast it) to keep the ends from fraying.  Again, lift the zipper up and out of the way.

20 Folio Flipped Out

Flip the folio inside out and wiggle that end of the zipper to a nice squared-off edge.  Congratulate yourself!  You are done!

Project Portfolio Filled_Interior

Here’s what the other side looks like, interior view.

Project Portfolios

I made a conscious choice not to “box” the lower corners to create a dimensional folio.  I want to be able to lay in flat things (books, patterns, fabric, etc) and then, when done, store them flat.  In use, I haven’t missed the boxed corner at all.  Everything flexes around what I want to put it (refer back to the original post and that overstuffed folio *here.*)

Zipper Pull Ribbon

I thread a bit of ribbon through my zipper pulls to make them easier to grab.  Trim the edges at an angle, and apply a little bit of Fray Chek to them, if you are worried about fraying.

Three Portfolios_corners

Project Portfolio Three_top

Okay, now tell me how you’ll use your flowered Elizabeth’s Project Folio in your comment below, and how you follow me (email, Feedly, Bloglovin’).

˙˙˙˙˙˙˙˙˙˙˙˙˙˙˙˙˙˙˙˙˙˙˙˙˙˙˙˙˙˙˙˙˙˙˙˙˙˙˙˙˙˙˙˙˙˙˙˙˙˙˙˙˙˙˙˙˙˙˙˙˙˙˙˙˙˙˙˙˙˙˙˙˙˙˙˙˙˙˙˙˙˙˙˙˙˙˙˙˙˙˙˙˙˙˙˙˙˙˙˙˙˙˙˙˙˙˙˙˙˙˙˙
Note: the Giveaway is closed now, but thanks for stopping by!

Quilts

Project Folio–Part II

Project Portfolio Filled_1

This is part two of the tutorial for the Project Folio.  Click *here* for part one.

STEP TWO: Making the Front Vinyl Window

8Sandwich Vinyl

The side (1 1/2″ wide) strips go on first, on the shorter (15″) sides of the vinyl rectangle.  Sandwich the vinyl between one interfaced piece of fabric and the other (un-interfaced, or plain) piece of fabric, lining up the raw edges, with right sides facing each other and towards the vinyl.

9StitchVinyl

If your strips are longer than your vinyl, don’t freak out.  Just center the vinyl and stitch along the long edge, using a 1/4″ seam.  Carefully press the strips away from the vinyl, keeping your iron ONLY on the fabrics.  Don’t touch the vinyl.  You won’t be happy if you do.  Topstitch on the fabric, about 1/8″ away from the vinyl.  You may use contrasting or matching thread.  I was whipping through these, so whatever I was sewing with was what I used for topstitching.

10Trim Edges

Trim the fabric strips even with the vinyl.  Repeat on other shorter side.

11Top Strip_2

To put the upper, top strip on, sew ONE piece of wider (2 1/2″) interfaced fabric to the vinyl, right sides together.  It’s easier if you put the vinyl to the feed dogs to do this step, and kind of ease it along.

11Top Strip_3

Fold the long  edge over 1/2″ and press.  You are working on the TOP edge of the vinyl front window at this point.

11Top Strip_4

Turn to the back, lining up the folded edge with the seamed edge, peeking through the vinyl to make sure they line up.  Topstitch this down, encasing the vinyl edge.  After stitching, if the raw edges extend beyond the existing side pieces, trim.

11Top Strip_5

Here are all three of my folios, showing trimmed edges and stitched-down tops.

To add the edging to the bottom of this window, use the sandwich technique you used with the shorter sides.  Sandwich the vinyl in between one interfaced piece of fabric and one (un-interfaced, or plain) piece of fabric, right sides facing each other and towards the vinyl.  Stitch in a 1/4″ seam, then press away from the vinyl.  (Carefully.)

12Bottom Strip

I’m trimming the excess fabric off the bottom strips in this photo.

STEP THREE: Trueing-Up the Back and Front

Confession: I had a scrap of vinyl that was slightly smaller than the desired size, but I used it anyway.  But then that makes the front a different size than the back.  I can fix this with my rotary cutter.

No, I didn’t obsess about cutting down the back, either. BUT! I only trued up the sides.  The front is LONGER than the back, in the top-to-bottom measurement.  DON’T TRIM THE TOP OR BOTTOM!!

13 Truing Up_1

Just lay the back down onto the vinyl window front, centering it as shown in the photo above, so you can trim the exact same amount from the sides.

13 Trueing Up_3

I’m only trimming down the sides here.  I kept the differences in the top-to-bottom and only cut the sides to be the same width.

13 Trueing Up_2

Sides are trued up; notice longer length on vinyl window front, peeking from behind the back pieces.

Next post: Zippers!! and Finishing.  And a Giveaway!!

Three Portfolios_corners

All of these folios measure roughly 11 x 17.  You are more than welcome to make these for your own use, or sell them in a craft faire, but please please, don’t take any of my tutorial and copy it onto your blog.  Practice Friendly Attribution, if you please, by linking back here, if you would.  And please please don’t steal my content to make your own pattern, and call it your own. 

Quilts · Tutorial

Project Portfolio Tutorial–Part I

Project Portfolio Three_top

A long time ago, in a foreign market, I bought zip portfolios to hold stuff.  But they weren’t always quite right–too small, too rigid–for my projects, too wrong-sized.  So I decided this summer to make my own.

1Project Portfolio

But that’s just a way to lead you into thinking about your fall, now that schools are beginning to start and you can finally finish a sentence — or a seam —  without being interrupted by your offspring or husbands or pets or whatever.  And now you are going to be sewing up a storm, and need a way to keep all your projects organized as you head out to sewing circles, sew days, quilt nights, or just stay home and quilt in your jammies.  Because it’s almost fall, after all, and you can. (My apologies to my Southern Hemispheric readers–just substitute in the appropriate season.)

Project Portfolio_chair

Materials:
Two coordinating fabrics.  One will show on the outside, and the other will be the lining, but will show through the vinyl window
Clear medium-weight vinyl from the upholstery department.  Save the tissue they have with the vinyl–it’s easier to store that way
Fusible medium-weight interfacing
Zipper, approximately 20″ (you’ll be trimming it to size)
Matching thread

(Note: I am using three different fabrics in the following illustrations, so you may see some switching out.)

Project Portfolio Cutting Diagram

STEP ONE: Fusing

2Fusing back piece

Lay the fusible interfacing shiny side (resin-coated side) down onto the Wrong Side (WS) of your outer backing piece.  If you like to live dangerously, don’t use a press cloth while fusing the interfacing to the back in an ordered fashion: overlapping the iron shape, giving it a shot of steam, counting one-two-three-four in each position of the iron.

3Fused Pieces

Lay the interfacing fusible-side down and fuse to TWO of the four narrower pieces that will border your clear vinyl window on the side.

Then fuse interfacing to only TWO of the wider strips, as these will be used on the upper and lower edges of the “vinyl window.”

The results are above: one large rectangle of interfacing fused to main back fabric, and four pieces of interfacing fused to the four strips of main fabric.

4Trim to Interfacing

Trim up so the backing is even with the interfacing.  Try not to fixate on the fact that now your portfolio will be a hair smaller.  It’s really not important what the final dimension is, as you can still pack a ton of stuff in there.  Trust me.

5 Trim Lining

Lay the fused backing piece on top on the lining piece, making sure that both right sides of the fabrics are facing outward.  Pin.  Trim.

6 Trimmed Backing Complete

So this is what you’ll have: a two-sided rectangle.  Unpin the two layers, and set aside for now.

Tomorrow’s post will show STEP TWO: Making the vinyl window front.

All of these folios measure roughly 11 x 17.  You are more than welcome to make these for your own use, or sell them in a craft faire, but please please, don’t take any of my tutorial and copy it onto your blog.  Link back here, if you would.  And please please don’t steal my content to make your own pattern, and call it your own.  Practice Friendly Attribution, if you please.

Quilts

Faced Binding Tutorial

FacedBindingTitleA faced binding is applied to the front of your quilt and is wrapped to the back.  If done well, it can’t be seen at all from the front, allowing the last border of your quilt to act as the frame for your quilt, and eliminating one last design element from your quilt.  Often used on art quilts, when an additional line of a border would distract from the art, it can be also be used on our regular quilts.

kaleidoscope-top

I used it on Kaleidoscope, as the printed border needed no other embellishment.

Step One: Prepare the quilt and strips
Trim the batting and edges of your quilt.  In the best world, your trimmed line falls at the edge of your fabric.  A little fudging here and there is okay.

For the binding, you’ll need four strips, one for each edge.  Measure the edges of your quilt and add 10 extra inches to that measurement.

Cutting

Cut 4″ wide strips for a medium- or large-sized quilt, and 3″ wide strips for smaller quilts.

Trim Ends

If you need to piece the strip to provide the right length, trim both ends at a right angle (make sure they are slanted the same way) and piece together on the bias.  Fold the strip in half lengthwise and iron.

Step Two: Applying Binding Strips
Leaving a tail on each side of about 5 inches, pin the binding strip to the FRONT of your quilt, raw edges even, with the folded edge of the binding falling toward the quilt center, just like you would for a regular binding. Only this binding is giant-sized, and you won’t stitch around the corners continuously.

Pinned Binding

Continue pinning the strips onto each side.  Pin the strip nearly to the end, as you’ll be leaving the last one-quarter-inch of each seam unsewn.

QuarterInch from Corner

I measured one-quarter-inch from each corner edge, and placed a pin there to remind me to stop sewing.

Stitching Binding

Stitch on the binding, using a quarter-inch seam allowance, and stopping at your placed pin, 1/4″ from the edge.

Step Three: Mitering the Corner

Pressing

Take the quilt to your ironing board and using a light touch, press the binding strips away from your quilt.

Mitered Corner2

Then lay the quilt so you can fold back the binding tails, as shown.  Work to have a perfectly straight 45-degree angle on those folds where they meet; use a ruler to help you align it, if necessary. Press.  The slight gap you see there between the folds is normal–the folds relax when you take the iron off.  It’s better to have a slight gap than to have an overlap.

Mitered corner1

Another view, but this is just fingerpressed.  While you can just fingerpress the folds, I think it’s better to get a hot iron on there so you can see the crease.  (See next image.)  Remember that you are pressing through double-folded fabric, so do a thorough job.

Unfold and align the binding strips for the first corner, making sure the pressed diagonal lines meet and folding the quilt down and out of the way.  You are also making sure the top folded edges meet.  I try not to pin this next seam to death, instead using only three pins:

Mitered corner3a

• #1–Place a pin at the outer, folded edges of each binding strip and line the creases up.

• #2–Then go to the bottom, near where it’s joined to the quilt, and poke a pin from the top crease down into the bottom crease, lining them up.

• #3–Lastly, line up the creases at the center and place a pin there.

Again, you are pinning along the crease you made when you ironed in that beautiful miter at the ironing board.

Stitch the seam.  You’ll begin stitching from the folded, outer edges and sew back towards the quilt-binding seam (at the bottom of the picture).  There’s really no need to “tack” by backstitching.  So don’t.  Just leave your thread tails long and you should be fine.

Mitered Corner 4

Trim the extra fabric to one-quarter-inch, as shown, then press the seam open.

TrimCorner

This is the backside of that mitered join up above.  Notice how the seam allowances become smaller at the point?  That’s because I trimmed them down to eliminate bulk.  Trim out as much of the batting as you can, while making sure you don’t cut the stitching. Don’t skip this step.  Just proceed carefully.  (You will be fine.)

Step Four: Understitching
Often used when attached a facing to a neckline in dress-making, understitching is a technique to join the weensy seam allowances to the faced binding, which will keep them from rolling to the front and showing on your quilt.

First, since you pressed the binding away from the quilt up above, you’ve already started on this step.  If you didn’t press at that time, do your best to press it now, going as far into the corner as your iron will allow.

Understitching

Line up your needle so you are just to the right of the binding seam.  Stitch a straight line, smoothing the binding and the quilt away from the seam as you go, keeping a light tension on the quilt/binding fabric.  Light.  The success of understitching depends on not letting the binding bunch up toward the quilt, nor wandering in your stitching onto the quilt.  Stay on the binding, smooth away the  binding and it will go as smooth as butter.

Of course you can’t sew deep into the corner, so go as far as you can and cut the thread tails long.  Now begin again on the next side.  You’re almost there.

Step Five: Sewing down the Binding

Carefully turn the binding to the back of your quilt, giving it a quick press, if needed.  Gently ease out the corners.  If you are brave and not foolhardy, you can use a chopstick to help ease out the tip.  But if you go too far, you’ll have a mess on your hands.  Proceed gingerly.

If after turning, you think your corners are distorted and look like the tips of a witch’s shoe, a little pulling at the side edges, just below the tip, will shorten that tip and bring it back into shape.  Set it with a little shot of steam from your iron, then press it with your fingers or a piece of wood until it cools.  Seamstresses use “clappers,” or smoothed wooden tools just for this purpose.  However, it’s better to lay a piece of cloth down and put your tender fingers on that, that to smash the heck out of it with a hot iron.  Never over-iron your quilts, or blocks, for that matter!  A horribly flattened block means that, to me, someone has decided to start wearing out their quilts early.

Stitching Down Binding

You’ll stitch the binding down by hand, just as you do a regular quilt binding.  Now you can clip those long thread tails on the top of the binding as you come to them.  Tuck the long tails that are on the backside of the binding up inside–no need to trim those.  If you find your miter is buckling just a little and has too much fabric, with your handsewing needle take a small tuck and secure it with tiny stitches.

All done!

Faced Binding--back

This is what the binding looks like from the back, when finished.

faced-binding-front

And this is the binding from the front–invisible!

Note: If you need to attach a quilt sleeve for hanging, you’ll create your tube of fabric and stitch it on now, aligning the top edge 1/2″ to 3/4″ down from the top, and leaving a slight bulge in the sleeve to leave room for the hanging rod.

˚˚˚˚˚˚˚˚˚˚˚˚˚˚˚˚˚˚˚˚˚˚

Return to OccasionalPiece-Quilt (or OPQuilt.com)

Colorwheel Blossom_front