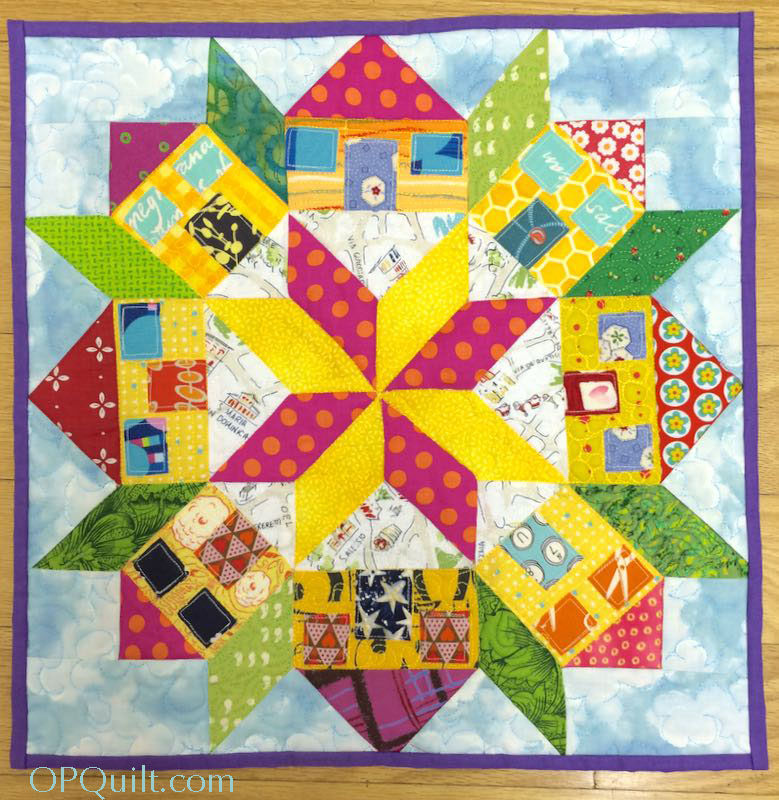
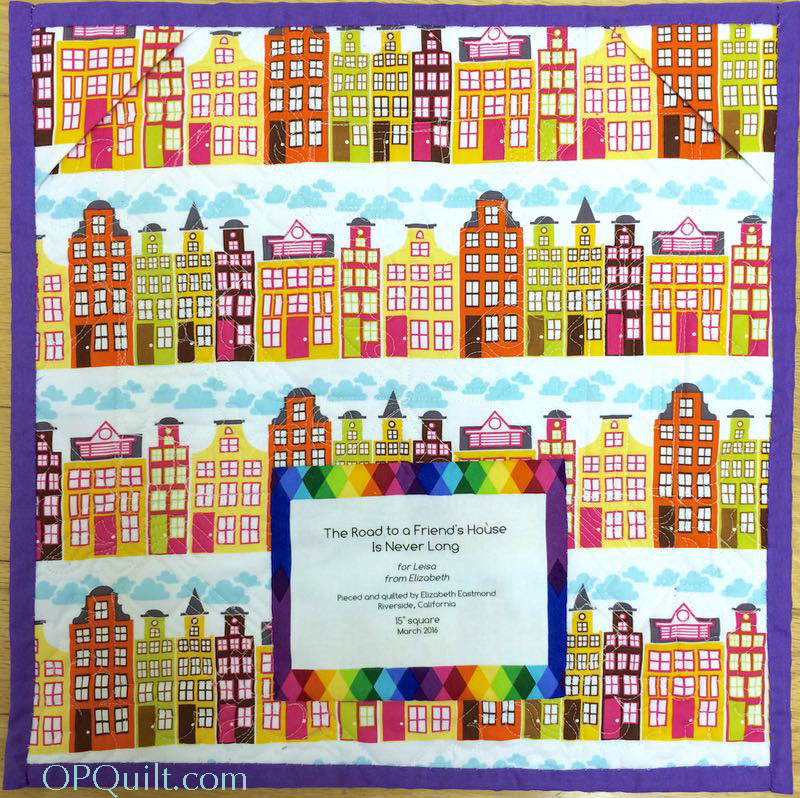
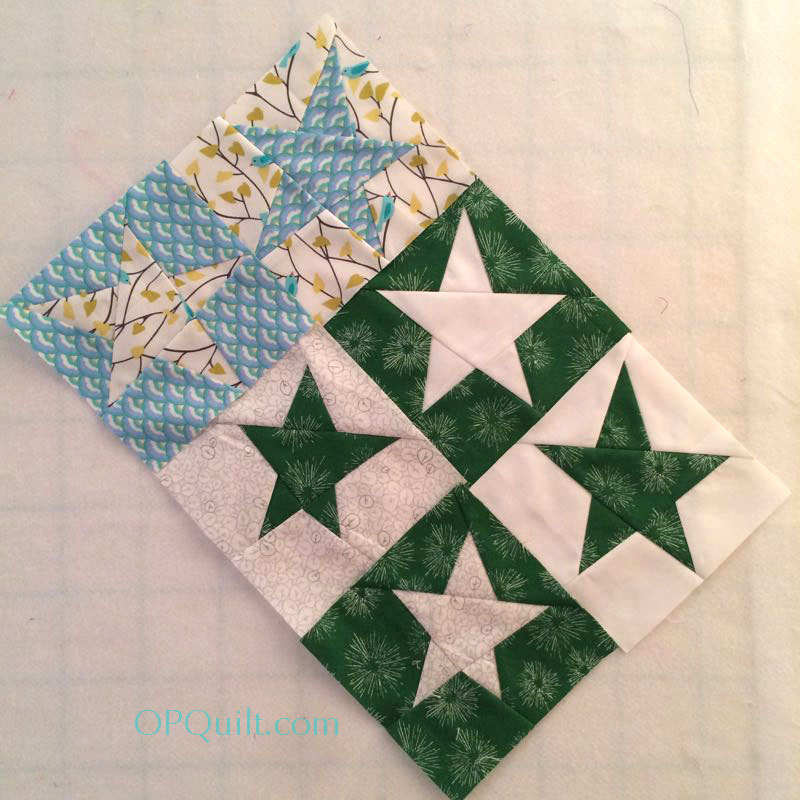
The Road to a Friend’s House is Never Long, Quilt #159
I started this July 2015, and you know what happened to me shortly after that, so it was nice to get it fixed up and quilted, because I’d had a purpose in mind: a gift for a friend.
Leisa likes it! Pattern coming soon. I used the new Northcott labels I bought at QuiltCon. I just cut them apart, backed them with freezer paper, and ran them through my printer; see the complete how to under the tab “Tutorials,” above.
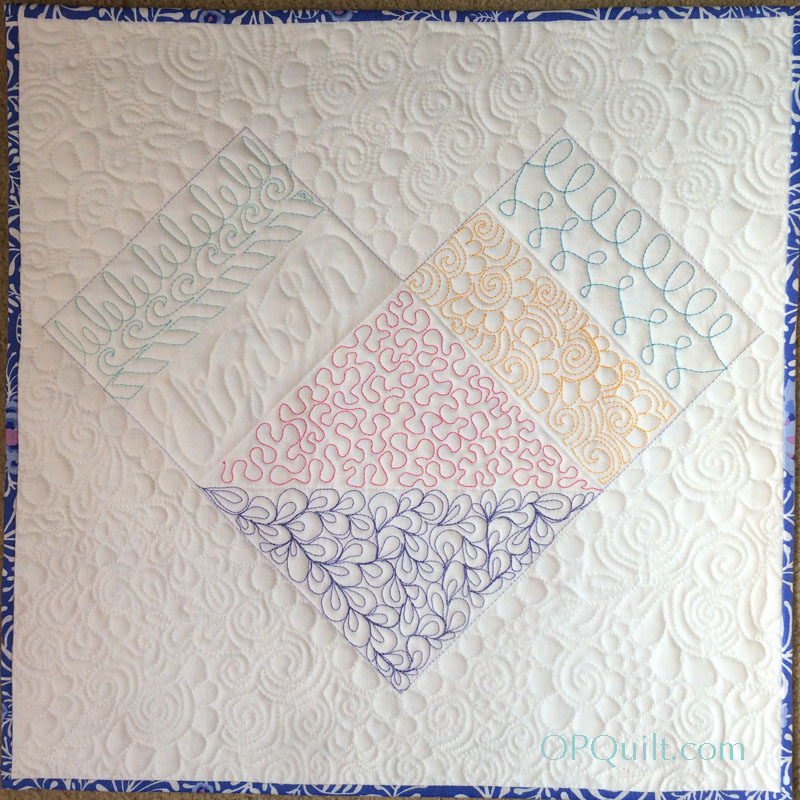
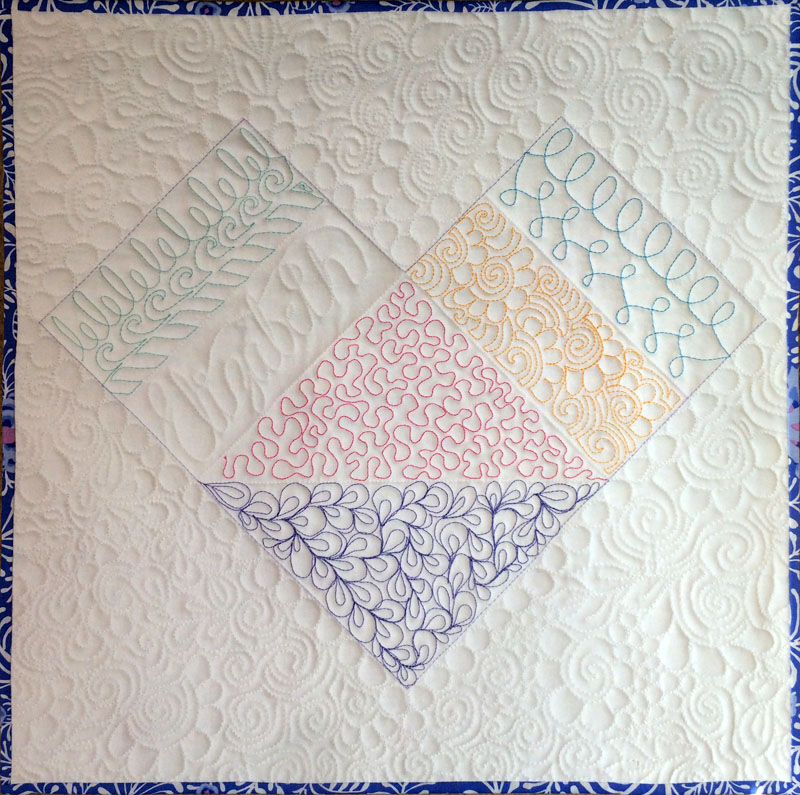
Thread Doodles, Quilt #160
And then there’s this one, a mini quilt made as a class sample for the Free Motion Quilting Class I’m teaching in late summer at Quilter’s Cocoon. I had to think of a way for the students to practice their stitches, yet display what they’d learned in a pleasing way. As soon as they master one of these stitches, I’ll have them stitch it onto their own class sample. They may want to finish it all up that day, or may want to add to it as they get better.
I’m big on naming my quilts. Another Northcott label. After they are printed, I cut a square of lightweight interfacing and fuse it to the back the “light” section of the label so I won’t see the fabric underneath.
Electra Magnetic, Quilt #161
I seem to be finishing up quite a few things lately, a nice change from the months November to February, where I felt swamped all the time, unable to seemingly get to anything. Do you have times like that–like you see everything around you and just can’t get to it at all? Where you are climbing, climbing Mt. NeverFinish and wish you could find the summit? That’s why these minis feel like a success story to me.
So, with all my rainbow-type quilts this past year, I’ve about run out of names. Combine that with the funny comment I got on one of my quilts that they thought it looked like Hal the computer from the Space Odyssey 2001. This quilt might also suffer from that comparison, so I thought I’d go with it. The electromagnetic spectrum is all the colors, from those that we can see to those that we can’t; they call it “wavelengths, both visible and invisible.” Okey, dokey. So I feminized that idea and came up with Electra Magnetic, mother of Hal.
I’m still working on these patterns, and should have them out shortly. Well, maybe not this week; I’ll let you know.
But let not’s stop there today. I have Brain Pickings in my Bloglovin’ Feed, and occasionally they hit a streak of book reviews on topics that interest me, and recently they did a review of Ursula LeGuin’s latest revision of her masterpiece on creative writing, Steering the Craft. Brain Pickings references her written piece “How do you make something good?” and notes that:
Isn’t that also what quilters deal with? We can make a decent quilt from stuff from the garage sale or someone’s basement (with that embedded fusty smell), but why not go for better ingredients? We are surrounded by loads of high quality quilt fabric. Perhaps instead of focusing on accruing endless supplies of this good fabric, why not focus on being good? That means getting in those oft-cited 10,000 hours of practice, but as Joshua Foer noted, sometimes just making and making doesn’t bring us to the place of making something good.
According to Joshua Foer, this is called hitting what is called the “OK plateau.” That’s when we are just going through the rote mechanics of quilting, making quilts of only rectangles, or traditional fixed patterns in a loop that’s known as thinking from “bottom-up,” where we are good-enough, automated, rote practices to get our work done. Yes, even those modern improv quilts with their fluid patterns can get stale. Daniel Goleman notes how we can get stuck here:
Foer also emphasizes this point: our deliberate practicing must be hard for us in order to engage that higher focus of creativity. I, like many of you, can cut and stitch until I’m so bored I can’t slice one more piece of fabric or sew one more HST. I’m falling right in line with studies that indicate that about four hours of concentrated deliberate practice is about the most amount of time we can do anything well. At that point, we have to take a break and do other things. Perhaps that’s why we are sometimes distracted by a new quilt, or a new design, or a new piece of fabric, as we try to restore our ability to refocus. Perhaps we just need a break, in order to deliberately practice well. But what I learned from these authors is that when I do come back to my quilting, I must “counteract the brain’s urge to automatize” and actively concentrate on what I’m doing.
So take a break, read that magazine, scroll through your IG feed, and then get back to it with a determination to make it good, make it better, and to fully engage.
This popped up in my email one morning, and it about wraps it all up, as far as I’m concerned. No, I never met Claudia, but I did meet a few other fine quilters, including some from different countries than California. (That was a joke, people.)
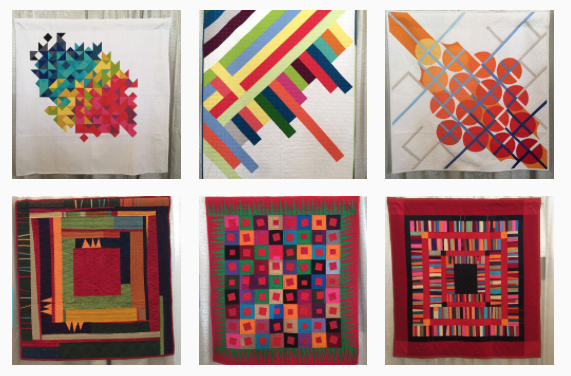
Since it’s been over a month since QuiltCon, I thought I should get around to writing about my impressions. The show was held in Pasadena, California and the Registration Desk, Vendor Mall, part of the quilt show, and lecture room were in one building.
Across the courtyard was a large older room with high clerestory windows (building behind these banners) where the rest of the quilts were, and to the other side of that, was the building where the classes were held. While pretty close together, I did miss Austin’s intimacy, but the great part about being here was that the weather was unseasonably warm which made everyone except those Californians happy (we want rain).
Silliest moment for me:
Hollering Polo! to Eileen’s (@luckycharm93635) Marco! as we bumbled out of the restaurant after topping off our 50/50 burgers with a bacon-brownie. And yes, we did the Marco! Polo! thing all conference long, whenever we’d see each other.
(I’m behind the camera)
Moment when I realized that none of us quilters ever charge enough for our quilts:
When, during our From Maker to Making a Living class, I glimpsed the majesty of Jacqueline Sava’s spreadsheets and listened to her funny and wonderful stories about making a living. She’s the SOAK lady, and to support her, I went down to the selling floor and bought a bottle of Flatter, in the Fig flavor. So so yummy-smelling and it works, too. A whiff of it and it brings back that class and the belief that I, too, can be as successful as she is. Kidding.
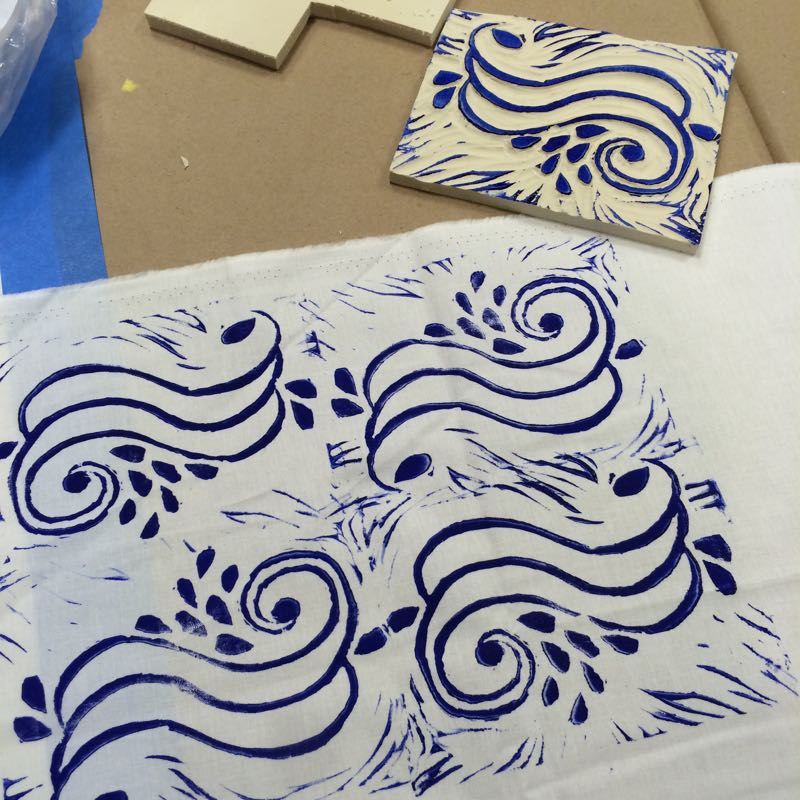
Moment when I realized that I’ve missed mucking around in paint all my whole life:
In Lizzy House’s block printing class. Even though I was beyond tired (and I’m pretty sure she was too), we had a great class of doodling, carving, printing, sharing. This was my last class of QuiltCon, and after this, I met up with Lisa and Simone and we drove the 90 minutes home. We’d stayed for two days and two nights, beginning with an early morning (up at 4:30 a.m.) on Thursday, and ending Saturday night.
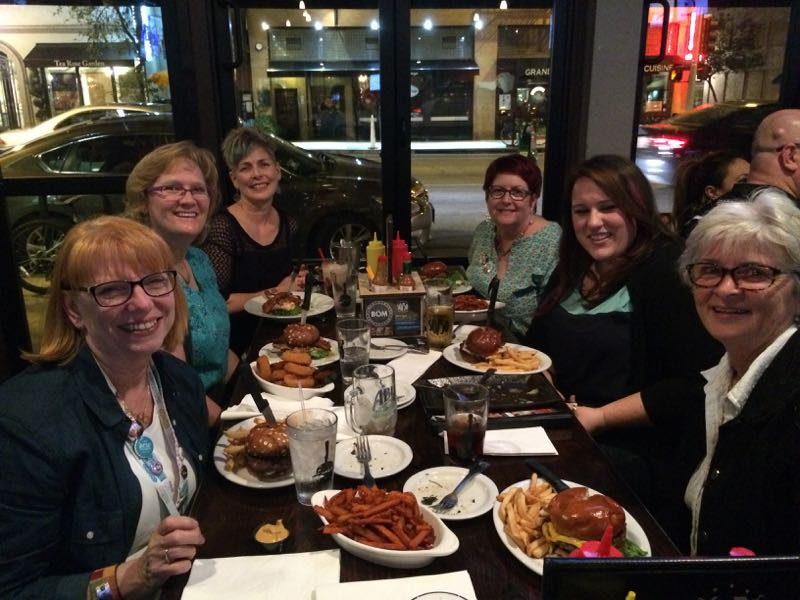
Moment when I realized that my QuiltCon experience had shifted from taking classes, to hobnobbing with the Women of QuiltCon:
This is the only photo I have of me ( at the end of the table, nearly on Lorena’s lap) and Lisa (third down on the right, with glasses and blonde hair) and Simone (second down on the right, with brown hair). The rest of the time we passed like ships in the night, or sat next to each at lectures. I met several quilters I’d only followed on blogs or on IG, and deepened friendships with many of these fine women.
Moment when I realized that quilting connections could be made from other subjects:
Simone’s notes from Victoria Findlay-Wolfe’s lecture
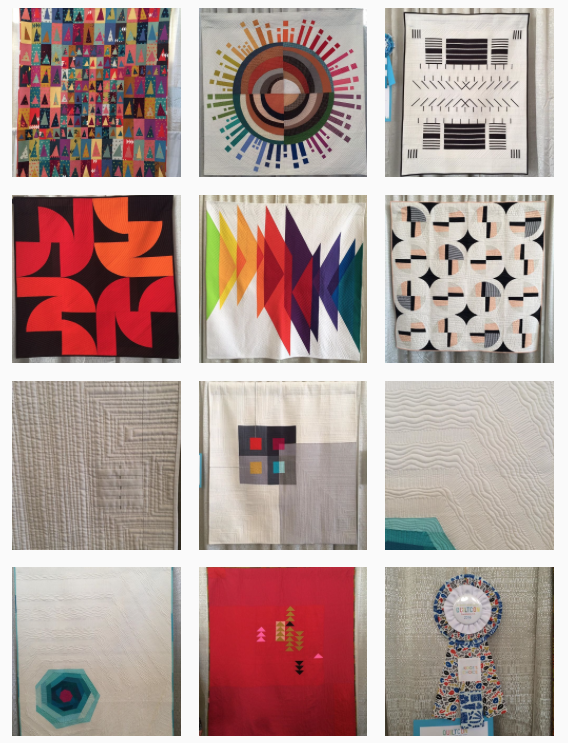
One of the highlights for me at QuiltCon this year were the lectures, and Bill Kerr’s lecture in particular. I filled pages of notes of him talking about the branching connections we make from the choices that come into our creative lives, and he used Frank Lloyd Wright’s homes around Chicago as an example. Victoria’s lecture was also good, as were Luke Haynes (I wish I could have gone out to see his exhibit of fifty log cabin quilts) and others. Usually I hit the vending floor’s mix of lectures, but hardly made it to any this year, and the ones I did, I thought sounded like commercials.
And in other ways (witness my badge collection):
Some QuiltCon eye candy is this tote bag and the signature quilt (hanging below).
Moment when I learned I should have left class at noon, like my buddy Martie did:
This was in our third conference/discussion of the day in a class where I found I was more interested in learning about how to make a panorama photo on my iPhone, than in listening to the adroit conference/discussion by our very well-learned teacher. When you know you are just done with a technique, it should be okay to go. The teacher was fabulous. I wasn’t, obviously. If I’d left, maybe I would have seen more of the quilts.
Moment when I realized that creativity was all around me, and I was slightly besotted by it all:
(That’s besotted using the archaic definition) Glimpsing the fabulous booth from our Los Angeles shop, Sew Modern. That camper!
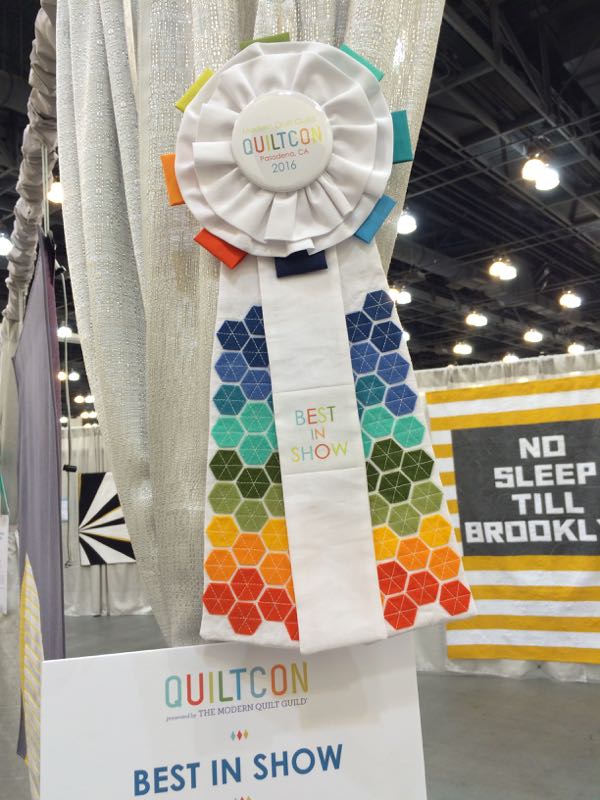
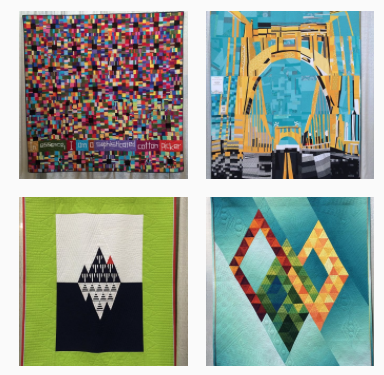
Moment when I found my personal Best of Show quilt, and wanted to grow up and be Yvonne Fuch (@quiltingjetgirl):
Happy Moment:
Lots and lots of them, but especially when I turned the corner and saw my quilt Focus in Paintbrush Studio’s booth. Thank you Paintbrush! It’s made from Paintbrush Studio’s line of solids, Painter’s Palette Solids, and I used the leftovers from making them a quilt for their booth at market, which will remain under wraps until then. (Well, okay. Maybe just one sneak peek…)
Another set of happy moments was finding quilts in the show from people I knew, and also when Cindy Wiens showed me the quilt she’d made for Lucien fabrics, using another design of mine, Semaphore:
from LiveAColorfulLife’s blog
Yes, I couldn’t find the photo I’d snapped one late night in her room, so I borrowed this one from her website. And here’s another of hers, hanging in the show:
Moment when I realized that I should skip going to Savannah-QuiltCon-East2017 and just stay home and sew:
When breezing through my Instagram feed, where I’d posted most of the quilts, and realized if I was ever to get a quilt in this show, I’d better stay home and get busy. So next year, I’ll be at QuiltNon, home and grateful for the chance I had to go this year, and looking forward to QuiltConWest in 2018!
Final Thoughts:
Most of the quilts I found fascinating are on my Instagram feed, to the right. Scroll back through the feed to see them, or follow me on Instagram (@occasionalpiecequilt) and see them that way. Take screen shots of the ones you love, compile your own QuiltCon collection and use them to inspire you further!
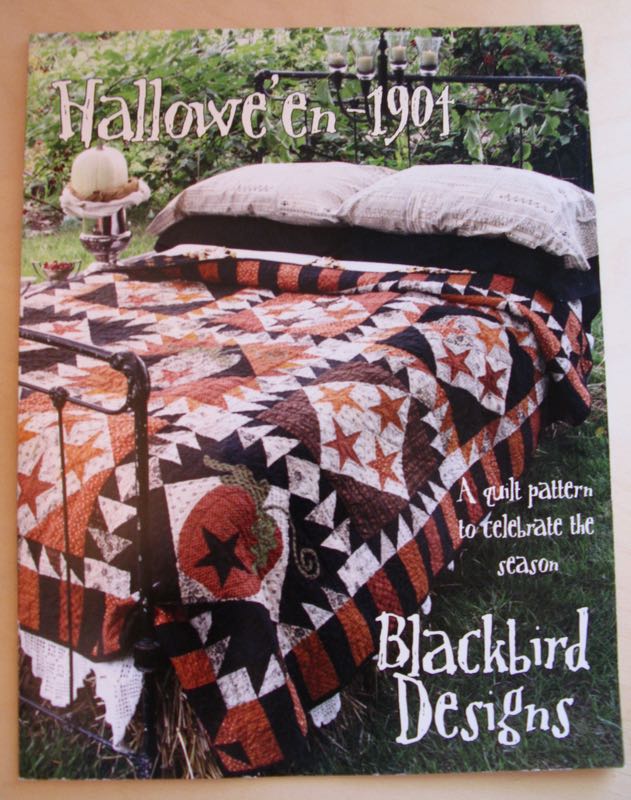
Happy March 13th! My friend Leisa and I got busy this month, cutting up our fabrics so we could show you this step. I’ve made some alterations to our Master Plan (below). If you’re not making this quilt–see you at the next post!
Yep, we got a little goofy on some of the cutting, but don’t worry! We made it through, and so can you. Remember that Leisa and I are doing only NINE blocks of the original twenty as we want wall-sized quilts, so if you are making the big one, your numbers and cutting time will increase (I know that’s a duh.)
HOWEVER, at the end of this post, I’ve included a smallerized version of this quilt, thanks to Mary Burton, one of my readers, who often “shrinks down” quilt patterns in order to make the full compliment of blocks. So you can make a smaller quilt, by also making smaller blocks. More, later.
As a reminder, we are following this pattern by Blackbird Designs, so of necessity, to protect the pattern designers, I won’t show complete measurements. But where I’ve deviated or made up my own pattern, I’m happy to share.
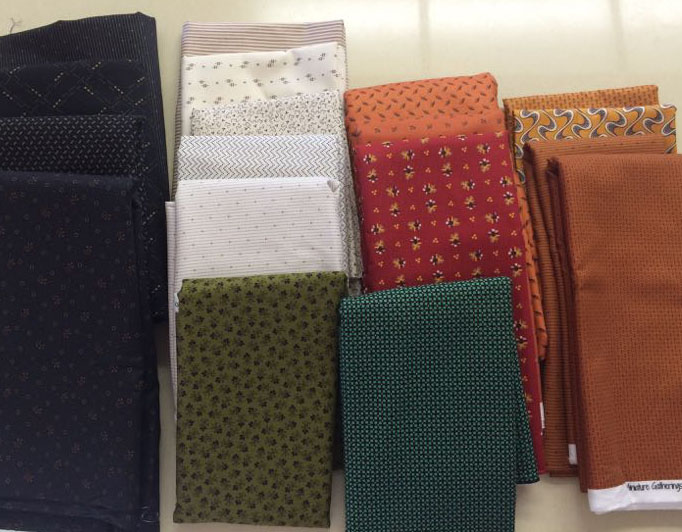
We started here. I didn’t have the pattern when we were buying, so we went a little overboard on some things, but amazingly, we ended up fairly on target for most of the fabrics. I would probably add another green, if I were doing it again. Download and print out the PDF of the cutting chart: Cutting Chart for Halloween Quilt
Here’s a part of it:
Across the top I identify the piece, then the color of the fabric and the number (#) of those pieces for one block. Then I added my column of number (#) for 9 blocks. You get to fill in your info on the last column. Keep reading. . . while you enjoy this wonderful quilt from Thelma, of Cupcakes ‘n Daisies:
Thelma’s Quilt, of Cupcakes ‘n’ Daisies
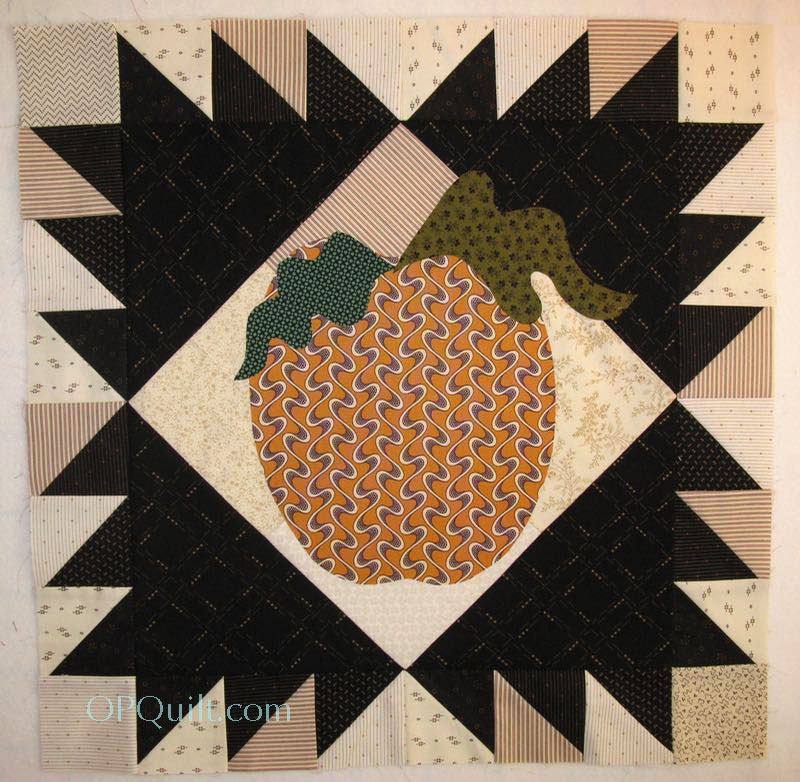
As you look at YOUR chart, you’ll need to decide how many star blocks you want, how many appliqué blocks you’d like to make. Then, further subdivide your appliqué choices into how many pumpkins? how many cats? how many moons/whatever? The pattern includes the pumpkins, stars and moons, but for the cat, you’re on your own (that’s what we have Google Image for–just type in silhouette halloween cat). Thelma’s owl is referenced in *this* post. Leisa and I are making 5 star blocks, 1 cat-on-a-pumpkin block, 2 pumpkin blocks, and 1 moon block.
We are doing the 8-way method of making half-square triangle blocks (HST)–more on this in the next post–but for the size of HSTs we need to go around the outside edge, we need to cut 7″ squares. Since there are 24 HST around the outside of one large block, you’ll need three sets per block of these 8-way HSTs–three of a dark (orange or black) and three of a light (tan/off-white). I couldn’t decide ahead what I wanted where, so I planned to cut 27 of each (dark, light) and I’ll figure it out as I go along, but then I’m okay if I have to mix orange and black HST points around the outside. Refer to the chart. Quickly, here’s all that we cut:
Cut seven-inch squares on this step, half in light and half in dark (orange/black) fabrics.
Then to make sure I was on track, I thought I’d better sew up one of these 8-way HST things and cut the triangles for the corners around the appliqué just to make sure it all worked. It does. I’ve put on the leaves on my pumpkin, but not the curlicue stem (that, and appliquéing them down will come later–I’m just testing). By the way, this block measures 19 1/2″ (finished)– just to compare it to Mary’s version of 9″ (her instruction sheet further down; keep reading).
ATTENTION: If you are going to appliqué down your stars onto the center of your background blocks, skip ahead to the next section. This next discussion (somewhat confusing until you start the actual construction, but I’ll do my best to explain it now) is for those who want to make wonky stars.
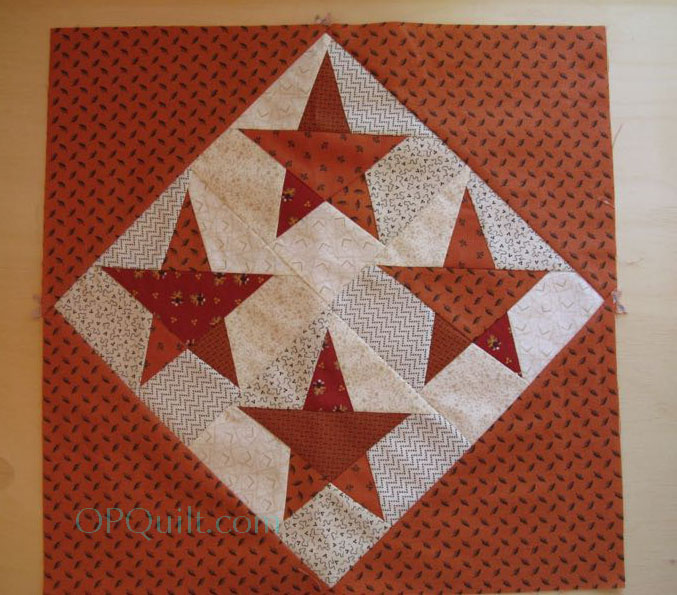
Let’s talk about the Wonky Stars. Here’s a sample (without the HSTs) to see how the fabrics are all placed around. There are four pieces for the star centers, and five pieces that make up the star backgrounds. Sew them together, trim and you have our block.
While this cutting-bigger-and-shuffling thing was big in the 1980s when we’d make wonky nine-patch blocks, it’s currently being taken to new heights by the Buggy Barn. But generally you make a pattern for the star bigger than you need, then sew it together after shuffling the pieces. I’ll give you this template next month, but above you can see one of the earlier prototypes.
The stars in the blue/light print are my first prototype and you can see I cut off the points. Re-draft. The next set (the lower green/white) just looked weird. Re-draft. I am pretty happy with the top two stars (green white) as their proportions look okay to me, and when I did them up in the fabrics of the blocks (above), they still looked okay. So, how did we figure out what to cut?
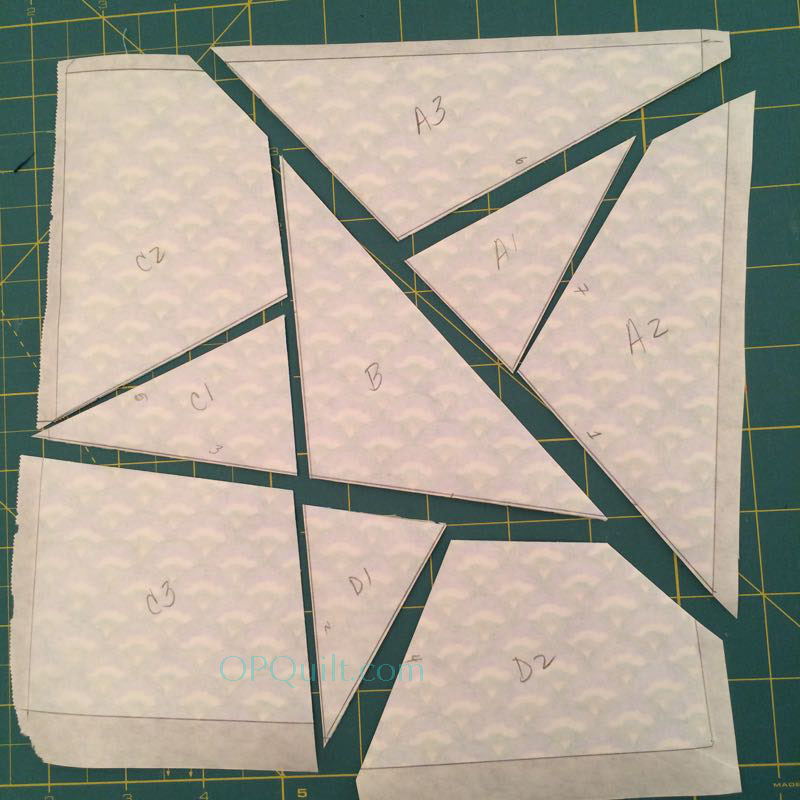
First, following Thelma’s lead, I made plastic templates for each piece, then divided them up by star-center and star-background. Leisa laid out the templates on the cutting board, trying to see how economically we could fit them onto a strip of fabric. She came up with a 4″ strip of fabric for the star backgrounds (and it will take 18″ of that strip for one background set) and a 3 1/2″ strip for the star centers (and you’ll use 11″ of that strip). So you can get two complete star backgrounds from one 4″ by WOF strip and three complete star centers from one 3-1/2″ by WOF strip.
The trick is, though, that you need a variety of prints to make the wonkiness. Since there are 4 pieces to the star center, you’ll need at least 4 strips, each of a different fabric. For the star backgrounds, you’ll need 5 different strips.
ARE YOU THOROUGHLY CONFUSED? Me too, and I already did it. Just download the chart, follow along how many we cut (or count the number in the photo) and get everything cut. Don’t give away your extra fabric, in case you need more, and tuck it all away in a box until April 13th, when we’ll start constructing the appliqué blocks, and I’ll show you how to do the 8-way HST blocks, too. Wonky stars are coming in May.
NOW, here’s Mary Burton’s measurements for her smaller quilt. She writes:
“The blocks finish at 8.5 inches with piano border finishing at 3″ so the quilt will be 40″ square. I love mine. I don’t usually make bed quilts so I reduce lots of patterns.”
I’ve purposely left this photo uncropped so you can use the outlet for a gauge as to how elegant this smaller version of the quilt is. Really fabulous, and I love the way her backgrounds in the star blocks go from medium to light.
She and I corresponded back and forth several times. She mentioned that:
“[Going smaller] isn’t harder when you are an experienced quilter. You just take your time. Take two squares, sew your seam and measure that piece to be sure you have the measurement you are supposed to have. Do that until you get the correct measurement. If you do that you should not have to pin. Also, you will always be able to use that needle position for all future projects.
The only part that I had to slow down for were the half square triangles because they are so small. If you use the easy angle ruler, they actually cut and go together fast. I just learned how to use it this year and it’s wonderful. Since I made this quilt last spring I just cut 2-inch squares in half and sewed my triangles together and then squared them down to 1 1/4.” The Easy Angle ruler leaves that step out and you don’t have any fabric waste. You do have to find your correct measurement though. You don’t measure your seam, you measure those 2 squares after you sew them.
I did press my seams open because of so many seams. You can use any technique you wish. I always use whatever works for me. If you have never use the Easy Angle ruler, Bonnie Hunter has a tutorial for it on her site. Don’t bother with the tutorial from the manufacturer.”
Download her instruction sheet here: Burton_Halloween1904 And if you want to thank her, leave a comment and I’ll forward it on to her.
By the way, I’ve changed some of the schedule stuff below. Just keeping’ things up to date. See you next month!
Revised Master Schedule:
Step 1 (Preparation): February 2016–buy all the fabrics and find the pattern. Mine was purchased from Common Threads in Waxahachie, TX (www.commonthreadsquilting.com). The quilt measures 90 by 90, which is too large for me, so I’m only doing nine blocks. Each block is 20″ square, and with the outer borders, that should come to roughly 65″ square. I may change my mind, but this looks good from here.
Step 2: March 2016–Cut out the quilt: the tan backgrounds of the squares, the border triangles, the smaller half-square triangles, strips for the wonky stars, but save the piano key border for later.
Step 3: April 2016–Assemble four blocks and add large appliques; use Thelma’s method (of Cupcakes and Daisies) for adding the curlicue stem. Make and add half-square triangeles (HSTs) around these blocks, using the 8-at-a-time method of HSTs, here and here. In the pattern, and in the photo from Thelma, they are mixed up and varied, but also harmonized (some have a mix of orange and black, some have just black, some have just orange.) Make your own rules and go with it.
Step 4: May 2016–Cut and make the wonky star blocks from templates and strips. We’ll be using Thelma’s method. I’m doing five blocks, so will need to make twenty wonky stars and true them up.
Step 5: June 2016–Assemble the rest of the star blocks, adding the large triangles on each corner and their HST borders. In the pattern, and in the photo above from Thelma, they are mixed up and varied, but also harmonized (some have a mix of orange and black, some have just black, some have just orange.) Make your own rules and go with it.
Step6: July 2016–Arrange the blocks on your design wall and stitch together. Cut the pieces for your borders. Make the four corner pinwheels.
Step 7: August 2016–Sew borders together and attach them to the quilt.
I’ve signed up to teach a few classes at our local quilt shop, The Quilter’s Cocoon, and thought I’d let you know about them. The first three are mini quilts, where you learn a new skill with each one. There’s a discount for signing up for all three. Then in June, I’m teaching the Wonky Baskets quilt, to use up a lot of scraps. July’s class is Machine Appliqué, making an originally designed Lollypop Tree block (pattern included in class) in either Christmas colors or summery/spring colors.
Finally, we’ll finish off with Beginning Machine Quilting, using your domestic sewing machine. Hope you can join me for one or all!
April 19, Tues: 10:30-2:30Rolling Rainbow Star
This brightly colored mini quilt is where you’ll learn about the color wheel and how to piece Y-seams (easily). Class materials fee is $2.00. I’ll be teaching a series of three mini quilts. It’s $30 for one class or $75 for all three. I’ll be teaching at Quilter’s Cocoon, in Riverside, California (951-351-0346)
May 3, Tues: 10:30-2:30Spectrum
This mini quilt is composed of multiple Kaffe Fasset fabrics, all done by hand with English Paper Piecing. Class materials fee is $10 (pattern included). You’ll learn the basics of paper piecing, and some tips in working with the color wheel. I’ll be teaching a series of three mini quilts. It’s $30 for one class or $75 for all three. I’ll be teaching at Quilter’s Cocoon, in Riverside, California (951-351-0346)
May 17, Tues: 10:30-2:30Home, Sweet, Home
This fun neighborhood centers around a town star! Pick up the cutting directions when you pay for the class, and come with all your pieces cut. We’ll talk about how to get the perfect points on a half-square triangles and snowball blocks. Cost: $35. Class materials fee is $10 (pattern included). This is the third in a series of three mini quilts. It’s $30 for one class or $75 for all three. I’ll be teaching at Quilter’s Cocoon, in Riverside, California (951-351-0346)
June 7, Tues: 10:30-4 p.mWonky Baskets Quilt
A scrap-happy quilt with wonky baskets. You’ll need one short ruler to help you cut the sides and one long ruler (to cut the bias), but other than those two things, it’s wonky happiness! Bring a collection of scraps (more info on class handout, available when you pay) and we’ll sew sew sew all day long. Instructions for the borders will be handed out at the end of class. Class cost: $45,at Quilter’s Cocoon, in Riverside, California (951-351-0346)
July 16, Sat: 10:30-4 p.mChristmas Treat
This Christmasy wall hanging can also be made in spring colors in Kaffe Fasset fabrics. (See below). In this class we’ll talk about combining fabrics, freezer-paper machine applique. Instructions for the borders will be given out in class, in case you don’t get to them. See class supply sheet for more information. Cost: $35. I’ll be teaching at Quilter’s Cocoon, in Riverside, California (951-351-0346)
Spring version of Christmas Treat
August 27, Sat: 10:30-2 p.mBeginner’s Free-Motion Quilting
If you know your machine well, and are ready to finish off that stack of quilt tops in your closet, this is the class for you. I can not do tech-support for your machine, so make sure you are familiar with the basics of your sewing machine, have a free-motion quilting foot (see your dealer if you are not sure) and are ready to learn how to quilt with your domestic sewing machine. Cost: $35. Class materials fee: $15. I’ll be teaching at Quilter’s Cocoon, in Riverside, California (951-351-0346)
–OR–
Sept. 8, Thursday: 10:30-2 p.mBeginner’s Free-Motion Quilting If you know your machine well, and are ready to finish off that stack of quilt tops in your closet, this is the class for you. I can not do tech-support for your machine, so make sure you are familiar with the basics of your sewing machine, have a free-motion quilting foot (see your dealer if you are not sure) and are ready to learn how to quilt with your domestic sewing machine. Cost: $35. Class materials fee: $15. I’ll be teaching at Quilter’s Cocoon, in Riverside, California (951-351-0346)