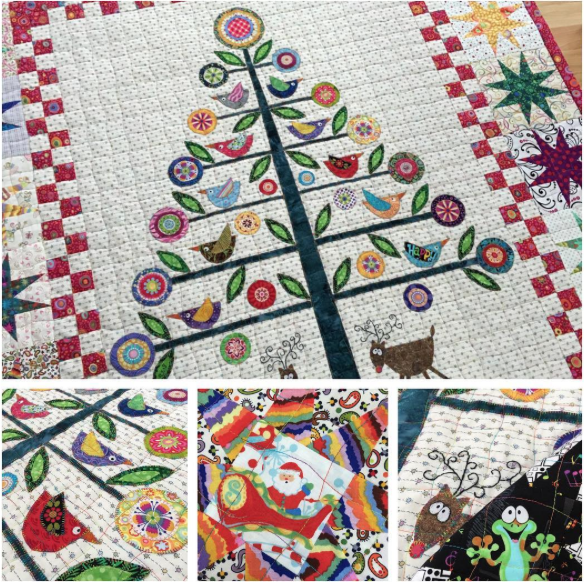
Today is Step 6 of our Oh Christmas Tree Quilt-a-Long (#ohchristmastreeqal), following a pattern by Wendy of FlyingFishKits and which was published in Simply Moderne issue #3, by QuiltMania. As always, we have an assist from Wendy of Wendy’s Quilts and More (blog) and wendyquiltsandmore (IG). Our hashtag on Instagram is #ohchristmastreeqal so look there for more ideas.
I’ve been keeping a log of the steps in the tab above, Oh Christmas Tree Quilt-A-Long, so consult that page when you need to find a post.
And yes, there is a giveaway at the end of this post, so have fun reading through the maze of red triangles.

Today is the Dreaded Border Problem. No, not that kind of border problem, but a QUILT border problem. To guide you through all the blather this longish post, I’ve broken it into 5 parts: 1) The Pattern and the Problem, 2) The Fix, 3) Construction, 4) Fitting it to the Tree, and 5) More Ideas.
The Pattern and the Problem
 These were the inner red/background fabric border blocks, drawn to the measurements listed on the pattern in Simply Moderne. You can see the troubles already, right? None of them can play nicely together (that last shape is the dimension of the half-triangle, minus its diagonal line).
 (from here)
Maybe the Metric vs. Imperial measuring system may have something to do with it? but I don’t know (and to be truthful, I just really wanted to use that image).

When I tried to subtract the seam allowances, and create the wedge piece for use at each end of the borders, it just got messier.
But never fear! Wendy informed me that the seam allowances were left off the triangle and the wedge piece, EVEN THOUGH IT SAYS THE SEAM ALLOWANCES ARE INCLUDED. She sent me photos showing a difference in the base of about 3/4″ across.
Which explains. . . a lot. Like a lot of you have gone ahead and cut out the triangles then got to a place like where Gwen did, when she noticed that they were too small! She eventually made more triangles to fit across the area needed. Leslie, another friend who was trying to make this at a retreat, emailed me with the same problem; she decided to stop until I figured it out.
The Fix
But before I knew about the news from Wendy, I had scrapped their templates entirely and made my own, which work fine (free templates for download are below). I compared my triangles to the revised pattern (now including) seam allowances, and mine are slightly larger by about 1/4″ total on the large triangle (1/8″ each side), but interestingly enough, perfect for the wedge triangle. So you have a choice: do theirs in their imperfections — first adding seam allowances — or, forget theirs and go with mine. You should know, however, using my templates will change the number of wonky stars you’ll make for the border, if that matters to you. The finished quilt photo is at the very end of this post, if you want to compare how mine turned out with the magazine’s photo. And Simpy Moderne’s link for the errata; it simply says “add seam allowances.” Okey, dokey.
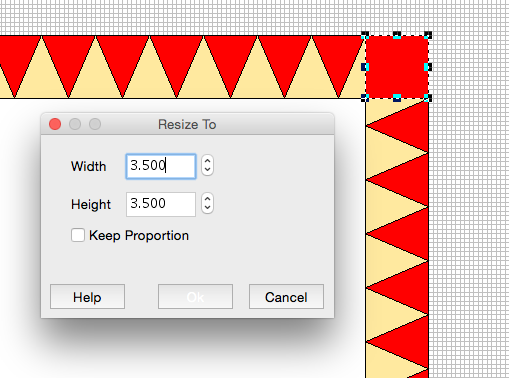
I figured out my templates by starting with their lower border measurement, which just happened to be one that I could evenly divide by 3. So I redrew my triangles to measure 3″ across the bottom. Then I had to change the side border measurement to also allow division by 3. Here’s my working snapshots from my QuiltPro software.

These images show the measurements without seam allowances. The templates that you’ll print off (at 100%) include those pesky seam allowances. 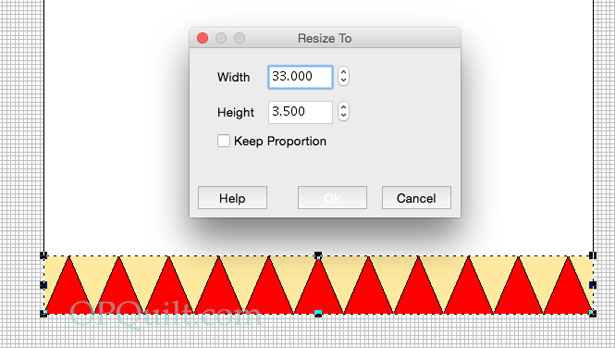
So here is that link to a PDF file that has templates for the new triangles and corner block: OCT New Border Templates. To make sure you are printing it out correctly, the inside measurement of the cornerstone (w/o seam allowances) is 3.5 inches (or the entire square is 4″). Please print out only one copy for yourself. If your mother or friend want the pattern, please send them here to get it. Many thanks.
Construction

I cut three 4″ strips WOF: as you can see, the strips were big enough to accommodate the triangle pattern. I did flip it back and forth so was able to get about 10-12 triangles out of that folded cut per strip (I forgot to count). So, from three strips I had plenty. You’ll need 11 red triangles each for the top/bottom border, and 13 red triangles each for the side borders. Cut 12 whole background triangles and 2 smaller wedge triangles for each side border; top/bottom borders require 10 full background triangles and 2 smaller wedge triangles. [NOTE: I do show you two different ways to think about your placement; read all the way to the end before cutting.]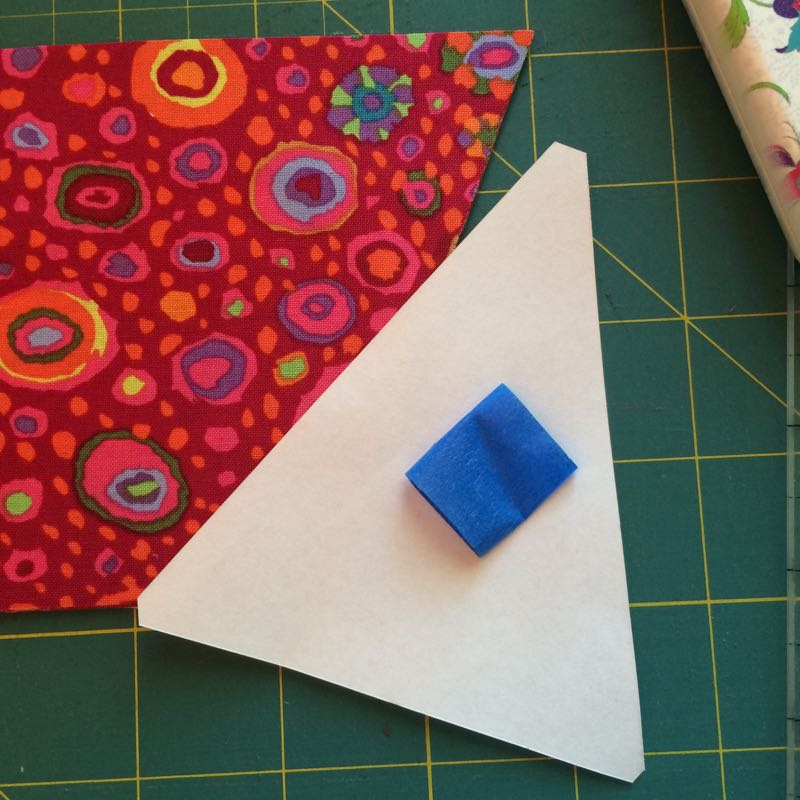
I put a double loop of painter’s tape on the back of my template so it wouldn’t shift while I was cutting.
I also don’t really worry about the outside edge of the template so much, instead focusing on lining up my ruler with the actual dimensions of the triangle. That way, if I accidentally trim off a bit of the template while cutting, the world doesn’t end. I’m paying more attention to the inside “actual triangle” shape when I cut, than to the triangle’s outer seam allowance line.

I’ve also learned to shift the fabric going up away from me (north-south direction) when I cut angles, shifting it slightly left or right as needed, so it’s easier cutting with less stress on my hands.

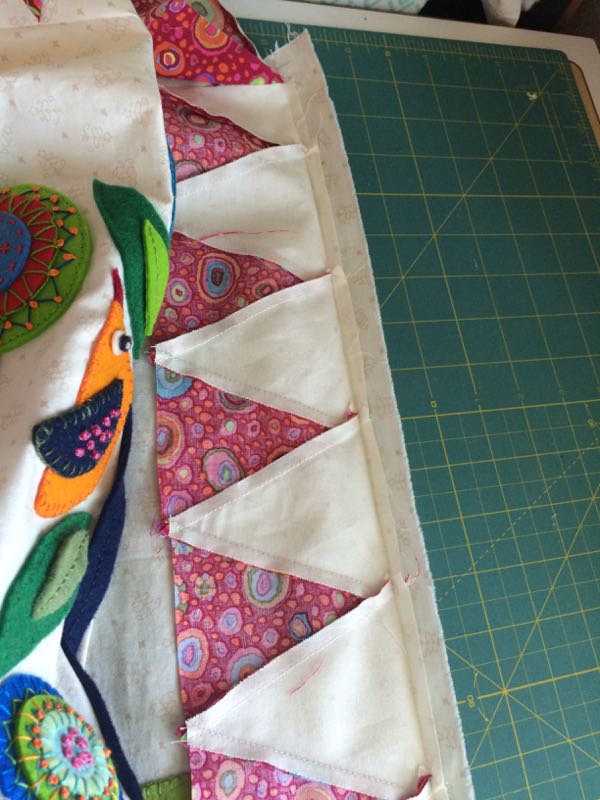
All lined up, ready to sew. 
Since I cut three strips at once, I work with a stack of six red triangles and six background triangles, laying them out like this.

Line up the tip like this, then sew along the top edge with an accurate 1/4″ seam, shown here by the dotted line. Do your best to get that seam as accurate as you can, as you are working with a ton of seams here, and a little scoonch off at this point can yield big differences later. Having said that, I wouldn’t worry about it too much, as there are lots of ways to adjust these borders.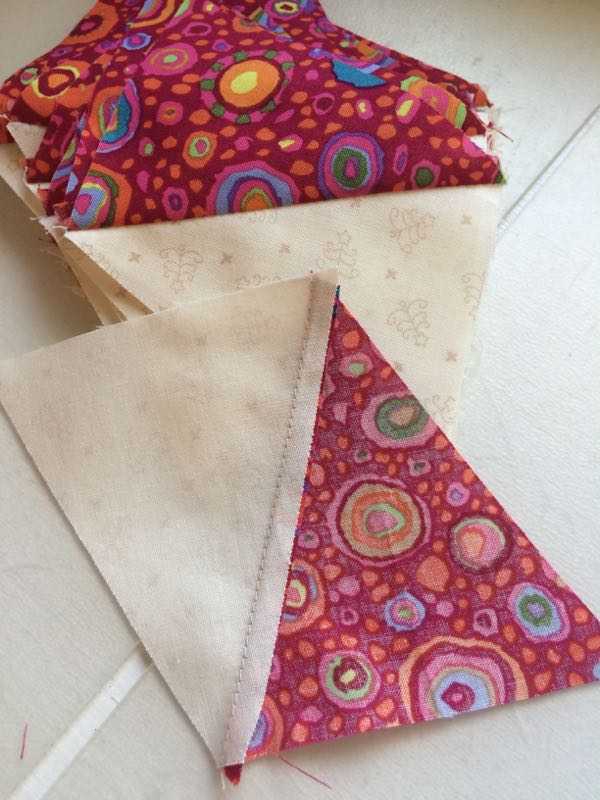
I stitched them in pairs, then pressed to the dark side.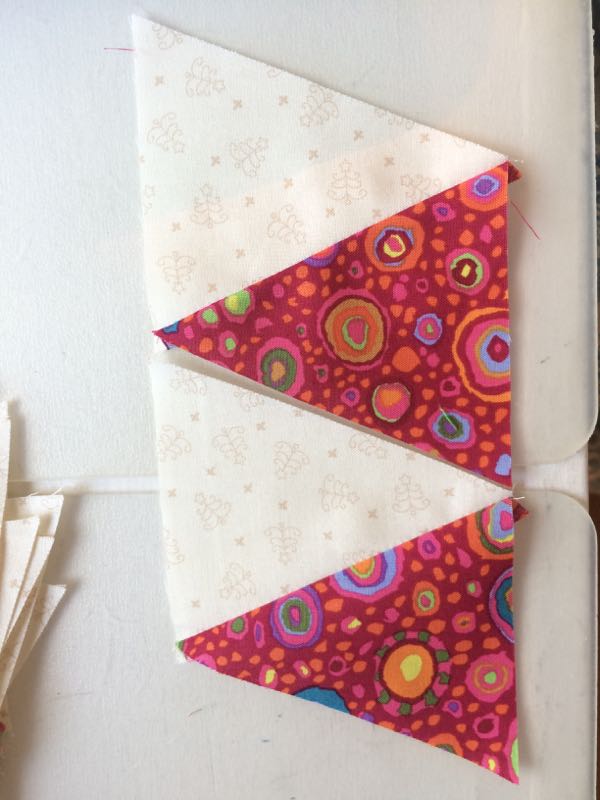
Then I seamed two together, pressed again to the dark side, then built out my four different borders by combining these sets. Watch out–you will have an odd number so you’ll need to sew on just one red triangle at the end of each border, then sew on the smaller half-triangle shapes to make your borders. To reiterate, you should then have:
• two borders with 11 red triangles
• two borders with 13 red triangles
This is different than the pattern in the magazine. Sew a corner block on the ends of the 13-triangle (side) borders and iron all the seams to the dark side, as before.
Fitting It to the Tree
Find yourself a nice big flat surface, preferably with a grid.
 Like a cutting board, or something (Why yes, I do work on my guest bed all the time). I smoothed out my tree, aligning the tree trunk on one of the lines (north-south) but quickly realized that even though I thought I had sewn the tree on straight on my background, it was slightly off (see the slope of the lower edge). You’ll cut the background 33 1/2″ by 39 1/2″ if you are using my templates. Please follow the measurements in the magazine if you are using theirs.

I was more concerned that the tree be upright and straight, so I continued lining up the tree trunk and the limbs with the grid underneath, then putting pins to anchor them straight.

Since I want the background to be cut to 33 1/2″ inches wide, I put the 16-3/4″ inch line in the middle of my tree.
If you have one of these hanging around the house, that’s even better. They are nifty rulers that allow you to find the center easily. Just line up the similar measurements on the outside (in this case, the 1-inch marks on the top edge of the Center-Finding Rule) and you’ll instantly find the center. 
Mark the outside edges.
Now connect the marks. I also used the grid underneath to aid me, deferring to those lines, if I thought my marks were a little wonky. I measured the height of this rectangle (39-1/2″) and it turned out to be almost exactly two inches above the big circle at the top of the tree and the lower edge of my manger in my scene. (Lucky me!) I then used the grid underneath and the right angles of my big ruler to draw the top and bottom lines.
The idea is to draw yourself a squared-up rectangle. If you draw the lines at 33 1/2″ and 39 1/2″ then you can align the raw edges of your borders with those lines as you pin them on. BUT DON’T TRIM THE BACKGROUND YET!!
Of course, the best-laid plans often go awry. I’m a bit short here, but instead of stretching the border to fit (which I could do, since it’s mostly on the bias), I let it be a bit short. I’ll adjust the outside wonky star borders as needed. Sew on the top and bottom borders first.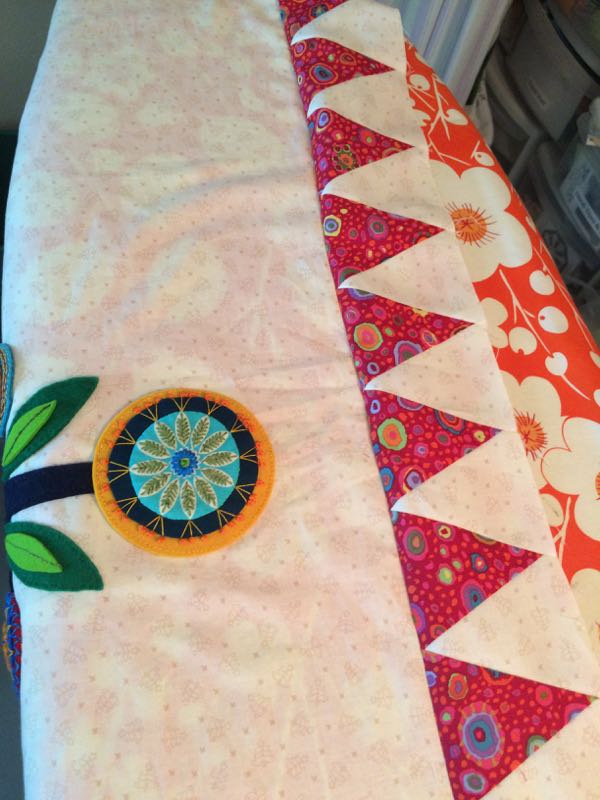
While ironing this seam, I just realized that the red triangles should be pointing TOWARDS the Christmas Tree. I un-sewed, then re-sewed, all the while listening to this (30 hour!) book:

In this season of political intrigues, constitutional fights and jockeying for power, it’s been interesting to revisit the original story of political intrigue, constitutional fights and jockeying for power. Okay, back to the triangles.
Sew on the top/bottom borders first. Then sew the two sides, leaving the corner block seam areas unsewn. Press, then check them, THEN TRIM THE BACKGROUND FABRIC. After that, stitch the corner block seams.
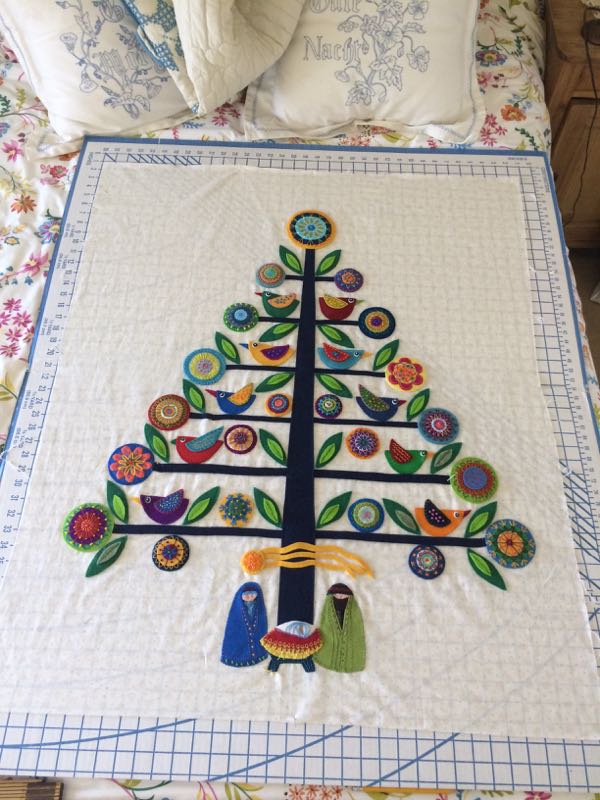
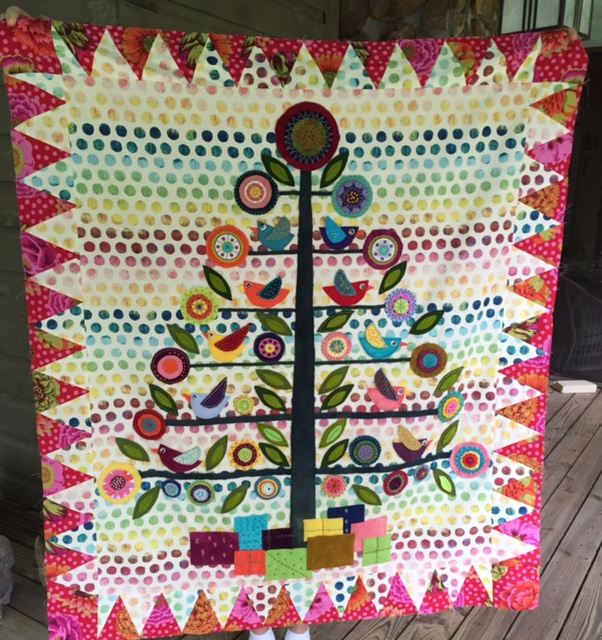
Ta-Done!! It changes the look of everything to have this first border on, and now I can’t wait until I can get sewing the Wonky Blocks for the outside. I’ll cover that on our last installment of the QAL, including how to adjust in case your borders aren’t quite what you thought.
Betty, another friend who is doing this, was working parallel with me that day, and we talked back and forth as we worked. The big take-away is that I think this quilt is jinxed, has a spell on it. Or maybe it was because it was too hot:

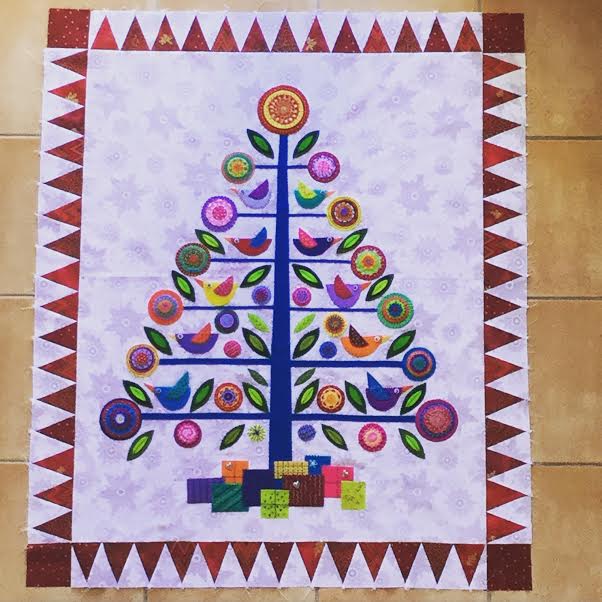
At one point, nearly in tears, I called my husband and told him this pattern had gotten the better of me, and I wanted to chuck it through the window. So if you have this reaction, you are not alone. But carry on, it gets better. Betty’s quilt turned out like this:
(Isn’t that background fabulous?)
Here’s the kicker: she had to eliminate the wedge triangles from the two sides at the lower edge, where it joins the square. In fact, she had to cut those triangles in half. Her measurements are only 1/2″ different than mine, so that’s when I decided that with this pattern you have to:

Go Zen.
Oh yeah, that’s totally me up there, but only after I got the red borders on. Just let go of trying to make this pattern be a precise, precision-cut and sewn quilt, and just work with it. And by the way, Wendy from NZ was working with the “good measurements” from the original pattern and she still had a hard time getting the red border sewn. But like me and Betty — and soon, you — she did it.
Yes, she reversed her triangles, but when I commented on it, told me that she was all finished so they were staying that direction. I mention this to fit in with the theme of Go Zen. There are many ways to complete this pattern, and they are all charming. Keep reading for another.
Once you get here, you’re going to want to keep going and get the whole dang quilt finished off. So, instead of waiting a month for the next installment, I’ll give you roughly a week to get it on (and to get the cursing out of your system) and then I’ll pop up with the the final installment, where we Finish This Thing.
![]()
More Ideas
I first saw this on IG. She did it all in Kaffe Fasset fabrics (apparently, no wools anywhere), with a red/white checkerboard border and that she plans to hang it up all year long. This photo is from the IG feed from Linderella’s Quilt Works in North Carolina. (This is the advantage of tagging your photos!)

And then Janice of french75too (and a huge EPP enthusiast) sent me this picture that was posted on the Kaffe Fasset FB group. The quilt is by Susan Holman, who gave me permission to post it here. She also mentioned that she “had to cut the inner section a bit smaller” and also “re-drafted the stars to finish at 7.5,” as the depth of the border changed the dimensions.
Just to torture myself further for fun, I decided to think about how the quilt top would look if I used different end wedge triangle colors. Here are two pictures to illustrate what I mean.

This is how the pattern goes: small half-triangles made of the background fabric sit next to the corner blocks. The center triangle, in the top and bottom borders, is pointing exactly at the tree trunk.

In this one, the small wedge-shaped triangles are red, which means that the numbers are slightly inverted (10 full red triangles, instead of 11) and the points of the center triangles are on either side of the tree trunk. You get to choose. And because I promised you, here’s a look at my completed top:

This photo is showing number of triangles and the number of wonky stars (which we’ll do next time).

Here’s our updated schedule (can you believe we’ve been working on this since January??):
January 2nd, Step “prepare”: buy the magazine, books, gather your fabrics, buy the felt/wool, buy/find the pearl cotton.
February 2nd, Step 1: Make the tree on the background and stitch it down.
March 2nd, Step 2: Make 21 flowers.
April 2nd, Step 3: Make 10 birds and all the leaves.
May 2nd, Step 4: Appliqué down the flowers and birds.
June 2nd, Step 5: Scene at bottom of tree–make, then appliqué onto background.
July 2nd, Step 6: Sawtooth border (reds); sew together and attach.
July (sometime mid-month), Step 7: (finish up Quilt-A-Long): Make wonky star blocks, sew them together and attach border #2.
September, Step 8 Show and Tell, just in time for school starting again. Please send pictures of whatever state your Christmas Tree is in–whether it’s just the bones of the tree, of a completed top–we want to see it!


Since we are now winding down our Oh Christmas Tree QAL, I thought you’d like to have another project to start. How about some Dresdens? This lovely book, Dresden Carnival, written by Marian Gillian and Yvette Marie Jones, has sixteen different quilt projects using the Dresden Plate block in ways you never thought of. The color pairings are bright and fun and the settings will have you thinking about Dresdens in a whole new way.
To win a copy of this book, please leave a comment telling me what your best Dresden Plate block memory is–from that vintage quilt you saw in an antique store to inheriting a set of blocks from your aunt, to the colorful Dresdens now flying around on the internet (including the free EPP pattern on this blog). I’ll activate the Husband Random Name Generator and we’ll pick a winner.
UPDATE:
Well, my husband was reading intently, so I fired up the Random Number Generator and it picked a winner. See next post for more info.

Happy Independence Day!
After listening to Hamilton, this whole process has a new meaning for me. I owe a great debt to those early patriots.