Quilts

Rainbow Gardens

Stauffer SewJo(from here)

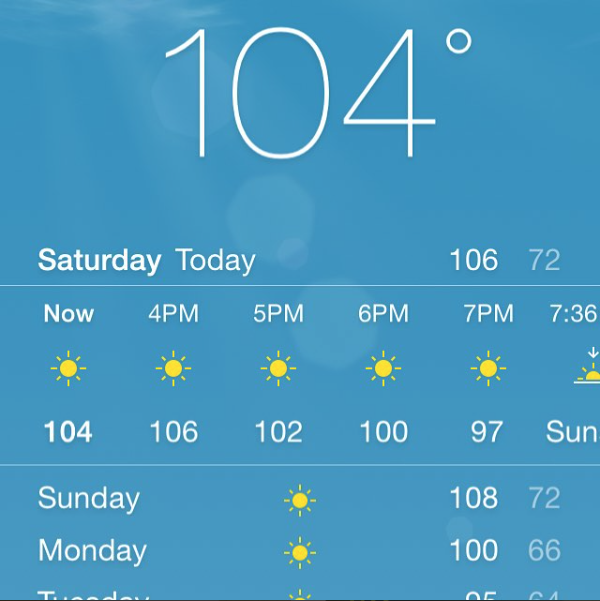
Sometimes I feel like this lady here, moving at snail’s pace, trying to make my entrance, but know I’ll miss it somewhere.  Slow-jo, or Missing the Sew-Jo seems to be a topic of conversation on Instagram and on blogs.  It’s the end of summer for the northern hemisphere, and we’re all a little out of sorts with the hot weather and all.  Frankly, I’m just happy to be on the snail these days, as for a long time I wasn’t doing anything but Recovery (it gets a capital letter around here).  So here’s some of my snail-sewing for the last while.
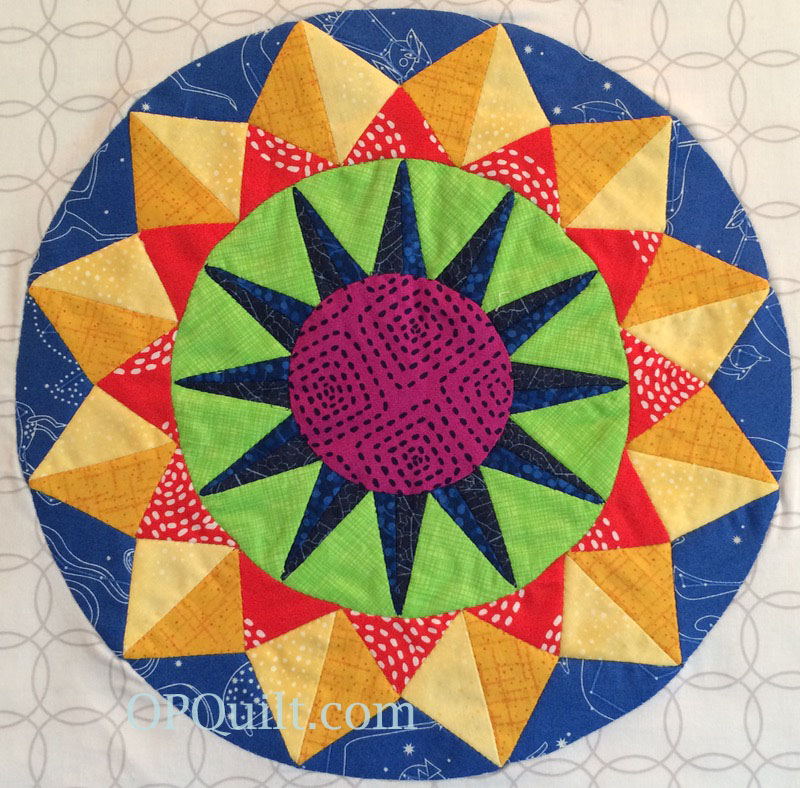
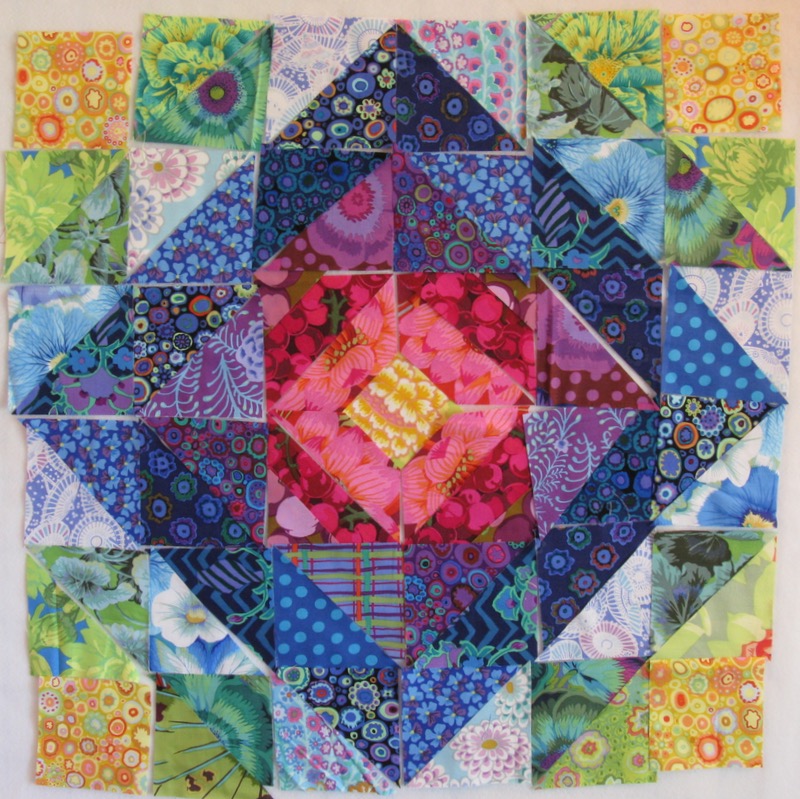
Rainbow Gardens

Rainbow Gardens
Quilt #148
18″ square

This started when I realized that I wouldn’t be able to finish the block I had planned for the Kaffe Fasset Mini Quilt Exchange. My friend Lisa and I had been talking about patterns that were from the 1960s era, and this morphed off of that, as I wanted to subdivide the center to allow for greater color gradation.  I have the pattern and templates for sale in my PayHip shop.

IMG_6003 IMG_6009

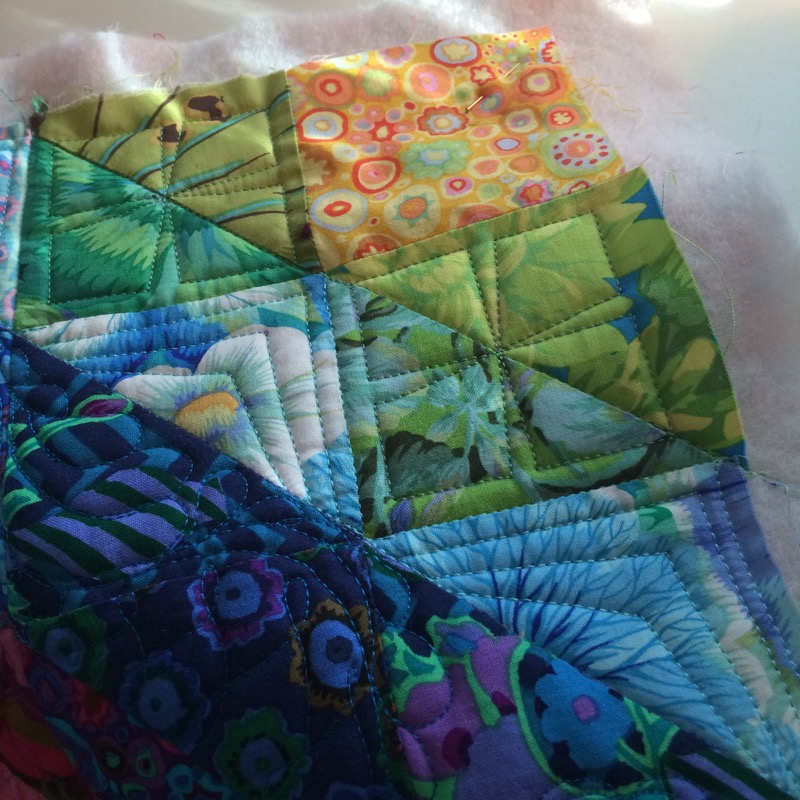
I had fun customizing the quilting, using floral motifs in the floating center square, and geometric designs in the outer corner backgrounds.  Someone on Facebook said it looked like the glowing camera lens from Hal in Space Odyssey, which is a completely creepy thought, if you’ve ever watched the movie.  I prefer to think of it as walking through a large botanic garden, the rows of plants giving way in color as the varieties change, hence the name, Rainbow Gardens.

Unnamed

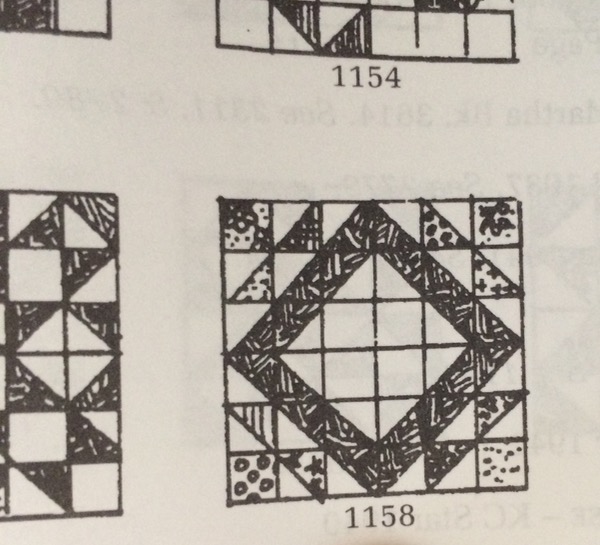
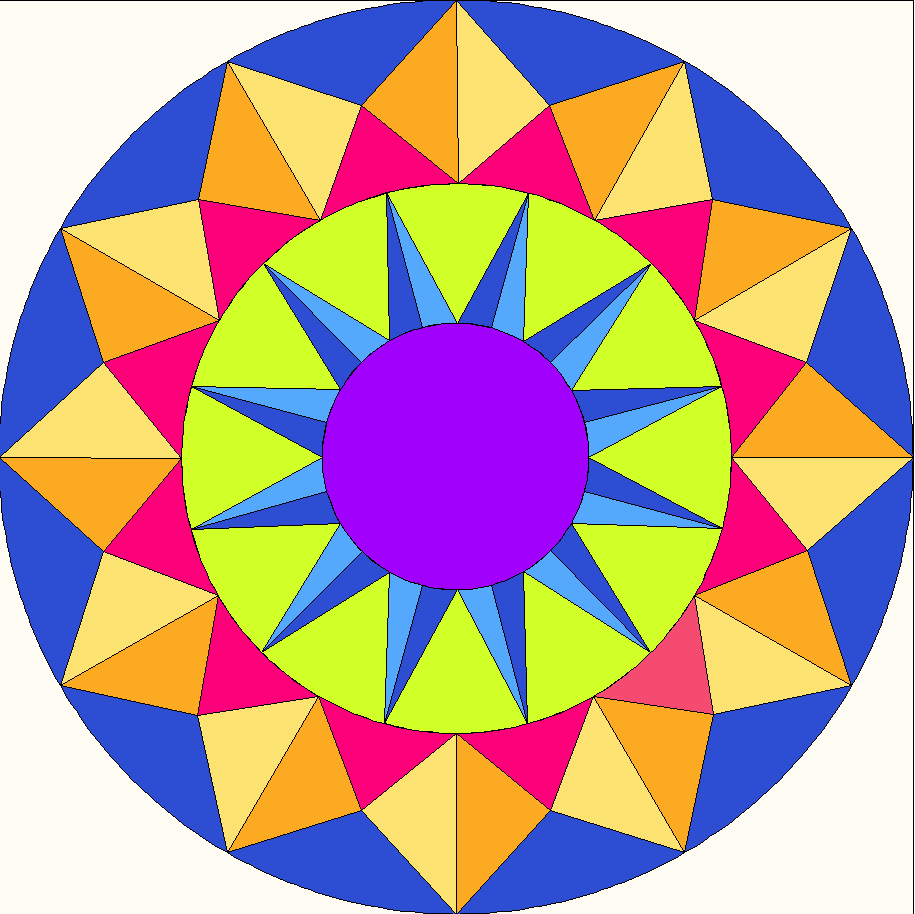
This was the original block, “Unnamed” from Woman’s Circle in 1963.  This is from Barbara Brackman’s Encyclopedia of Pieced Quilt Patterns, which has been out of print for ages.  However, the other day I noticed on her blog that she now has an e-book version of this amazing publication (scroll down on the left of HER blog for the link).

Mini Quilt hanging

Here’s I how hang the minis: cut a large square and fold diagonally in half (this one is 6 1/2″ for an 18″ quilt) and sew it into the two seams top and side.  Cut a dowel to fit across–it works great.Rainbow Gardens_back obscured

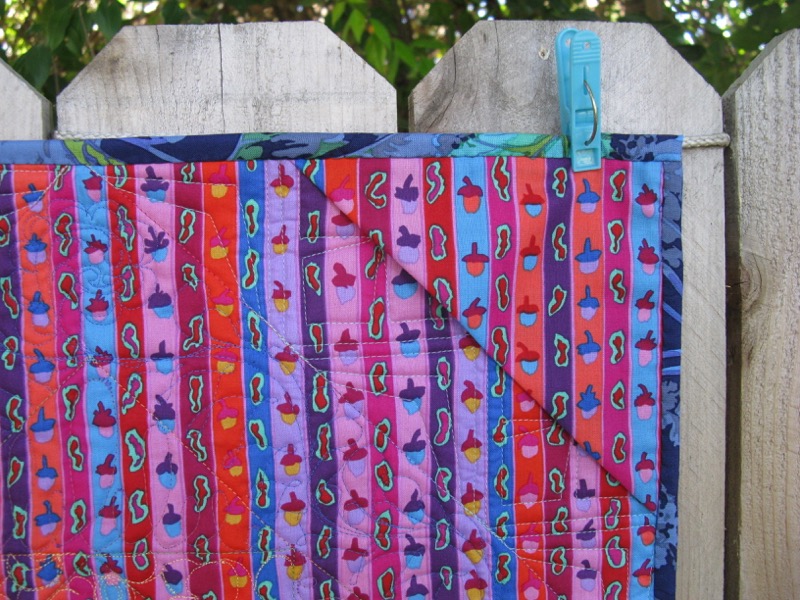
And the back of the quilt.  I love this cheery print. Yes, I’ve obscured the name of who gets this, as we don’t send it out for a couple of weeks, and it’s forbidden to tell who our partner is.  I hope she likes it, though.

Spectrum blades finished

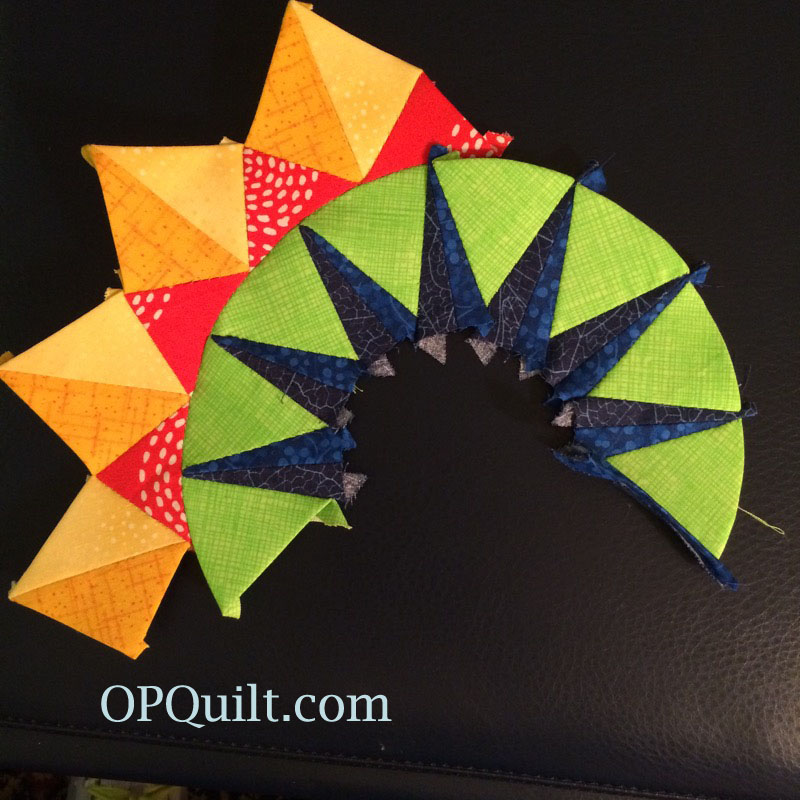
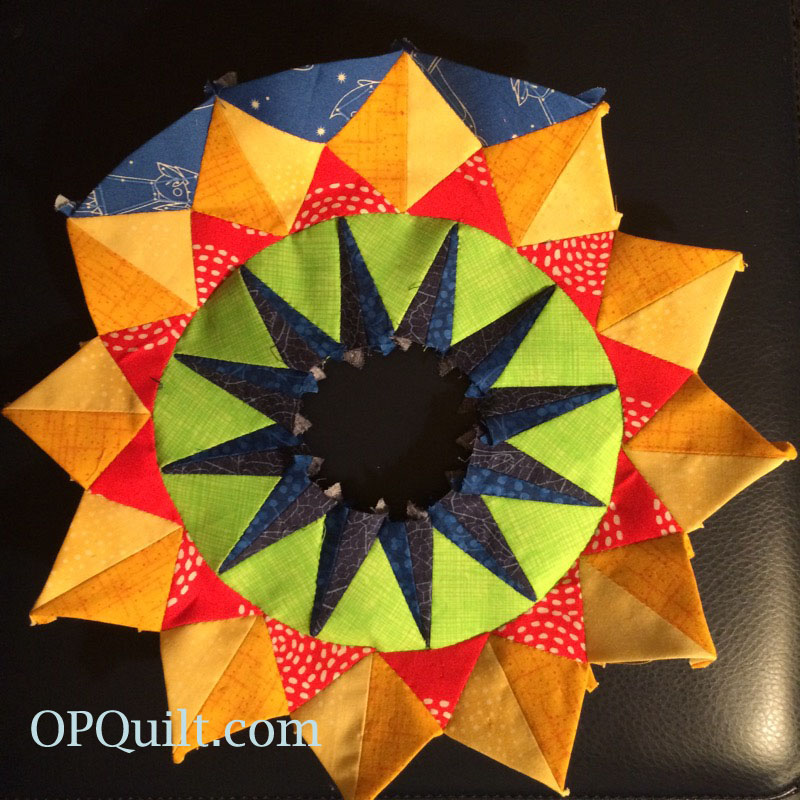
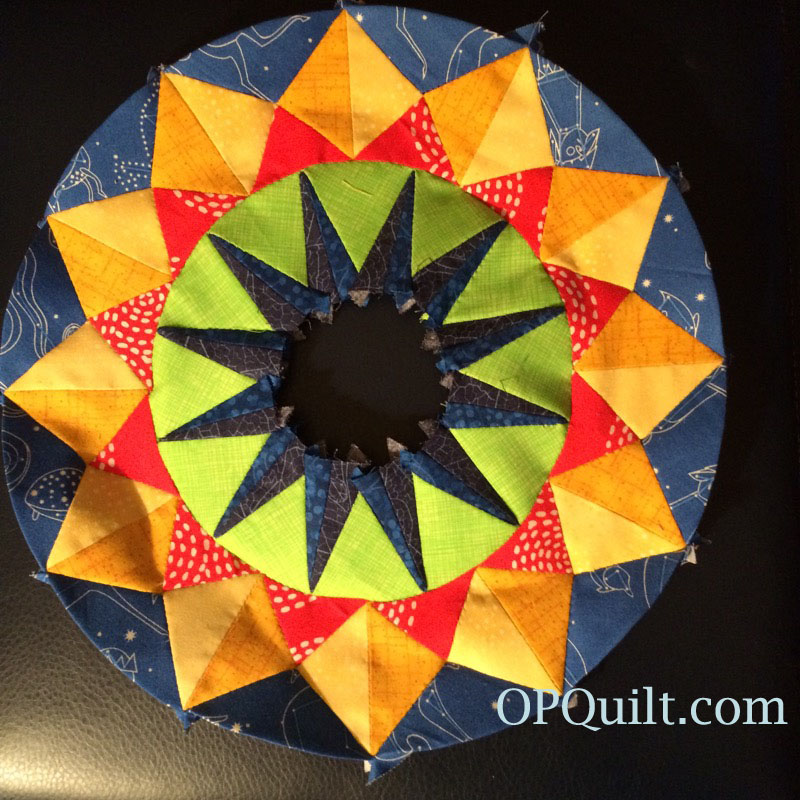
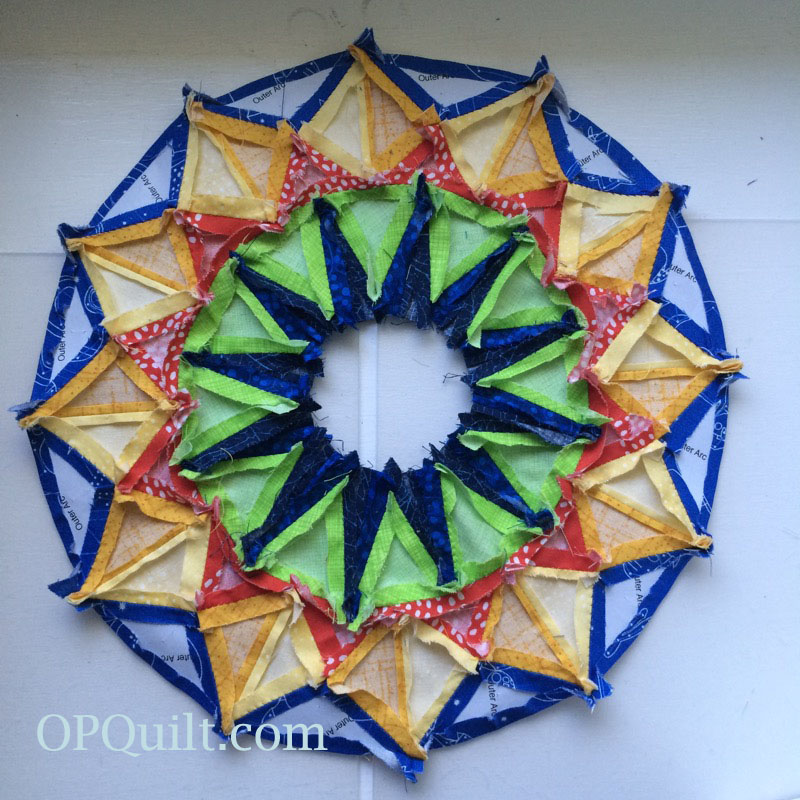
I had intended this one to be made for  the swap, but when I got to here, realized I just didn’t want to push forward on this, so went with the Rainbow Gardens design.

Back of Spectrum

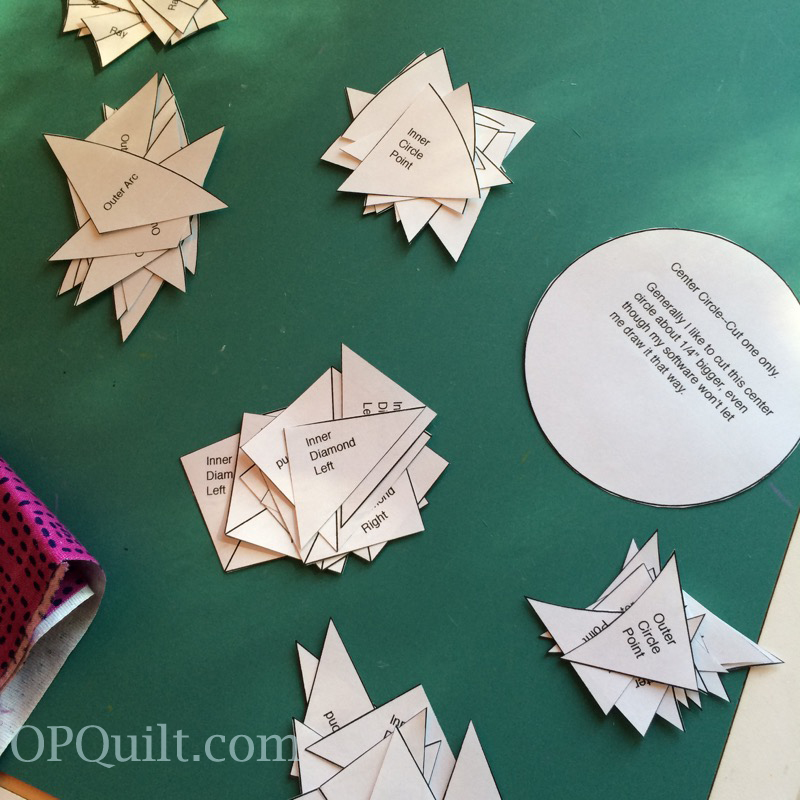
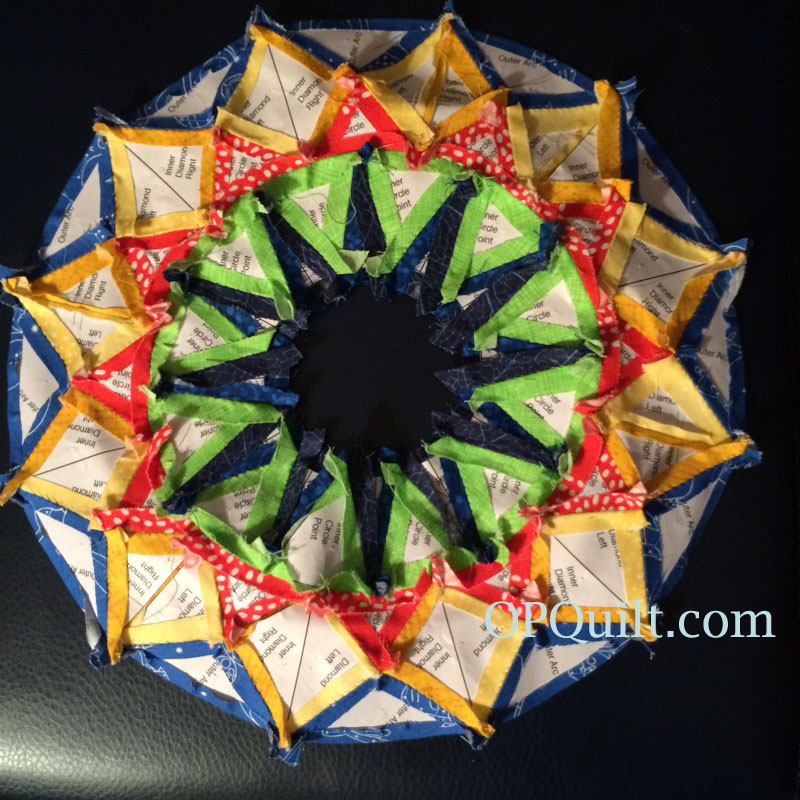
Love the back, with all the papers.  This is an enlarged version of one of my circle blocks, and as soon as I get the mini quilt finished, I’ll put the PDF up on Craftsy.

Kaffe Circle Mini

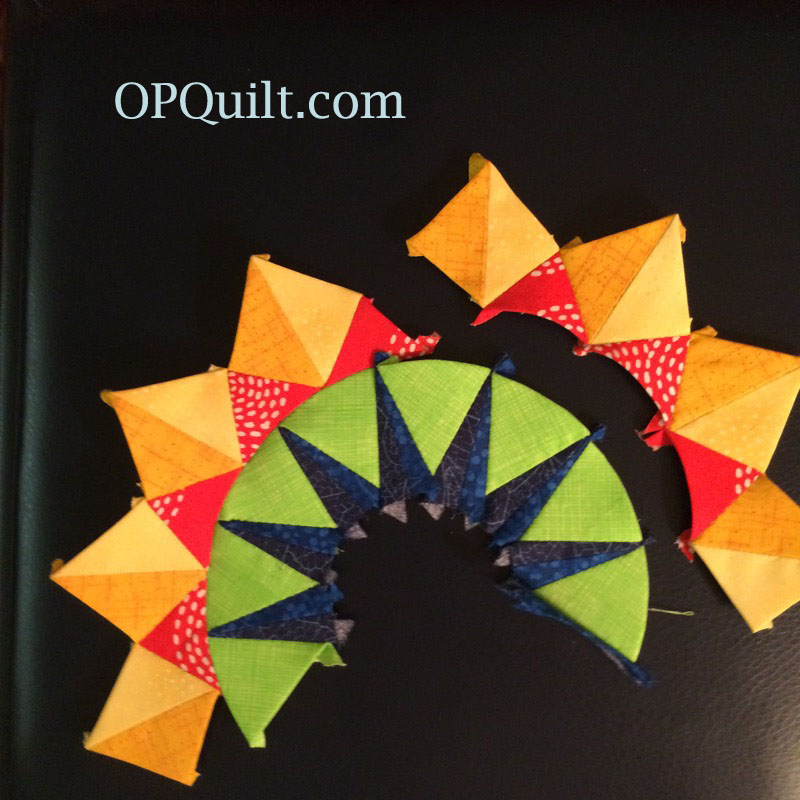
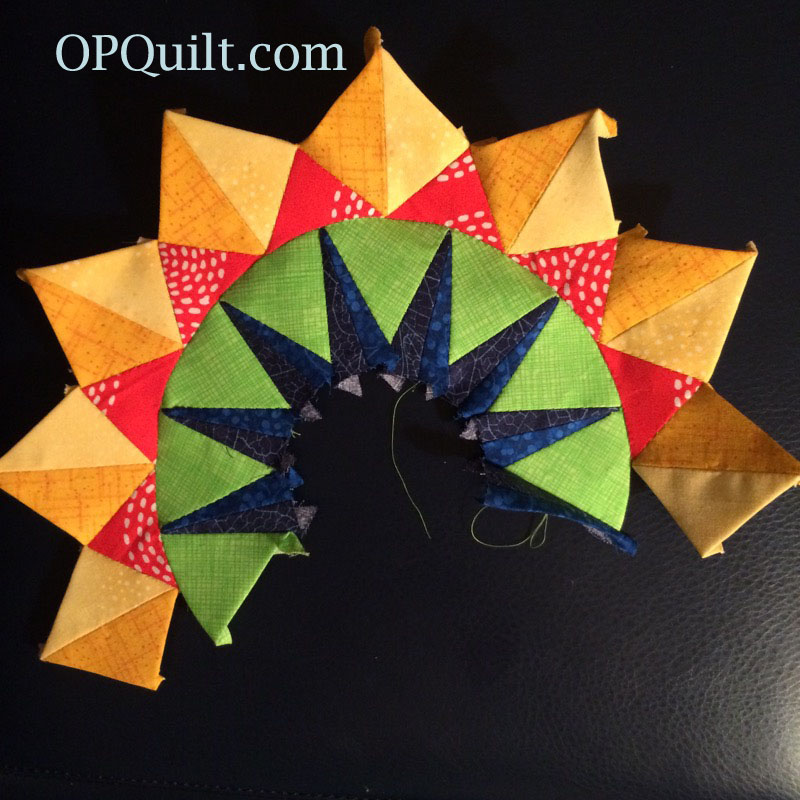
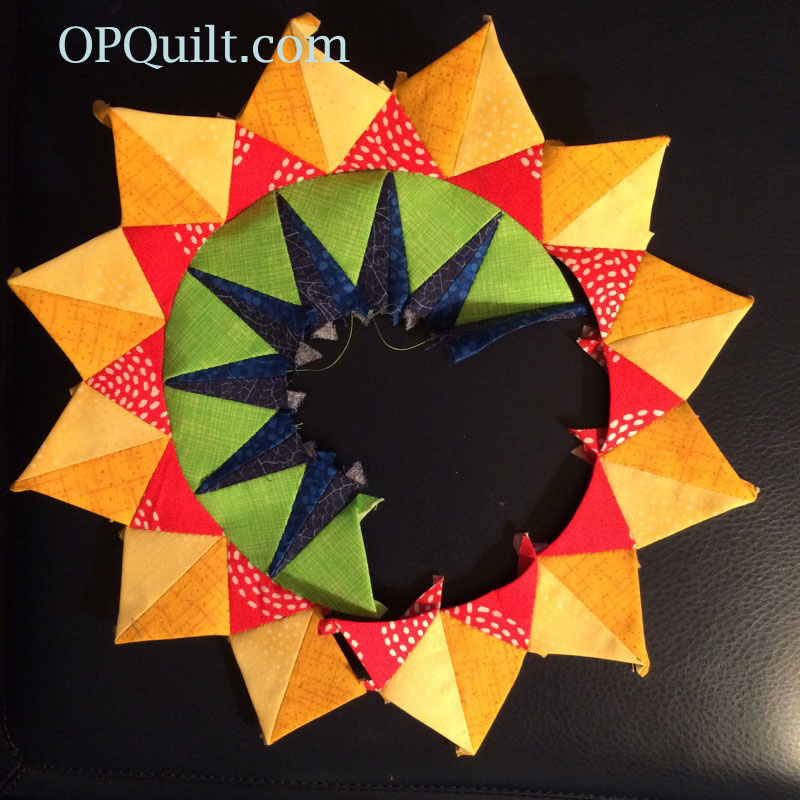
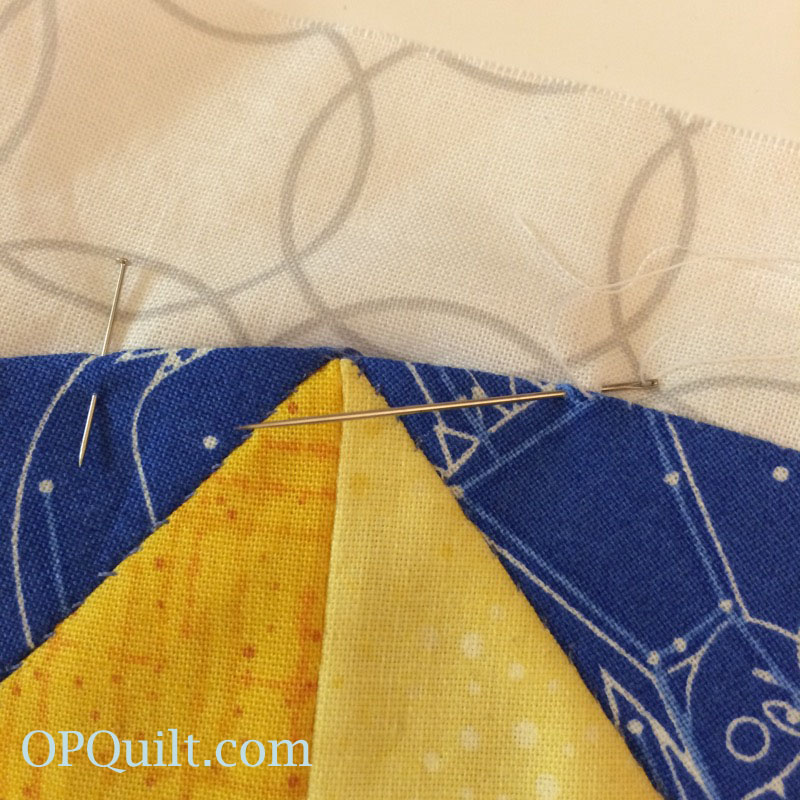
Of course, once the pressure is off, the sewing can proceed apace, so then I was able to put the outer arcs on the design.

Spectrum

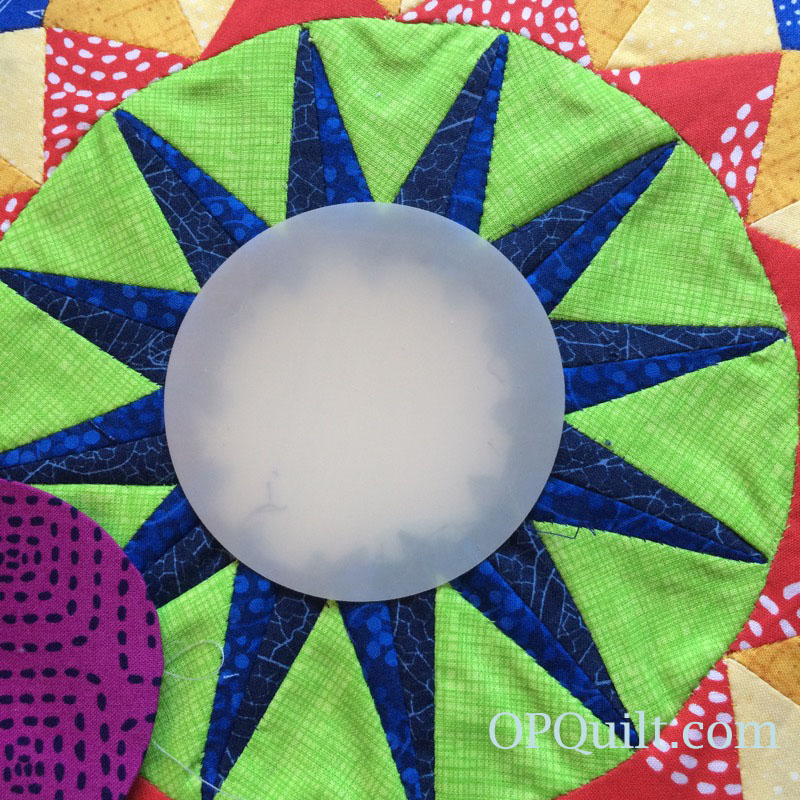
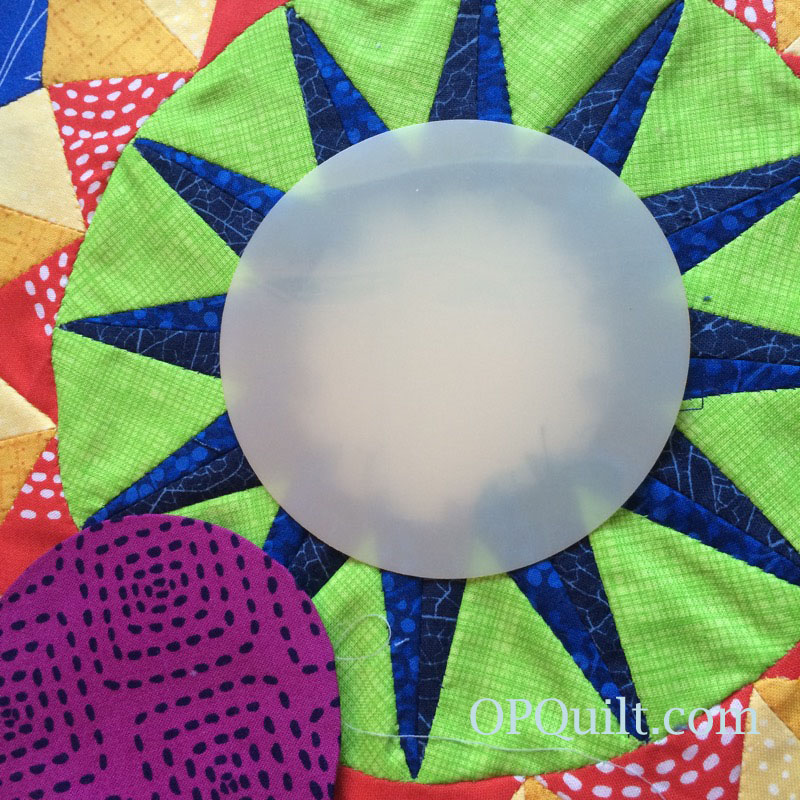
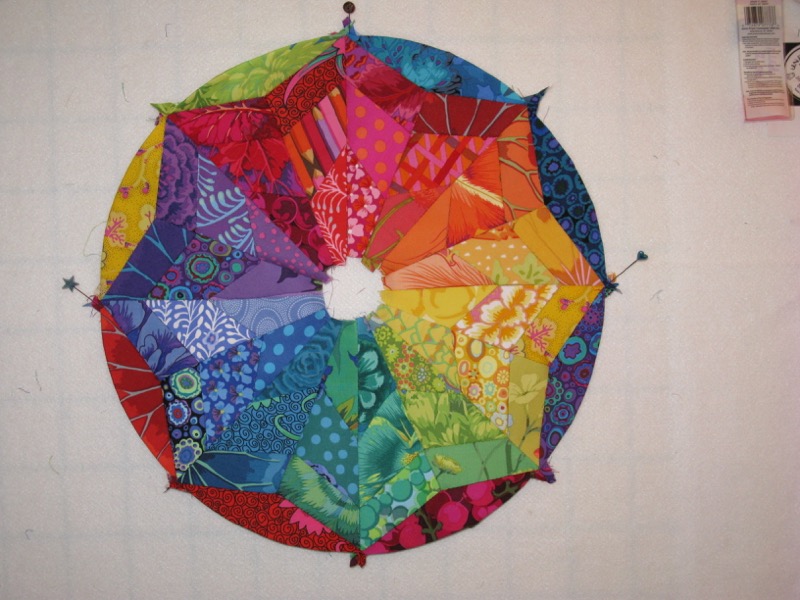
Then I got this far: center circle on and the background chosen and just didn’t like it.  But since I’m not under a deadline, I had time to un-pin, re-think.  I had put up this photo on social media with its twin (but with a different center circle), asking which center circle people liked.  It was so evenly split, it told me that I hadn’t hit the home run on center circle choices.  Back to the drawing board. . . and the quilt shop.  (Can you tell I’m still riding a snail?)

Rosette #4 partway done

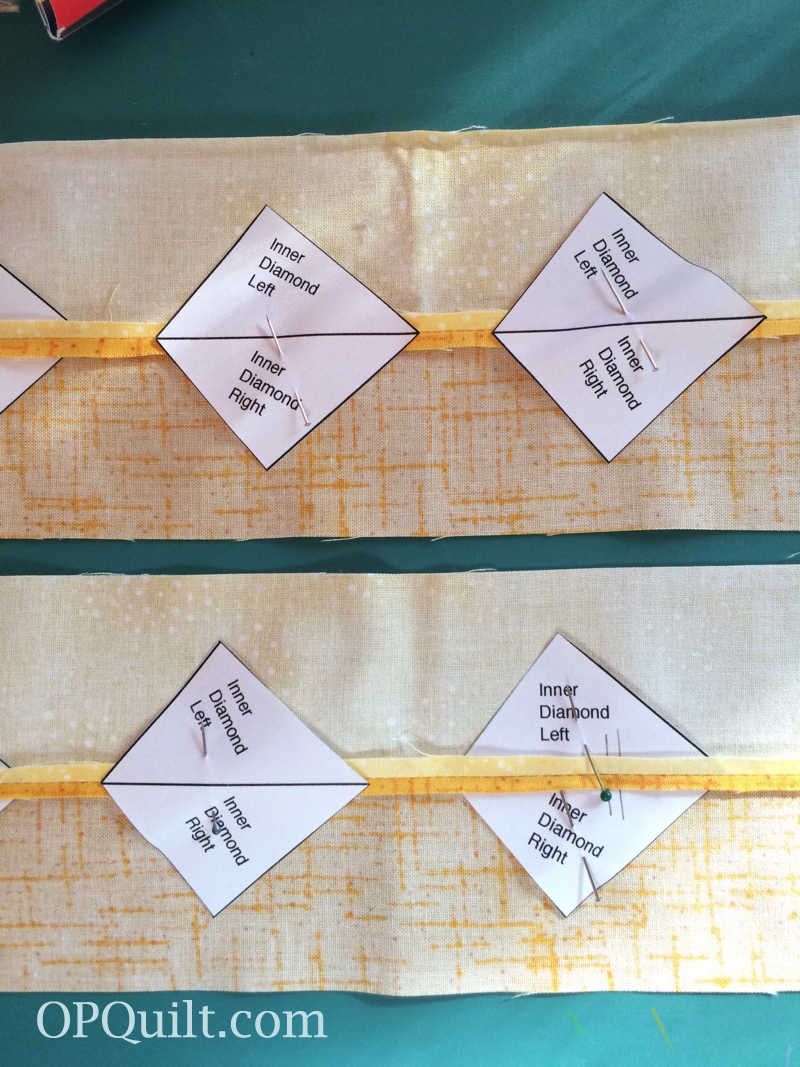
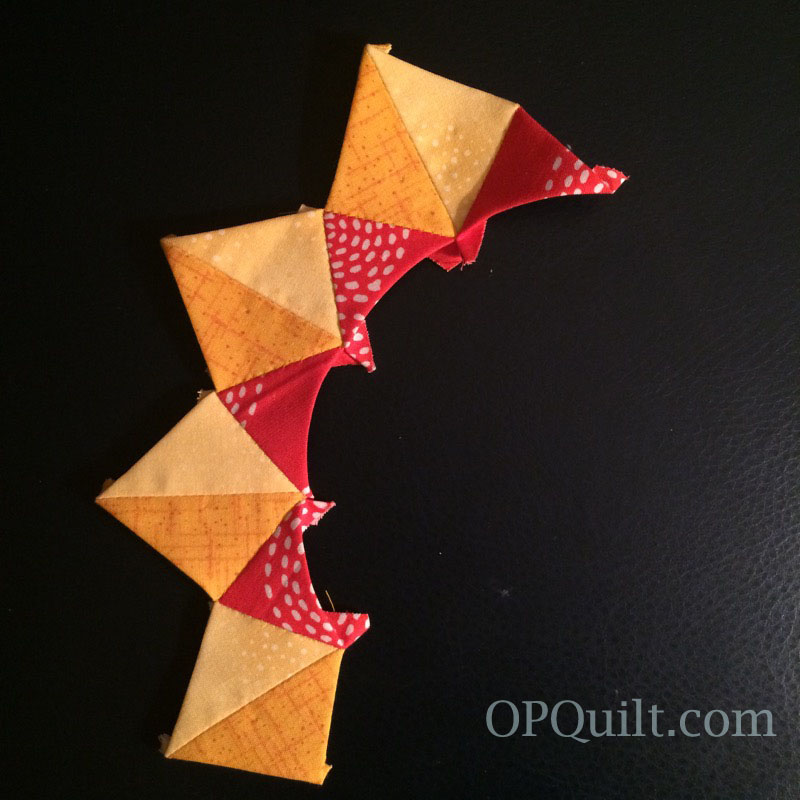
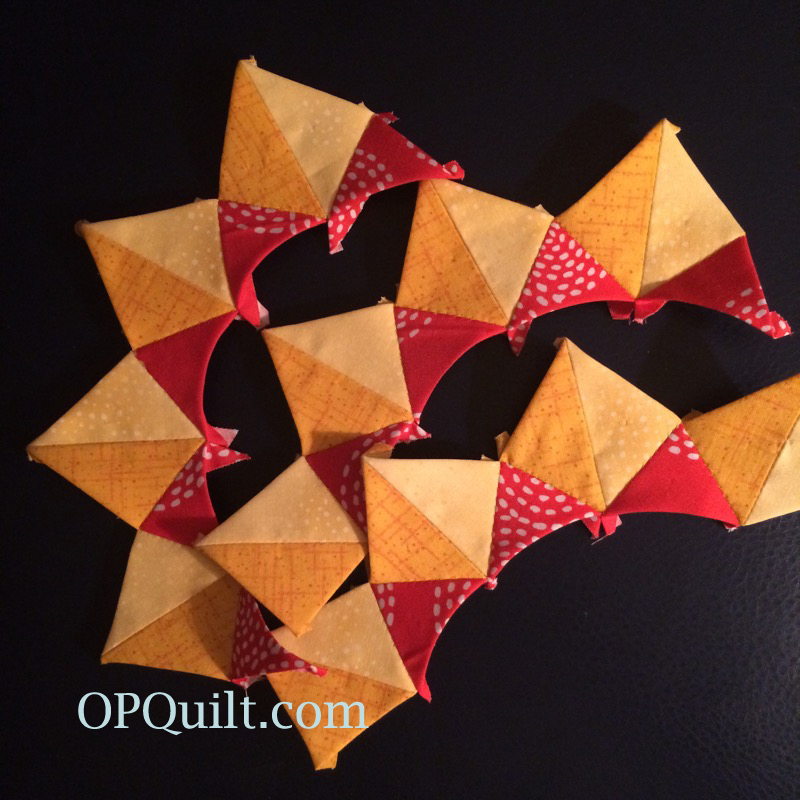
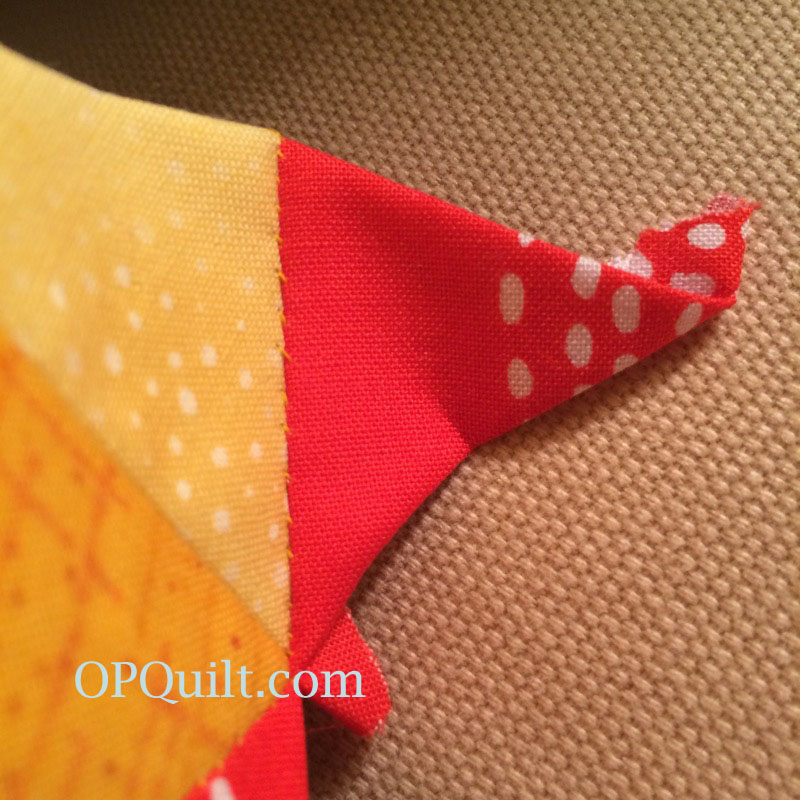
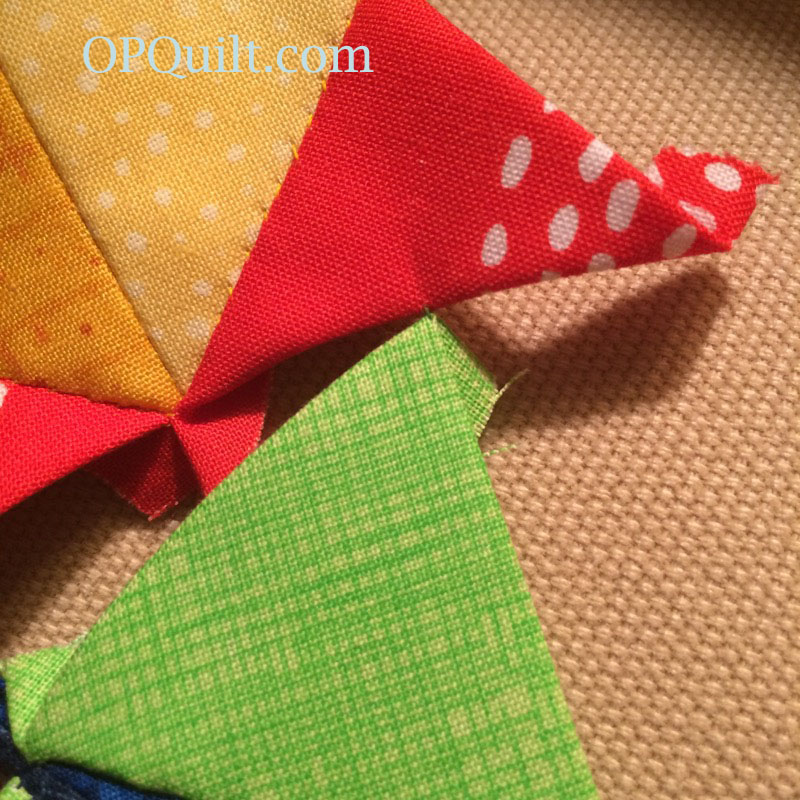
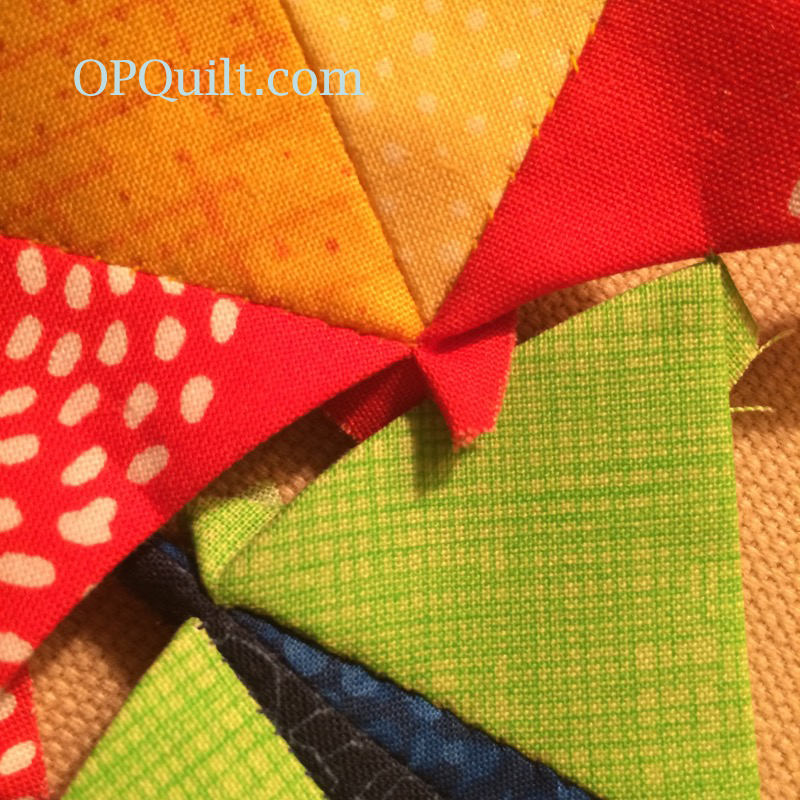
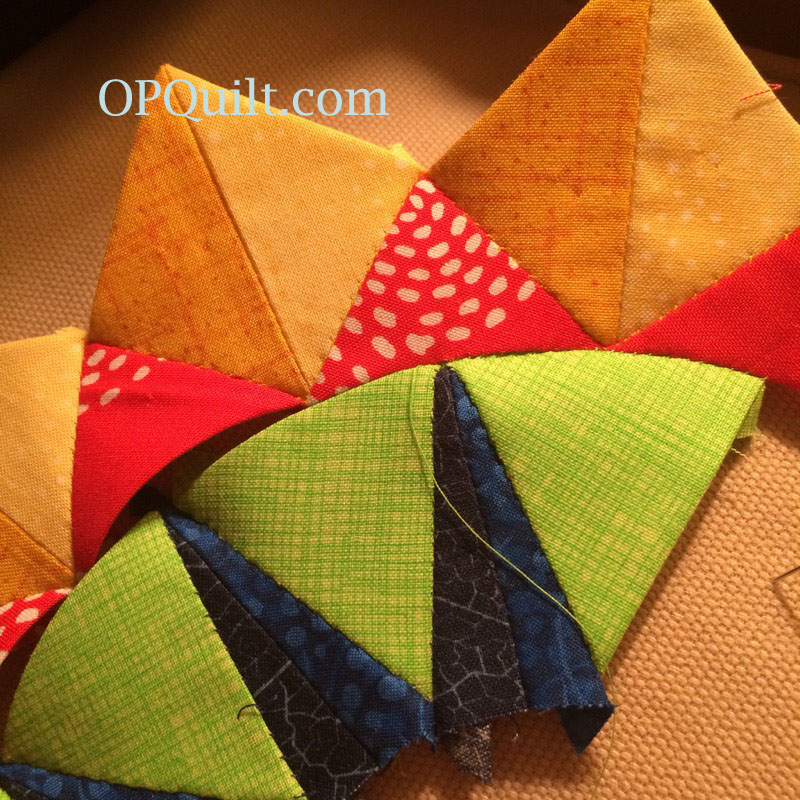
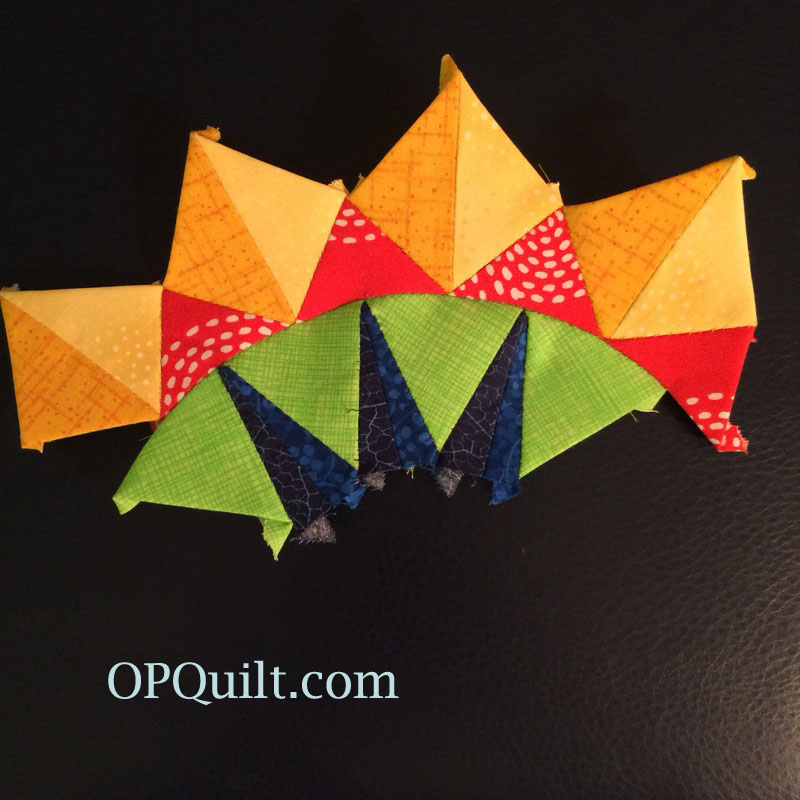
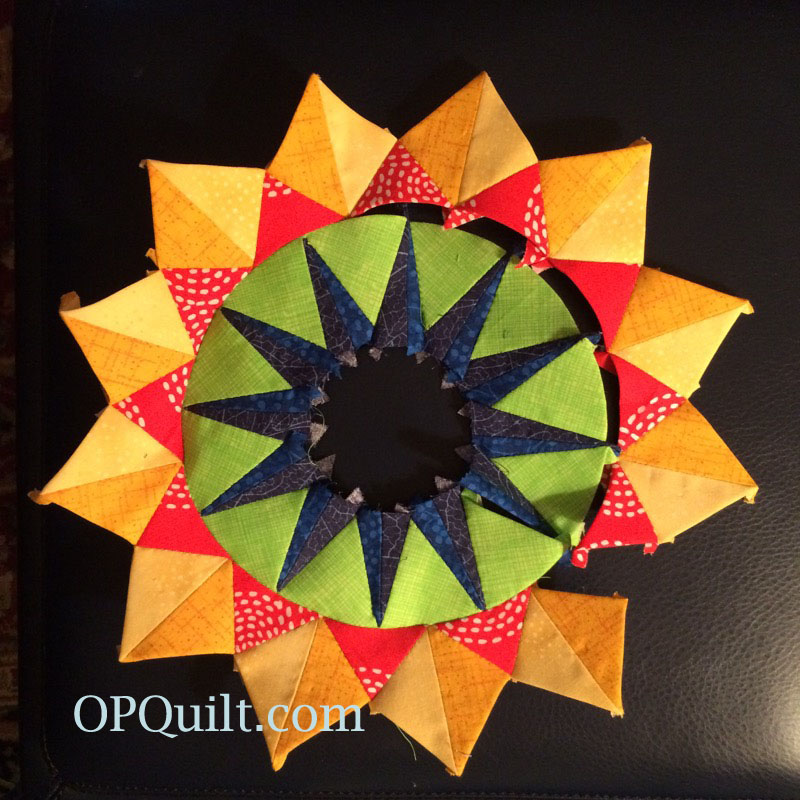
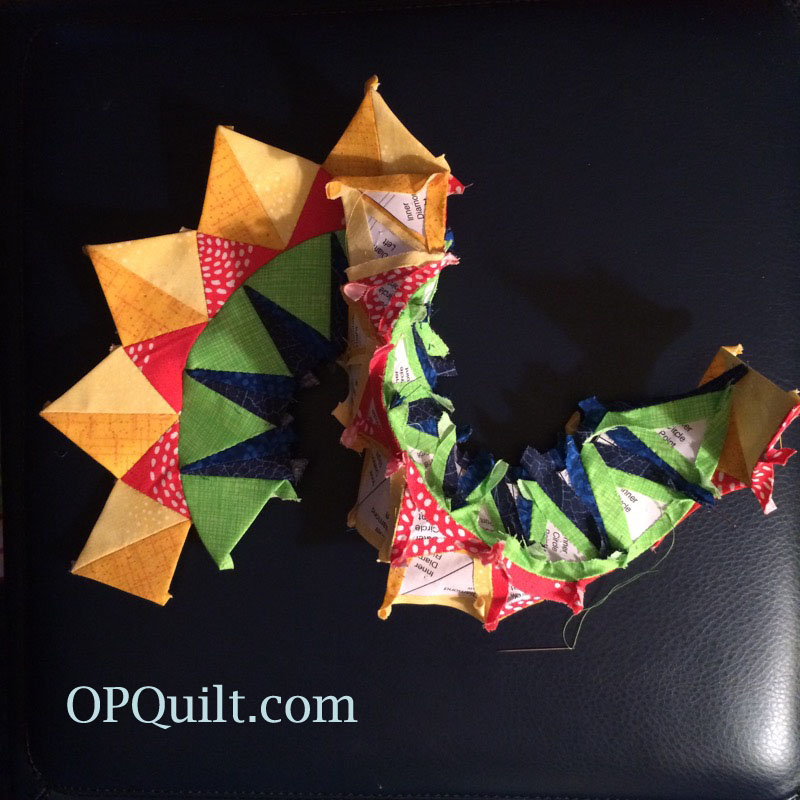
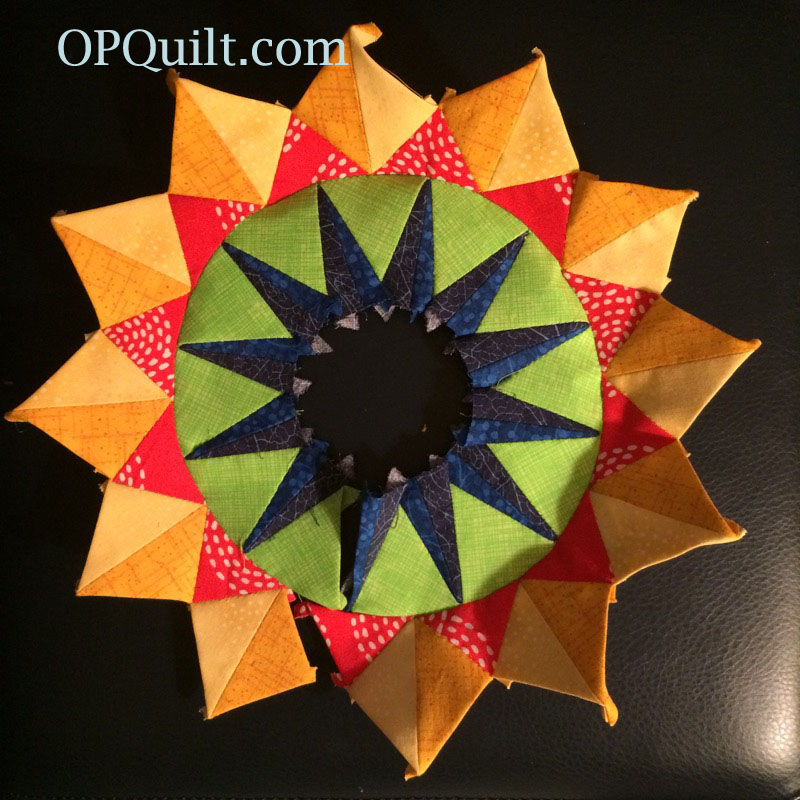
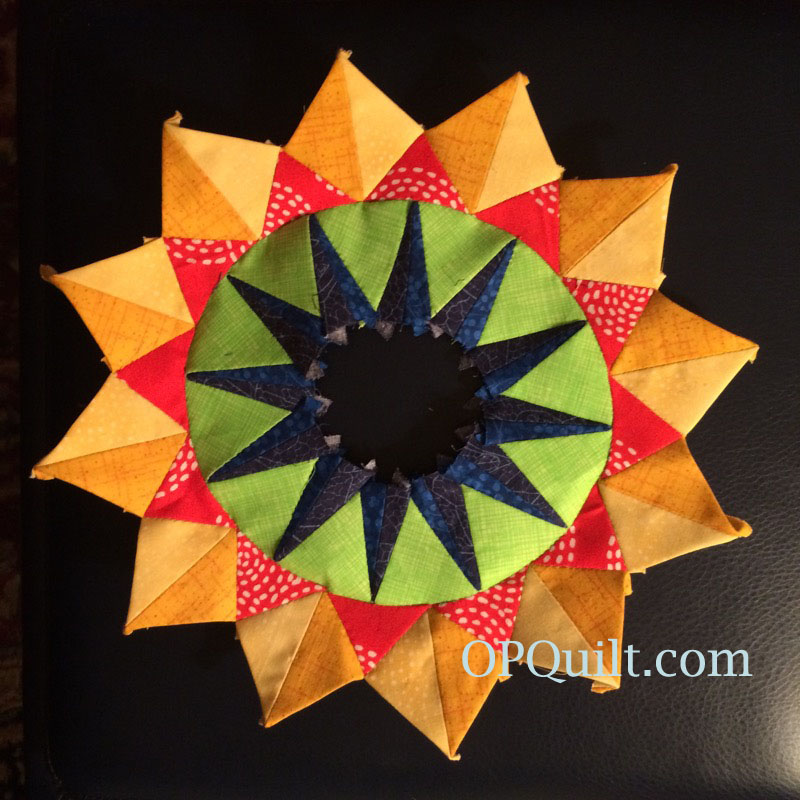
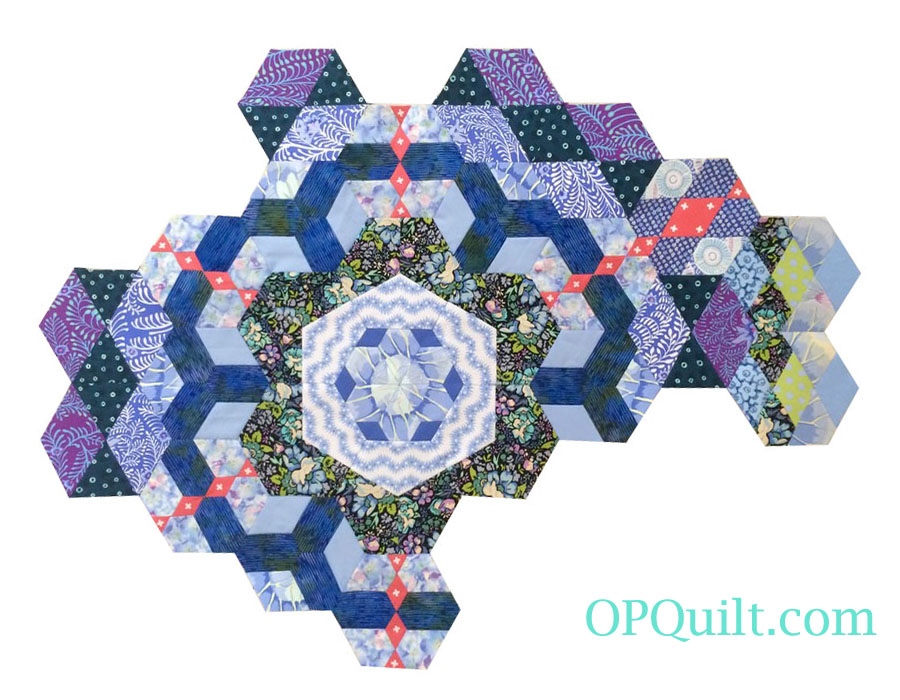
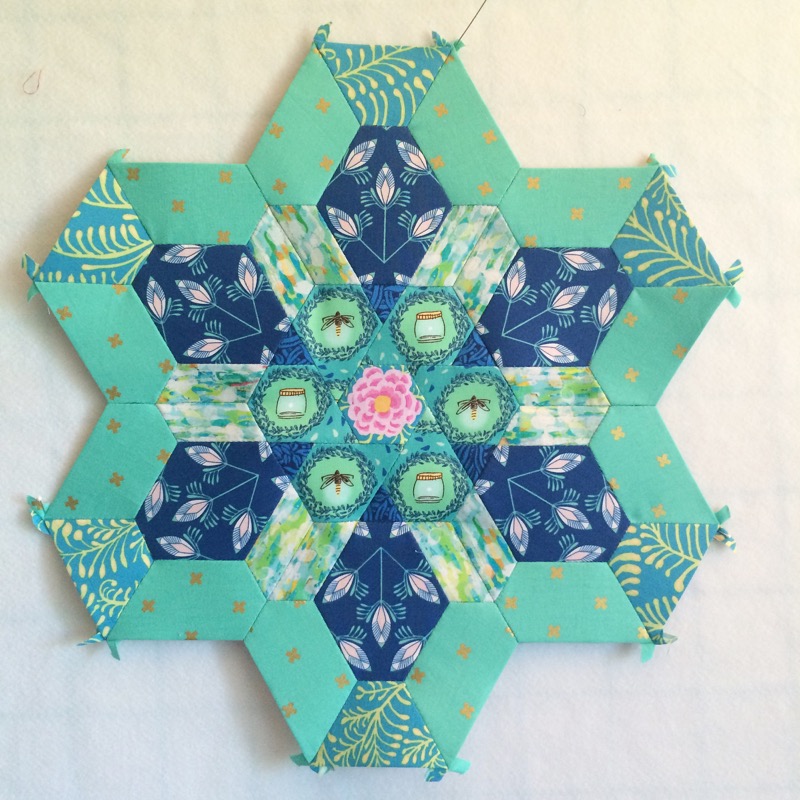
I did get this far on Rosette #4 of The New Hexagon Millefiore block, then stalled.  Later, ‘Mater.

Bibimbap bowls

Bibimibap serving

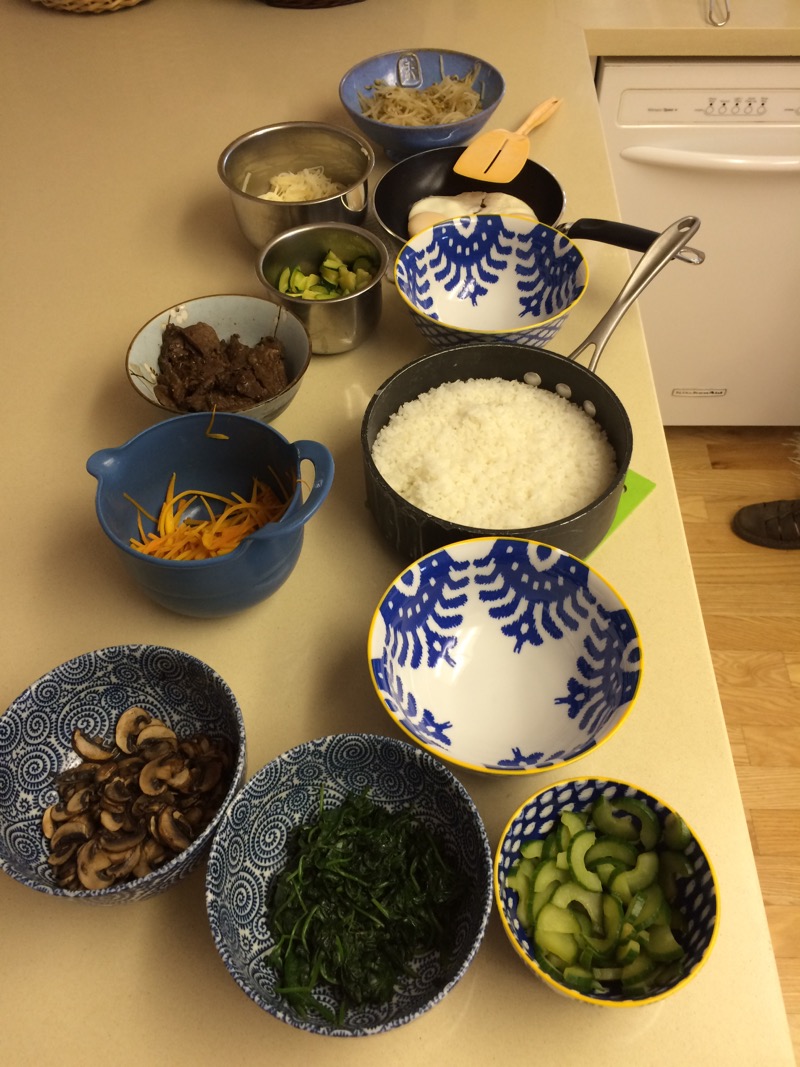
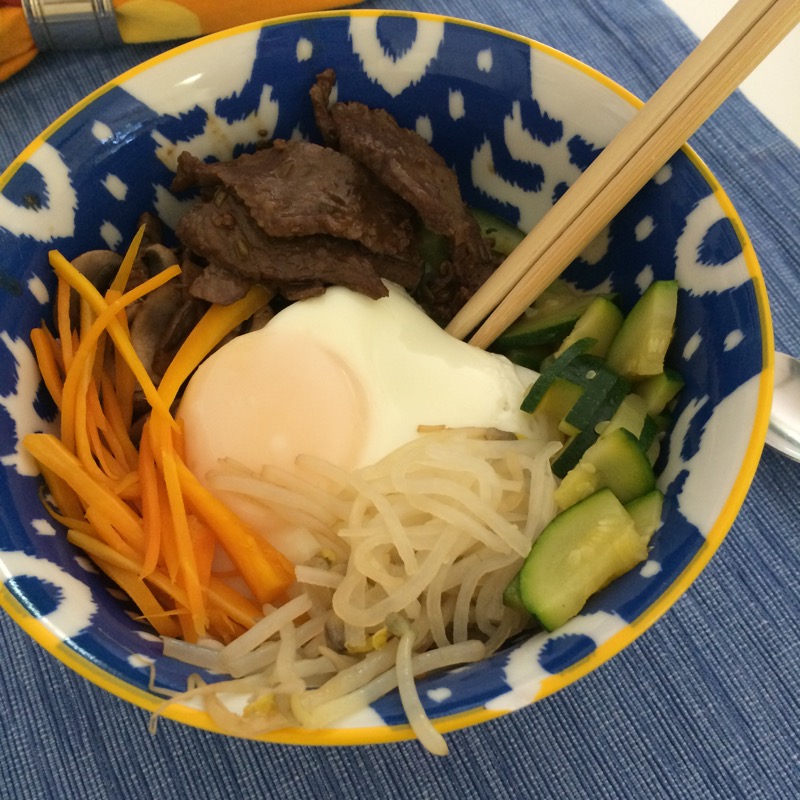
The one day had a craving for Bibimbap (recipe *here*) and no energy to drive the hour to Orange County to get it, so had to make our own.  While it sounds complicated, dicing and slicing and blanching all those vegetables, it took way less time than driving to my favorite restaurant and back, and now I have another recipe conquered.

Mini House_frontlabeled

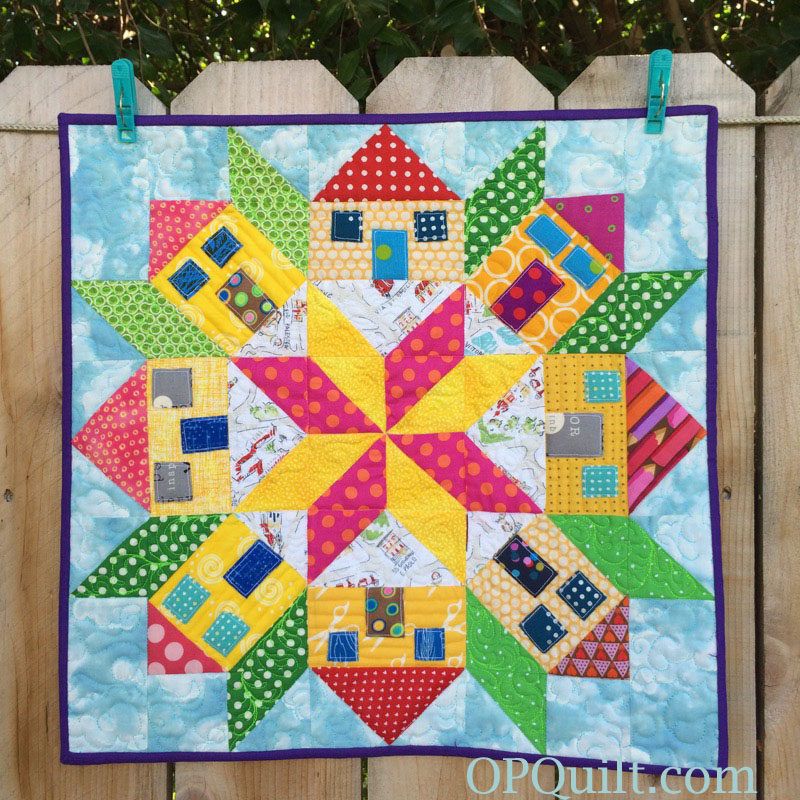
Earlier I’d written about my mini-quilt for the Houses swap, posted a pattern and a brief tutorial, keying off another popular tutorial online.  I’m sending off the quilt today (one day early–I just can’t stand waiting any more!), so here is the label for my quilt, a clone of the mini I’m mailing off to Indiana:

Houses Label

It was finished in that anxious week before surgery, and boy, was I weepy and sentimental, not knowing if I’d survive the surgery, or be diagnosed with cancer, or if they’d carve something up they shouldn’t.  I just wanted to hide in my lovely home with my beautiful quilts and out-of-control vegetable garden.  Yes, my mind can ruminate and imagine Worst-Case-Scenarios like no one else.  So this is how I felt, and six weeks post-op, I still like the message.  I’ll tell you what I put on my partner’s label. . . later.

Barbie dolls

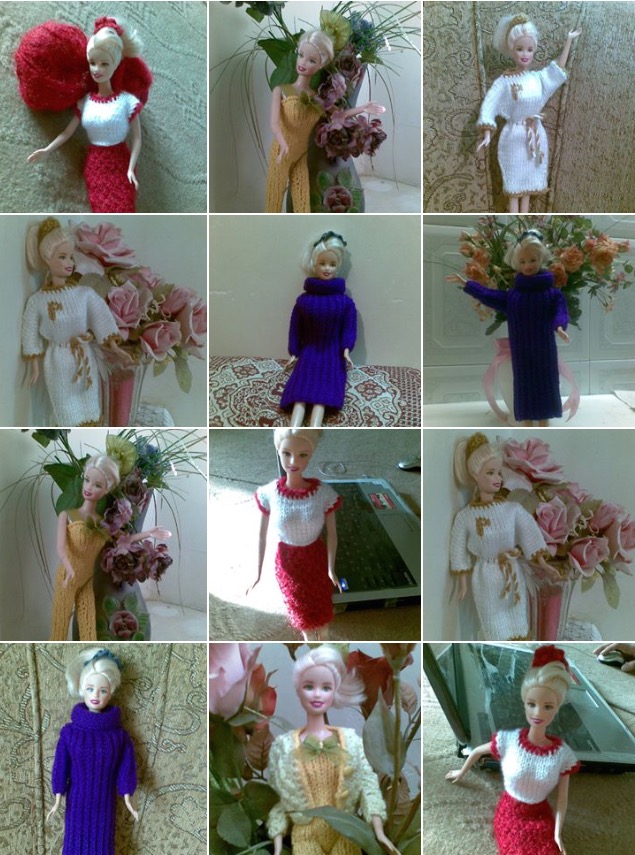
And when really, it all is just too much, there’s always a spin through your Instagram pictures. . . or someone else’s.  This is from a new follower of mine.  I love all her knitted clothes for Barbie, plus all the cool poses in which she places Barbie.  I say, let the fashion doll come up with the moves.  I’m headed back to the snail while we get through the last hot month of summer.  Yes, here in SoCal our summer always lasts until the middle of October.  Can’t wait for fall, y’all!

EPP · Quilts · Shine: The Circles Quilt

Circles Block #15–EPP Sew-A-Long

Circles EPP Button

Circles Block 15_OPQuilt

Compass Rose
Number 15 of the circles blocks in Shine: The Circles Quilt

About this time, I was running out of ideas for another two circle blocks, so of course I turned to the internet, but didn’t type in “quilt circle blocks.”

Collections Bibliotheque Municipale de Rouen. Photo : Th. Ascencio-Parvy

 Instead I typed in “compass rose” as every map from the ancient days had an elaborate compass design in the corner, orientation the sea-faring ships to North, keeping them on track.  I found several I liked from those old maps, and modified them to be suitable for my quilt, and drew them up in Electric Quilt 7:

EQ7 Circle 15 w:o split rays EQ7 Circle 15 with split rays

The difference between the two is the subdivision of the spikes around the inner circle into two rays.  I liked that, but I also knew a short cut so I wouldn’t lose my mind piecing them.  If you like the solid rays in the inner circle, just don’t cut the patterns for that ray apart (but don’t cut them apart anyway. . . keep reading).

I have the final four patterns as a group up for sale on Payhip.  I will post the tutorials each month until the set is complete.  The finishing instructions pattern for Shine: The Circles Quilt is also listed on Payhip.

(Note from the 2020 Elizabeth: A new, revised pattern is coming soon, so I’ve removed the old ones from previous posts.  Many thanks.)

Print four of these out at 100% scale.  Cut them out, but count as you do this, because on one of these last patterns, I may have missed a beat or two and added an extra ray.  BUT FIRST!  To cut down on your EPP efforts, you can leave the rays and the diamond pieces together, cutting them out as a unit. I’ll show you what I mean, so please read this entire post before you snip snip snip.

Circle15_1

Circle15_2

Pull your fabrics, using a good range of colors and value (light to dark).

Circle15_3

Okay, here’s what I mean about some time-saving.  I didn’t cut the diamond apart.  You can seam two strips together, then lay out your diamonds to cut.  Here I am measuring for the diamond strip width (above, which will be 2″), and below for the rays (which will be 1 1/4″ inches wide).  I use a lighter version and a medium version of the fabric color I chose so the difference will stand out.  Above you can see the two colors, layered.

Circle15_4

Circle15_5

Seam the long strips together, then lay out your pieces, making sure that the center line of the ray is exactly on your seam, as shown.  Trim away the excess like I did in the upper ray example.

Circle15_6

Ditto for the diamonds.  However, the layout of the pattern has you cutting some apart.  No worries.  Just tuck them up under the seam allowances (as shown in lower right diamond above) and proceed cutting around them and gluing them as normal.  I made a command decision to make my seam allowances a wee bit smaller on these two pieces, as I didn’t need a full 1/4″ inch.  The seam allowances are at about 3/16″ of an inch, just a bit narrower than usual.

After gluing them, I put them in a baggie with a printout of the drawing of the block, so I can keep things straight.

Circle15_7

Since the outer golden diamonds are already sewn together (or if you constructed them more traditionally, stitch them together first, then come to this step), you can start sewing these golden diamonds to the outer orange point triangles, making sure that the curved edge of that triangle is pointed towards the eventual circle.

Circle15_8

Sew all your groups; I did a grouping of three.

While I don’t have a photo for it (where was my mind?), stitch the rays to the inner circle points (the green points in my block interspersed with the blue double-rays).  Do those in groups as well.  Now to get them sewn together.

Circle15_9

Find the lower center of the outer point, and pinch it, leaving a mark.

Circle15_10

Match it up with the outer edge of a green inner circle point, and take a stitch, as shown.

Circle15_11

Find the center of the next outer point, and put in a crease, as shown.  Line up the ray with this crease. I sometimes like to put a single pin to keep me on track.

Circle15_12

Stitch carefully, neither adding — nor subtracting — any ease, moving one stitch at a time around the arc.

Circle15_13

Keep pinching in the centers, and matching up the rays until you’ve got this set together.  Yours may look different than mine, in terms of how many rays you sewed together, or outer diamonds and points you sewed together.  But the principle is the same for matching.

Circle15_14

Stitch the next set of inner rays and points to the existing set.

Circle15_15

Join the next outer set of diamonds and outer points to the existing, as shown.

Circle15_16

Using the “pinch the center method,” join those two arcs together.

Circle15_17

Here we go again.  This time I sewed on the outer diamonds/points unit to the existing.

Circle15_18

Then I stitched the inner points/rays together on one side only.  Although it may look like it, the circle is not stitched together!!  Leave it as a giant arc on both sets.

Circle15_19

Continue the process of pinching to find the center, and matching it up with the rays.  It will serpentine in your hands as you work.  Perfectly normal and easier to do than if you had joined them both into circles.  (Don’t do that!)

Circle15_20

That outer arc seam is almost done.  I left the last orangey-red bit unsewn.  Now I’ll stitch the blue ray to the green inner point.  Then stitch the orangey outer point to that inner circle.  And last, I’ll close the outer yellow-diamond-orangey-point circle.

Circle15_21

Don’t you feel like you’ve crossed the oceans, charting by a compass and the stars only?  But look how beautifully it came together–no puckers anywhere.  Just move slow and steady.

Circle15_22

You knew I’d work that constellation fabric in here somewhere, didn’t you.  Yes, it’s my outer arcs, and I now stitch them into place.  Take a stitch at that outer edge, just over the yellow points, to hook the two blue arcs together.  Just a single stitch, to keep them together around the circle.

Circle15_23

I love seeing all the papers lined up in a row.

Circle15_24

Circle15_25

Remove all but the outermost blue arc papers, flip it over and give your circle a press.

Circle15_26

In thinking about what size center circle you’ll want, lay your Karen Kay Buckley Circle templates out on the block.  You’ll want a circle that covers the open area, but doesn’t hide the points, like the one above.  The one below is too big: it covers too much of the rays’ inner points and makes it look like something is missing.

Circle15_26a Circle15_26b

This was the dimension of circle I used.  Trace your circle on your chosen fabric, then cut 3/8″ around it for the seam allowance.  Stitch a running stitch around the outer edge, then slip the plastic template inside and draw up the thread to enclose the circle.  Give it a shot of spray starch, press it, then let it cool and slip out the circle.  I show how do do this on *this post.*

Cut a square 14 1/2″ and find the centers, as you’ve done for the other blocks.  At this point, at block number 15, you are used to doing some of the steps, so if you are joining me just for this block, I’d suggest browsing back through other Circles blocks (see tab Shine: The Circles Quilt EPP above) to learn the tips and pointers.  Appliqué the circle to the block.

Circle15_27

I always pin around, then when I get to a join area, I first fold in one side, then the other, before continuing on (see below).

Circle15_28

Circles Block 15_OPQuilt

That’s it for this block!  The tutorial for the last circle block, Block #16, will post October 1st, then our series is complete.  While you work on your blocks, I hope to work on the quilting of this quilt and have it ready to show at the beginning of October.  Have fun stitching!

Quilts

Popsicles in My Way

All Popsicles in My Way

This morning, I drove the car down to our local park, walked one mile with my husband by my side, and drove home.  Not a big deal for most people, but it was the first time I’d driven a round trip and walked that far in one swoop since the surgery nearly five weeks ago.  Maybe all the post-surgery obstacles are now, after five weeks, becoming more like popsicles: little humps of fun to celebrate with song and a leap into the old swimming hole.

Mary's Blocks for August 2015

So even though this feels like a lost summer, this past week I had another first: I operated my sewing machine, sewing up the Bee blocks for Mary’s turn at bat.  And the world didn’t end. Tutorial is *here* or you can find it on the tab above under Tutorials, where I keep links to all of the tutorials on this blog.

Granite Flats

We’ve watched nearly all three seasons of Granite Flats (only 2 more episodes to go) and I’m continually amazed at how much freedom children in the sixties were given to roam around on their bikes and get into scrapes and generally explore.  While it can be at times cheesy, it’s a fun show that has allowed me to sit and stitch, fully entertained.

Rainbow Kaffe laid out

Earlier I was able, over the course of several days, to put this together on my pin wall, then went to bed for nearly two days to recover, paying for my creative burst of energy.  During recovery I was confining my sewing to handwork, and was hoping to get this stitched up for the Kaffe Mini Swap I’m in, but I saw the writing on the wall, and switched to a different project that involved the sewing machine.

Kaffe, Two

I was able to put this one on the wall (only took two days this time), and will now tweak it and stitch it together and quilt it–all tasks that will probably take me oodles longer than usual.   (Working title: Kaffe’s Rainbow Block.)  But that is the good news!  That I am actually quilting, working with the cloth, however slowly, and participating once again.

The Road Not Taken Book

And to further prove that I’m into Popsicle Territory, I have started reading a book, a task unthinkable two weeks ago with my fuzzed-out brain cells.  David Orr’s book is a fascinating look at Robert Frost’s well-known poem, and while I find myself arguing with Orr’s analysis every once in a while, he wins me over as he progresses, teaching me about Frost, perception, decision making and the “deciders.”

Little steps, but definitely progress.

Quilts

Summer’s Hot and the Recuperating is Easy

Hot Summer 104Let’s start with the first item: summer’s hot, and yessiree it is.  Tomorrow is supposed to be 108.  This is a good time to stay inside and keep getting better, which leads us to the second item: recovery.

Recovering Activities

Here are some of my recovery activities, omitting the one I do most: lay on the bed.  I finished up my Rosette #3 in periwinkles, blue and purples (below) and started putting Rosette #4 together.  The photo in the upper left took about a week to do, in twenty minute intervals off the pillow.  I continued sewing up little felt creations from kits I’d picked up at quilt shows (why do I buy these?) and thought I’d finished them all.  However, I found another batch in the closet yesterday.  My husband took me for a Big Day Out to Cinnabon, and I could only eat half of a mini, a side-effect of surgery.  Nightly I would I arrange my applesauce and spoon for the 3 a.m. pain meds routine, which I am happy to say, as of today, has been phased out.  However, I am still in my nightgown, so be sure to call first before showing up on my doorstep.

I have spent an inordinate amount of time stitching while watching movies, because I am always tired and because apparently I had a serious case of Bonzo-Brain (from the effects of the anesthesia and pain killers).  I found this out because my son told me I was “a lot more coherent than last time we talked.”  And my husband says “you’re more alert now.”  And my mother says “you are sounding so much better today.”  Good to know that I have people who love me and will humor me when I am functioning at toddler level.

Rosette #3 photo

Rosette 4 center sewn

Here’s the center of Rosette #4, all sewn up.  It may take me another week to get the next round, at the rate I’m going.

Chuck Nohara examples

Because I now also apparently function at teenager level with my phone in my hand while I lie in bed (tablets are too big and a laptop is way out of the question), I discovered the Chuck Nohara Instagram group and fell in love with these amazing little six-inch appliqué blocks.

Chuck Nohara book

Which led to the QuiltMania website and the purchase of this book, which may or may not have had the most expensive postage I’ve ever encountered in my life.  Even accounting for the lack of critical thinking during the Bonzo-Brain state, I was pretty freaked out.

Chuck Nohara book in transitWhich has led to my obsessive compulsion with tracking the dumb thing.  That book is going way more interesting places than the Cinnabon shop at the mall.  (Attention FED EX: For the record,  I live in California.  Why is it stopping in Memphis?)

pajama party retro

But there are two things that have gotten me through these past few weeks. The first and foremost has been my amazing husband, always asking me if he can do something for me, putting lotion on my toes and pulling up the covers for me in the middle of the night (because I can’t reach either of them).  He has cooked for me, done the wash, brought in the mail, fixed me fresh orange juice every morning and taken me to the doctor appointments.  He listens to me when I cry, reminding me that I will be in recovery for 6-8 weeks and it’s only nearing the end of week three and would I like to get out and take a drive?  And we do and I stop crying and take a deep breath at how beautiful the world is, even if the temperatures are soaring.

Then I go and lay on the bed, my phone in my hand and read about you all on blogs and IG, distracting me in a lovely way from this work I am doing at getting better.  This is the other thing that has gotten me through: my family, friends, and the sweet messages of hope and encouragement and inspiration from you, just like we were all girlfriends hanging out together in our jammies, drinking root beer and playing records and the ukulele.  I am always amazed at how much we have come to know each other through correspondence and sharing activities, as well as quilting together.

Thank you all, so very much.  You kind attentions have made my tough summer a bit more easy.