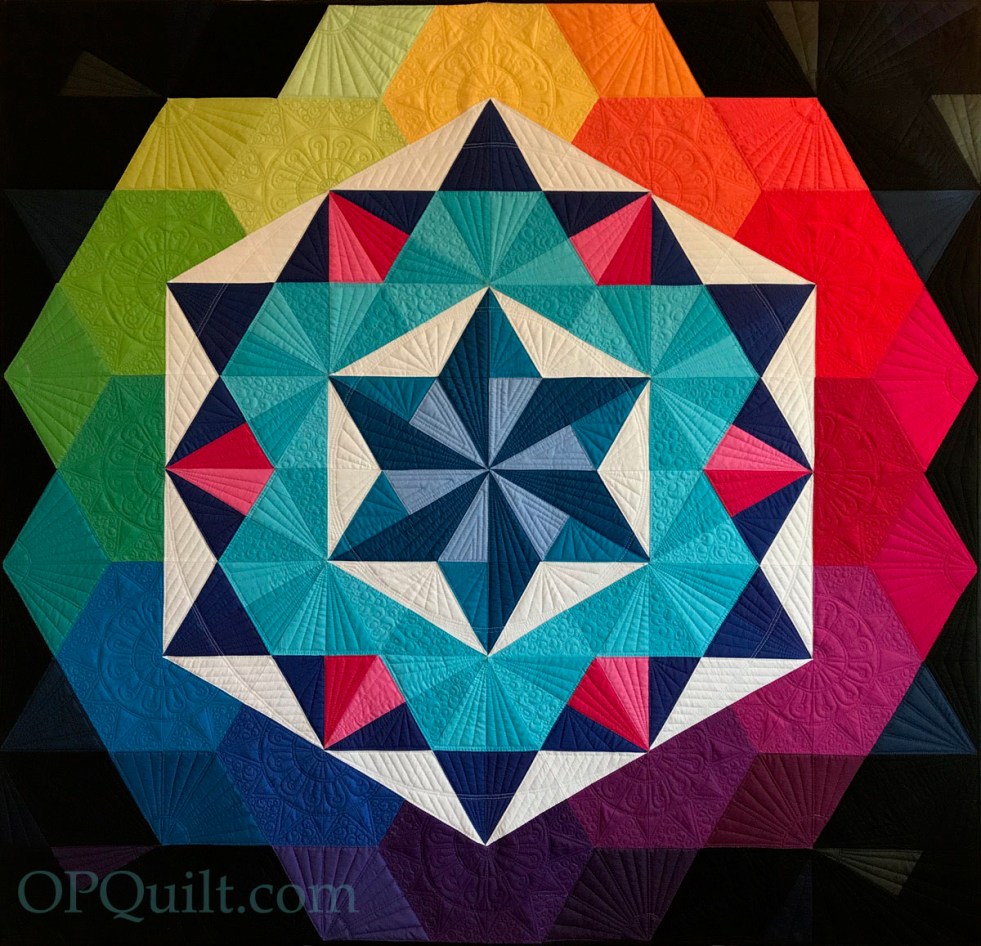
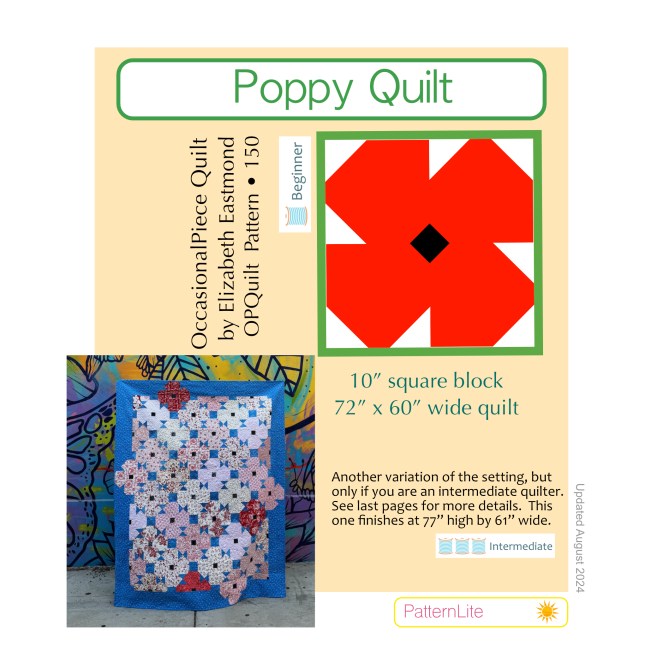
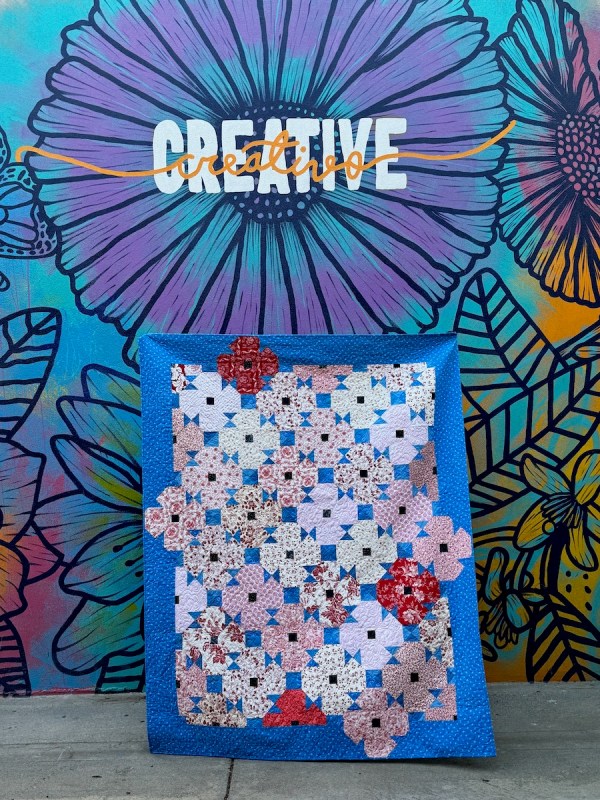
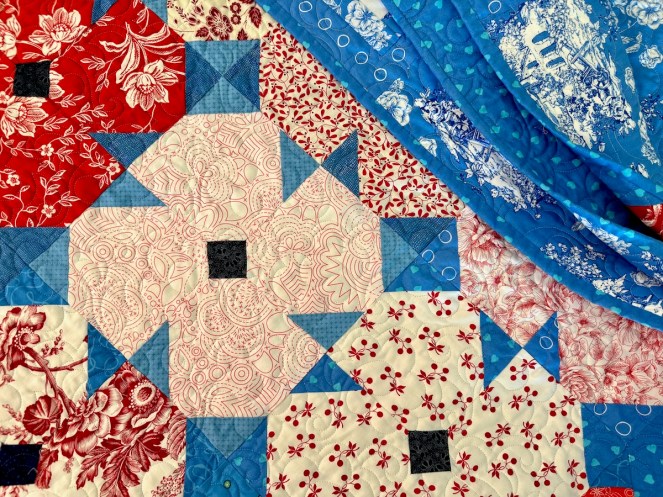
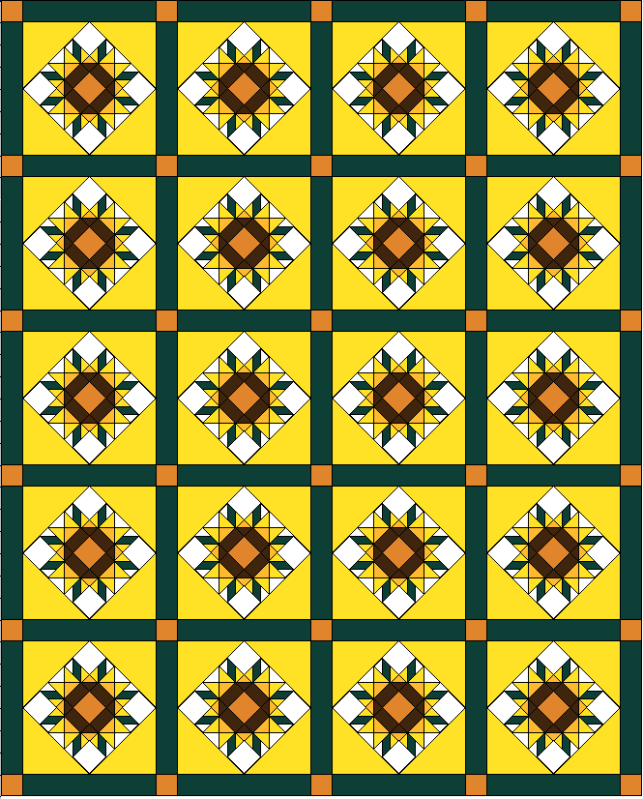
300 Quilts · Patterns by Elizabeth of OPQuilt · Quilt Patterns · Quilts

Annularity

Annularity_May 2018LabeledAnnularity
Quilt #203
Began October 2017 • Completed May 2018

Annularity_3Detail
Annularity_1Detail
Annularity_2Detail

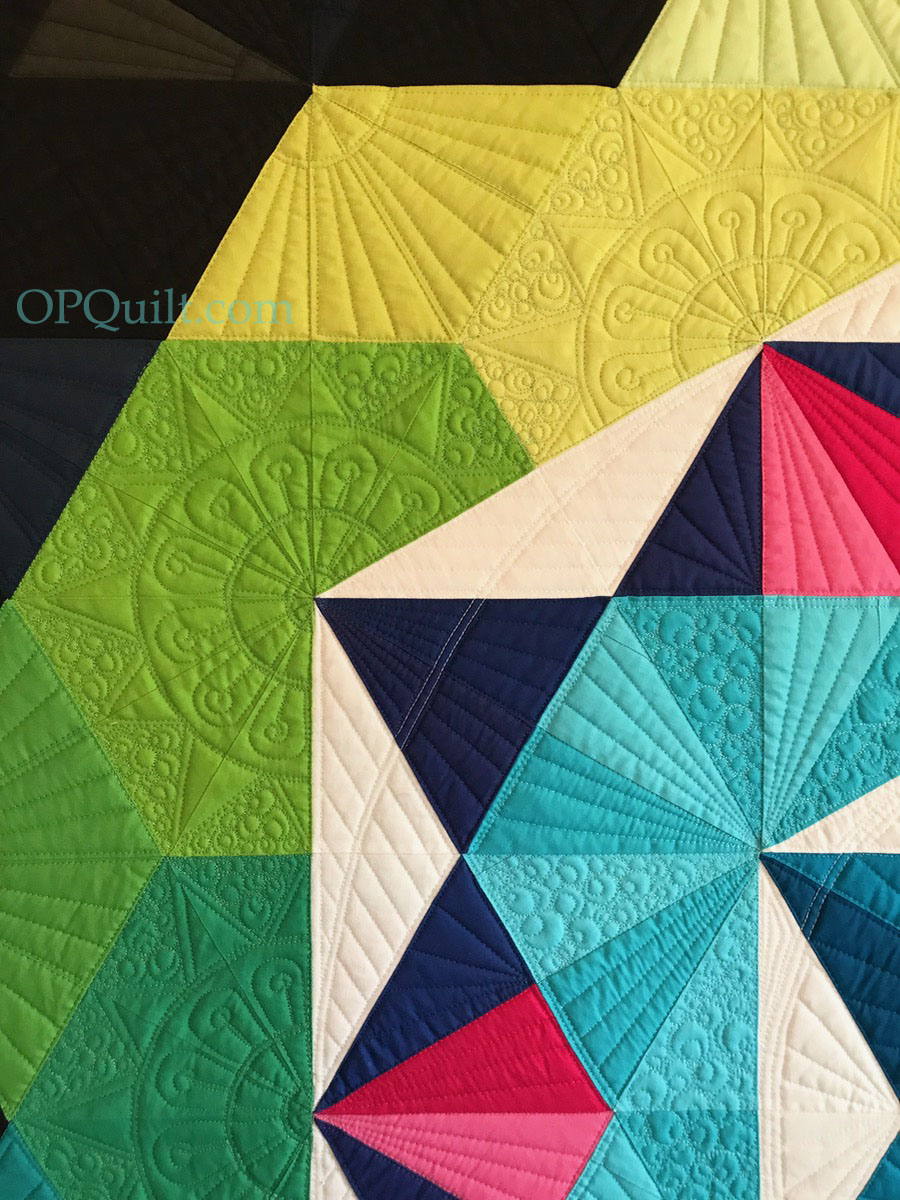
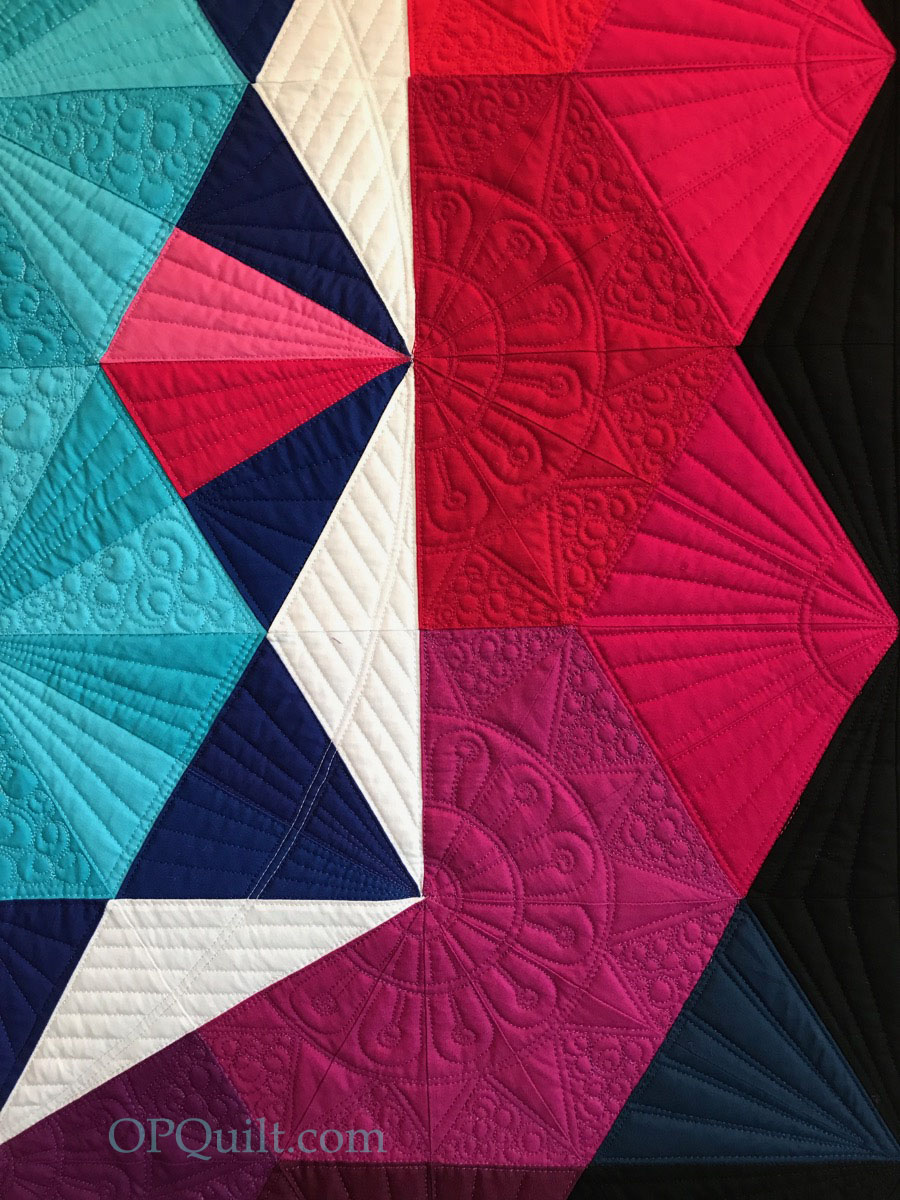
I use Magnifico thread as it has a nice sheen without being shiny, and it lays down a lovely line of stitching.  In the bobbin is So Fine thread (both by Superior Threads).

Annularity_6a

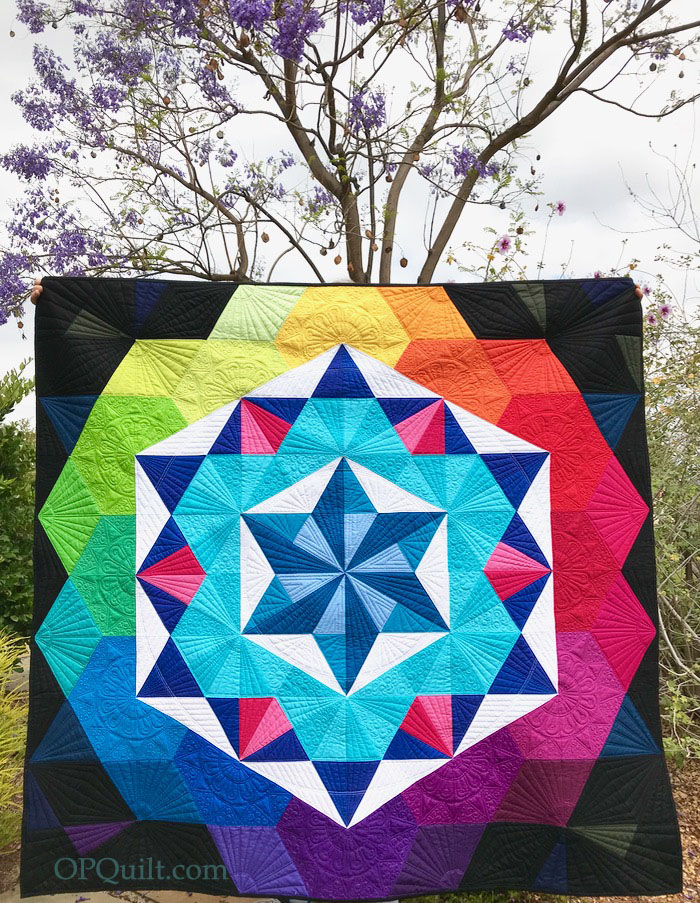
I made a duplicate of  Annularity II — which was a quilt I designed and made for Paintbrush Studios (which hung at QuiltCon, and most recently, Quilt Market) — because I thought the first version had been lost in the mail en route to the quilter. It hadn’t, and now I had my own top.

Then I decided to quilt my own, trying out different ideas as explained in an earlier post. But thanks to my quilt holder Dave, I can now reveal the fully quilted version to the world, as well as deliver some great news about this quilt.

Recently I’d been talking with Rick and Dot Kimmelman of Pineapple Fabrics about this quilt, hoping they’d want to use it for their booth, as they carry the full line of Painter’s Palette Fabrics. In between Point A and Point B of our discussions, they purchased Keepsake Quilting, which made many of us in the QuiltWorld very happy.  And so, beginning this summer, Keepsake Quilting and Pineapple Fabrics will be the exclusive sellers of my Annularity pattern.   Both Keepsake and Pineapple will also have kits available that include all the fabrics for the top and binding.  (You can check Pineapple Fabrics.com to purchase within the next month, and see Keepsake Quilting’s Fall catalogue, due out the second week of August.  You can bet I’ll put something up on here when I first lay eyes on my quilt in their catalogue!)

Annularity_4Back_fixed
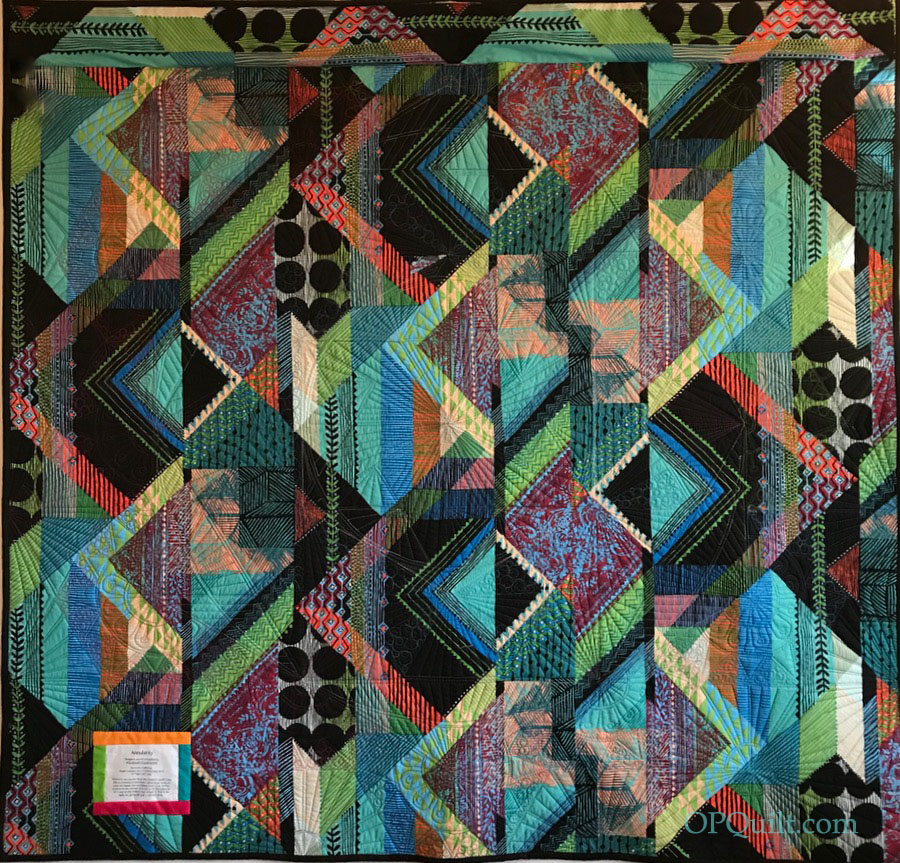
The wild and crazy back.  It’s “prairie house” from the De Leon Design Group, for Alexander Henry Fabrics.  I thought it might disguise any oopsies, but I was happy to note that I actually had very few.  I guess maybe after ten years I’m getting better at the quilting?  Much credit belongs to the Sweet Sixteen machine I use, and the threads, which always seem to balance so well.Annularity_4bBackScrap

After one quilting session, when I turned it over to check the back, I noticed I had quilted in this wedge-shaped scrap onto the back.  I started to try and cut it out, then decided I kind of liked this nod to the process, so left it in.  Really, you can’t see it, when looking at the overall back. (Well, NOW you do, but you didn’t at first, right?)

Annularity_6
Annularity_4cLabel

So, thanks for being my cheering squad, motivating me to finish up my quilt.  And I hope you enjoy making yours!

PatternLite · Patterns by Elizabeth of OPQuilt

Flowers!

Since this link is out in the universe for a Poppy Block, and a lot has happened in those intervening years, let’s cut right to the chase.

The pattern has been updated, and the links below reflect that. Now you can find the pattern in my pattern shop on PayHip here.

While the original poppy block is in the pattern, I’ve also given different ideas for setting your blocks, so it’s not the same old thing:

I wrote all about this quilt on this post.
Here’s some more flower/pattern information.
The Poppy shows up here, along with Sunflowers.

Okay, back to the originally written post.


Original Post

My nephew’s wife, Grace, wrote to me and asked for help.  She is a young quilter, who makes awesome gooseberry jam (she shared a jar with me), so I wanted to help. The quilt was for someone close to her who had just been diagnosed with breast cancer, and she thought a quilt was needed.  I agree.

Sunflower1

She sent me the screen shot you see above, and since it was on Pinterest…and you know how much I LOVE their search engines (NOT), I thought it was easier to draft it on my computer using QuiltPro than try to find the original design (I tried…and failed…but kudos to whoever dreamed it up).  Besides, that was one of those “barn” quilts, painted on wood, not a cloth quilt.

This is what I came up with.  But I knew Grace wanted to move quickly, and yeah–all those pieces?

I thought about my Home Sweet Home mini quilt, and how she could make fewer blocks, but bigger blocks?

UPDATE: There is now a pattern for this sunflower quilt.

Grace wrote back.  She loved what I’d done, but now they were thinking poppies. She sent me a sample of a quilt she’d seen.  I drafted it up in my quilt software and drew up a quilt.  But I thought I should test out my own pattern, so I made a Poppy Block:

Poppy block constructon1
trimming snowball corners
Poppy for Grace

I think it will be cute quilt.  

It can be made in reds and greens and be thought of as poinsettias for Christmas.  Or made to commemorate Anzac Day in April, for the Australians.  Or red and white for a bouquet of posies for Valentine’s Day.  Have fun, and if your friends want a poppy pattern–send them to my pattern shop to get their own PatternLite pattern.  Thanks. PatternLite patterns were developed as they were simplified, and cheap — less than your drink at Starbucks.

redwhite triangles1
redwhite triangles2

Making that block added to my collection of red and white triangles (ignore the interlopers in the upper right corner).  I trim them to whatever measurement’s closest, without it being a weird number, and save them.

Every once in a while, I sew them into four-patches.

I haven’t decided yet what to do with them, but a couple of questions arise: do I include the Christmas prints?  Or do they get their own collection? (I think so.)

Do you ever quilt with “rules”?  It’s about all I remember from my beginning art classes, ages ago in college.  The assignments laid out rules to create by — an edge to the sandbox — if you will, and went something like this:

  • Take an old piece of clothing, adhere it to a canvas and paint it like something else.
  • Use three shapes only.
  • Create a composition by taking a square of black paper, cutting out some shape and using the negative and positive pieces.
  • This assignment will use only two colors, but you may use any range of those colors.

And so on.  There are many books out there in the marketplace for guided creativity, but they all start with a rule.

Sometimes I find little bags of treasures in my sewing room, with pieces inside that have been collected according to some rule.  Like the red and white triangle rule.  Or the 3-inch square rule, but I kind of think that last one’s a bit of a cheat.

HST quilt
source

Several years ago, I saw this on Jan Burgwinkle’s blog, Be*mused, and fell in love with it.  Maybe that’s why I started making little HSTs.  (While she doesn’t seem to update her blog much these days, it’s still amazing to read through the archives.) So that’s my rule and I’m sticking with it: red and white triangles, although seeing this quilt again does make me wonder if I should break it.

Round up of some recent patterns:

All the PatternLite patterns can be found here.

300 Quilts · Christmas Quilts · Free Quilt Pattern · Patterns by Elizabeth of OPQuilt · Tutorial

Christmas Tree Block Swap

xmastreeswap
xmastreeswap_1

My friend Leisa saw a Christmas Tree Block Swap that was going on online, and said “Why don’t we do one like this with our group?” Sure, why not?  We don’t have anything else going on, do we? (right)

I drafted a pattern, just drawing this way and that, then made up a test block.  My graphic design guru Simone approved it, and we were off.  I transferred my dimensions to Quilt Pro, my quilt software program and here it is for you to download:

That’s FREE, no charge, but as usual please don’t print off one for your mother or your sister, but instead, send them here to get theirs.  Many thanks.

AND…as a reminder.  Please be sure to set your scale to 100%.

Now, the tutorial.  I apologize in advance for the pitiful lighting.  Chalk it up to working on a deadline, because our swap is in a a week and a half, and I need to get this to my quilt group for our Flash Mob Quilt Night.  (I hope they bring Christmas cookies to share…just saying…)

xmastreeswap_2

I also apologize for filling up your mailboxes with two posts so close together.  But then again, you might need this too, to spread a little holiday cheer around your sewing room.

xmastreeswap_3

This tutorial is for one block.  It took me a grand total of about one minute to make one block.  Choosing and cutting the fabrics took a little longer.  For our trees we are using clear bright tones/prints, such as green, yellow, pink, aqua, purple/lavender, orange, red.  For the backgrounds, we are using black or white prints.  For the tree trunk: something trunkish, please.  Here are all the pieces laid out. (Thank you Mary, for my cool board.)

Sew the Upper Background piece onto the tree.  Leave that tiny wedge of 1/4″ goodness at the bottom right corner (shown in the red circle), and let the top of the upper background just hang off the tree.  Stitch 1/4″ seam.

xmastreeswap_4
xmastreeswap_5
xmastreeswap_6

Backside of that piece.  Now the 1/4″ wedge of goodness is at the lower left, and the extra background is at the top.  Press seam towards the tree.

xmastreeswap_7

Repeat with other side.  

xmastreeswap_8
xmastreeswap_9

Trim off the extra point.  Press towards tree (see below).

xmastreeswap_10
xmastreeswap_11

Seam the Lower Background pieces on either side of the tree trunk.  Press towards the trunk.

xmastreeswap_12

Line up the tree trunk with the tip of the tree, to get it on straight.  I’ve left a bit extra on either side, so if you want it wonky, feel free.

xmastreeswap_13

Press all seams toward tree.  You can see here the extra I’ve left you so you can adjust the trunk as needed.

xmastreeswap_14

Trim the block to 6 1/2″ by 7 1/2″ like this: Leave space above the tree tip, roughly 3/4″.

xmastreeswap_15

Then whack off the bottom, so the total height is 7 1/2″.  This tree will finish at 6 by 7″.

xmastreeswap_16

Fussy cutting is always encouraged.

Now if you want to cut out a lot of Upper Backgrounds at once, do this:

1-Layer two pieces of fabric with wrong sides together (like it comes off the bolt).

2- Cut a square 5 1/4″ by 6 1/8″.

3- Measure up 1 1/8″ on opposite sides, and draw or cut a diagonal line.  It should be the same size as your piece B or D.

Remember that these pieces are opposite of each other, so don’t layer up your fabrics with all right sides up, or this won’t work.

xmastreeswap_final1

Here’s my first batch.  Now I’ll go do this some more.

Have fun making a forest!

tiny nine patches
Patterns by Elizabeth of OPQuilt

Mini Sew-Together Bag

Mini Sew Together Bag_1

Woohoo!!  It’s a Mini Sew Together Bag!
A Mini Sew Together Bag has two pockets and is smaller than its big sister.

Mini Sew Together Bag_2
Mini Sew Together Bag_3

(Two Regular Sew Together Bags and Four Mini Sew Together Bags)

While I love my regular-sized bag, I really wanted one that was just a bit smaller.  

UPDATE:  I have re-written the pattern completely into a stand-alone pattern.  It can be found on PayHip.   

Here are some photos of the bag in process…and completed! For more information, refer to this post.

Mini Sew Together Bag_4 open
Mini Sew Together Bag_4e1

I was able to crank out four Minis in about a day and half; I think it went so quickly because I had already made a couple of the bigger bags. Before I wrote the new pattern, I had to refer to The Quilt Barn’s Tutorial when I became stuck. 

Now everything is included in the pattern.

Mini Sew Together Bag_4h zipper end
mini-sew-together-bag_tab-end1a

For the tab ends, I didn’t necessarily slide them all the way to the end of the zipper before I sewed them on (and by the way, refer to the pattern for an easier way to make them, rather than the tutorial).  Instead I played with the tab ends a bit, sliding them up and down the zipper, seeing how big of a “handle” I wanted.  Most of the time I placed the zipper about halfway into the tab end.

Mini Sew Together Bag_5

And that shiny thing in front?  For adjunct teachers who use white board markers, you know what a mess the eraser makes in your tote bags. The Community College administrators where I teach give us the white board markers free at the beginning of the school year, but we buy our own erasers. If you leave yours in the classroom, you can kiss it goodbye, so we carry the erasers (and markers) back and forth to class.

Mini Sew Together Bag_5a

To keep my sew together bag clean, I made a clear vinyl pouch, sewing a self-binding fabric strip around the top to hold my eraser.  The dimensions were 7″ by 6 1/2″ of clear vinyl; sew two folded strips along the 7″ sides, then with WST, sew the side seams.  Yes, I did a tiny “boxing in” of the bottom corner to accommodate the eraser. 

Mini Sew Together Bag_5b stuffed

Mini Sew Together, fully loaded for school.  But this would also be great stacked with hexies, or other smaller hand-sewing projects.  Because the Mini is a smaller size, it will fit into…smaller places!

Mini Sew Together Bag_8

I also made a matching tote bag to go with this for a gift, as California will be phasing out our plastic grocery bags.  I used my Grocery Bag Tutorial, found *here.*  The usual request applies: don’t embed the pattern on your blog, refer your friends back to OPQuilt.com to download their own.  And if you Pin anything from this post, please use the correct post address. These little Minis are fun to make and fun to use, and sew up quickly for a cute and fun Christmas gift!

˚˚˚˚˚˚˚˚˚˚˚˚˚˚˚˚˚˚˚˚˚˚˚˚˚˚˚˚˚˚˚˚˚˚˚˚˚˚˚˚˚˚˚

Circles Block #6 duo

In case you are looking for the Circle EPP Quilt-A-Long, because I gave you two renditions of the block in November, we are taking a vacation in December.  Merry Christmas all you EPP-ers and we’ll see you in January.

˚˚˚˚˚˚˚˚˚˚˚˚˚˚˚˚˚˚˚˚˚˚˚˚˚˚˚˚˚˚˚˚˚˚˚˚˚˚˚˚˚

I get my zippers from ZipperStop in NYC.  There are other places to locate good quality, inexpensive zippers mentioned on other quilty blogs and in the comments (so check them out), but I can highly recommend Zipperstop, having placed several orders from them.  The zippers arrive quickly, and in the color range I like and I like the prices.

SaveSave