FAL · Finish-A-Long

Finsh-A-Long–Second Quarter Report

First, on July 3rd, I’m guest hosting today over at Leanne’s, of She Can Quilt, where I have written a tutorial for making a faced binding on a quilt (used on Kaleidoscope). This tutorial is in conjunction with the end of the second quarter of the Finish-A-Long, which she is hosting this year.

FacedBindingTitle

Now that you’re back, every quarter we monitor our progress and check in with Leanne, who is hosting this year’s Finish-A-Long program.  So now it’s time for the second quarterly report of how many of our goals we finished.  For a reminder, here’s my original mosaic, showing the quilts I was thinking about finishing:

FAL Q2_2013

And now the wrap-up:

Hunter’s Star–still in the closet (not finished)

Doleket Art Quilt-front

Four-in-Art: Fire–Doloket, finished

TakeMeBacktoItaly front

Italy Quilt–Take Me Back to Italy, finished

Lollypop Class Sample I–(top is finished, but the whole project is not finished, because it’s at the shop for a sample)

Lollypop Tree Quilt–(not finished, still hanging in the closet)

Christmas Treat final

Lollypop Class Sample II–Christmas Treat, finished

Friendship Quilt, still in the closet (not finished)

Kaleidoscope Front

EPP Quilt–Kaleidoscope, finished (amazingly)

So that’s four finishes.  Not bad.  I also snuck in a few more that weren’t listed:

SpoolinAroundTop

Spooling Around

Giving Christine the quilt

A quilt for my sister Christine:  Christine’s Philadelphia
(We’re in a pastry shop)

Christine's Row Quilt labeled

One really nice thing is the way that participating in the Finish-A-Long (FAL) keeps me focused on what to do next.  So often I can be swayed by what I see on Instagram, or from blog reading, or the latest internet craze, ignoring my own goals and projects.  I still have way more ideas and fabrics and projects that I will ever finish in my lifetime, but I like participating in FAL, where I least have a fighting chance of pointing to something at the end of the quarter that I did, that I finished, and that I’m proud of.

Now I need to think of things I want to try and finish for next quarter’s FAL.  Hope you’ll join us.

FinishALong Button

Housekeeping · Tutorial

Hot Mitts

Hot Mitts

No, this isn’t a reference to our past election and Governor Romney.

Old Hot Mitt

This is in rereference to my hideously stained and abused and damaged kitchen hot mitts.  I went to buy some new ones and didn’t care for the ones at a famous cooking store and at Macy’s–where Martha has taken over everything in the domestic world–there were only hot mitts with ruffles.  Ruffles?  I knew they’d be disgusting looking in short order.  (Ruffles?  I’m still shaking my head.)

Old Hot Mitt1

So one day, I turned the ones I liked inside-out to see how they were made.

Old Hot Mitt 2

Then I traced it with a sharpie onto what was laying around on the counter–an ad from the car dealer.  Actually this ended up being a good idea because it was thicker than regular paper and pretty sturdy.

Old Hot Mitt 3

And after I cut it out, I had a pattern.  But I decided I should allow for shrinkage, because I wash and dry these over and over, so I enlarged it by 10% which yielded the pattern at the end of this post.  Print it out, match up the car writing and making sure your 1-inch guide on the side is really one-inch (every printer is a little bit different), tape it together and you’ve got a good pattern.  I’d actually purchased a pattern but took it back when I realized how easy this was going to be.

Insulated Fabric

Utility Fabric

Go the Big Box fabric store and buy some utility fabric that looks like this: a metallic cotton on the outside, cotton batting on the inside, already quilted together.  Use your coupon.  I bought one yard and I’ll get four mitts out of it. Get yourself some 80% cotton/20% wool batting or some 100% cotton batting, if you don’t have scraps laying around.

Bias Tape Maker

And throw a bias tape maker into your cart, too.  I chose the 1″ version and it worked great. I picked up the Dritz (on the left) and on the right, I show the full complement of Clover Bias Tape Makers.  Either work fine.  They have decent directions on the back of the Dritz.

Layer Up Fabrics

Layer in the following order: (1) Utility fabric, metallic side down  –  then –  (2) your cotton batting – then – (3) your chosen fabric.  I’m using some of Malka Dubrawsky’s first line.  I love it, but I have never figured out how to use it.  This will be perfect as it will brighten up my kitchen every day. Using pins, secure it in a few places.  Cut out what you need by placing your hot mitt pattern down and guesttimating: I think mine ended up about 14″ by 18.”  Roughly.  Quilt all layers together.  Don’t get too precious about it!

Cutting Out1

Now lay out your pattern and cut out one mitt.

Cutting out 2

Reverse the pattern by flipping it over, and cut your second mitt.  Match them up, metallic sides out, then pin in a few places so it doesn’t shift.  Sew from under the thumb all the way around the mitt STOPPING 2″ FROM EDGE.  Leave that edge flapping, as it will be easier to attach the bias tape.

Stitching Inner Curve Hot Mitts

Close-up of the curve of the thumb.  Carefully clip down to the curve, stopping short of the stitching line.  This will make it lay better when you turn it inside out.

Making Bias Tape

(You can click to enlarge this picture so you can see the writing better.)

Follow the directions on the back of the tape maker package for cuting a bias strip.  Basically you fold the corner down into the fabric, creating a bias edge.  Cut the strips 1 3/4″ wide for a one-inch bias strip.  Feed it through the bias tape maker tool, using a pin to help out the leading edge if you need to.  Then use your iron to set the folds.

Bias Binding

I put two pins on the tape, as I drew it out, and then pressed it.  It sounds WAY more complicated than it is.

Open Edge Hot Mitts

Beginning with one of the loose edges, fold the tape over the lower raw edge, and stitch the tape onto the mitt.  I found it easiest to stitch from the “inside” for some odd reason.

Stitching Bias Tape Hot Mitts

Again, don’t get too fanatical about this–just make sure that both folds of the tape are caught in the stitching.  I did one, and then decided I wanted to trim out that seam allowance under the thumb edge for about one-quarter inch up from the lower edge, just to get rid of some bulk.  The world won’t end if you don’t.

Hot Mitt inside

Finish stitching that last two inches, and backstitch to secure.

Hot Mitt binding joining

I also zig-zagged that last two inches to finish it off.  Given that it’s BIAS tape, it’s not going to ravel, but hey.  Just thought it needed it.

Hot Mitt binding finished

Flip your mitt right-side out, easing out the thumb and smoothing out the curve.

Coasters
I cut some scraps into squares with rounded edges, and used the leftover bias tape to make a couple of coasters.  Don’t examine my stitching, because like I said, it’s pretty obvious I went for sturdy over beauty.

Okay, below are the patterns.  Print them out and adjust your printer settings so the inch mark is true, then tape your two halves together.  I scanned my pattern so it’s pretty true; I’m hoping you don’t have to do too much monkeying around.  My hand size? Medium in rubber gloves, so if yours is smaller or larger, use your copier/printed to enlarge or smallerize your pattern.  


Hot Mitt Lower Hot Mitt Upper

Have fun making them!

Hot Mitts final

This is one of the projects on my Finish-A-Long list that I have completed, from Leanne’s Finish-A-Long!

FinishALong Button

200 Quilts · Family Quilts · Quilts · Tutorial

Sunshine and Shadow Quilt Tutorial

SunshineShadowBlock

Here’s the recipe for the quilt I gave to my sister-in-law, Janice.  But I think you’ll notice how “lopsided” the block is–and that’s because I wanted to eliminate the sashing step, including it in the making of the quilt.  I also wanted to make this quilt completely from my fabric stash, so I chose colors I had multiples of, in different designs and shadings.  What is sashing?  It’s those long strips that separate blocks from each other and can be part of the design of a quilt, letting each block float in its own little world.  Many modern quilts eliminate them, but I like them occasionally.

Choosing from the Stash

I started with the centers and cut all of them from the same line, but used two versions of the yellow flowers.  Then I pulled out a lot of different fabrics, trying to keep in the same tonality in the blues, and in the yellows, so the quilt top would be harmonious.

1. After cutting, the first step is to sew two blue strips on the sides of the large center block.

SunshineShadow1
2. Sew two yellow blocks on the end of the blue rectangles.

SunshineShadow2

3. Line them up.  After choosing good sets that go well together, stitch the yellow square/blue strip pieces onto the center.  I pressed the seams towards the blue, away from the yellows.  Sew the strips onto the center section.

SunshineShadow3

4. True up, by placing a 9 1/2″ ruler on top.  I found if I trued it up at this stage, the rest of the construction went smoothly.

SunshineShadow4

5. Sew all but one of the blue squares onto the larger yellow strips.  Then get ready to put them all together.  You won’t use all the blue square/yellow strip pieces at this point.  Just set the extras aside.  I wanted to audition how the random yellows and blue fit together, so I took one large block, a yellow strip and a blue square/yellow strip piece, making sure I wasn’t duplicating fabrics in any significant way.

SunshineShadow5

6. I pinned the yellow strip on the bottom, and folded up the other strip and pinned it to where it would eventually be sewn.  Sew on the yellow strip.

SunshineShadow6

Here it is, with yellow strip sewn on, showing that I pressed the seam to the outside yellow.

Pressing

In all cases, first press seam flat to eliminate puckers, wobbly edges, then press the seam open.

SunshineShadow7

7. Sew the blue square/yellow strip piece on the center construction, matching seams, etc.  This is the finished block.

SunshineShadow8

8. Because my pin wall is longer from side to side, than from top to bottom, I rotated the blocks a half turn and laid them out on the wall.  I kept using my digital camera to make sure that there weren’t too many of those darker yellow-gold pieces mushed together, as well as eyeballing a good distribution of the rest of the colors.  The quilt looks a bit strange now, because you are still missing a length of “sashing” on the left side and on the bottom.

SunshineShadow9

9. Because I still wanted to sew these as blocks, I laid out the “sashing” pieces, each with a blue square on them, where they should go. I laid them out, again checking for color and value distribution.  I had to sew that random last blue square onto a yellow strip/blue square piece, then I sewed these pieces onto the adjacent block.  When you replace these new expanded blocks on your pin wall, be careful not to rotate them into a wrong orientation. Use your last digital photo as a guide.

10. Put quilt together:  I put row markers (shown in *this post*) on the blocks on the left side of the wall, in order to keep track.  Then I stitched the rows together, going across.  Stitch rows together, going down, until the quilt top is complete.  I think it goes much faster (have I said this before?) because you are sewing blocks, rather than long strips of sashing.

SunshineShadow FavMuseumShot

Quilt as desired (and my favorite way is calling Cathy and having her do it for me).  I used the extra bits of blue strips I’d cut out, plus extra, to make a scrappy binding.

Okay here’s the honest truth: I started out with a completely different idea for this quilt and cut a whole lot of blue and yellow fabrics into 2 1/2″ strips, but realized that my time was short so I had to step up to a quicker quilt.  That’s when I had the idea of adding the sashing pieces to the block, because sometimes sashing just wobbles and stretches and becomes one pain-in-the-rear step to making a quilt.  This was was much faster, and I think the integrity of the quilt doesn’t suffer for it.  You’ll notice I tried to press to the “sashing” side always, as I think that distinguishes those pieces from the “block.”

SunshineShadowLabel

To make the label, I did the usual method of pressing some fabric to freezer paper, running it through my Epson printer (they have the best inks), bordering it, then stitching it onto the quilt invisibly around the outside edges.  I also like to do it on the inside edge of the border, where the label meets the edging.  No one can tell, but it poofs out less from the surface of the quilt if it has that second round of stitching.

SunshineShadow

BlueYellowFullQuiltwTitles

I’m actually planning to make another like this, as it is really quick, and I like the fact that I can use up my stash.

I seem to have lost a few days here, but with the weekend coming (a holiday weekend!), I hope to find time to dive into some stitching, and some blogging.

Giveaway · Quilts

Snapshot: Putting the Quilt Top Together

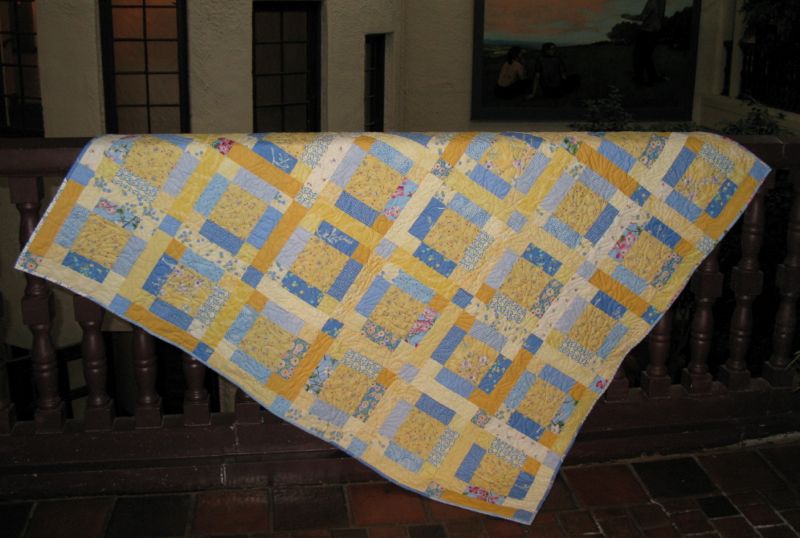
Here’s my Snapshot Quilt, in the requisite rustic pose drooping over a gate with rusty wheelbarrow.  Go yard work for great props.

This is the third and final post in my tutorial of how to make the Snapshot Quilt, constructed from lots of Polaroid blocks.  And at the end, my little giveaway.  I have three sets of 10 blocks each to giveaway, but hey! you must be a serious Polaroid-er to get them.  Leave me a comment telling me what you’ll do with them–have you started your collection?  Do you have a few and want more?  Do you have plans for them?  And for fun, tell me about your favorite vacation photo, since this quilt is, after all, a tribute to vacation photos everywhere.

Here’s a close-up of some of the Polaroids.  I received the truck Polaroid in the swap.  Love it!

And that German-looking couple on the right was cut from my Barbie-doll dress.

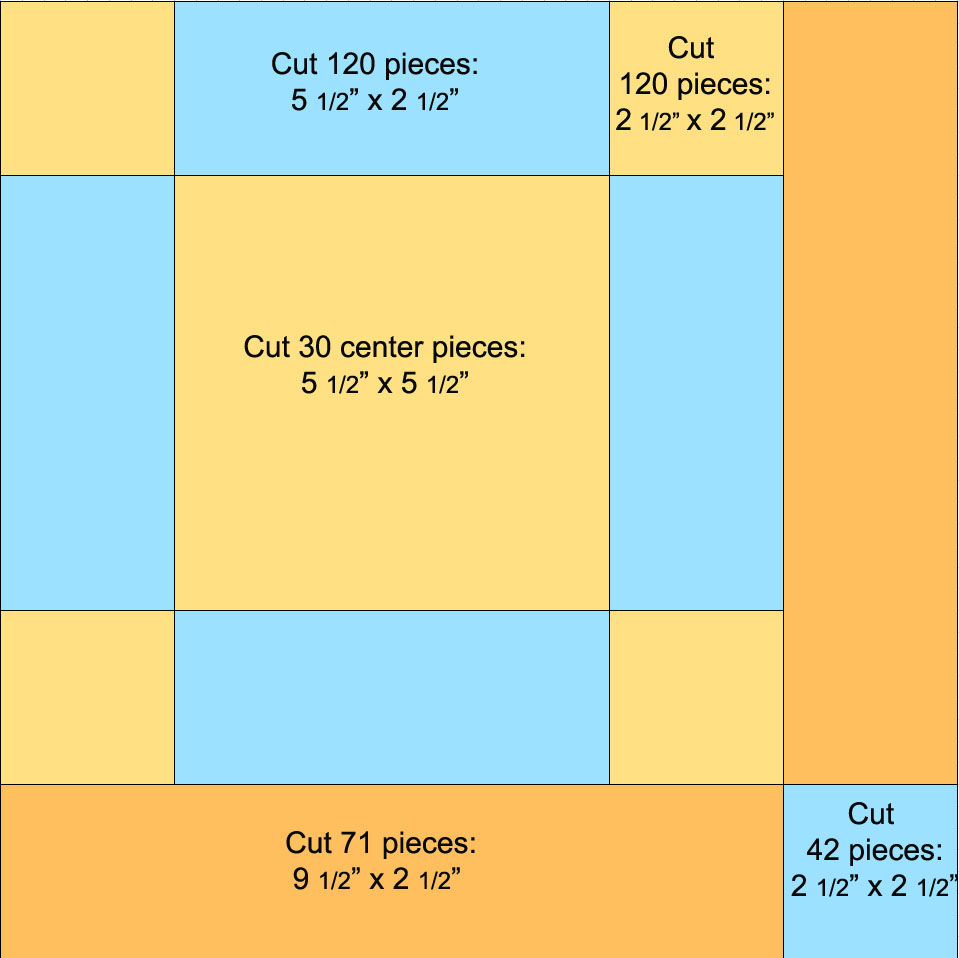
Now back to work.  I have made a PDF to help guide you with cutting, and it includes the basic bones of the quilt.  Download it: PolaroidQuilt

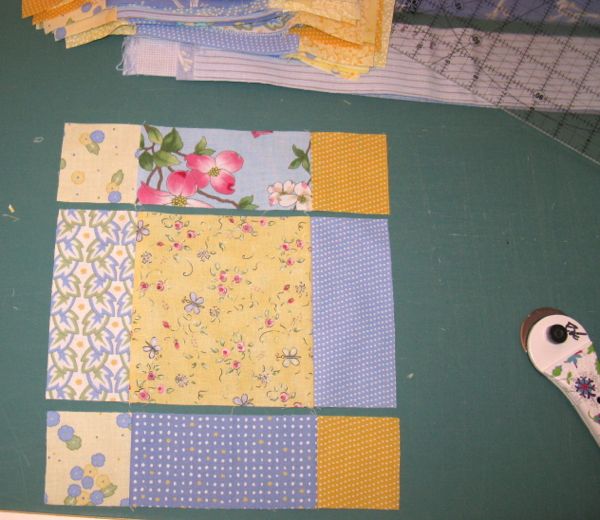
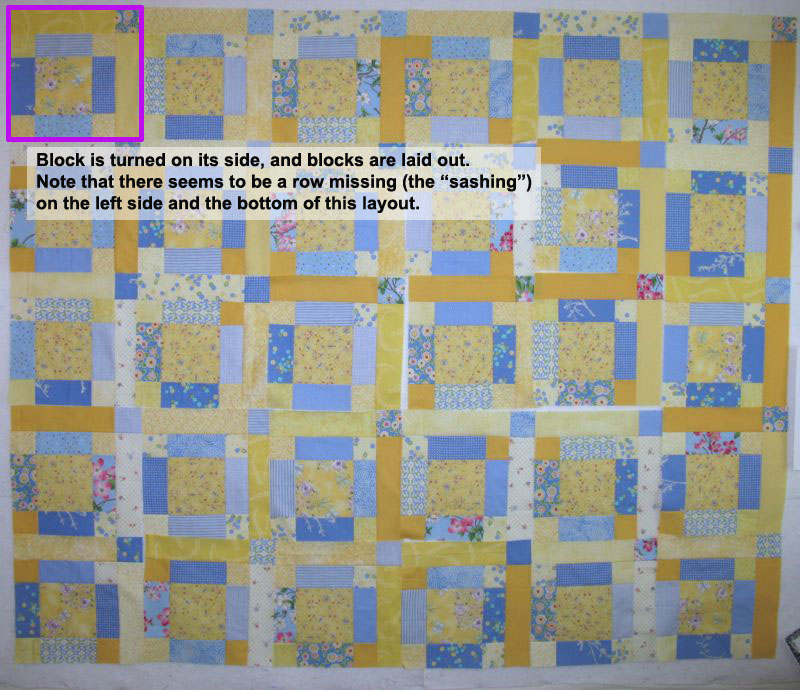
Start throwing up blocks onto your pin wall.  This was my first attempt. I knew I wanted a stacked coins effect, but was playing around with inserting blocks into the middle of the stacks.  Meh.

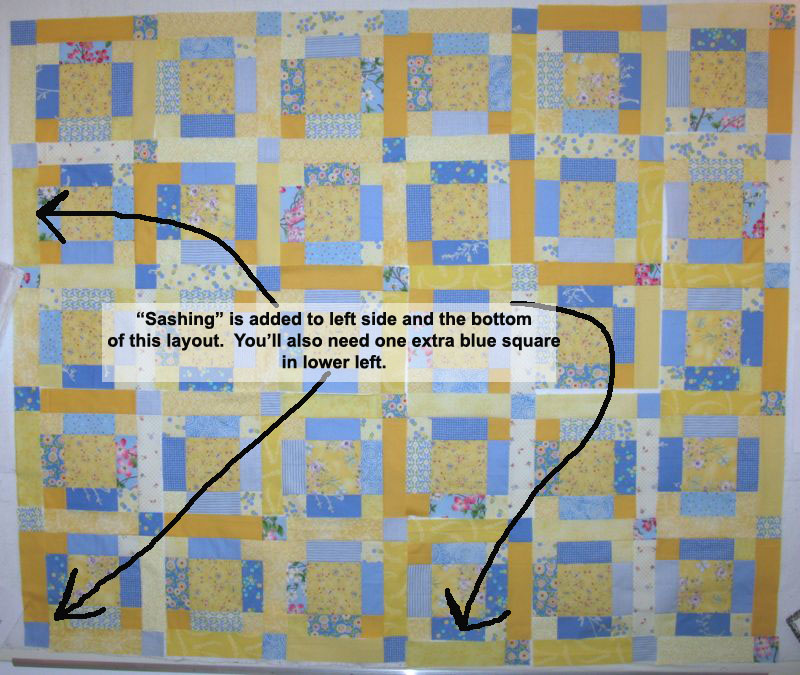
Second try.  I like this one better, but not keen about the four blue blocks across the top, so I switched them around.  Check the previous post for the doctors-office-view of the quilt, which shows how I ended up arranging all my blocks.  I also checked to make sure that there wasn’t a glob of orangey-red blocks, or too many of one type or color.

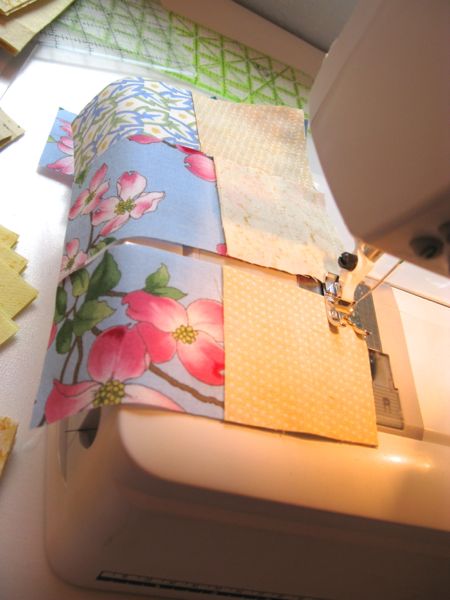
After getting the blocks the way you like them, sew them together.  My row tags, made from embroidery holders, indicate which row it is, and which is the top. I pinned them all together in a row, then stitched them.

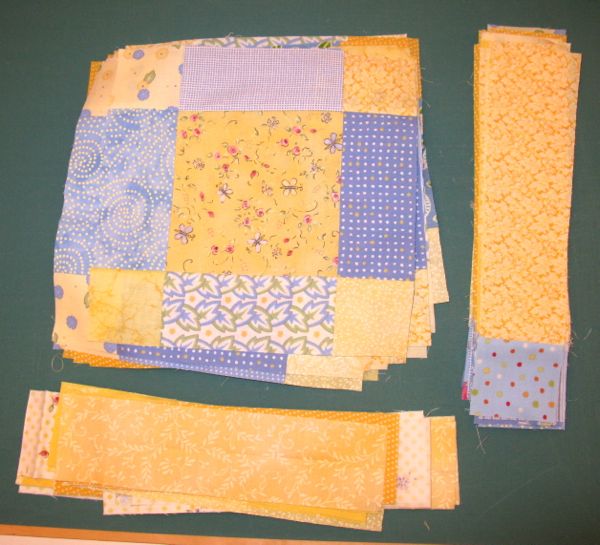
Cutting the white internal strips and borders:
Internal rows are 4 x 52″ (w/o s.a.) so cut three strips that are 4-1/2″ by 52-1/2″.  I’d STRONGLY advise cutting them on grain, that is, cut them parallel to the selvages of your white fabric.  All these double-Polaroid blocks are slightly on the bias, so they need the strong stable edges of an on-grain piece of fabric.

Borders (seam allowance included):
Border #1, top/bottom: cut two pieces 2-1/2″ x 40-1/2″; for the sides, cut two pieces 2-1/2″ x 56-1/2″” long
Border #2 (print), top/bottom: cut  two pieces 2-1/2″ x 44-1/2″; for the sides: cut two pieces 2-1/2″ x 60-1/2″” long
Border #3, top/bottom: cut two pieces 2-1/2″ x 48-1/2″; for the sides, cut two pieces 2-1/2″ x 64-1/2″” long
NOTE: I’d cut the border pieces slightly longer, to give allowance here and there for ease needed when sewing on borders.

Matching centers and edges, ease the stacked quilt blocks onto the white on-grain strip of white fabric.  Repeat until four rows of stacked quilt blocks and three strips of white fabric are sewn together.  I sewed the seam with the quilt blocks to the throat plate of my sewing machine, allowing the motion of the feed dogs to help ease in any extra fabric.

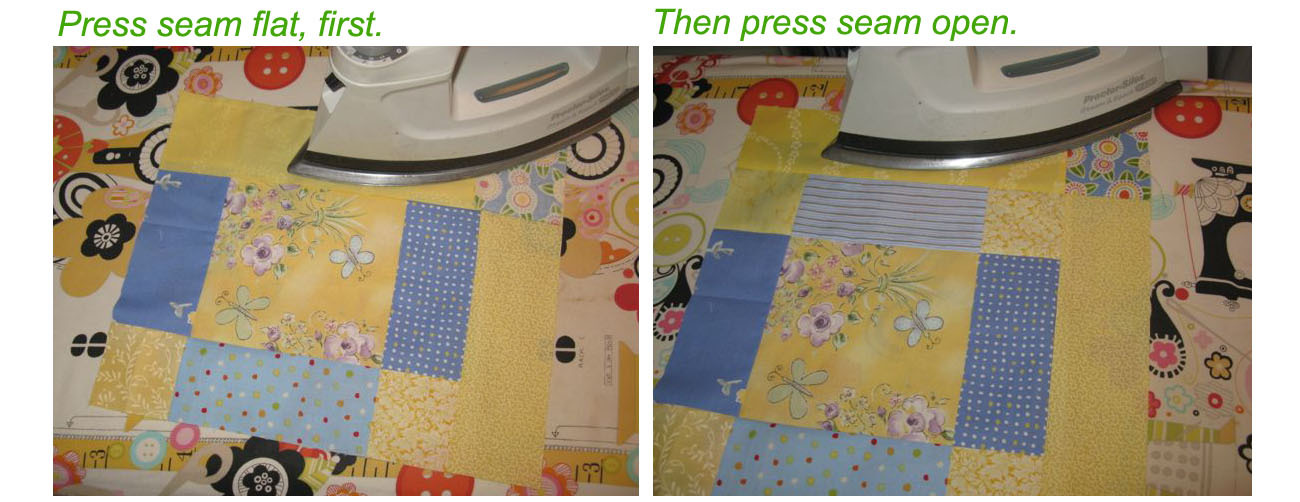
Sew on the first top border, then the bottom.  Then, matching centers and edges, sew on the side borders as you did above, keeping the white strip UP and the quilt block stack to the feed dogs.  Press seams toward quilt blocks.

Attach the print borders next in this order: top, bottom, side, side.  I was exacting on the lengths and matching edges and centers, but I should have given a little more ease to the side borders.  It’s a challenge sometimes, as you don’t want to get the borders too small so that the quilt “bows” with a curved edge, but you also don’t want it so loosey-goosey that it ripples.  Pin and check, is my advice.  Then press the seams toward the print fabric.

Lastly, attach the last white borders in the same order: top, bottom, side, side.  Press toward the second (print) border.

You’re done!

How do I plan to quilt this?  I’m thinking I’d first stabilize those long stacks with either stitching in the ditch white white thread, or a quarter-inch away into the white.  I’d like to outline along the Polaroids to make them pop.  The white sections call out for some sort of overall pattern, like this pattern from Leah Day of Free-Motion Quilting, Bow-tie Parade:

Go and visit Leah’s site for lots of ideas and a stimulating blog.  I love reading her posts.  I do plan to bind this with more of that print shown in my border.

Now! Leave a message if you are interested in scooping up some of my Polaroid blocks, and mention what you’ll do with them–have you started your collection?  Do you have a few and want more?  Do you have plans for them?  And for fun, tell me about your favorite vacation photo, since this quilt is, after all, a tribute to vacation photos everywhere.

Mine favorite vacation photo is from when Dave and I were newly married (under a year) and we took all the kids to Zion National Park.  We are standing there in the middle of red rock country in our slightly dirty T-shirts, a group of 2 adults and 4 children who were on their way to becoming a family. Now let me hear about yours.


UPDATE:  Congrats to the winners of the Polaroid Blocks: Mary, Cindy and Marilyn.  I’ll look forward to seeing what they do with their blocks, so send those photos over to my email when that future finish day arrives.