Cindy, of LiveAColorfulLife, called me up one day and said she had a great idea and a great name for a bee: Mid-Century Modern Bee, and that everyone had to be at least mid-century in age. Maybe it was the exasperation I felt that all the newbies were claiming invention of tried and true blocks and methods, or that I was ready for another bee, or that Cindy’s charm could not be turned down, but I jumped at the chance to be a part of this new group. We’ve been going strong for three years, so I’m dividing this post into parts, and am grouping them by the participant, rather than going through the calendar years. We now have a blog, courtesy of Susan and PatchnPlay, so I guess you could say we are all grown up. I wanted a place where all our blocks, quilts, and tutorials could be listed; you’ll find links to many tutorials of these blocks, so have fun browsing. 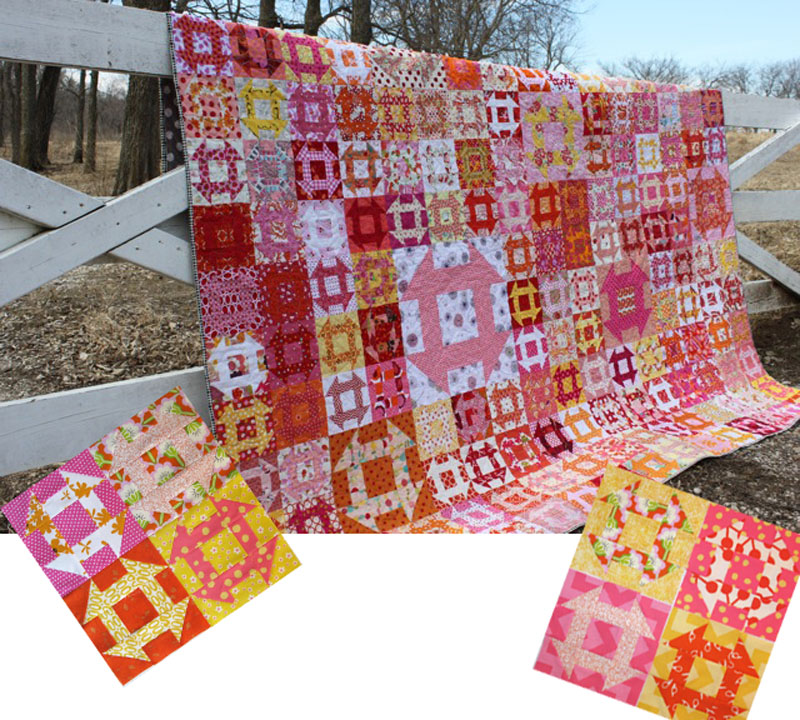 The first project we did was Carla’s Church Dash quilt, with the tutorial found *here.* The next year, Carla (Lollyquiltz) had us make another block churn dash block for her, and the beautiful quilt above is the result.
  Carla is still working on this year’s batch of blocks, a birthday cake block using *this* tutorial. This bee also does signature blocks, which I love, and you can see the array at the top of her pin wall. My birthday cake block is the blueberry with mint filling, as one of the fun things she had us do was list what “kind” of cake we would make for her. If you use the tutorial, remember to set your print scaling settings at 100% so your block will be 12″ square.
  Cindy thought for her first turn, she would do the Winged Square Block with the tutorial found *here.* When I sent around the letter asking for photos of blocks/quilt tops/quilts, she sent me a photo of all the blocks together.
 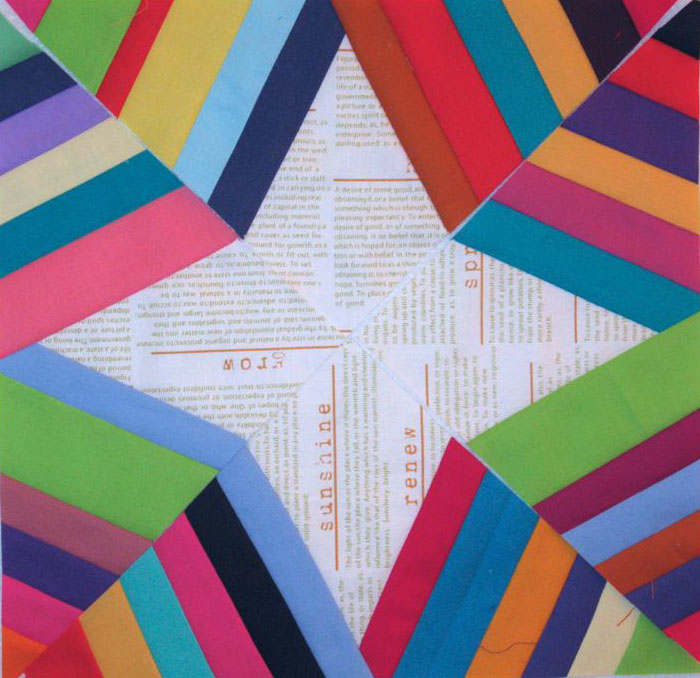 For her second round, she fell in love with Rene’s spiderweb block (another member in our bee) and decided she wanted one too. This became common–we are so well matched that we borrow ideas for each other regularly, tweaking them slightly. We used *this tutorial* for these blocks.
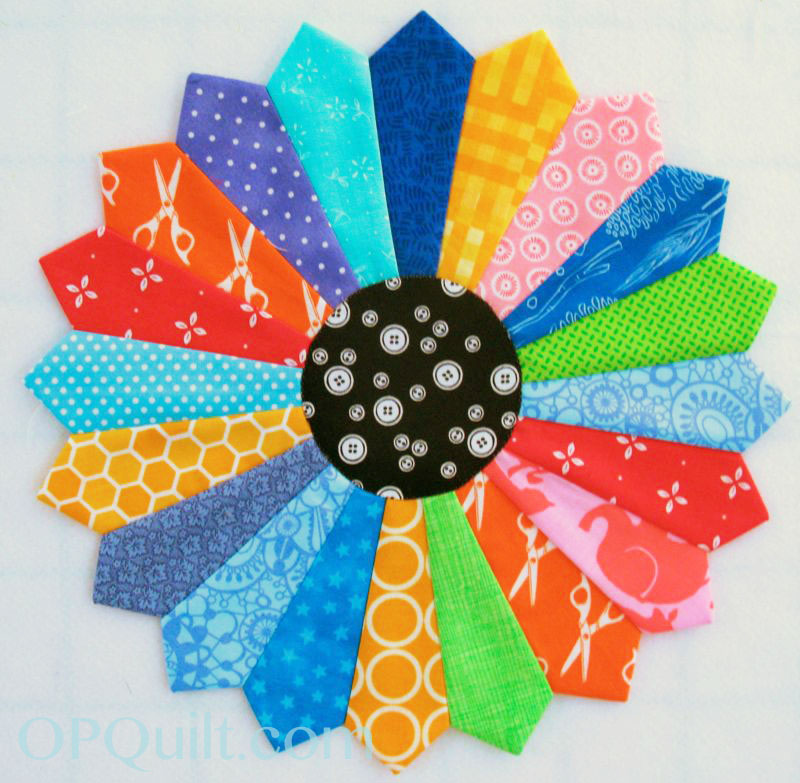 Using *this* tutorial, and again borrowing from Rene’, Cindy went with a rainbow Dresden plate, with a black and white center. Unlike the Always Bee Learning Bee, we make from our stash, not sending out fabrics to each other. It is fun to see how many of us have the same fabrics.
  Her last request was matched by another bee she is participating in, so her design wall was flooded with circles.
 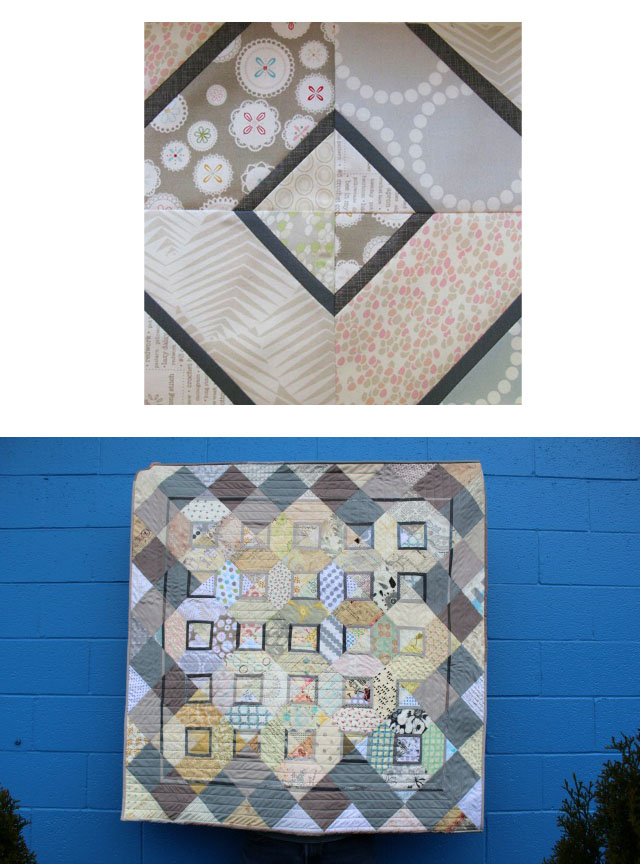 Debbie, of A Quilter’s Table, asked for a variation of the Hugs and Kisses Block, but done in soft hues and colors (aka “Low Volume”). Her stunning completed quilt, above, titled Common Affection, has gone on to be published and to win ribbons. I love that blue wall, as it really shows off the low volume fabric choices.
  Debbie’s next block (in 2014) was a pair of rolling diamond blocks, from *this tutorial.*
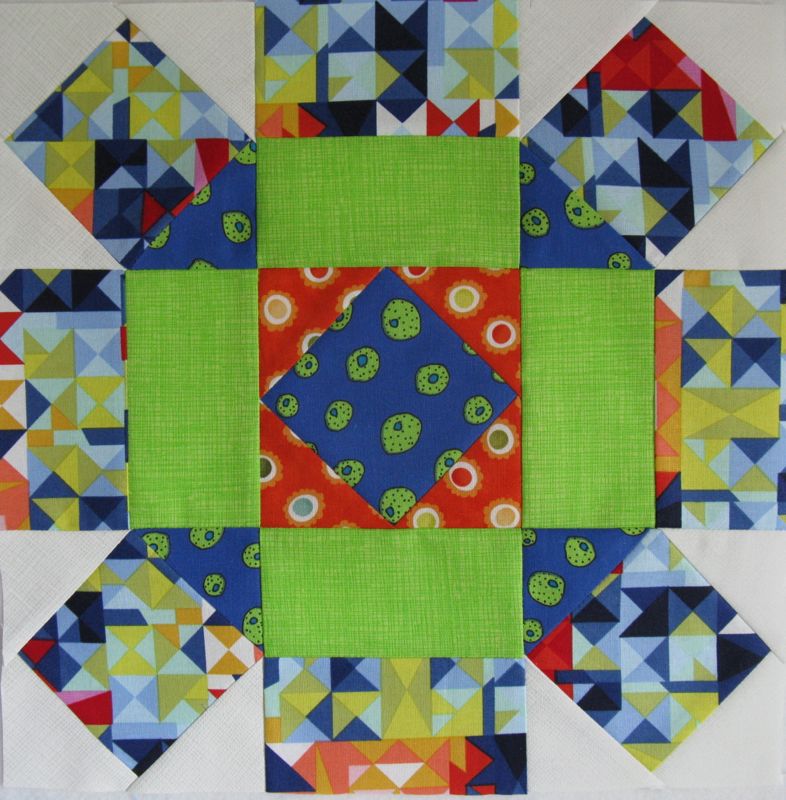
 Here’s her completed quilt, Vivid, adding a few more to round out the original collection.
 Rene’ of Rene Creates, and who inspires many of us with choosing blocks, asked us for a spiderweb block (tutorial link found above), but in scrappy fabrics. She made this cool quilt with the colors moving all around–a real scrappy treat. She took it with her when the family did Christmas photographs together; I love the setting.
  Her 2014 block was this cool-in-blues-and-greens Dresden block (tutorial listed above).
 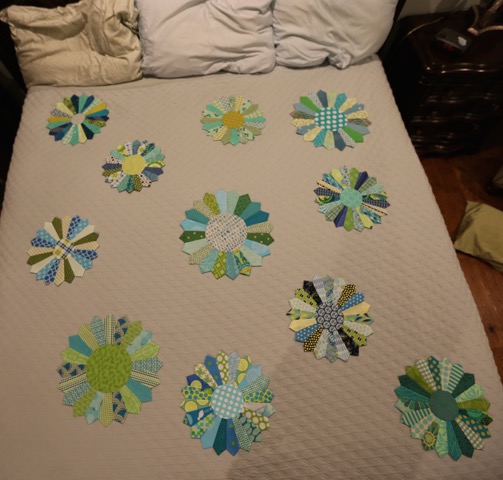 She laid them all out on her bed to show us how they look together. Because of different printing sizes, they range from smaller to larger. She plans to place them scattered across a solid background for her quilt.
  Deborah, Simply Miss Luella, asked for house blocks, and here are a few. Mine is in the upper left; link to the blog post about it, with the pattern is *here.* You can find her on Instagram.
 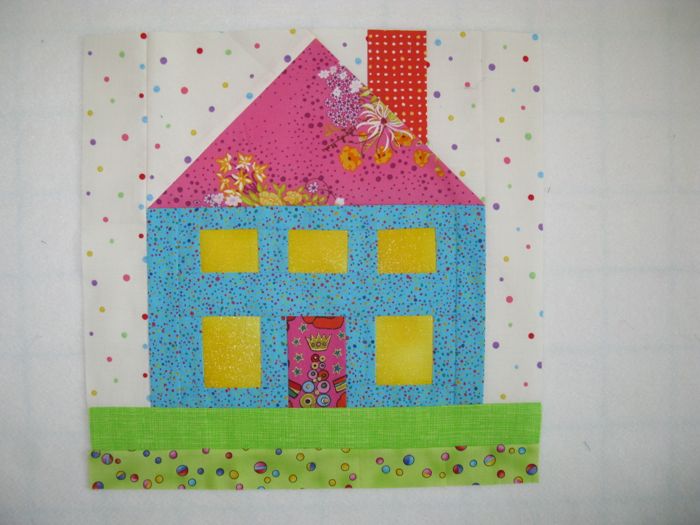 I made this house for Linda, drawing from my collection of free house patterns that I had worked up for my in-town sewing group. The reason she asked for houses, is that her house burnt to the ground, and she lost everything shortly before Thanksgiving of the year she was with our group. We all made houses, our hearts going out to her as she worked hard to rebuild her life. (to be continued)
Tag: Tutorial
Signature Quilt for Lora
Lora suddenly moved away and two of us in our church group decided she needed a quilt to remember us. One day she was here, puttering around in her house. Then a fall, where she wasn’t discovered, which led a brief stay in a skilled nursing home. Her children rallied round her and took her to live near them, where Lora can be cared for. So I went looking for ideas for a signature quilt (see them at the bottom of this post), and decided on the basic signature quilt block since it needed to be put together quickly. My friend Lisa (who is our friend’s niece) and I decided on a 6″ block.

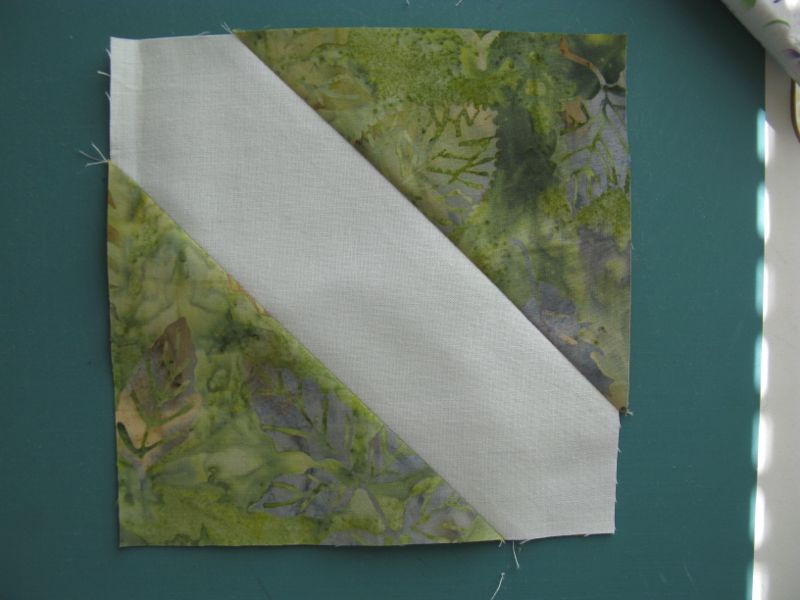
For every signature block, cut one bigger square in a light color (so the signatures will show) and two contrast squares. The dimensions are above. You can see that I double-stitched the diagonal seam, the lines 1/2″ apart. I then cut in between that line so I could have some HSTs in case we needed more places for signatures. In case you haven’t done one of these, the directions are:
1–Line up the contrast square with the light-colored square and sew a diagonal. I use The Angler tool from Pam Bono so I don’t have to draw lines. Stitch a batch of blocks, then go back in and stitch 1/2″ away.
2– Cut in between the two stitched lines, then press the contrast fabric away from the center white block. (Set aside the cut-off triangle. You’ll now have a growing stack of Half-Square Triangles (HSTs) for another project!)
3– Sew the other side (which is what you see above).
Done. I then cut a bunch of strips of freezer paper and ironed them on the back of the white strip, so to make it easier to sign. We’ll have them sign with a Micron Pigma Pen .08 as it leaves a nice line.
This same process is the one I follow when we make Signature Blocks for our bee, only we use the light colored fabric cut to a 3 1/2″ square and the contrasting “snowball” blocks are 2 1/2″. I don’t save the triangles on those.

I finished 74 squares this past couple of days. Isn’t the fabric beautiful? Lisa has a whole collection of batiks which she graciously contributed to this project. (Yeah. I contributed the Kona Snow.)

I signed mine so you can see what it looks like.

Here’s a signature quilt, pulled from the web (sorry, I don’t have the attribution), and they used their extra HSTs in the borders.
 Here’s another version, without borders.
Lora, in her earlier years, made wedding cakes. The rich, the famous, the well-heeled, and well, all of the young girls in our church all sought out her cakes, because not only did they look elegant and beautiful, they tasted good. Rich and yummy, full of vanilla fragrance and just the right amount of sweetness to make you come back for seconds. Or thirds. For my daughter’s wedding, she also made a double-fudgey chocolate groom’s cake. It was only at the very end, a year ago, that she gave two of us her secret recipe for the frosting, and the secret ingredient that made my kitchen smell like her cake was baking right there. She also did flowers, interior decorating, and we loved it when she decorated the church hall at Christmastime for our church dinner, transforming it to a winter wonderland, making us all feel like we were the rich, the famous, and the well-heeled, instead a bunch of modest church-goers. Lora did everything up Big. Every year she would get the giant wreath out of the storage closet at our church, get a ladder and hang it up on the wall behind the speaker’s podium, arranging and re-arranging the red glass balls so they looked like someone just tossed them up there. That look takes real skill. Lora was part of the warp and weft of our church, and while some say she’ll be back, others say she won’t.
I think the reason why this affected us all so much is that within the space of a couple of weeks, Lora’s life spun around on a dime and her life in her home, which she had decorated in rich autumns and golds, was probably over. That quickly. Yes, she’d had some health problems. Yes, we knew she was more frail. But how our lives in our carefully curated homes end is not something any of us like to think about. So a fall can happen, or a sudden health reversal, and like a flash, we can be taken from our collections, our quilts, our memories: a sudden shearing off of a life. And what happened to Lora is right around the proverbial corner for all of us, and we know it. So perhaps by making her this quilt, we are saying we understand. To the best of our abilities at this younger times in our lives, our hearts ache for you.
With this quilt we are saying, Lora, you are not forgotten.
Straighten Up and Sew Right
 (from *here*)
It had been nearly a month since I’d threaded the needle of my sewing machine and sent it to humming, and I felt like the sad seamstress in the photo, above, pining away. I wanted to get to the machine and have a good sewing session and have something to show for it. As one Instagrammer said, “My sewjo is missing.” But I wasn’t idle. First, I had a root canal, which ought to occupy anyone for a few days. And I also cleaned out the stash a bit, filling two large mall shopping bags with swatches of fabric to let my quilting group, the Good Heart Quilters, rummage through before donating the rest to our quilt guild. And here’s some photos to prove I have tidy cupboards, before I start messing it up again:

I like to organize mine by color and value (light-to-dark).
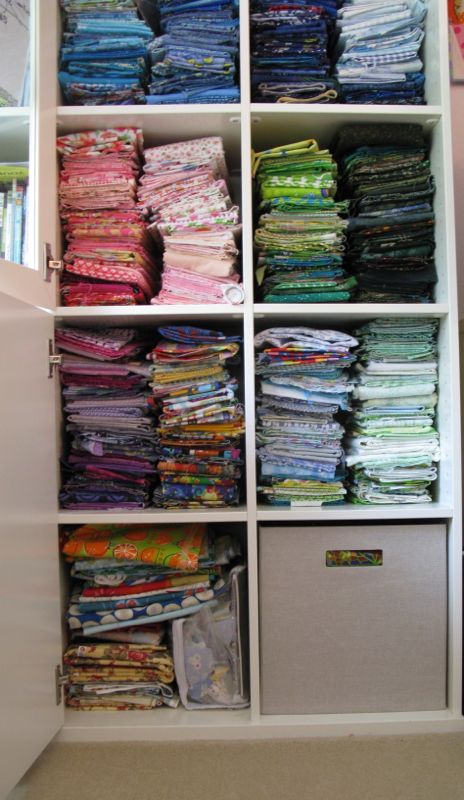
The lower half of the cabinet. Inside the pull-out box are browns and blacks–easier on the back this way. I keep the Kaffe Fassets in another place, and I also have a stack of cream/tans and a stack of “low volumes” (neutrals or pastels), and stack of predominantly white/light background fabrics.

Here’s a close-up of my Molly Qee collection (the characters with the crowns). They are hard to find in the States. I started my collection when my sister Christine and I happened into a collectibles shop in Lyon, France.

And on the other shelf are other doodads. My husband gives me the little Japanese dolls (ningyō). And those fabric-covered binders are all my journals, began when I was a young woman of twenty-one years old. Since the advent of email and cheap phone calls, I’ve stopped writing them, but I love having them around (they hold all my secrets!).
 So after a busy month, I pulled out the machine and got started. I decided to ease my way in slowly, making a selvage block.

When I begin, I use my standby translucent paper, cutting, then pasting a strip on one side so it measures 10 1/2″ square. Then I draw lines on it to keep the selvages on straight. Do I cut all my selvages off when I buy fabric? No. I like having them on to keep track of the newer stuff in case I need more. Most of these selvages happen when I’m going through older fabrics that are in my stash (like those to be donated), of which I know I’ll never need the information again. Then I slice it off, leaving about one-inch to 1-1/2″ of the fabric on top of the selvage so I have Lots of Options.

I get started by cutting two 4 1/2″ blocks, then slice them on the diagonal to make up the four triangles you see in the center above. I pin them down, then start sewing on the selvages, placing the selvage edge 1/4″ in from the raw edge of the triangle, as shown. Sew closely along the edge. I like it best when the first selvage next to the color is the same, or nearly all the same, so I look for a longish piece. I think it just helps set the stage. Sometimes I piece selvages to get the printed symbols and the words closer together (above) and other times I just let it be. Then it’s random, random, random after that, some thinner strips, some thicker strips. Some people like to trim the fringey pieces, but I just leave it that way. Sometimes after I sew on a strip of selvage, I’ll go in and trim down the underneath piece just to keep it tidy.

Sometimes I get things off balance, like in the pink block way above (too much deep maroony-pink in the lower left) but then I figure I’m teaching myself how to let go a bit and just enjoy the process. And I do. I now have five colors of four 10″ (finished) blocks, so the block will be twenty inches square after all four parts are sewn together. This is going to be one big quilt, but I’m in no hurry.
To close with, here’s a quote from The Rise, by Sarah Lewis (the book I wrote about in the Creativity post):
“Perhaps we have grown impatient with the incomplete. We are part of a generation that, as the African proverb goes, wants to eat dinner in the morning, that longs for the immediate, fully prepared for consumption. Yet the strength to linger over the long-left unfinished reminds us that something inexhaustible in us is empowered by striving, that we sense unnaturalness in blunt ends of journeys, of lineage. And that power comes from where we least expect to find it.”
Go tackle something incomplete, and enjoy the power of taking another look at something that in our hands, has had a long journey.
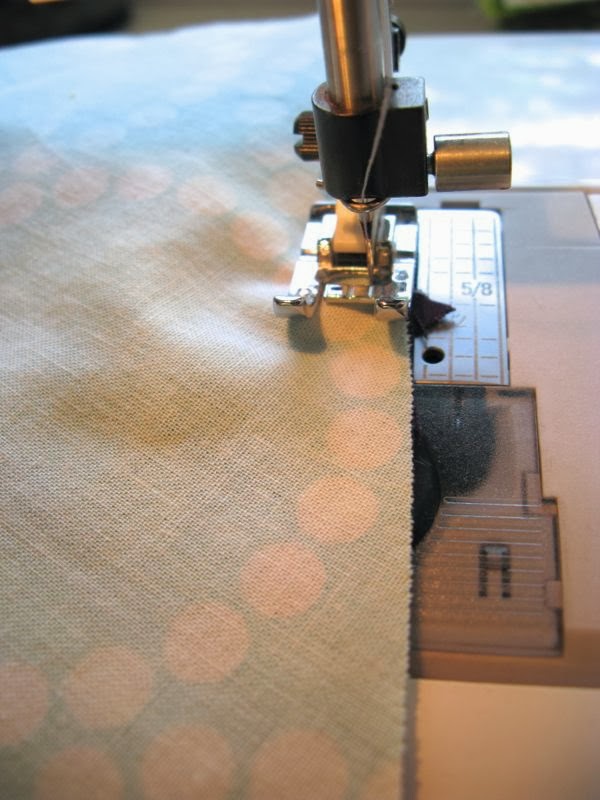
Y-Seam Tutorial

During Thanksgiving Week, I thought it was time to re-post this tutorial from Leanne’s blog, from the Third Quarter Finish-A-Long Tutorials. As background, I’ve been sewing and quilting for more years than I should admit to, and during that time have completed over 120 quilts. So I’ve faced down more than my share of the Dreaded Y-seams.

In June of this year, I made this quilt for my sister. As you can see there are lots of peaks and valleys in this thing–lots of Y-seams going both ways (some people call them Y-seams and V-seams) but really, let’s keep it simple.

They are called Y-seams because the V-part of the letter Y usually has fabric with no seam, and the tail of the Y has a seam. I’ve marked the Y for you in red in the picture on the left. The picture on the right is the other type of Y-seam. I’ll show you both.

Let’s start with the first type of Y-seam, where the “tail” of the Y is facing toward you and the “V” of the Y is underneath. Place a pin at the 1/4-inch mark through the seam, and into a spot that would be the peak of the 1/4″ seamline, if you could draw it on and imagine it.
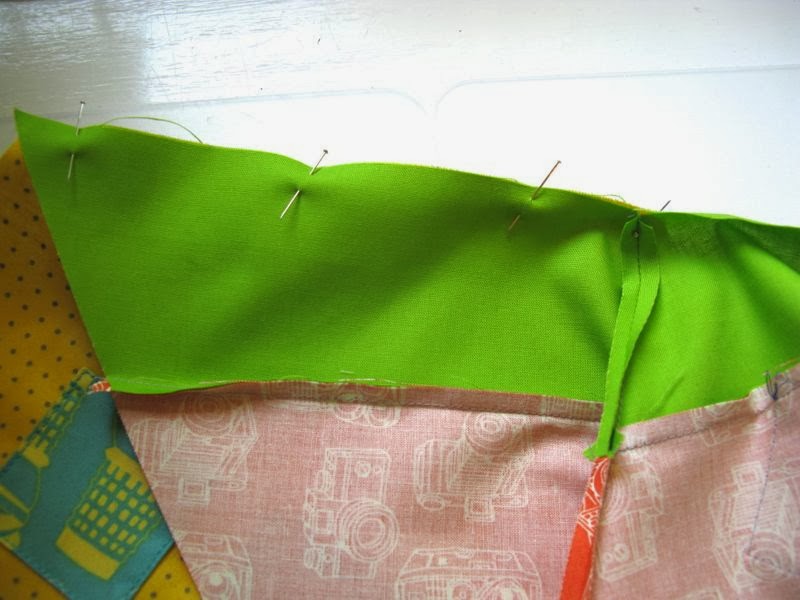
Most beginners want to pin that seam to death. Run screaming in the other direction. The success of the Y-seam depends on the “float” of the fabric.

I sometimes will place one pin on either side of the seam, just to anchor it as I get going, then another pin or two along the starting point. Then I take out the (above) pin. I want my fabric to float — don’t want to anchor that second half of the seam too much, as I need it to pivot.

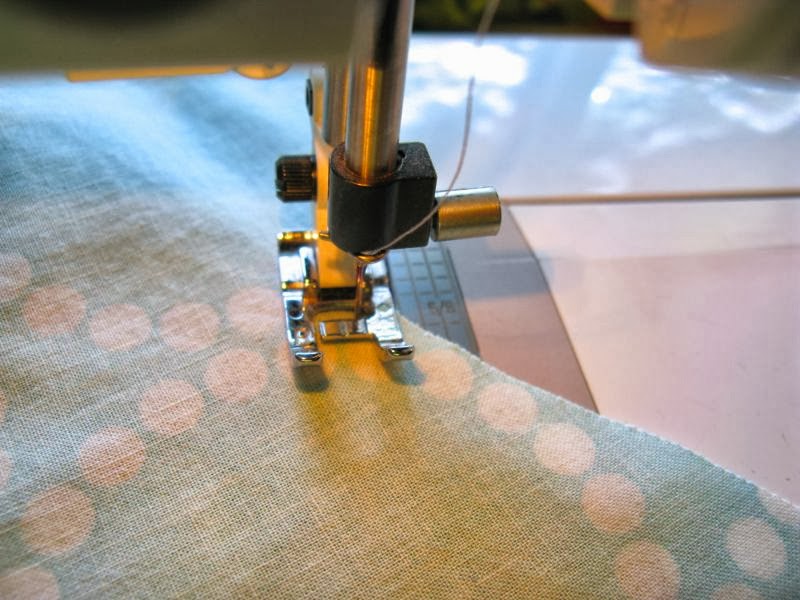
Start sewing from the left edge, as the seam faces you, using a 1/4″ seam allowance. Fold the seam toward you, and as you approach the seam, slow down and use a bit smaller stitch. You are trying to anchor the stitching a bit.

When you get to the seamline, when you are on top of the thread marking that other seam, STOP. Make a tiny stitch on top of the one before to anchor, but DON’T GO OVER THE SEAM LINE.
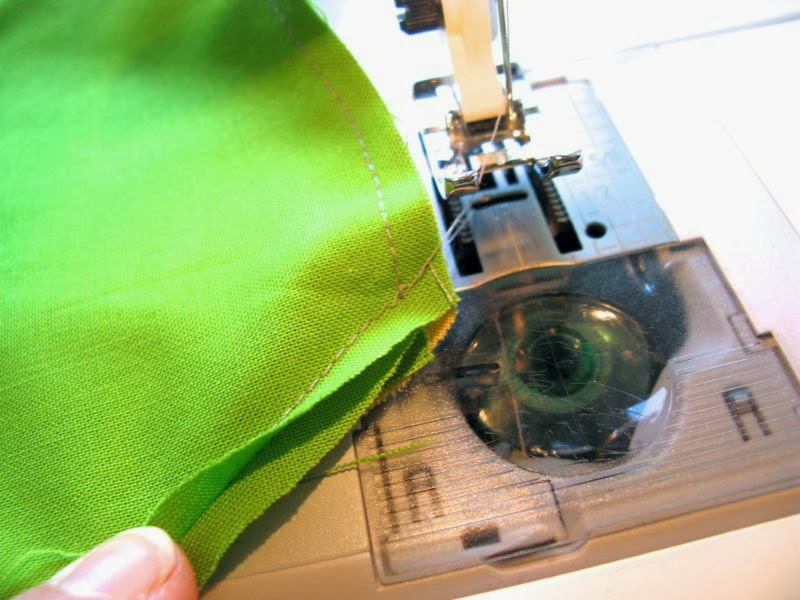
Lift your needle out of the cloth. I pulled it away to show you what I mean, but you don’t need to do that. Just give yourself a little room to smooth the (green) seam allowances out of the way, and to find the place to insert your needle again.

Re-insert your needle just on the other side. Then line up the next two raw edges, smoothing the fabric away from the needle and your presser foot. Sounds more confusing than it is. Take a few tiny stitches to anchor, then change your stitch length back to normal.
Another shot of my needle placed just on the other side of the seam allowances (which I flipped to the back of my presser foot).

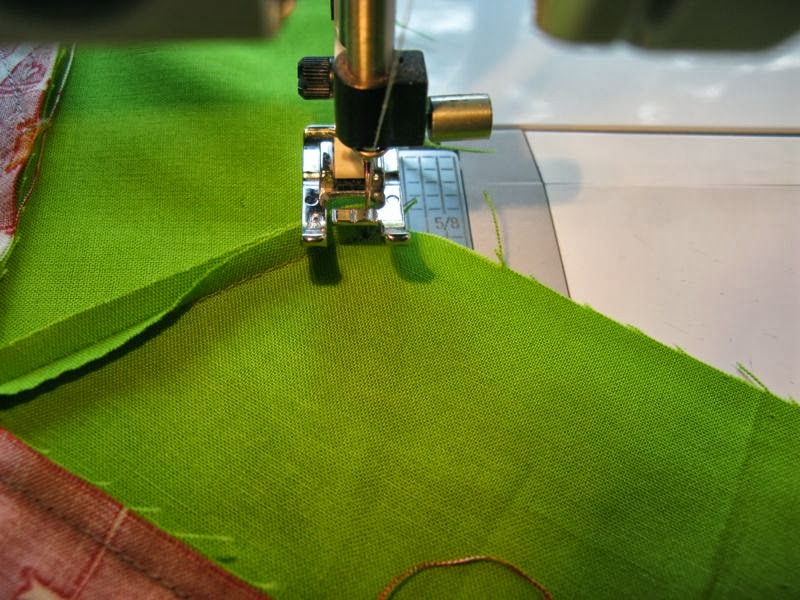
Depending on the amount of cloth in your Y-seam, and if you just feel better about it, go ahead now, and pin those raw edges together and stitch the rest of the seam.

When you are through sewing, clip the thread if it is restricting the ability of the seam allowance to open up and lay flat. If you left a bit of thread there (pulled it away from the needle as in my photo above) there should be no problem.

Press, keeping the tail of the Y-seam open.
From the front, it looks like this.
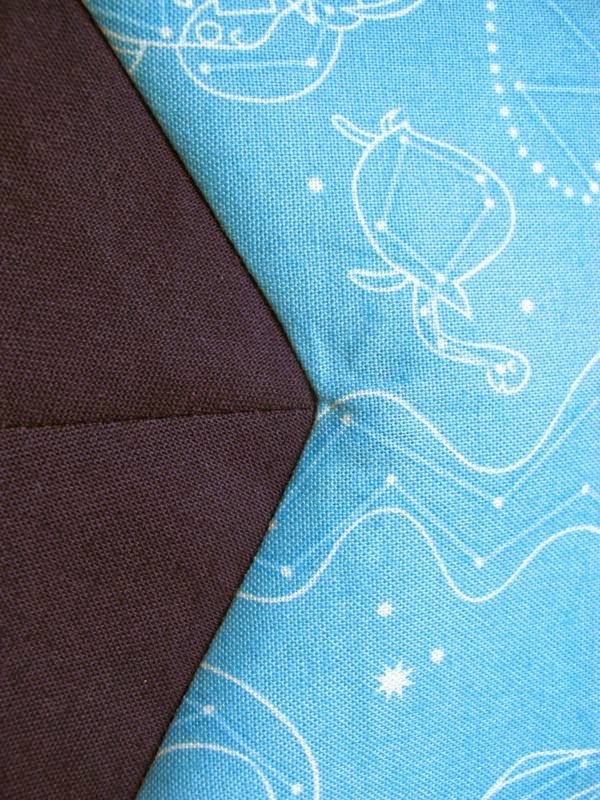
Now we’ll tackle the other kind of seam–where the seam of the Y’s tail is underneath, and you see the “V” part of the Y.
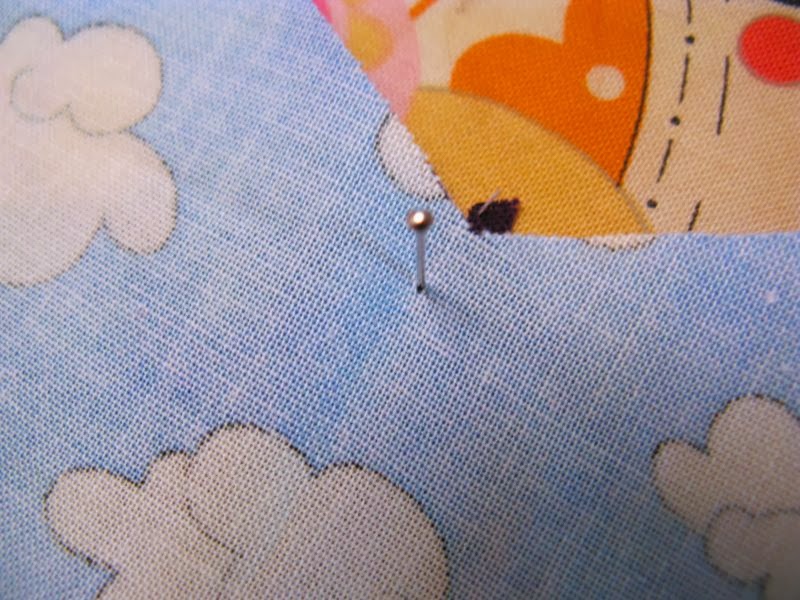
First locate the valley of the one-quarter-inch seamline and put a pin there.

Snip to within a couple of threads of the pin. Leaving the pin there insures that you won’t cut too far. If that happens, curse a little. You can sometime rescue the piece with a bit of fusible interfacing. Better to not cut too far. Half of the seam (1/8″) is all that’s needed.
Find the 1/4-inch peak of the seam below, and poke the pin in to anchor. You can leave in that center pin to hold it, and if you are afraid it will slip, it’s okay to put one pin on the backside. If you can, try to avoid that pin on the right. Again, the success of a Y-seam lays in the ability of the fabric to move and pivot.

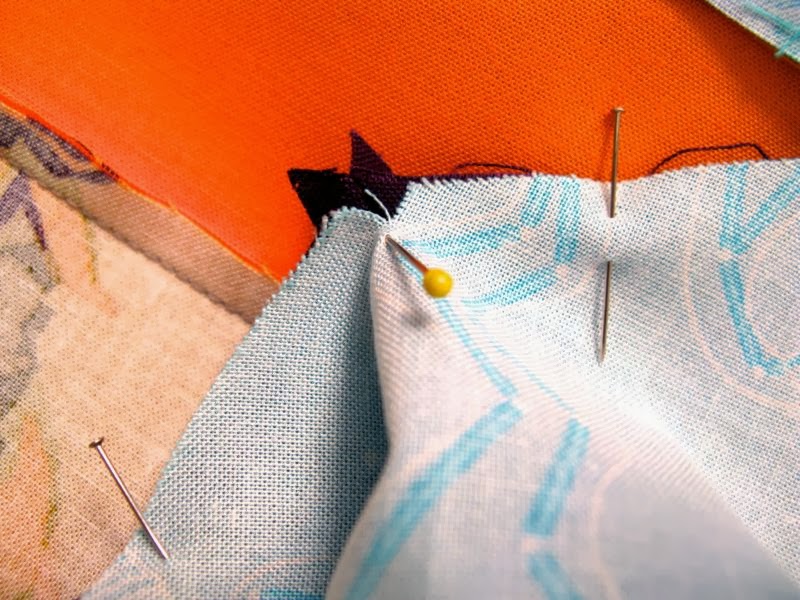
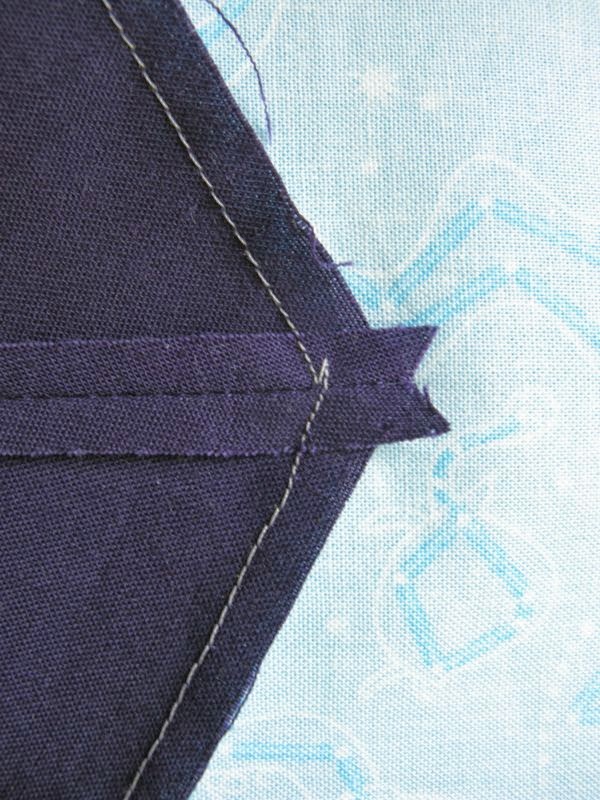
Just as in the first type of seam, start stitching from the left side of the seam, towards that center pin.
When you get to the pin, STOP with your needle down in the fabric. Remove the pin, then pivot the fabric so that you can match raw edges. Move the first seam out away from you, as you align the new sides. It may feel a bit bulky under your foot, but smooth any excess fabric out away from you.

Here you can see that I’ve pivoted, repinned the new raw edges together and am starting down the other side of the seam.

This is what it looks like from the back. That deep fold is the V part of the Y-seam.
The front. Give it light press. Resist the urge to saturate it with your pressing goo and mash it flat with your iron.
Sometimes your seam gets a little jig-jaggy. As long as it’s not too bad, it will be fine. I did the same kind of stitching process on this one: shorten your stitches as you approach the point, then lengthen them out on the other side.

A better point. All of these work fine in the quilt, because you haven’t a) stitched it to death, and b) murdered it with your iron.

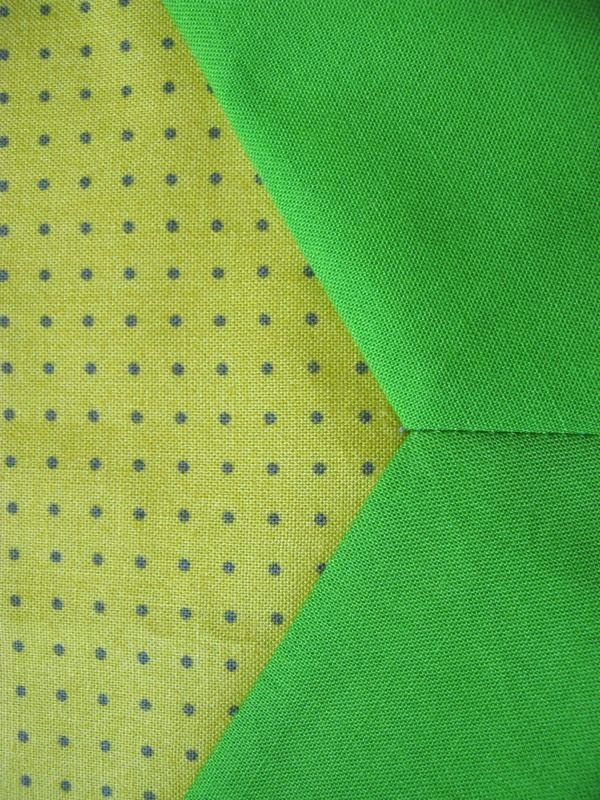
You can see one type of Y-seam where I joined the green roofs to the yellow houses. And you can see the other type where I joined the purple roofs to the sky.
Now you know all my dressmaker/quilter tricks: never be afraid of Y-seams again!
One more time, thanks to Leanne, of She Can Quilt, for hosting a series of guest tutorials for the Finish-A-Long Motivational Program. (Just kidding on the name of it, but it does help get those UFOs out of the closet and onto the bed. Or wall.)
