200 Quilts · FAL · Quilts

January’s Three Finishes–FAL

I’ve always wanted to say that I’ve had three finishes in one month.  Well, in my mind, I’ve had FIVE, but two of the tops (the wonky Christmas stars and the wonky Christmas log cabin) are at the quilter and won’t be back until next month, so technically the binding and label is all that remain (and I’ve already cut the bindings!).

4-in-art_3

The first (or third) is my art quilt for our Four-in-Art group, which has its reveal tomorrow.  I have to say I don’t think of myself as an artist, but instead, a creative person.  But like anything in life, when that deadline starts looming, all of a sudden I start getting ideas.  Tons, this time, but I only made one of those ideas.  See you tomorrow for that.

The second is Into the Woods, my autumn quilt (follow the link to see that).  And the third finish this month is Summer Treat.

Summer Treat

I started Summer Treat last summer.  I finished up the top, and it sat–like all good UFOs–but this one was all backed and pinned and ready for quilting.  When I saw that I had a few hours to myself yesterday, and realized I could say those magic words: “three finishes in one month,” I pulled it out and started quilting.

SummerTreatbinding

Then binding.

SummerTreat Quilt

And so here it is: Summer Treat.  This is #105 on my list of 200 quilts. (Yes, I know I need to get the list updated.)

Summer Treat detail1

Detail.  I stitched on either side of some of the rows and then diagonally on the side of the white Xs.

SummerTreatstitching

The backing and binding are the same fabric: some wild dots.

Summer Treat back

So, yay!  I’m putting this up on the Finish-A-Long Flickr photo-sharing site, hosted this year by Leanne.  I had resisted joining this group, but it’s been very good motivation to get some of these quilts finished up.

Update: Original Post showing all planned finishes is *here.*

FinishALong Button

WIP

WIP–Summer Treat Quilt Top

Many thanks to Rebecca, who is subbing for Lee at Freshly Pieced, for hosting our WIPs. Click on the link to be taken back over to that site to see others who are sharing their Works In Progress.

Summer Treat Quilt Top is done.  But it is still a work in progress, as now I have to decide borders.  I was visiting with my friend Tracy the other day, and we agreed that we go great guns on a quilt until we get the borders, then its hem and haw and puzzle and finally cut something out and slap it on. Kidding.  Sort of.  I suppose we all have that place where quilting is hard.

Get out your sunglasses.  Scrappy Stars came back from the quilter and I’m in the process of putting on the binding.  I’m still not sure about that name, but can’t think of a better one right now, so like those nicknames from childhood that some people get — like Bubba, or Winky or Elmo or Beezer —  it will probably stick.

I finished up Deb’s Far Flung Bee Blocks.  She’d asked for this block with a grey fabric as the contrast.  Since I’m generally a grey-fabric-hater, I had to really hunt for some grey fabric in my stash.  But I did! and sent these off at the beginning of August.  One of the “rules” of our Bee is that the fabrics come mostly from our stash, so it’s kind of a fun challenge as well to not rush out and buy something.

I also made some row markers, seen on my blog travels somewhere.  *Here’s another version* of them.

Buy yourself some floss bobbins-these little white plastic tab things found on the knitting/embroidery aisle at JoAnn’s.  I laid them out and put decorative washi tape on them, cutting in between each bobbin.

Wrap the tape around and smooth it down.  I wrote the numbers on the front and back of the row markers, and on the front I put an arrow to remind me which way to press my seams, as I’m one of those who presses her seams to the side, and can never remember  — when I’m assembling a quilt top — which way to press.

They work pretty well, I must say.

They kept out of the way when I was sewing the rows together.  Usually I’ve used a post-it note pinned to the quilt, but I’m converted to these now.

And last, here’s a gallery of some recent fabric purchases.  Most were from Long Beach, but that layout on the bottom left is from when a friend bought some Riley Blake — 15 bolts worth — so when my daughter was here we turned my dining room into a fabric shop, cutting and chatting and making plans.  That’s what I do when I see new fabric. I make plans.

Here’s hoping your quilting, cooking, end-of-summer, play plans all come to fruition, leaving you with lots of fun projects, good things to eat and a host of good memories.

Good Heart Quilters · Quilts

Good Heart Quilters — Summer Fun Day

I’m leading with this shot of a houses quilt, because this was the very first project our group, the Good Heart Quilters, had ever done together.  I designed all the houses on my QuiltPro quilt program, passed them out.  Leisa and I went shopping and bought two fabrics, and we passed them out.  The requirements: make eight houses all alike, using pieces of the two fabrics.  The trees were created by each individual quilter, as well as the setting.  When we met yesterday at Lisa’s house (a different one that the above Leisa), she was busy putting borders on everything and found this first quilt.  I was glad to see it again.

Our group has changed, shrunk, expanded and changed again, but the core members shown in this photo are me (2nd from left), Lisa (in bright green shirt) and Leisa (on far right).  JoDy is in the red-stripey shirt, Jean is next to Leisa on the right and our newest member is Carol, just moved here down from the mountains near our city.  Our first unofficial meeting was when Lisa was pregnant with her daughter when she helped us tie a quilt for my son.  Her daughter is now 15 1/2.

Here’s a slideshow of our day, with lots of finishes.  The blue quilts with all different patches is another one we did together, when we had about 12 members.  Lisa was “headed for the borders” all day long, getting things done.  I didn’t catch a photo of Carol’s finishes, but she was working on flannel rag quilts for charity–the local hospital, and you’ll see Karen working on her bargello quilt.

As usual, WordPress puts in ALL the photos from the post, so you’ll see the above two again as well.

This slideshow requires JavaScript.

I brought my Polaroid patches to show and one of Simone’s girls (soon-to-be-added member) asked me “What is a Polaroid?”  Gulp.  How do you explain the magic of what we saw when the picture would develop right before our eyes, rather than having to take film down to the drugstore?  These are young girls of the digital age, and the idea that it would take 5 minutes to get a photo is rather like us having to imagine hand-cranked ringer washers.  But she listened politely, and afterward had fun sorting through all the squares.

You’ll also see Lisa’s collection of EPP rose stars, and the other set of patches laid out is my Summer Treat quilt (click for the tutorial).  I hope to wrap that one up today, as well as work on my last two squares for the Far Flung Bee.  I’m still a little tired from yesterday, but it was a lovely day of quilting: our potluck was delicious (recipes are above under “Good Heart Quilters”), the quilting was fun and the company was divine!

Quick Quilt

Summer Treat Block Tutorial

This is an OPQuilt Quick Quilt, as the block (even with unpicking my mistake) took me about 1 hour. But I sew quickly.  Your actual time may vary.  (Aren’t I supposed to say this kind of stuff?)

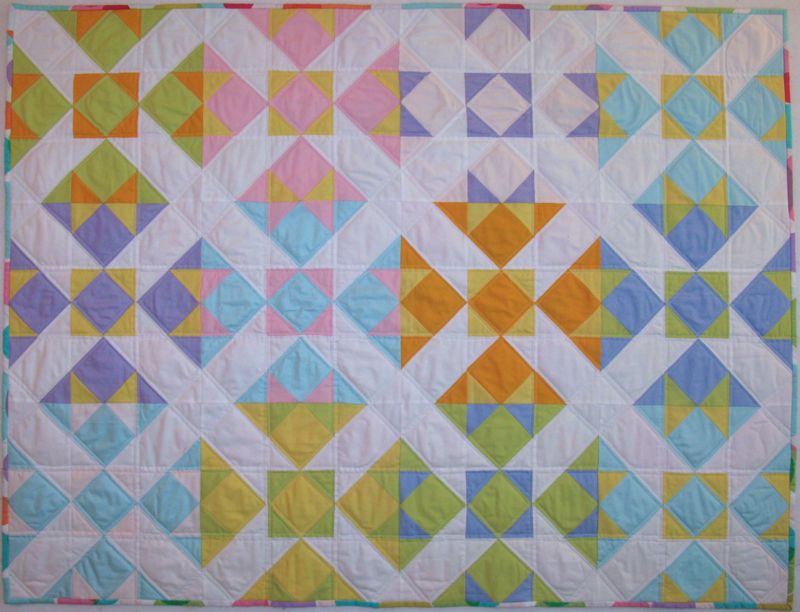
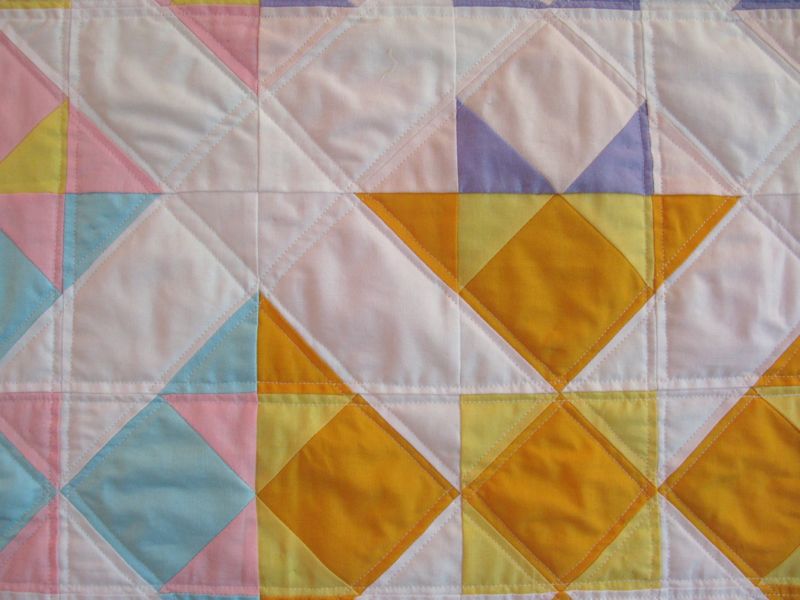
Each block has three colors: main color (color A), white (color B) and accent color (color C).
Cut 4-1/2″ squares–5 of color A (shown here as aqua)
Cut 4-1/2″ squares–4 of color B (shown here as white)
Cut 2-1/2″ squares–8 of color A (shown here as aqua)
Cut 2-1/2″ squares–12 of color B (shown here as white)
Cut 2-1/2″ squares–12 of color C (shown here as yellow)

Now ready, set, sew by propping up your sewing machine on door stoppers as the angle of your machine makes you less tired.  I learned this at a quilt show, which is why it’s always a good idea to take classes once in a while.  You can’t learn everything on the internet.

You need some way to mark the diagonal lines.  Of course, you can eyeball them, but if you’re like me, your straight-stitching skills go out the door.  This is called a Quick Quarter tool, and you can find it at JoAnn’s.  Often I’ll use a template with lines marked that affixes to the bed of the sewing machine, but I just went with this for one block.  That latter-not-shown gizmo is called “The Angler” and is worth every penny of the eight bucks it cost.

Align the outer edges of the small square with the large square and stitch just to the side of the pencil line, moving your needle towards the outer corner.

You can see it in this photo here.  My stitching line is not ON the pencil line, but towards the outside edge by a couple of threads.  This allows you room for the fold, and so it won’t distort the shape of this smaller unit in your block.

Sew on as many of these corners as you can, as it saves time to do a bunch of sewing, then a bunch of ironing/pressing, then a bunch of trimming.  But I’m sure you already knew that.

This is the part where you should turn off your music or that novel you are listening to, because you have to think CAREFULLY about what part should be cut off.  I remember it by placing the ruler over the part I want to preserve, then lining up my ruler.  I then cut 1/4″ away from that stitching line.

Yes, you are making a bunch of snowball blocks.

Keep trimming.  Love how the white looks pink.  But, it’s white.  After trimming, head to the ironing board and press the snowball corners away from the center of the larger square.

Unit #1 is done, all four of them.  Set them aside.  And yes, I press my seams to one side.  It’s not a gospel with me, this press-seams-open business, like it is with some modern quilters.  If it is with you, have at it.  I prefer them pressed to one side because I own several old quilts, and they are still sturdy  although worn, and I haven’t had to sew any seams back together from popping apart.  Since pressing to one side works for me, I’m sticking with it.  I believe the thinking it that they look “flatter.”  Judging from the appearance of my older, worn quilts, um . . . that’s really not an issue after a few years.

First corner is on, so lay out the next set of stitching.  I put the yellow square opposite on one of my squares, to remind me that only one has all four corners that are yellow.

Stitch, again staying a few threads to the outside edge of your pencil lines.  Chain stitch as many as you can together.  I found that by focusing on my end point and going a bit faster speed, my stitching line was straighter than if I obsessed about staying next to the pencil line.  Aim for a straight seam, as my college Clothing and Textiles professor used to say.

See that thread cutter on the back of the machine that you sometimes use?  Use it now, letting it cut your sewn units apart.  Quick! and easy.

Keep sewing. Keep trimming.  Keep pressing.  Repeat until all the snowball corners are on all the blocks.  Give these units another final press if you haven’t done so already.

Now eat your vegetables, by taking time to true up all the units.  I learned long ago that by truing up the inside units, there is less distortion in the final block (and usually I never have to true up those).  If you are a newbie quilter, it simply means to lay a ruler over your block/unit and trim off those slight edges that don’t belong.  I also take this time to get it back to “square” by checking the diagonal and making sure it runs from corner to corner.

All the units are trimmed up, and I laid them out next to my “pattern,” a print-out of the block.  Now sew the first row’s units together, then the middle, then the last row.

To make sure those intersections line up, stick a pin through them (top photo).

Straddle that pin on either side with two other pins, then remove the placeholder pin (bottom photo).  It shouldn’t shift now under the needle.

This is how I pressed my seams (seen from the back).  I like to be able to nestle the seams together by feel, so one has to go one way, and one has to go the other.  Now pin the rows together, then flip over the block and check them.

Otherwise, if you are like me and are talking to your mother and wishing her a Happy 84th Birthday, you’ll sew them all together incorrectly.  A nice block to be sure, but not the one I’m trying to make.  Unpick.  Re-stitch.  Then give it a good pressing.  How did I press these last seams?  Towards the middle.  Often a seam will make its will be known by how thick it is, or how many intersecting seams it has.  Just be consistent.  I do admit that if it’s a really pesky, lumpy intersection, I may press just that part of it open, leaving the rest of the seam pressed to one side.  Experiment, but remember you are making these quilts to last.  And last and last.

And that’s it!  Now make 11 more, throwing in a random darkish patch here and there to keep the eye moving and give it some interest.  Or not.

Happy Summer Sewing.  Now I’m off to figure out my gingham quilt!

Quilts

Cleaning Up the Study/Happy Memorial Day!

What my sewing study looked like at the end of the semester, after I’d posted grades.

Way leads on to way. . . getting worse.

Ahhhhh.

Before I exploded the room, I was working on a little quilt design for a quick summery treat.

Here’s the quilt.  It’s titled Summer Treat, but when I was working on it I called it Ice Cream Treat, as those colors look like you could lick them. I threw in a couple of purple triangles just to make things interesting, for I believe that every quilt should have a full range of lights-to-darks.  Just like any good photograph.

Here’s the block.  Since it’s a 12 inch block, this should go together quickly.  I’ll post some templates tomorrow and hopefully a shot of one of my refreshing Summer Treat blocks.  Now that my study’s all cleaned up, it’s time to pull out the fabrics and put that clean space to use.

Happy Memorial Day, or Decoration Day, as my mother calls it.  She and Dad have already started putting flowers on the graves of those relatives who have gone before, adding another one or two each year (everyone gets buried near them–kind of our psychic home away from home).  I appreciate that they honor the original meaning of the holiday, and it makes me think about my grandmothers and my one grandfather who I knew best.

We’ll be heading out to the main street near our house to cheer on thousands of motorcyclists for Rolling Thunder West Coast, an homage to Rolling Thunder, East Coast.  We saw that one when we lived in DC–so many bikes came over that bridge on their way past Lincoln’s Memorial and on to the Mall.  Last year for West Coast Rolling Thunder we had about 4,000 bikers and I waved my little American flag and hollered.  It was great.

Barbeque for us?  Maybe.  Or maybe we’ll just go out for a burger and let others do the grilling for us.  But I’ve already picked up the strawberries for our Summer Strawberry Cake (recipe on my cooking blog).  That’s they beauty of all the children grown–life’s a bit more flexible around the edges.  And of course–some sewing in my nice clean study.

Happy Memorial Day!