That’s all–a giveaway of zippers from Zipperstop, USA recipients only, no international. I’ll choose two winners, one from this blog and one from Instagram, so leave a comment in both places to get two chances.
[Backstory: I had a change-up of an order from my regular zipper people: Zipperstop. I have been doing business with them for years, and love dealing with them, not only for their prices, but also to call and hear the essence of New York City on the phone. (I especially like their YKK #3 assortment, and you can specify the colors.)
So, instead of returning the zippers to them they said I could do a giveaway, so here it is–these are perfect for those Christmas projects you are starting to crank out. These are all 18″ YKK zippers.]
Leave a comment to be entered in the drawing. I’ll close this on Thursday morning, November 30th; I’ll choose the group for you.
Giveaway is now closed.
Congratulations to Susan S.! I’ll be in touch to get those mailed out to you.
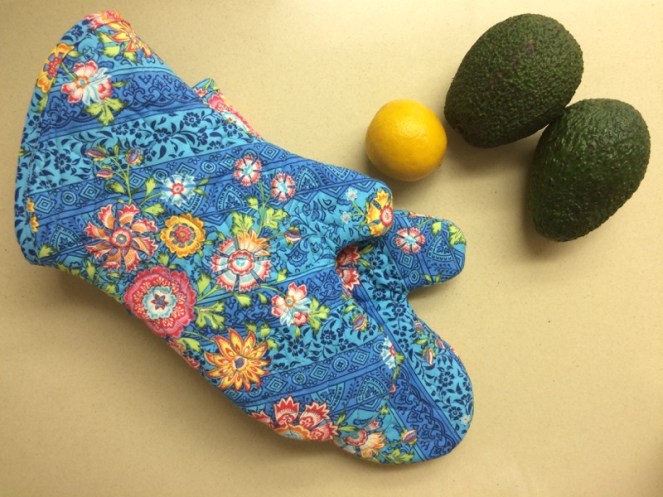
It was time. When I last made hot mitts, it was 2013 and now, many hot pans later, I was in desperate need of new hot mitts. Scary picture of old mitts, below.
I made it really small so you wouldn’t faint.
DON’T DOWNLOAD THIS for pattern!
So I looked up my tutorial about when I first made these oven hot mitts. I printed out the pattern at 100%, checking that picture of the ruler to make sure it matched 1″ on a real-life ruler. I taped the two parts together (shown above…again DON’T use that photo as your pattern!–refer to the tutorial), and set them aside.. Layer up the fabrics, according to the directions in that original post.
I chose my thread, using a variegated So Fine for the Amy Butler floral, and quilted the fabric layers together by just scribbling and swirling all over it. I’ve also used my walking foot and done straight lines. It really doesn’t matter what you do; just get those layers secured together.
I cut out enough for two mitts: that’s four hand-shaped pieces. Remember to reverse the pattern when cutting a pair (as shown in the top photo). Then it was make bias binding time.
I followed the instructions, as before (old picture, above), but if you need a more detailed refresher on how to make bias tape, head here, to the Dritz website.. (Or download their PDF file here, if that link doesn’t work: dritz-tutorial-how-use-bias-tape-maker)
I now have some handy-dandy new hot mitts. Reminder: they are a little big until you wash them a couple of times. I built in that shrinkage to the pattern.
Mitts in action. Recipe is my go-to Summer Pasta Salad, found on ElizabethCooks.com, my recipe blog (see below).
Now I can cook in style.
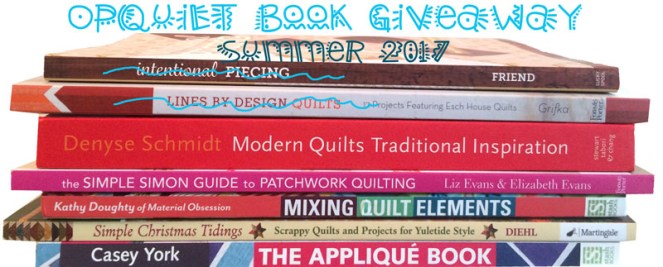
The ongoing OPQuilt Summer Book Giveaway is still going on: you get a new book and I get more shelf space in my sewing room.
Here’s the total stack of books I’m giving away. The first two titles are lined out as they are all finished, and next up is the Denyse Schmidt book. I’ll let this one run until August 3rd, and will notify the winner by email. I’m letting you know what is coming up so you can either enter all the giveaways, or just the one you want. I’m still very happy to receive your comments, though! This week’s Intentional Piecing has been given, in accordance with the strict rules of the Husband Random Number Generator, to Andrea in Florida.
The penultimate Four-in-Art reveal for 2017 is coming up on Tuesday, with the Challenge of Stained Glass. Join us all then to see the quilts our group makes.
Leave me a comment below to enter the giveaway for this week.
(Yes. Lower case title, just to reclaim some of my quirkiness.)
I recently posted about taking a break from the creative world, from the quilty world, from whatever and while I was gone, I had some to time to think about how I’d gotten to that non-creative place.
I’d say, for me it was a factor of four: Time, Health, and Mental/Physical Fatigue, as well as a Too Much to Do. My Dad used to say “Too many irons in the fire put out the flame.” While a reference to the bars of iron that blacksmiths use, I did have too much going on.
I was intrigued with the idea of Creative Block, and one article “7 Types of Creative Block and What to Do About Them,” from my favorite place online (99U) discussed this issue, that apparently is a very-much-real thing. In that piece, I liked the sub-topic of Work habits that don’t work, as I have been struggling to (re)learn three new computer programs: EQ7 (I learn it, then forget it, and there’s so many hurdles with the design of this software…but then that’s another post), Affinity Photo (to replace Photoshop) and Affinity Designer (to replace Illustrator). Three more irons in that proverbial fire.
99U’s advice to “[s]tep back and take a good look at how you’re working, and where the pain points are….If you don’t have enough energy, are you working at the right time of day? If you feel paralyzed by freedom, introduce more structure and order into your day. If you feel constrained by routine, find room for improvisation” felt like it was just for me.
I always love the Brain Pickings articles, and the review on a book from Danielle Krysa (Creative Block: Get Unstuck, Discover New Ideas. Advice & Projects from 50 Successful Artists) seems to hit some of those stuck spots:
Jessica Bell noted that “When I can’t make progress, it is often because I am mentally scattered; this happens when I am overcommitted or have a schedule without any breathing room in it. I have to have a lot of space and quiet in my head to think my best thoughts. An artist I admire told me a few years ago that “you can’t make art in the cracks.” Carving out a block of time devoted to nothing else but the pursuit of new work has never steered me wrong.”
So, Miss Gasoline Station stepped aside and made space for some creative time. I’ll be posting a few projects in the next post, but since it’s summer and it’s time to play, it’s good to keep a balance between working and quilting and cooking and playing and family and friends…
Eastmond Family Reunion, atop Brian Head Peak (11,000+ feet)
Thanks to all of you who wrote and left comments on my last post. We headed out that day for a family reunion and I left the keyboard behind, but I read them all and appreciated your encouragement. I’m slipping back into the creative life, one stitch at a time.
The block of granite which was an obstacle in the pathway of the weak becomes a stepping stone in the pathway of the strong. –Thomas Carlyle
Each is given a bag of tools,
A shapeless mass and a book of rules;
And each must make, ere life is flown,
A stumbling block or a stepping stone.
–R. L. Sharpe
Because who knows what might spur your creativity, I’ve got some books to give away. If what I’m giving away (this will go on, erratically, for several posts) tickles your fancy or appeals to you in some way, if you leave a comment, please let me know you’d like to enter the giveaway. Some of the books are ones I’ve purchased and read, and no longer need; others were publisher giveaways at Quilt Market, and it’s time to pass them on.
The first one is Lines by Design by Debbie Grifka, a lovely book on how to make elegant modern quilts. Good luck! Giveaway will close in a few days and I’ll contact the winner by email and get it sent out.
Welcome to Day 4 of the Patriotic Palette Blog Hop, hosted by Paintbrush Studios and Painter’s Palette Solids!
Red, White, and Blue Star • Quilt #183
25″ square, made from Painter’s Palette Solids
A couple of weeks ago, the fine people who make Painter’s Palette Solids sent me some fabric and asked if I would make something. At the end of this post, there is a giveaway so you can win your own stack of red, white and blue fabrics.
I’m part of a series of posts showing items you can make with just three reds, three blues and some white. Here is the complete list and the days that they are presenting:
The project I chose was a quick and easy mini-quilt, which finishes at 25″ square, and is perfect for a table top when you want to give a little patriotic flare to the kitchen. I’ve written up a free pattern, available in my Craftsy shop for download (see button to the right), but the instructions are here if you need any tips and help with construction.
I was sent fat quarters in three shades of red, three shades of blue and a fat quarter of white. The white needs special cutting: cut the long borders first (see chart on pattern), then the squares for the half-square triangles. You may have enough the other way, but do it this way to be safe. I also was tight on the medium blue, as I used it for the binding, too. You’ll need to provide your own backing (about 3/4 yard, or pieced scraps).
I basically constructed this as a nine-patch, a favorite thing of mine to do with minis. I started by sewing four bright red triangles on the edges of the blue square, then pressed them all away from the center. I squared this unit to 7 1/2″. (This quilt is forgiving if yours is slightly smaller.) I squared all my nine units to the same 7 1/2″ as then I wouldn’t have to square up (or true up, depending on how you refer to it) the finished quilt top.
Next was the construction on this corner, sewing the medium and dark red triangles together to make a square, then sewing on the dark blue triangles to make a larger triangle.
Sew on the medium blue triangle to make it a square; true it up to 7-1/2″ inches.
Now make the rest of the blocks: sew the triangles together as shown, then seam those together to make a square. I always press to the side, if you are wondering. Only rarely do I press open, so avoid that.
Lay out all your squares (as shown above, left), then sew them together like a nine-patch (upper right). Measure the square; the sides should measure 21-1/2″. Trim your long white border rectangles to measure. Sew the darkest red blocks on each of two of the white rectangle borders.
Sew two white borders: one on top of the quilt and one of the bottom. Press. Then sew on the borders with the squares attached; press. Admire your quilt top.
Let’s get quilting!
Here’s a picture of the quilt in the sunshine, showing my quilting stitches. I always have the hardest time coming up with what to quilt where; yours may vary. The “bandstand swag” arcs on the outside were a happy accident.
This was all done on my Sweet Sixteen machine, but that functions like a domestic sewing machine. I did do ruler work (which is probably easier on my machine than a domestic) but it can be done on your regular sewing machine. Just make sure you have a thick enough hopping foot and thick rulers designed for this task (not your cutting rulers!); put grippy stuff on the bottom of your rulers, as you’ll use them to help you move the fabric under your needle.
Happy Fourth of July!
If you haven’t heard me tell you about Painter’s Palette Solids, made by Paintbrush Studio, you must be a new reader. It is my FAVORITE solid: it’s easy to work with, has a nice hand, deals well when I need to unpick and re-stitch (I had to do that with the quilting, but you can’t see it, right?). It’s a fairly new fabric to the market, but many brick-and-mortar shops, as well as online shops, are starting to carry it.
As is my custom when sewing for Painter’s Palette, I give away my scraps when I finish a project, so that some fortunate quilter can give this fabric a try. BUT! Paintbrush Studios has generously offered up a stack of the fabrics I used in this quilt — seven fat quarters — so you can make your own (giveaway is for domestic/US only).
To enter, leave me a comment telling me if you like fireworks, and why (or your most memorable). I’m not talking the little things that are lit up down on street level, but those glorious bursting displays of color and light. It will get us all in the mood for Independence Day.
I’ll activate the Husband Random Number Generator and pick a winner, to be contacted by email.
Giveaway closed. Winner has been notified and will be announced in next post. Thank you all!


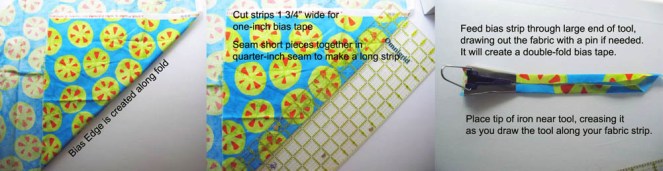 I followed the instructions, as before (old picture, above), but if you need a more detailed refresher on how to make bias tape, head here, to the


 The block of granite which was an obstacle in the pathway of the weak becomes a stepping stone in the pathway of the strong. –Thomas Carlyle


