Free Quilt Pattern · Gridsters · Quilt Bee · This-and-That

Wonky Hearts Aflutter

Wonky Hearts_7

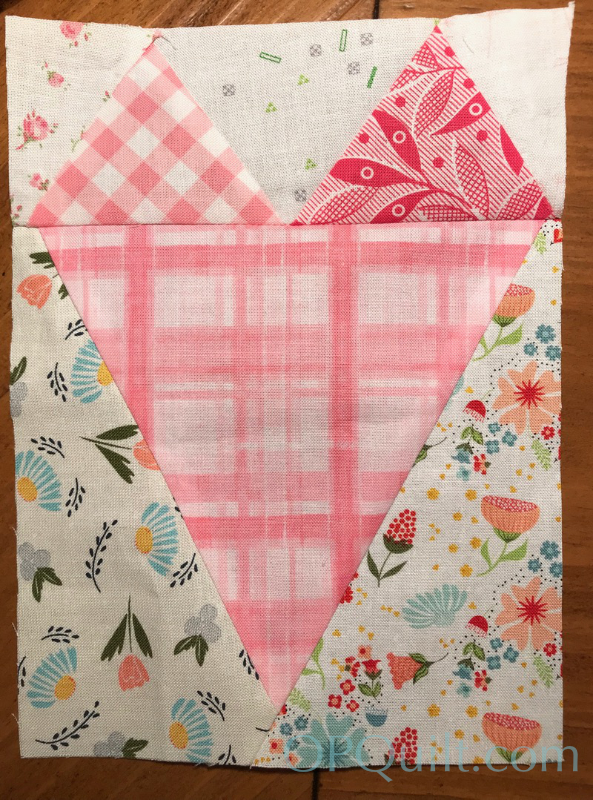
How do I make nearly 60 wonky, improv-y hearts and not go crazy? Now there’s a challenge.

Wonky Heart Illustration

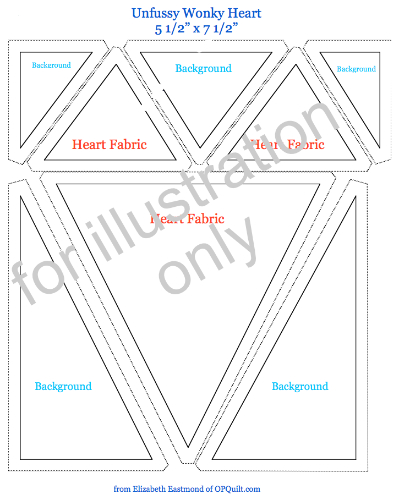
I started here, with a rough pattern of how big I wanted my “improv” wonky heart to be. The free PDF file is available for download.  It finishes roughly at 5 1/2″ wide by 7 1/2″ tall.

Click here: Unfussy Wonky Heart

Wonky Hearts_2

I started with the heart pieces. I layered up seven pieces of different pink and red fabrics, pinned on the heart pieces and placing my ruler along their outer edge, I cut around them with a rotary cutter: it wouldn’t really matter if I was hyper-accurate…close enough would do.  I repeated this nine times.

Wonky Hearts_2a

Then I did the same thing with the background pieces, but was careful with my directional fabrics: I kept the pieces oriented as they would sew into the heart block.

Wonky Hearts_1

Everything’s stacked up.

Word Quilt in Process
These photos were taken over two weeks’ time, as I tried to fit all the words together. Words were made in The Spelling Bee, from 2016.

I shuffled the fabrics so no two fabrics would be together, and made a sample heart (at the top of the post). I pinned it next to the quilt of words I’d been working on, closed up the machine, turned off the iron, and enjoyed the sunset:

Sunset July 2019

Word Quilt Mock-up

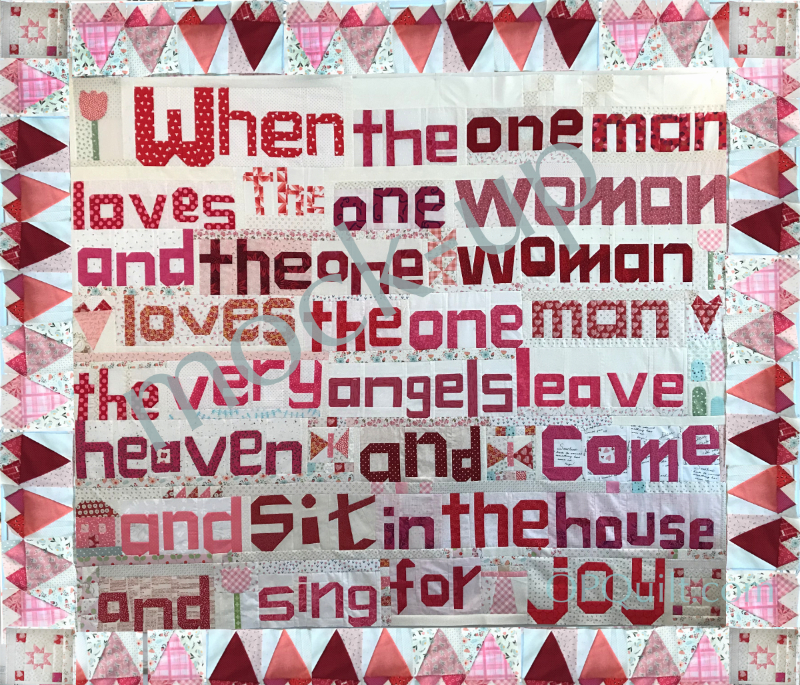
When I woke up in the morning, I decided to try a digital mock-up of the quilt with the hearts as a border, as I wondered if the hearts were too big.  I sent the photo to my two of my quilting buddies and they gave me two thumbs’ up.  I’ll probably try to sneak in a narrow red/pink border between the quilt center and the outer border of hearts.


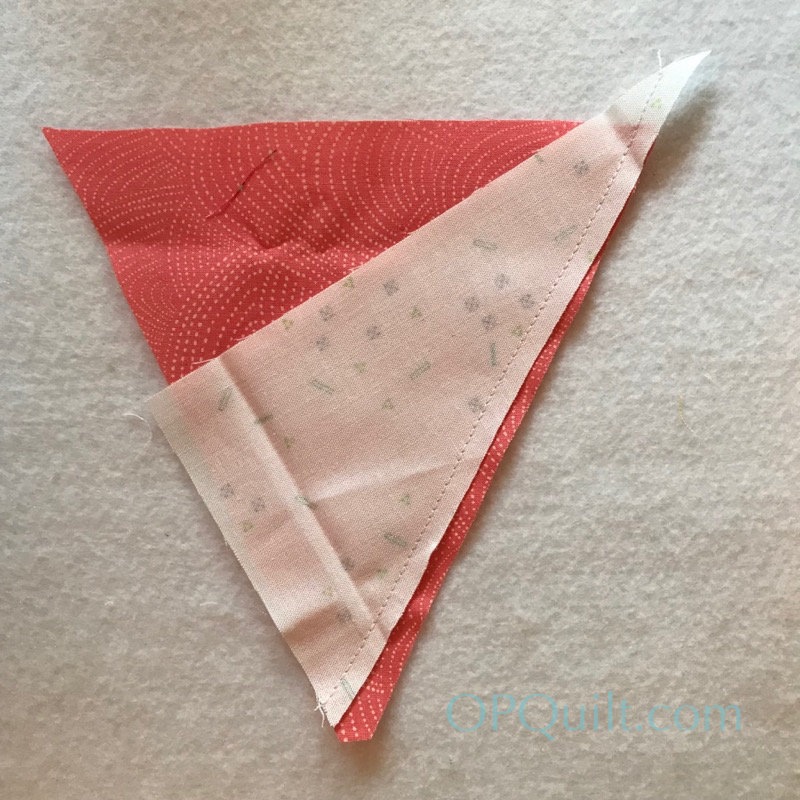
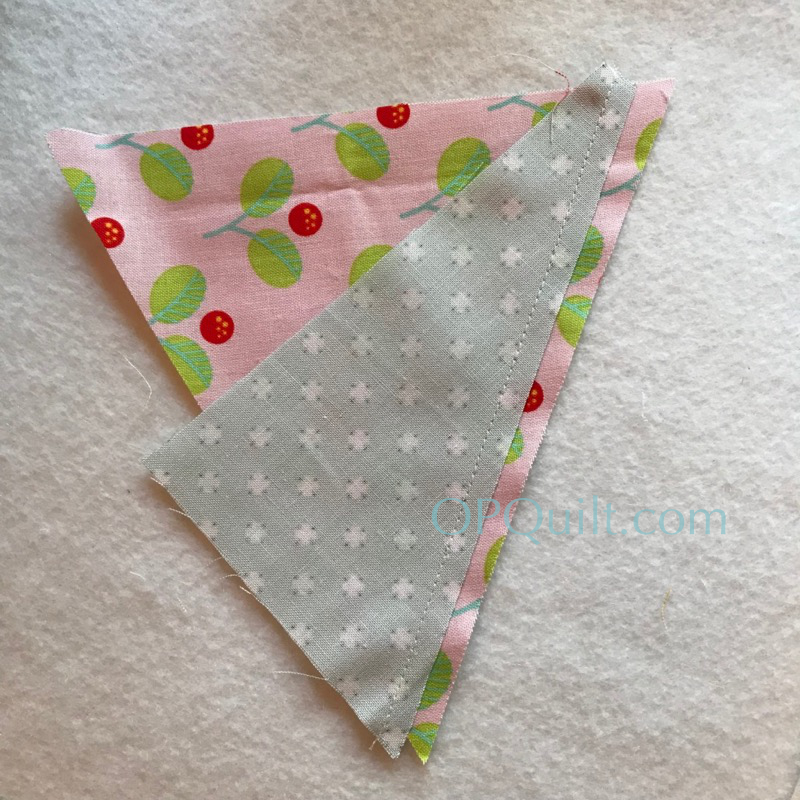
I’ve become braver about being wonky and improv-like, skewing seams, overlapping, cutting off points, generally going at it easy, instead of pristine.

Wonky Hearts_5

I have a few more hearts, now, and while the widths vary from 5 1/4″ to 5 1/2″ (I just trim them where it feels right), I’m forcing them to 7 1/2″ tall (that’s before seaming).  Because I am tired of cutting off the points, I’ll now be cutting about 1/2″ off the bottom heart section before I seam it to the top part.

This is one of two long-term UFOs that haunt me in my dreams.  The other one is Small World, which I keep in parts in a basket in my shelves.  I do have hopes on finishing that one, too.  I signed up for a Jen Kingwell class at Road to California in January; I suppose one goal would be to have it finished so she could sign it?  Right.

July Gridsters Block 2019

In other sewing news, I finished July’s Gridster Bee blocks for my beemate Linda and sent them off.


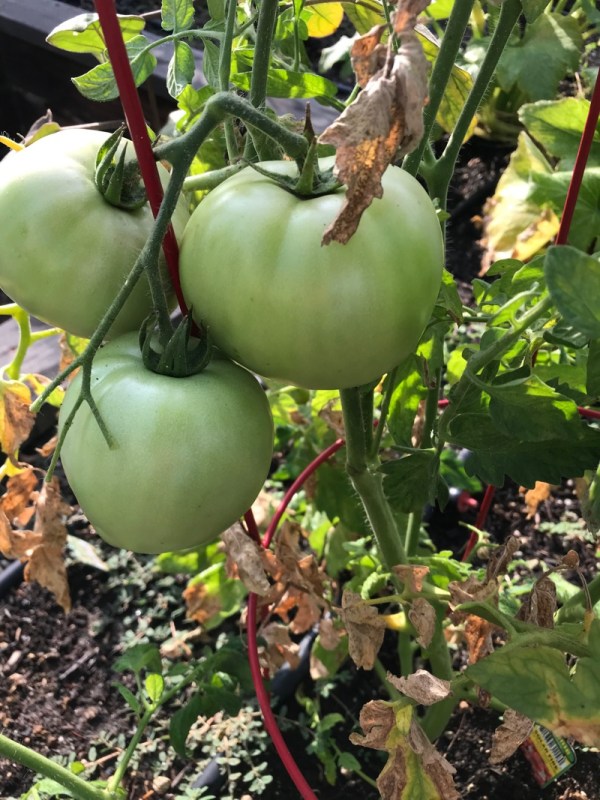
And I’m trying this new type of tomato, developed for scorching temperatures.  This year we were almost chilly and foggy until June, then the temps shot up high.  I haven’t had good luck with my garden in three years, after a stunning first year of beginner’s luck.  But hope is a thing with feathers, said Emily Dickensen, or my case, tomatoes.


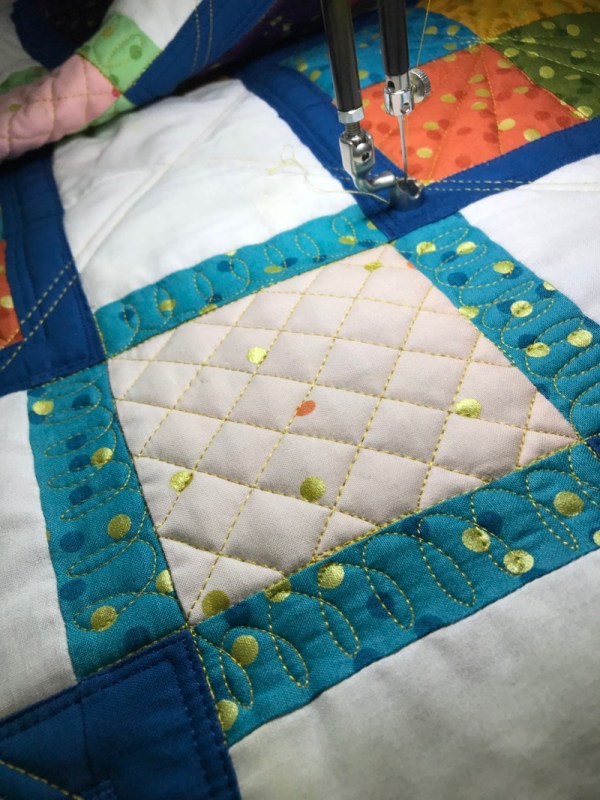
I’ve also started quilting City Streets, a quilt of my own design.

Quilting City Streets_5

I’d picked up this Magnifico-cousin (same type of thread) when I visited Superior Threads last time.  It’s color 101, and it looks like a gold thread, but isn’t a metallic thread:

Quilting City Streets_4

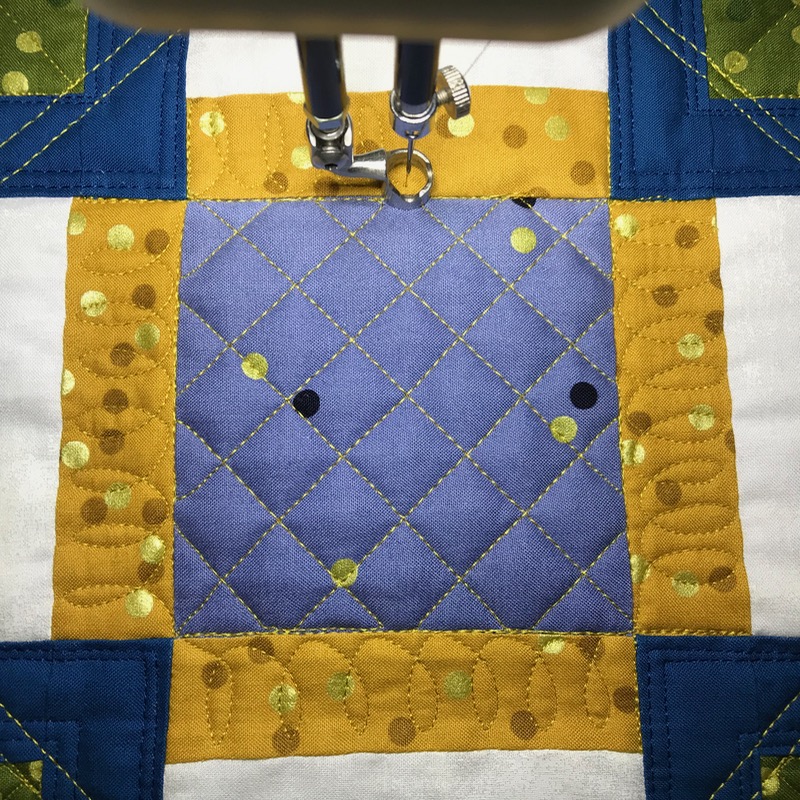
I hope I don’t run out before I finish this quilt.

Random Quilter

Finally, in my discussion about how the internet irritated me, I read a ton of blogs, some of which I can’t quite remember.  But I did take a screen shot of this gem, a featured quilter on a truly dedicated quilter’s blog. (Given what he says about his favorite fabric color, I don’t think he would like my gold thread.)  However, I leave you with the hope that you, too, have started quilting several times, as well as the ability to make the quilts in your head.


Free Quilt Pattern · Quick Quilt · Quilts

Bee Happy QAL Progress • June 2019

BeeHappy_June_1
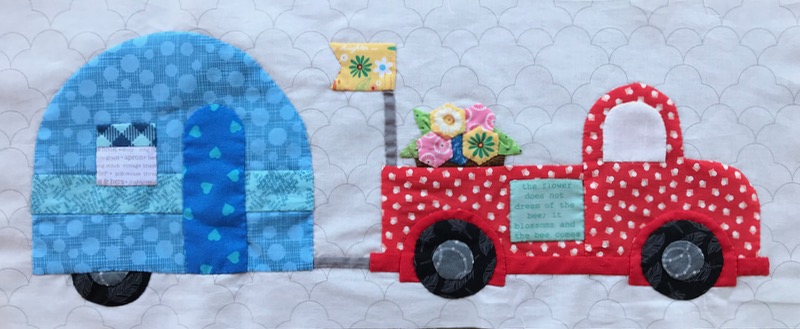
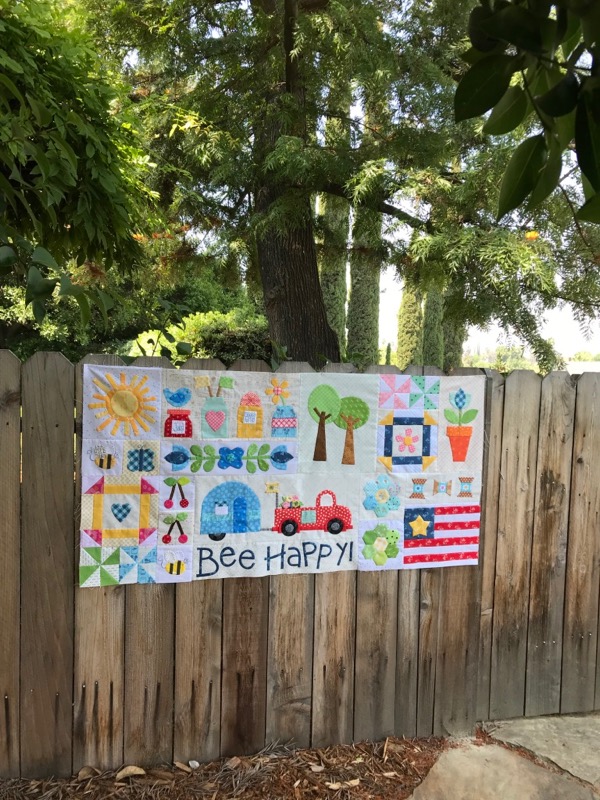
The wheeled devices in the So Very Cute Project I  lost my mind and decided to do are completed.  It’s nice to see it before it goes to a Time Out in my closet, so I can get some Real Quilting Work done.

But before I tell you about the basket of flowers in the back of the truck, you need this chart from Whip Stitch:

WhipStitch Bias Tape Cutting Guide

Head to her website to read all about it, or download it here.  Trust me, you’ll want this, as the weensy little instructions with the Clover bias tape makers will drive you batty.

BeeHappySewAlong Logo.png

This is Lori Holt’s logo for this delightful project.  Notice the dog in the back of the truck.

BeeHappy_June_2

Notice how the people who live in my quilt realized that they needed the space in the back of the truck for hauling baskets of flowers.

Make 1/2″ mini-hexies for the flowers, fussy-cutting a couple. Cover some triangles, sized in relation to the flowers, then give each a pleat in the lower edge before sewing them on.  I used three “leaves” and five flowers.  I used the lower edge of piece D8 as a pattern for the basket, then turned it upside-down to get the wider edge at the top.

BeeHappy_June_3

It is really dense in that section, with the layering of fabric.  I’m one who cuts away from the back whatever I can to lighten it up for quilting:

BeeHappy_June_6
one more wheel to cut out
BeeHappy_June_7

The Guidesheet for this week can be found in the tab above, Bee Happy Tutorial Sheets, under Projects for 2020.
See you later, Bee Happy-Sew-Along-gator!

LadybirdQuilt_June13

I’m still working on this quilt, which I call Ladybird, because it reminds me of a ladybird beetle (sometimes called a Ladybug).

IMG_E6529

I finished the first book (long, but good) and am now onto another:

SAVE ME THE PLUMS -- cover
IMG_6832

And this happened. Yes, no more PT. Now I’m getting ready for my project for tomorrow, Flag Day, the day when we find our rolled up flags in the front hall closet, and hang them out front, a prelude to the month of July, when it’s all red-white-blue all the time.

Betsys Creation Wallhanging

Okay, my wannabe flag quilt morphed into this flag-like wall hanging.  I say flag-like, because I read one Instagrammer say that she had to make another less flag-looking quilt because her family didn’t want to lay hers on the ground for picnics.

Flag wall hanging
Another version

I opened up my QuiltPro program, guessed out the proportions and figured it out.  There is no pattern in my worksheet, because I do assume that you’ll figure out how to make this, if you really want to.  Again, if either of my arrangements bother you, make one that you like.  I was inspired by a lot of what I saw on this post from Quilt Inspiration, where you can find lots of free flag and flag-like quilts for your patriotric needs.

BetsysCreation_Illustration.png

Here’s my worksheet, with all the dimensions, in a downloadable PDF file:
Betsy’s Creation_OPQuilt I named it after the original creator of the flag: Betsy Ross.

Happy Flag Day!!

Vintage Flags.png
Free Quilt Pattern · Gridsters

Scrappy Radiant Star

scrappy radiant star_1

Mary, of NeedledMom, chose this block for her June turn as Queen Bee of the Gridsters.  Originally found on Wombat Quilts website as a free illustration, I redrew the block to Mary’s specified 6-inch (finished) size.  Four of these blocks are put together to make Mary’s larger 12-inch block.

scrappy radiant star_2

Scrappy Radiant Star Illustration

Click on the download PDF file here:

Scrappy Radiant Star

You’ll need four copies to make one 12-inch block, as shown below:

scrappy radiant star_4
sketch I made to keep the colors organized

Notice there are FIVE colors per Mary’s larger block.  Four corners have the same color, which when sewn together make that center star.  But in looking at the way she designed it, the colors are to be distributed throughout the quilt.  You can see her initial thinking about this version on this blog post (where you’ll also get a glimpse into her gardens and cooking.  I love reading her blog).

Peek Marys Chart
Just a peek–download below.

Mary gave me permission to post the chart she drew up to keep her ideas straight.  You can download this as a PDF:Mary’s Chart_ June Gridster Bee

You can see that she’s diagrammed the main stars (in the center), and the secondary stars in the corners.  We Gridsters each chose two blocks, identifying our choices using her coding on the sides and are now sending them to her.

scrappy radiant star_5

To further my tributes to Mary today, I’m making her bread recipe to go with my version of Italian Wedding Soup.

Have fun making these blocks!

EPP · Free Quilt Pattern · Quilts

EPPing again with French General

Sometime ago, I glimpsed this quilt in an Instagram feed:

The description says it’s from the North Country of England, so I’ve taken to calling it the North Country Patchwork Quilt.  The more I looked at it, the more I liked how those red squares just kind of blended into the background on the outer rings, but floated over the foreground in the middle.

I tried to convince my husband to buy it.  That was funny, as he made some comment about didn’t we have enough quilts?  Seriously, he’s nearly perfect, but in the end, I decided to go ahead and make it.

too much to do.jpeg

Because I sure need another project.

But the project I need is a hand project, really–one that can be toted around in the car.  I finished my hexies project, and I finished (thankfully) my millefiore quilt, so now what am I going to do on long car rides?  Just sit there?

Car from the past.jpg

So I drew up the block, working between two different pieces of software: QuiltPro and Affinity Designer, and have created this pattern (click on the following link for free PDF file): North Country Patchwork Quilt

This quilt has 624 pieces in it, and if you divide that by four, you’d have to print out gazillions of the pattern page. So here are my tips for making that go more quickly:

Print off several of the free North Country Patchwork Quilt page.  Like 10.

Stack each printed page with about 4-5 plain pieces of paper.  Staple them together inside the pieces, as shown on the left.

Cut them apart in chunks, like the image on the right, using an old rotary cutter that you’ve dedicated to paper; or, a guillotine paper cutter; or, your paper scissors.

Then further cut them into the individual shapes: a honeycomb and a square.  Remove the staples.

That ought to get you started. No, I didn’t use cardstock, but I had some 24 lb printing paper that I used.  And yes, I’m gluing the fabric to these pieces of paper.   I used this paper when I did my Shine EPP quilt (most blocks are free on this blog) and it worked out just fine.  Repeat this process as you need to.

vivelafrance-hyb-fan_1.jpg

I’m going to vary from the fabrics in the original quilt, as I fell in love with this Vive La France line of fabrics from French General.  I’m over the moon for those dusky blues and strong reds.

I worked out some variations of this quilt in QuiltPro software, and they vary by how much of a border is around the central rectangle.  Here they are:

I also had some fun with putting the blocks in more contemporary colors (lower left), but decided I didn’t like that version.  The top three are sort of in the colors of the original quilt and it looks like to me, it was someone who was making do with cast-offs from her household clothing, as well as men’s shirtings.  But I’m anxious to get going and trying this out in the Vive La France fabrics.

I have no idea how I’m going to sew this together, but I will be concentrating on those arms that come into an X, and somehow I’ll do the red square.

Lastly, a reminder to pre-wash your fabrics: working with reds can be tricky.

three-year calendar.png

See you in a couple years!