EPP · Shine: The Circles Quilt

Circles Block #10–EPP Sew-A-Long


Circles EPP Button

Circles Block Ten_OPQuilt
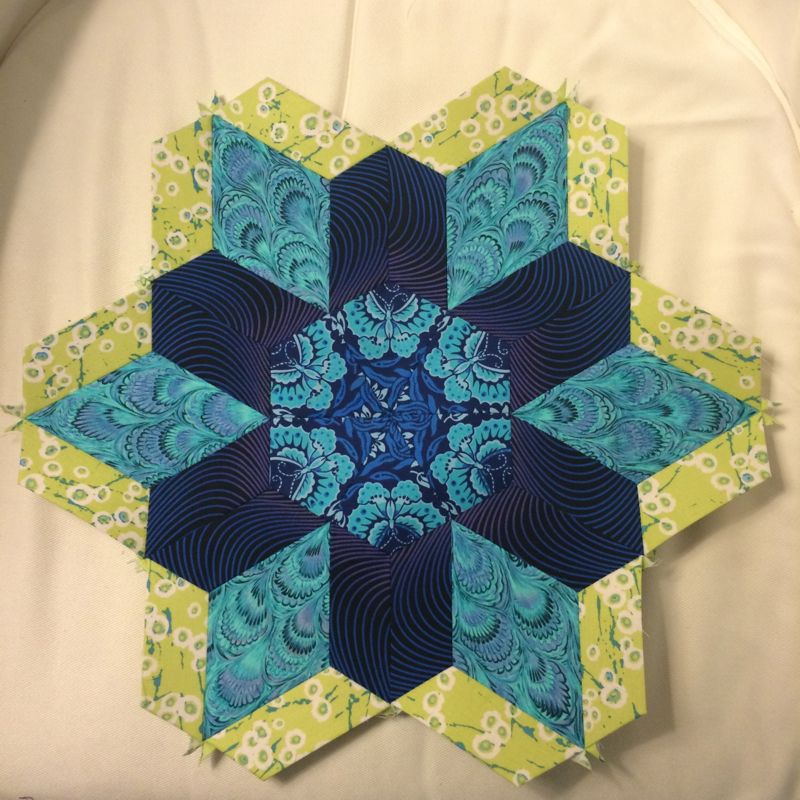
Dresden Plate, Rainbow Style — Circles Block #10

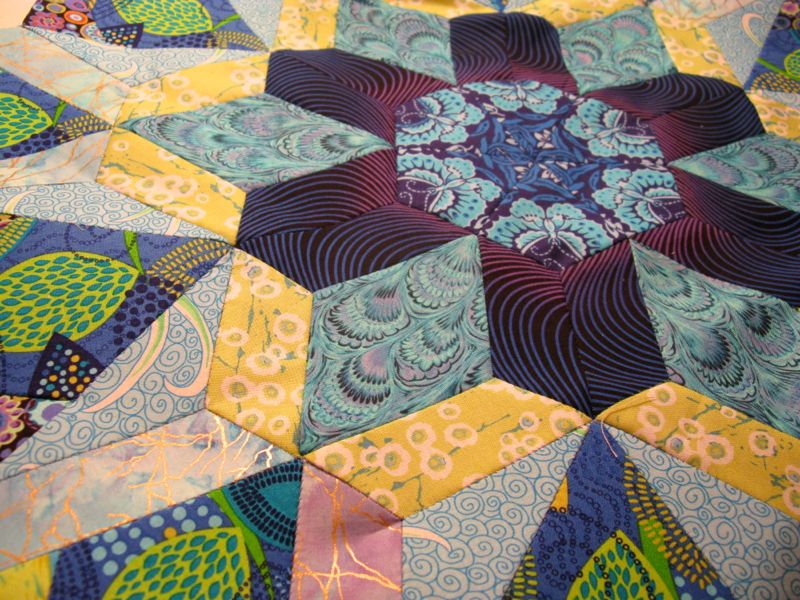
Here we are again, with block ten of the dozen or so blocks I have planned for this series, and I have to say it’s one of my favorites.

On Kitchen Cupboard

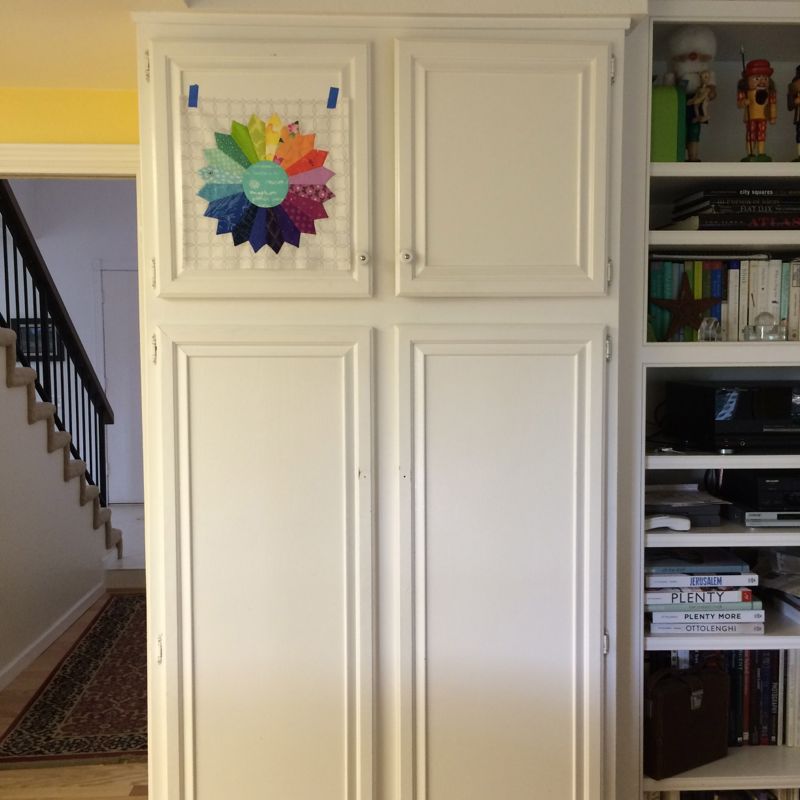
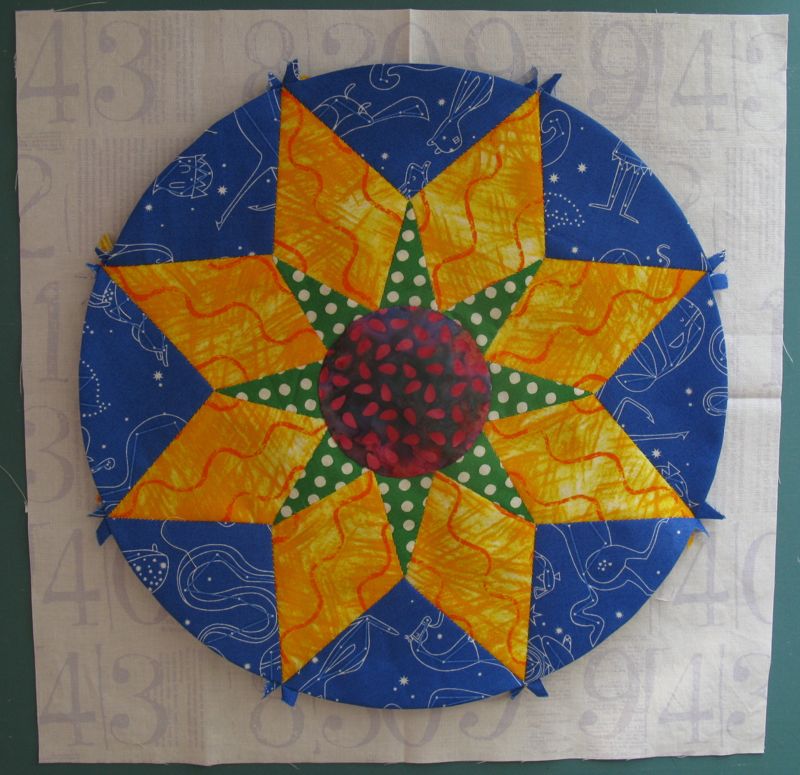
In fact I liked it so well, I taped it to my kitchen cupboard, where I can enjoy it.  My husband says it looks like a winking smiley face.  I just see a rainbow.

Circles Block Ten _Dresden

The free patterns are now returning (I did not do a Red, White & Blue version).  Again, I request that you not distribute them, but send people here to this website to get them.  Click to download a PDF file: 

SHINE Block 10 pattern_opquilt

Please remember to set your printer settings to 100% and check the little scale square included on the pattern.  It should measure 1″ in size. Illustrations below are with the OLD version of the pattern, so it may vary from what’s included now.

Cut Pieces Laid out

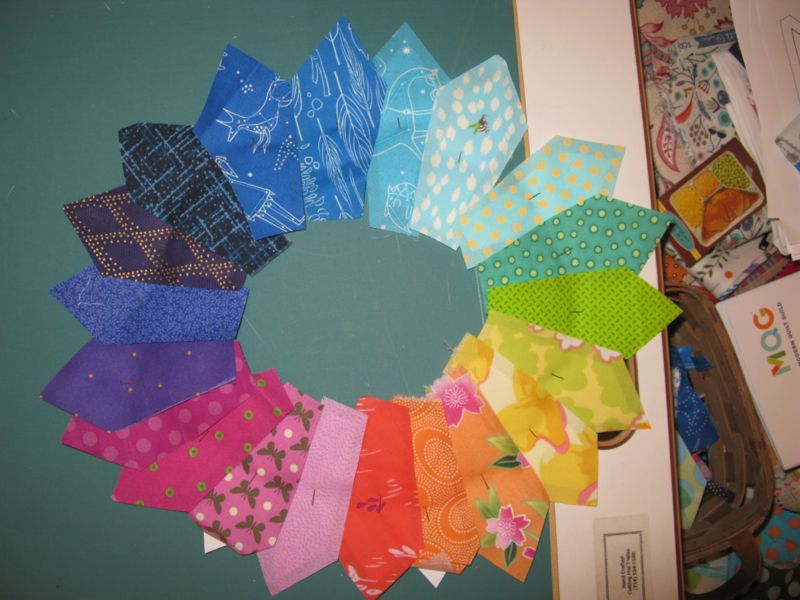
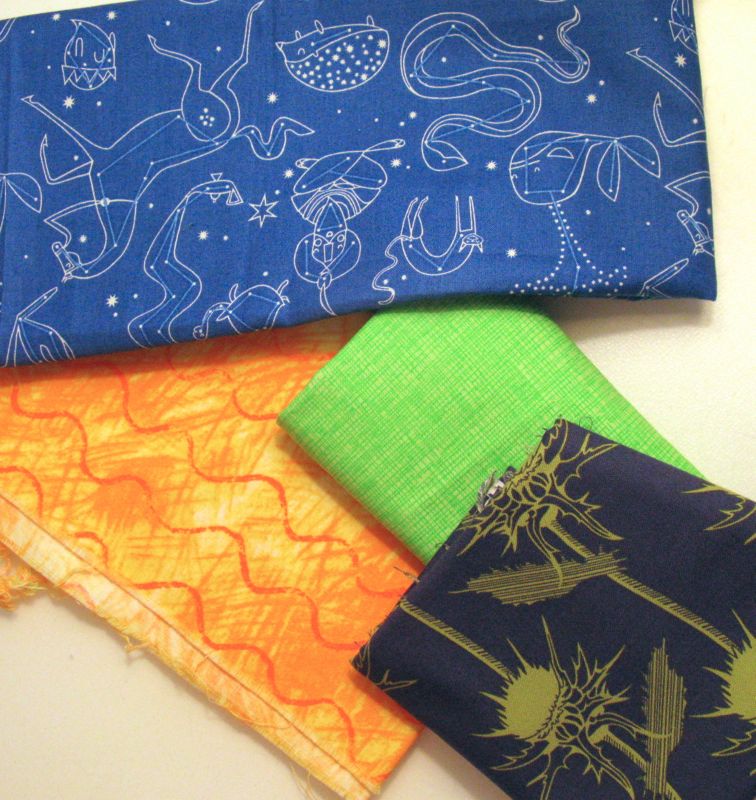
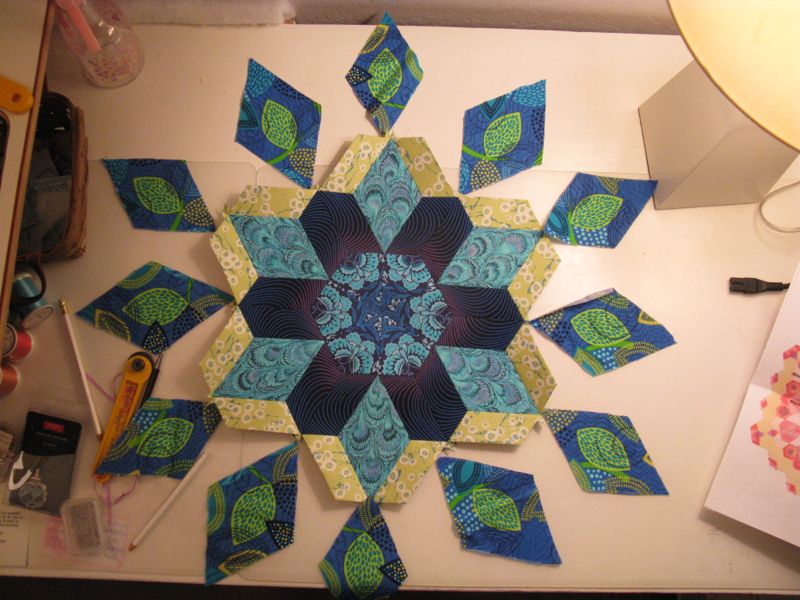
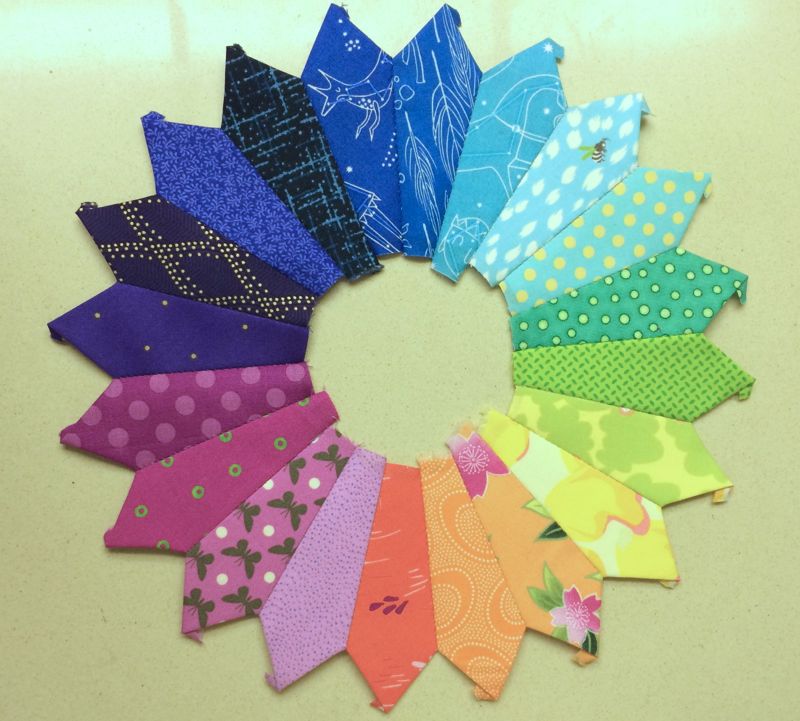
Here’s the blade papers pinned to fabrics and cut out.  I used pins initially as I was checking for a smooth gradation of colors for my rainbow.  Yes, I realized later I’d done the rainbow the reverse of what is normally shown.

Glued pieces laid out

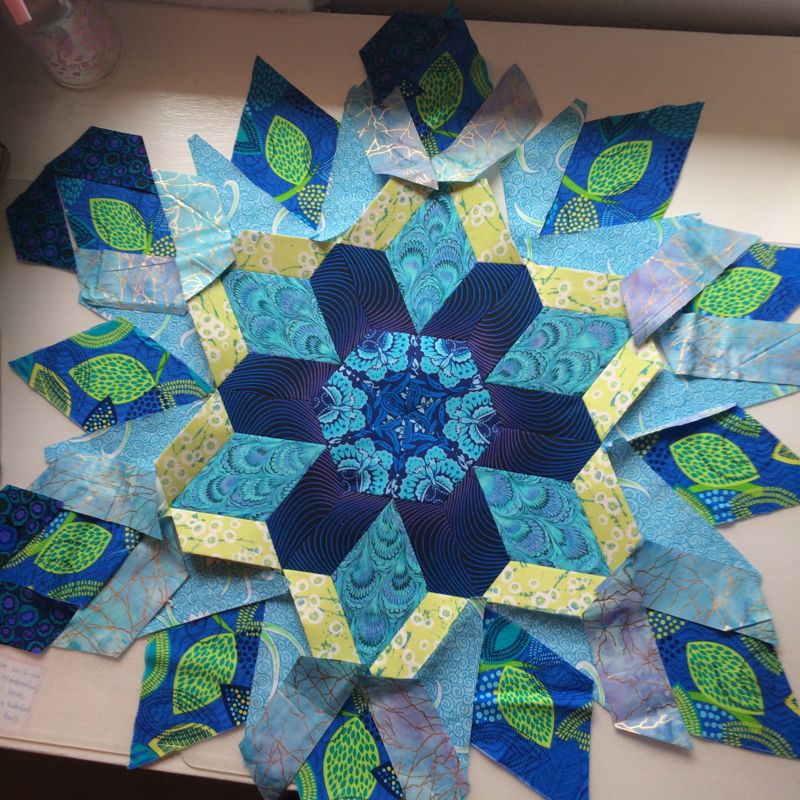
After I liked the arrangement, I used a glue stick and glued them to the papers.  I talk about gluing vs. basting in an earlier circle post, so read back through those to learn about that technique.

Perfect Circles1

The one new thing for this circle is confessing my undying love for Karen Kay Buckley’s Perfect Circle templates.

Perfect Circles2

I have them in two sizes: smaller, and bigger.  It’s what I use for my circles, instead of cutting out the paper pattern. I have learned to punch 2-3 holes in the biggest circles when I take them to my ironing board, in order to let the steam escape.

I choose a circle a little bit bigger than the paper pattern, then lay it down on the wrong side of the fabric, and trace around it.  I then cut about 1/2″ away from the line.  I did talk about the construction of them *here;*  just scroll down to where you see me taking a gathering stitch and pulling it up around the circle, then read on.

Starting at Point

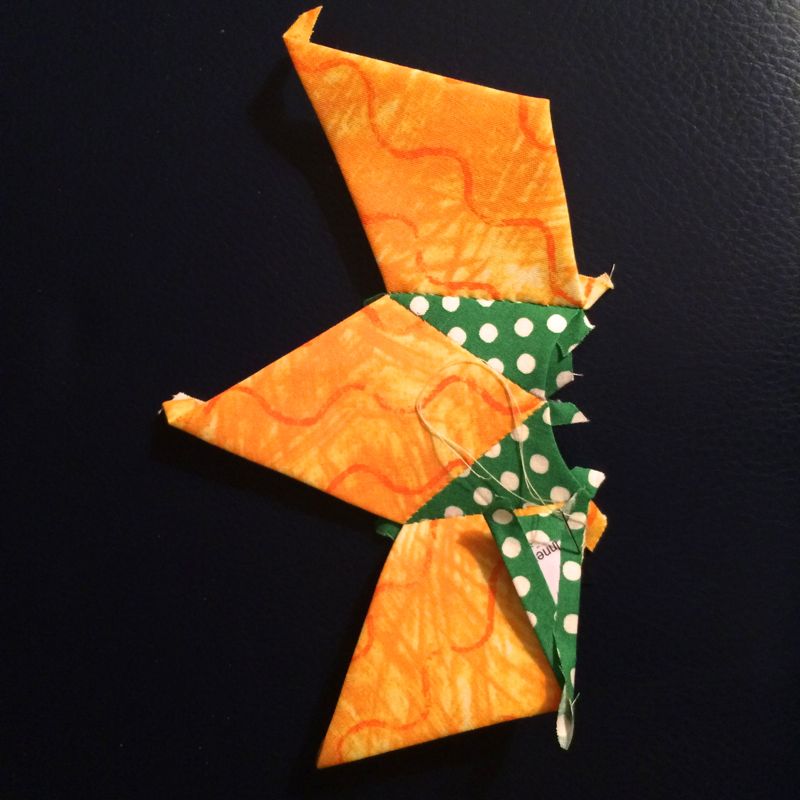
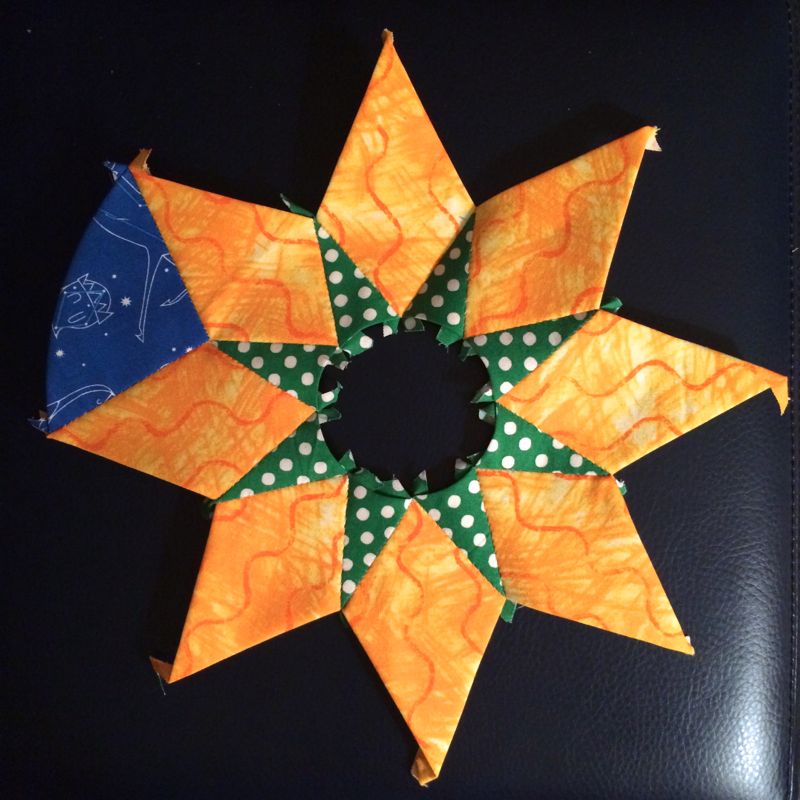
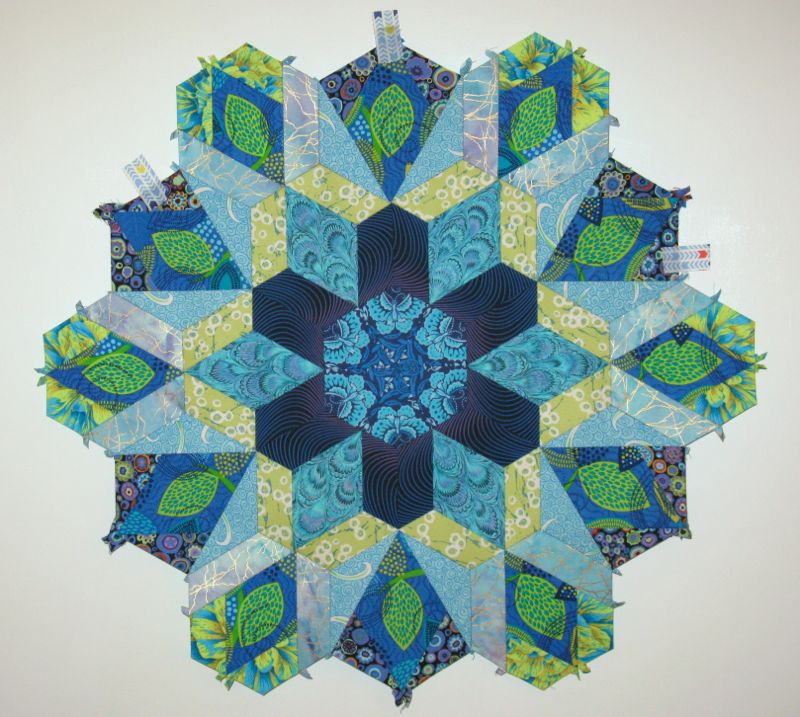
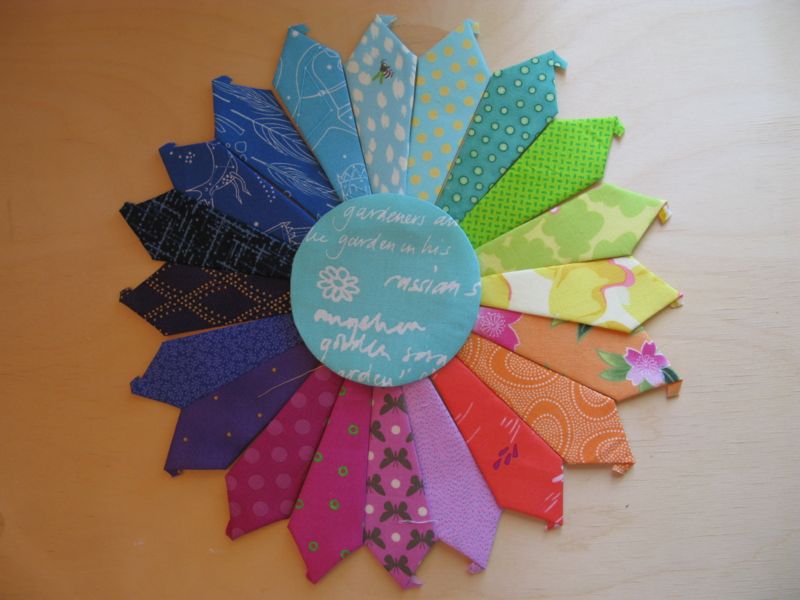
To construct this block, line up the “shoulders” of the upper edges, as shown.  Take a stitch, then loop through it to make it more secure, as shown in the next photo, pulling it snug.

Make an extra loop

EPP Stitching

Then keep going, taking tiny “bites” of fabric of each blade, whip-stitching them together.  It goes really quickly.

Pieces of Dresden

I did mine in sections, depending on which thread matched, then sewed the sections together.

Stitched to backing

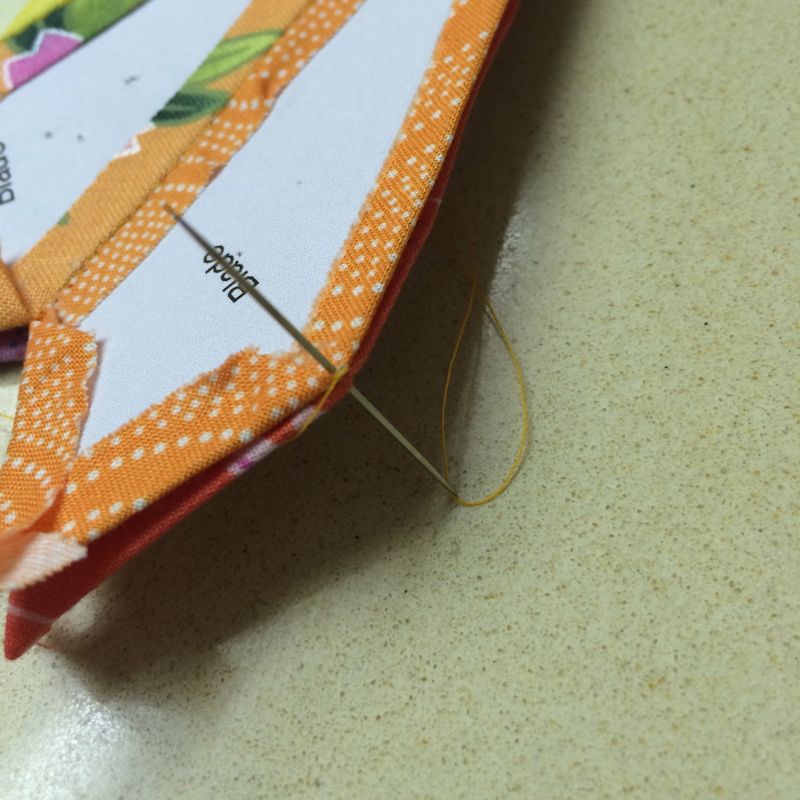
Cut a 14 1/2″ square for the background, and crease in the centers on all four sides; if you are not near an iron, just finger-press it.  Now it’s Decision Time: Point up, or valley up?  I went with the valley between the two points, but my friend Lisa, who was sitting beside me at quilt guild, preferred the point up.  I tell you this story to say that there is no right or wrong–just what you like. Applique this to the background using a neutral thread.  There’s a trick to good appliqué, and that’s to not have the thread come all the way to the top of what you are appliquéing, but instead kind of split the fold.  Then don’t pull the thread too tightly.  You want it to float on your background, not be nailed to it.  I have a photo below, when I appliqué the center, showing what I mean about “splitting the fold.” (At least I hope it does.)

Cut away backing

After you appliqué the rainbow Dresden Plate onto the back, trim away the underneath, about 1/4″ away from your stitches.

Loosen papers

Using either a pair of small, sharp scissors or the business end of a stiletto, loosen the glued edges, and pop out the papers.

Backing Cut Away

Like this.

Applique split the fold

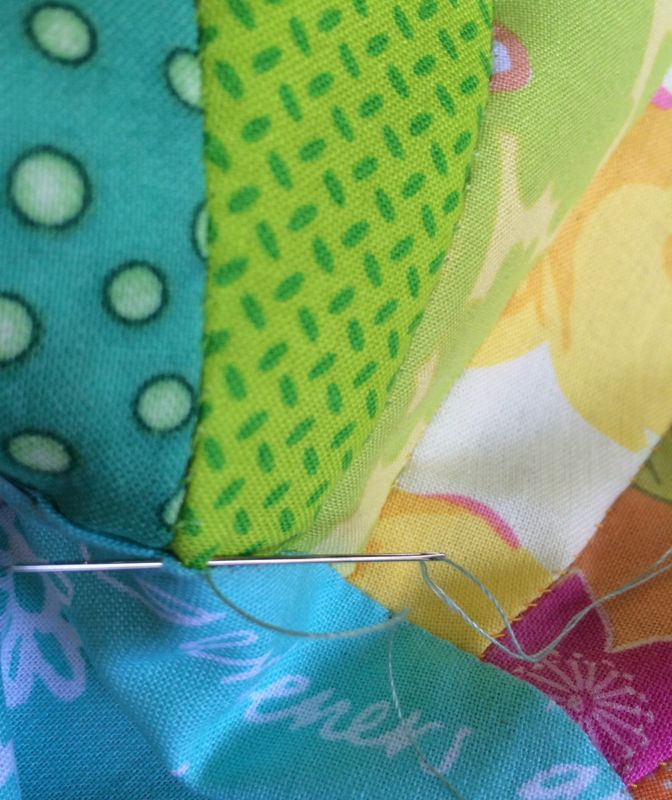
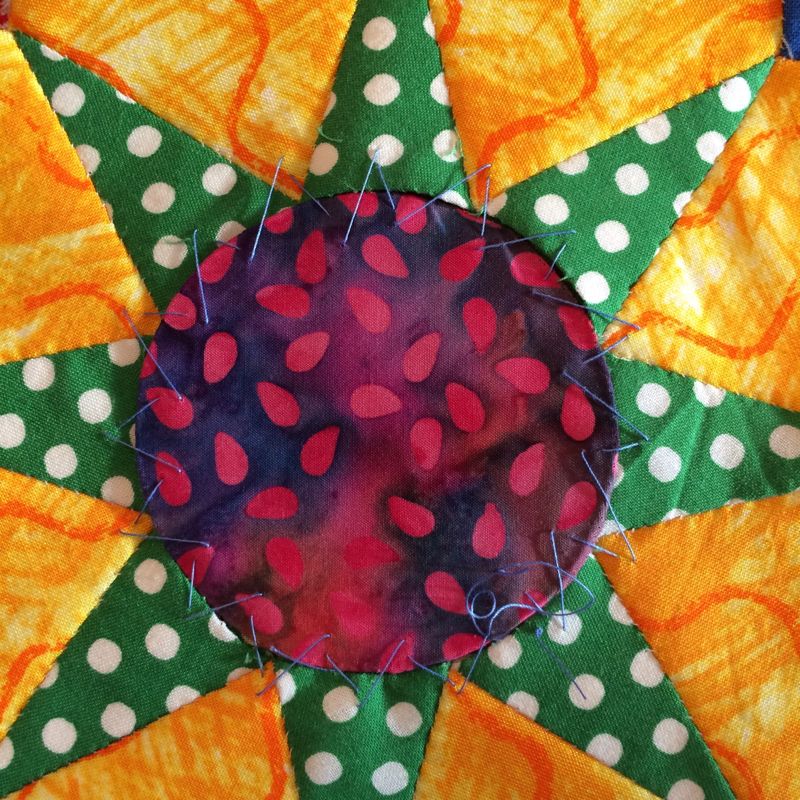
Arrange your circle on your Dresden, pin.  Now appliqué on.  I need to start making my circles a wee bit bigger, because it was a close call on some parts, so I sewed with teensy little stitches in a neutral thread (here: a grey-green).  See how the needle is kind of splitting the fold on that left-hand part of the photo?  You want to try to get a good bite of fabric, but not so the needle comes out on the top.  You want it at the “side” of the piece, if you can think about it that way, like if you were looking at a really flat layer cake–you’d want the needle to come out about where the filling is, not on top where the decorations are.  Don’t pull the thread too tightly. . . just snugly.

Circle on back view

Whew.  Some of those seam allowances are barely a quarter-inch, but my stitches are tiny and the center will hold. (Quick! which poem is that from?***)

Circles Block Ten_OPQuilt

Here’s your completed block.  Why a Dresden block?  Doesn’t every circle quilt need one?  I’d been making them for my bee groups.  We used *this tutorial* and sewed them on the sewing machine (although I used my version of the centers, and machine appliquéd them on), but truthfully, sewing them by hand didn’t take that much longer.

dresden plate_Opquilt

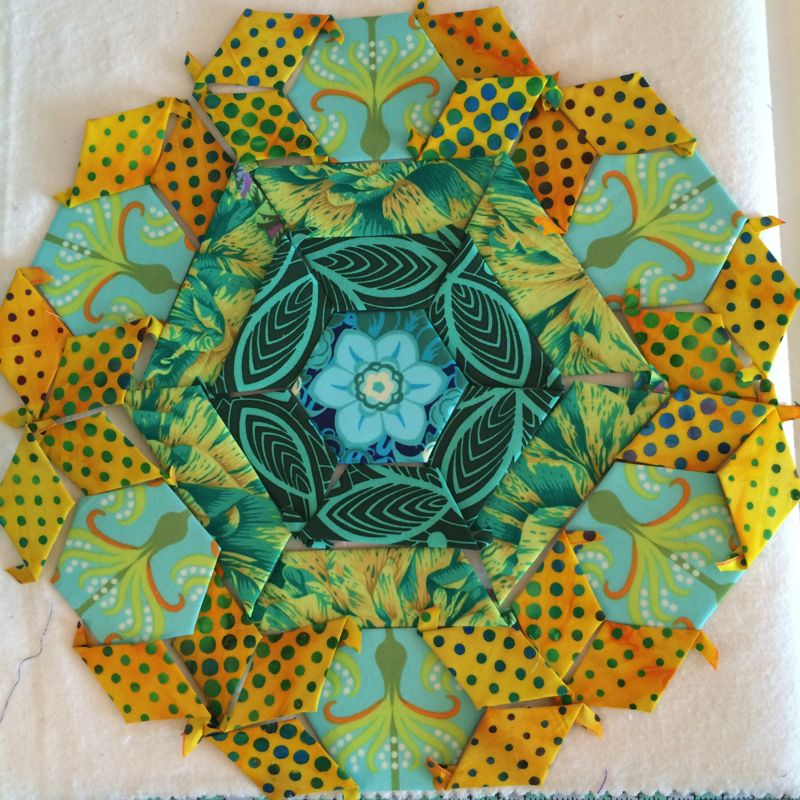
First, Rene’ had us make one in blues and greens.

2015 MCM March w0 label

And then Cindy had us make one in bright colors, so how I could I resist?

Ten Circles

And then there were ten!

˚˚˚˚˚˚˚˚˚˚˚˚˚˚˚˚˚˚˚˚˚˚˚˚˚˚˚˚˚˚˚˚˚˚˚˚˚

***  The poem is from Yeats, and he actually said the “centre cannot hold,” but your lovely hand-stitched center will.  Here’s the first part of his poem, and although I analyzed it to death when teaching it to my students, I still barely get the whole meaning, but it does have to do with the horrors of our twentieth century.  It’s pretty scary out there.  Too bad Yeats didn’t do English Paper Piecing.  He might have felt better about things.

THE SECOND COMING, by William Butler Yeats
Turning and turning in the widening gyre
The falcon cannot hear the falconer;
Things fall apart; the centre cannot hold. . . . .

Quilts

New Hexagon Millefiore– Rosette #2 Started

Rosette #2 Starts

Well, I’ve started Rosette #2 of The New Hexagon Millefiore Quilt-A-Long, originated by Katja Marek.  We even have our own Facebook Group (link is also on Katja’s page), and now I’ve found something I can post there, having stopped putting anything personal on Facebook once one of my very scary students found me (getting past all the privacy controls, because we all know how Facebook loves to play with our privacy controls!).  Now there are nearly 3,000 people on this group, and I think a lot of them are actually doing this, not just Looky-Loos.

Plitvice2b_view up the valley

Plitvice3_two toned again

I’m basing the colors in this quilt on our trip to Plitvice Lakes National Park in Croatia, where we traveled last year.  The colors range from the greens and yellow-greens to the blues and indigos.

Plitvice2_green lake

There was also aqua, and turquoise.  It was a beautiful place, and we loved hiking throughout all the lakes and waterfalls one afternoon.

Plitvice ESE

Oh, and white and sound and green and water and trees and browns and rocks and everything.  What a place!  I had a hard time with that second round, trying out multiple bits of cloth where the yellow with dots ended up.  It just needed a lift, a happy spot that wasn’t too ornate or over-done with pattern.  Sometimes the eye needs a rest.  Even if I am making a quilt based on Plitvice.

Plitvice13c_lakeview

Rosette 1 on fence

So this was Rosette #1, where I went for the blues.

Rosette #2 Starts

Okay, one more time for the beginning of this green/yellow-green rosette.  I’m thinking violets/blue-violet/indigo for the next.  It took me a while to get going on this again, as I actually had to do some housework, and some cooking, and some grading.

Circles EPP Button

Then there was finishing up the circle block for the April 1st post–it’s our tenth! and I loved making it.  I moaned mentioned to my sister that I hadn’t been very productive lately in the quilt department as I wanted to be, and yet I realize that these hand-pieced quilt blocks do take some time in the designing, and making.  So I guess I haven’t been a total slacker, but there are days that I would like to clone myself, and knew which part of my life I’d be doing, while the poor clone would be stuck with a mop or a grading pen.  Oh, and I’d also be reading blogs, to see what you are all up to!

Flower Spring 2015

It’s been a lovely week of Spring Break here, and the weather is a bit too warm for March but the wonderful side effect is loads of flowers on all our bushes and trees, so that made me want to work in rosettes again, too.  School starts again Monday, then a stack of papers comes in a week later.  Where’s that clone, now I need it?

EPP · Shine: The Circles Quilt

Circles Block #9–EPP Sew-A-Long

Circles EPP Button

EPP Circles Block 9_OPQuilt

Sunflower, Circles Block #9

This is the ninth circle in a series of free English Paper Piecing (EPP) patterns available here, on OPQuilt.com.  I began the series because I needed another hand-piecing project and was tired from all the geometric shapes in the recently finished quilt, Kaleidoscope.

EPP Circles Block #9

RWB SHINE_9

The free patterns are now returning (Red, White & Blue version is above).  Again, I request that you not distribute them, but send people here to this website to get them.  Click to download a PDF file: 

SHINE Block 9 pattern_opquilt

Please remember to set your printer settings to 100% and check the little scale square included on the pattern.  It should measure 1″ in size. Illustrations below are with the OLD version of the pattern, so it may vary from what’s included now.

Print four copies of this page at 100% scale, then cut them out, but cutting out only one circle.  Sometimes I’ll staple them together and then cut them out, but they do shift slightly, if that bothers you.  Now that the business is out of the way, this was the easiest circle yet. . . and the hardest.  Easiest because there are fewer pieces, and they go together quickly.  Hardest because of that dumb center circle, which I tried to ease in a la EPP-style.  Mistake.  But remember that I make the mistakes so you don’t have to.

Circles9_Fabric Choices

Picking out fabrics.  Yes, these do change as you go, but since there are fewer moving parts to this circle, it was easier.  I always wait until the last minute to choose the center circle.

Circles9_layout

I print out on 24 lb. paper, which is slightly heavier than regular computer paper, so I have good luck with just gluing my fabric seam allowances to my pieces.  I explained this on Circle Block #8 if you want to take a look.  There’s something new on every circle block so far.  What’s new on this one?  Keep reading.

Circles9_piecing

I’d say this is the faster circle yet.  All these pieces went together lickety-split.

Circles9_center star

Circles9_piecing2

Adding the outer blue wedges was easy, too.

Circles9_stitching on inner circle

Now I’m starting to add the center circle.

Circles9_stitching on inner circle2

Circles9_inner circle FAIL1

Whoops. What a mess.  Now I’m taking out the center circle.

Circles9_inner circle basted down

Now I’m starting again to add the center circle, this time basting the circle into place.

Circles9_inner circle FAIL2

Now I’m taking OUT the center circle and doing what I should have done in the first place: appliqué the center circle onto the sunflower.  That’s the something new.  Don’t try and force your EPP.  If it’s not working, move to a different technique.  I had no problem with the Christmas Star block, but this one looks hacked-up, messy, bleh bleh bleh.  Sigh.  It looks much better now that I’ve appliquéd it on.

Circles9_Background markers

For the background, cut a 14 1/2″ square, then fold in half and half again to find the centers; lightly press the marks (shown above).  I love this fabric!

Circles9_AlignmentA Circles9_AlignmentB

Decision time: Point UP? (top photo) or Wedge UP?

Circles9_loosening seam allow

Before attaching the circle, make sure you’ve popped out all your interior papers.  In the photo above, I’m using a stiletto tool to loosen the glue.  I leave in the outer wedges as it’s easier to appliqué the circle onto the backing with those outer papers in.  I take them out one by one, or you can just leave them all in until you cut away the backing, then pop them out.

Circles9_star pinned on

I decided Point UP.  I’ve pinned down the circle, and after hand appliquéing it on, I’ll cut 1/4″ away from the appliqué line, and cut off the backing to be used for another project.

EPP Circles Block 9_OPQuiltAnd there it is!  Another fabulous circle.

Nine Circles

And then there were nine.  I guess you could stop here, but I do have three more . . . see you next month?

Quilts

New Hexagon Millefiore Quilt Along

That title is a mouthful.  Did I get it all?

New Hexagon Book

Katja Marek, who wrote this book, is hosting Mother Hen to all of us as we work our way towards having a new version of a millefiore quilt, based on the blocks in her book.  Laurel and Rhonda and Cindy and about 1500 of my other closest friends are doing this.  It’s fun to see the rosettes pop up on Instagram and in my Google Images when I search for them for inspiration.

Millefiore Quilt Alonginspiration

I’d pulled these pages of a Morocan town out of the travel magazine, with all their aquas and moody blues, yellow-greens and dark blues as inspiration, then pulled a bunch of fabrics.

Basket of fabrics

For a long time they were pinned into my design wall, but then I needed the wall, so they now live in this basket.

Millefiore Quilt Along1

The very middle six triangles are the center, and here you see round one, of Rosette One.

Millefiore Quilt Along1a

Katja sends us an email every month, telling us about the next rosette.  I act like we’ve done this for years, but really we all started in January.  Well, people who weren’t trying to get a college English class up and going started January first, but the others of us began like, last week or so.  Here I’m plotting Round Two.

Millefiore Quilt Along2

Still plotting.  I ordered the templates from Paper Pieces, as suggested, mainly because my brain just couldn’t handle one more decision.  A good choice for me, but I know others are tracing them off.  Definitely do the glue stick thing when you attach your fabric to the paper pieces.  It’s brilliant.

Millefiore Rosette2

Tonight, as I watched The Muppet Movie (the most recent one with Tina Fey, who made me laugh), I finished off the third round of Rosette One.  I have one more round to go.  This thing is getting really big, so I decided to pop out the interior papers.

sliding out papers

I loosen the edges by sliding underneath them with my stiletto, and they pop right out.

Rosette Closeup2

Fun to be at this point.  Tomorrow, after I grade six more essays (I had a batch come in on Wednesday and I’m doing six-a-day until they are done), I’ll pull all those fabrics out of my basket and make a bigger mess in here (see photos below).

Goals 1stQtr2015

I also wrote up my goals for the quarter, conveniently skipping January because we all know what that month was like.  I can already see some holes in the quarter, like where are the Circle Blocks?  One a month?

Papers on ironing board

My horoscope, which I read faithfully and believe about 10% of the time, said I was spending too much time on things that would not matter in the long run.  This is one of those 10% times it actually coincided with what was going on in my real life.  Like lining up the readings for the next unit on the ironing board.  I sent eight more readings off to the printers today.  I have to get this unit ready because I’m headed to QuiltCon in about (wait, let me get my phone out of my pocket because QuiltCon has its own app that tells me how many days. . .)

QuiltCon App

Okay, this was a couple of days ago, but you get my drift.  They have thought of everything to make us freaked out, excited quilters.  It’s like it’s more than a Quilt Show…it’s a Life Changing Event.  I think of it as a way to party with quilters, and certainly these young’uns will be a different bunch than the usual staid quilters.  I knew this because one of the items in their scavenger hunt is to find someone whose tattoo I love.  Right.

Messy RoomOkay, so between the prepping, grading, planning and working on everything else, here is a Truthy Moment: the mess at my sewing desk.  I expect it will be clean, say, about July.

4-in-art_3button

I loved reading all your comments about our recent Four-in-Art quilts, and am slowly working my way through them.  Somehow the internet swallowed a few comments, so I have to go and find them.  I can see them on the website, but not in my email, where I usually answer them.  Thank you all for the lovely things you wrote.  I think we were energized by new members, the new yearly theme and the added bonus of choosing our own quarterly theme.  Now you know why I ordered my papers for my hexagon.  Way too many decisions!

Magnolias

P.S.  I think Spring is trying to happen out here!