EPP · Shine: The Circles Quilt

SHINE Circles Block 2, English Paper Piecing

EPP Circles #2 Block_finished

Circles Block #2: Sunshine

Here we go again, with the second block in our slow sewing, English Paper Piecing, series of circles.  While I call it Sunshine, because of the fabric I used, the official name is called Kansas Sunflower (I like it best when we quilters acknowledge the history of our blocks).  Barbara Brackman’s book shows its origin around 1928.

RWB_Block2

The free patterns are now returning (Red, White and Blue version is above).  I request that you not distribute them, but send people here to this website to get them.  Click to download a PDF file: 

SHINE Block 2 pattern_opquilt

Please remember to set your printer settings to 100% and check the little scale square included on the pattern.  It should measure 1″ in size. Illustrations of the patterns below will vary from the newer version.

This one has a large center circle, which measures a bit under 5 1/2,”  but I would cut the fabric circle for the center at 6″ diameter, because I think having the extra bit of cloth is better.  To get a smooth template to gather it up over, iron two pieces of freezer paper together, then trace the circle.  It should give you enough stability.  Or do as I did: head to your iron, and using the tip, iron it in small bites around your paper circle, then sew it to the paper.

EPP2 Circles block #1

Here’s the sketch of the block.  On the lower right you’ll notice that I colored in one half-arc green and one half-arc blue.  If you want to split yours up like that, I included just one tracing of that as an option, but you could also just cut the other arcs in half and go at it that way.  I prefer the larger outer arc. As before, in Circles Block #1, there is an assumption that you know a bit about English Paper Piecing, where you take the pattern, lay it out, then fold the seam allowances back over the paper pattern, then baste.  Others have used freezer paper, or glue.  Do a Google search if you are curious about these other ways of securing the paper.

EPP2 Cutting out EPP pieces

I wanted to use a chevron for the “petal” piece, so I fussy cut them so the chevron stripes would meet along the sides.  I pin down my pieces (since these are symmetrical pieces, it doesn’t matter whether the printed words are up or down), then just freehand rotary cut around them.

EPP2 Pieces Laid Out

Auditioning everything.

EPP2 Arcs Basted and Stitched

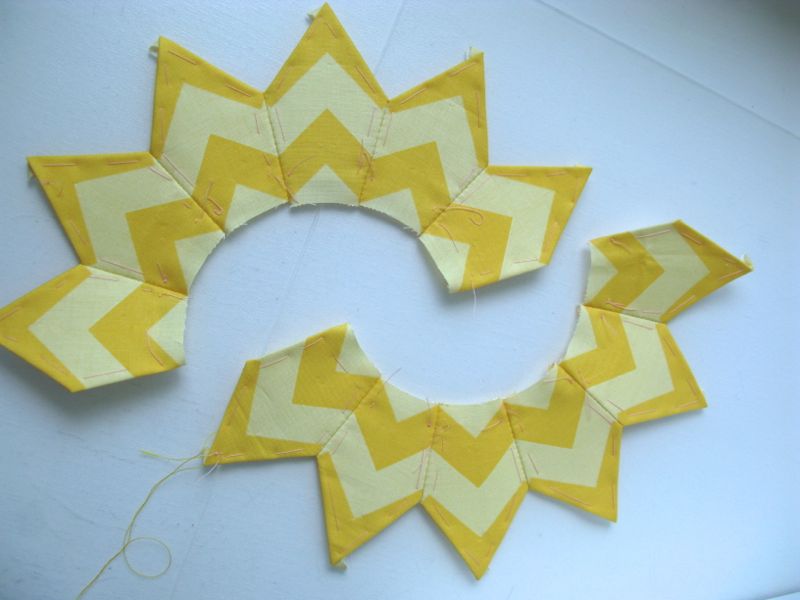
After basting the seam allowances down to every pattern piece, I stitched the petals together in two groups of six.  Then I sewed the arcs in between those, as shown below:

EPP2 Setting in Outer Arc

EPP2 Stitched and Center Circle Pinned

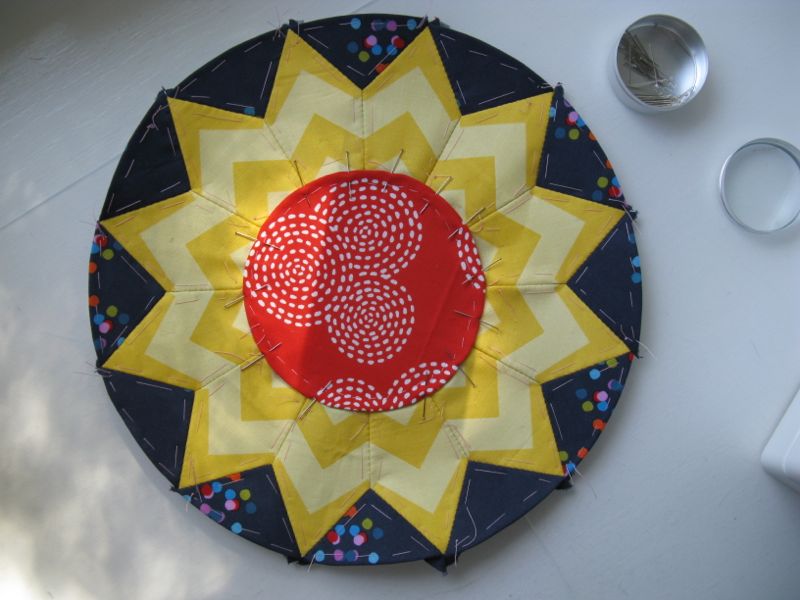
I stitched those two flower halves together, then the last two arcs, then laid on the center.  I don’t know why I chose this orangey-red; it just spoke to me.  I had already basted the seam allowances down so I just arranged it on the petals and pinned it down.  I appliquéd it onto the petals, and that’s when I discovered that maybe a 6″ diameter circle might make you happier as it’s a scant 1/4″ overlap in some places.  Then the fun part: taking out some of the papers.  I released the center circle basting threads and the petal basting threads and took out those papers, but left the papers in the deep blue outer arcs.

EPP Circles #2 Block_finished

I’m putting the photo in again, because now you have a decision to make: do you want those four seams in the outer pieces to line up with a point?  Or to be offset (like mine)?  I went back and forth and decided I didn’t want it so busy–I liked the slightly off-kilter look of not having points dead center at Noon, Three, Six and Nine O’Clock.

EPP2 Sewing Diagram

I don’t think there is any easy way to get those four outside pieces on.  This is how I do it: I stitch the seams between parts #1 and #2 to get two pieces hooked together, then pin it about four places around that the #1 arc of the outside circle.  I begin at the lower center  (XX) and stitch around that 1/4-arc, stopping one inch short of the next seam allowance.  Part #2 is just flapping in the breeze.

UPDATE: After doing a couple of circle blocks I found I liked it better using a 15″ square and appliquéing on the circle.  See Circle #3 for information.  Your choice.

Then I go back to where I started stitching (XX), and stitch the other side (#2), using a few pins where needed (not too many, or it’s ouch-ouch-ouch).  I then seam together pieces #3 and #4, and repeat the process.  As I draw near to the #2 piece, I thread a different thread, do the seam between #2 and #3, then tie it off.  I go back to the thread I was stitching with before and then finish it off.  Repeat for 1/4-arc #4.

I just reread this, and if you are confused, I don’t blame you.  It’s just hard to navigate those pieces when they are backed with paper, and I get tired of fighting with them.  I suppose you could just seam all four outside corners together, then pin and appliqué it down like you did the center circle.  I don’t think there is a wrong way or a right way to do this.  Have fun and let me know what works for you.

EPP Circles Block 1 and 2

Are you worried about the fact that my circles aren’t matchy-matchy?  Sometimes I was worried about that too, but then in the previous post I noticed that there was such a variety of circles and colors in a couple of those quilts, and calmed right down.  Keep going.  Keep stitching.  Have fun.  Next circle block comes up around the first of August, right after our Four-in-Art Reveal of Contrasts.

I’ve started a tab with all the blocks and their posts, for easier reference.  By the way, there is no big deadline for any of this; I think I’d have a heart attack if I had one more deadline.  I just wanted a project to put in a little box and carry with me on car travels, on vacations, and while I collapse in the heat at night on the sofa to watch a good movie. (And given that it will take me several months, I may be curling up under a quilt in the cold, still hand-sewing.) Just know that it’s here if you want to make some circles, or a pillow, or need a hand project that is an alternative to 5,000 hexagon papers.  If you do decide to make one, or several, send me a photo and I’ll put it up here on the blog.  Have fun sloooow sewing!

Circles EPP Button

Quilts

Some Interesting Circle Quilts

IMG_0862

While looking through this blog, I found some examples of interesting circle quilts.  This one, made by Kathleen H. McCrady and titled  Sawtooth X, is patterned after an old one from 1875, using reproduction fabrics in brighter colorways.

IMG_0863

IMG_0821

This is kind of “circle-y,” but has added oak leaf appliqués in the corners.

American Folk Art Museum Circle Quilt(from *here*)

Known as the Georgetown Circle Quilt, its maker is unknown, but it was made in the era between 1900-1920.

Georgetown circles variation(from *here*)

Here’s a modern variation of that Georgetown Circles quilt.

airship_propeller_std

I found this one on my computer, with a date of 2005.  It’s from Freddy Moran and I believe she calls it Airship Propeller. But I could be wrong about that title.  Jenn Kingwell did a similar design, but turned her blocks on point:

Steampunk1(from *here*)

Circle Block from Smithsonian

Lastly, when I lived in Washington DC, the Smithsonian Institution’s American History Museum had this sort of secret quilt tour, but if you knew about it, you’d call them up and a docent would take you in the back and open lots of archival drawers, showing you positively ancient quilts (some 250+ years old).  It was amazing.  In one drawer was this quilt with circles.  This one looks challenging to piece, but I think easier if is English Paper Pieced.  I’ll save this one for later in the series, once we’ve gotten our skill set up and going.

All this proves that our slow sewing, of making English paper  pieced circle blocks is an idea that has come around again.

Something to Think About

Cleaning the Design Wall

Since I am away from the computer for a while, I’m running a few favorite, previously published posts.  
This one originally ran on July 22, 2010, but is modified for today’s post.
˚˚˚˚˚˚˚˚˚˚˚˚˚˚˚˚˚˚˚˚˚˚˚˚˚˚˚˚˚˚˚˚˚˚˚˚˚˚˚˚˚˚˚˚˚˚˚˚˚˚˚˚˚˚˚˚˚˚˚˚˚˚˚

Here’s the before:

The during:

The after:

Okay, that’s not a very exciting thing to do, right?  We want all our sewing tools to keep on working, day after day, no complaints, no breakdowns, no upkeep or maintenance required.  But it’s such a little thing to take a few minutes and cheap-o lint roller remover and stroke down the board.  And really, is the Before picture really so objectionable? Yet, what surprised me is how many of the threads that came off on those sticky papers were seemingly invisible to me.

But since I did it yesterday, just walking into the room is different.  My pin wall is thread-free (for the time being) and it makes the room look cleaner.  It made me think of the premise behind Malcolm Gladwell’s book The Tipping Point: that an epidemic can start with one small thing and roll on out from that.   It’s like how picking up the towels in the bathroom and rehanging them triggers a cleaning of the sink.  Or washing the curtains makes you repaint the bedroom.  I’m talking about those kinds of mini-epidemics, that are just one person wide and one person deep. Those changes I make myself.

My sewing room (aka The Study) had been a mess since we arrived home from our trip to Canada and I just didn’t seem to have the mental energy to put the things away.  But I cleaned the threads off the wall and now I’m putting away those little naggy things that linger after travel is done.

So maybe, taking time off to take care of things has unintended consequences?  That this can, in some ways, apply to our own creativity level?  That taking time off to clean out a few cobwebs, have a walk on the beach, or take a minute to sing along to a popular song in between shuttling the family to various places is like cleaning the threads off the design wall?

boyinwaderpool

Perhaps a little mental maintenance on our own selves is why summertime is such a tonic, even if we don’t know what ails us.

Something to Think About

Process vs. Product

Since I am away from the computer for a while, I’m running a few favorite, previously published posts.  
This one originally ran on July 16, 2010, but is modified for today’s post.
˚˚˚˚˚˚˚˚˚˚˚˚˚˚˚˚˚˚˚˚˚˚˚˚˚˚˚˚˚˚˚˚˚˚˚˚˚˚˚˚˚˚˚˚˚˚˚˚˚˚˚˚˚˚˚˚˚˚˚˚˚˚˚

Is it possible to lust after another person’s finished quilt?  Yes, quite possibly.  Definitely. For sure.  The quilt shown above uses the Castle Peeps line, and was put together by  Elizabeth Hartman, of Oh! Fransson.  I purchased the blue colorway of this line this summer and before I close out my sewing blitz and focus on The Job, I’m dying to throw together one more quilt.  This design has inspired me.

There’s been a lot of talk on the blogosphere about the issue of production in quilting, and I’m here to add my .02.  Jennifer, of “That Girl. . . That Quilt,” has written a whole series of her thoughts about “quilting without obligations.” They seem to be a reaction to the feeling that quilting is all about production, rather than about the process.  This is an age-old discussion and is found in other corners of the creative universe.

When I was an undergrad, working in the black and white photo lab, this idea–process vs. product–was discussed constantly.  To give you a flavor of what our conversations sounded like, as we blew dust specks off of our negatives and worked at creating “art,” have a listen to the little clip below. Yes, it’s dense, but give it a go.

I think his point that when we focus on product, we may miss other connections that may arise from the creative process is valid, but there are times when product is not the Big Evil.  Sometimes I just want to get something done, speaking of quilts and quilting.  Sometimes I just want to quickly make up a quilt in a fabric line because I want to see that on my bed.  I’m not interested in being drawn into the process of the quilt–I just want to lay down under it.  Or hang it up on the wall.  Or because the process has already happened in my mind, in thinking about it at the back of my brain when I couldn’t get to the sewing machine for one reason or another.

I read a lot of blogs, like the rest of you, and many of them are designed as advertising.  The quilt artists/makers have been involved in the process of their art and designed fabric/patterns/quilts that they need to sell in order to make their living.  Many blogs are tied to online quilt shops.  These are valuable places for me to go and get my ideas, be exposed to new fabrics, enjoy the fruits, if you will, of other people’s labors all before I take up my rotary cutter to slice into some fabric.  I enjoy these blogs, love reading them, admire the work.  But I do not ever confuse what they are doing–earning a living–with what I am doing.  Some other blogs have “taken the process pledge,” and try to put out on their blogs how they arrived at the journey’s end.  This is a valuable resource for us as quilters when it truly involves process, and not just a “how-to” tutorial (although I like those too).

It seems to me that there is enough room in this quilting universe that we can quilt what we want to, blog when we want to, go off on vacation when we want to, work (when we have to) that we don’t need to compete.  Commercial blogs? Non-commercial blogs?  They are resources for us all to glean from.

ProductProcess_PreK+KImages, and interesting reading,  from *here*

Product?  Process?  We need them both.