Gridsters · Patterns by Elizabeth of OPQuilt

Mercato Square • new pattern

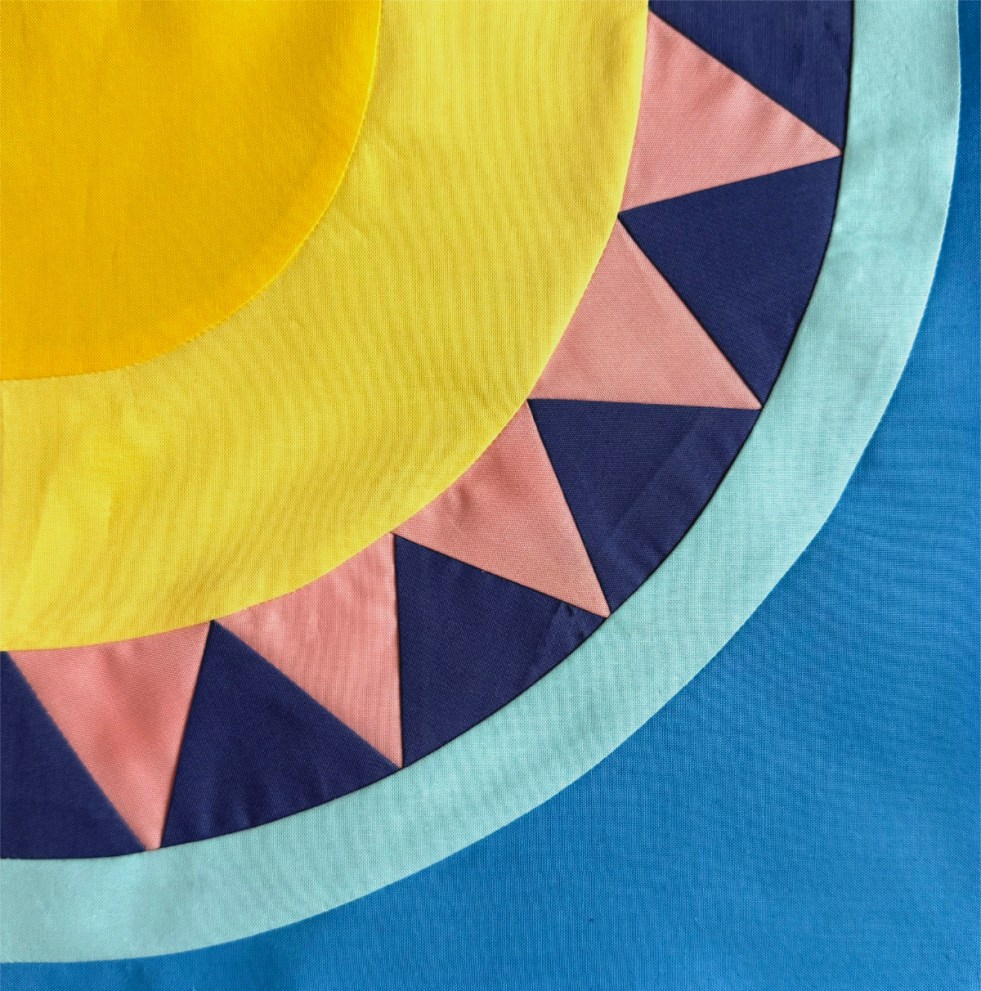
Mercato = market = me thinking about Italy, and really how fun the market squares are wherever you are, but especially in Italy. Okay, and maybe in France. Couple this with needing a block for my turn in the Gridster Bee, and after some searching and trying different ideas out (I think I wrote and erased a few bee Google Spreadsheets) but now! Finally! I’ve settled on this:

As always when I try out a new pattern, I try for different looks:

How about Christmas?
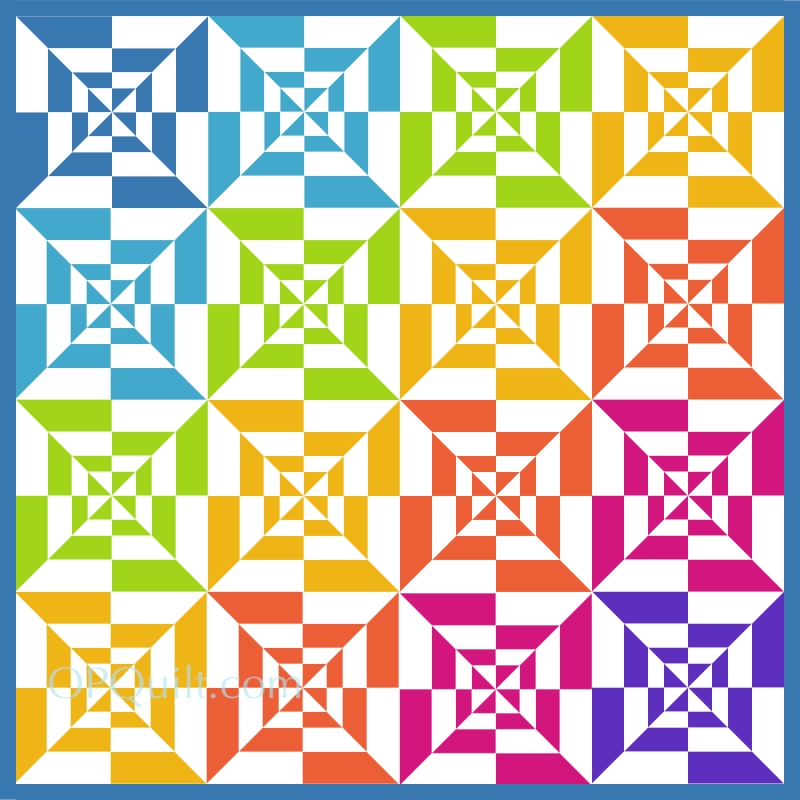
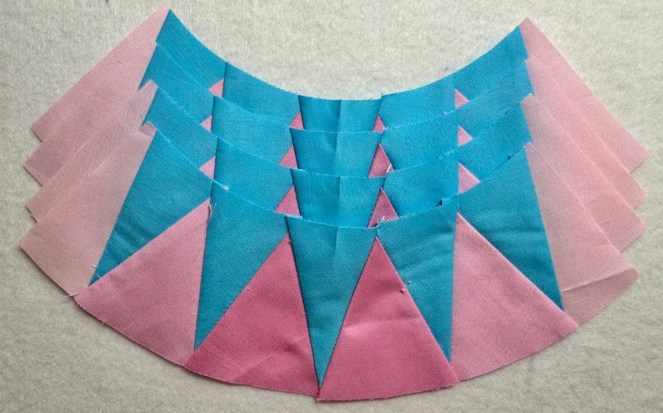
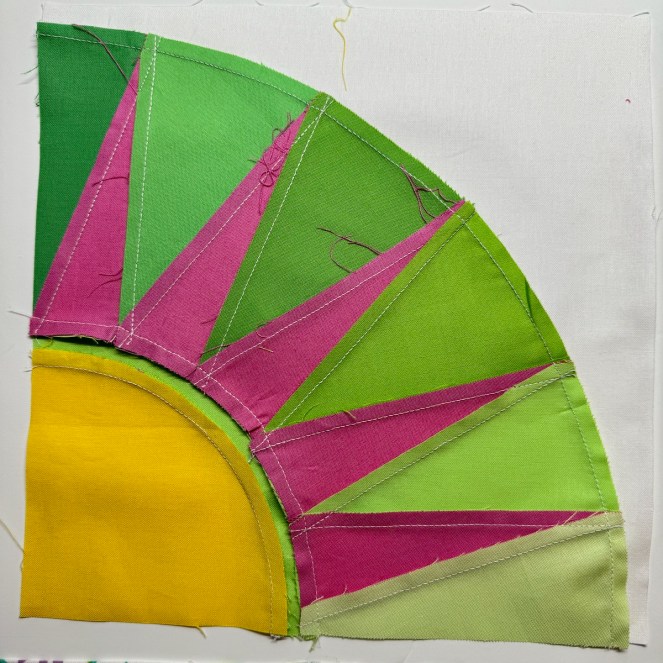
How about colorful?

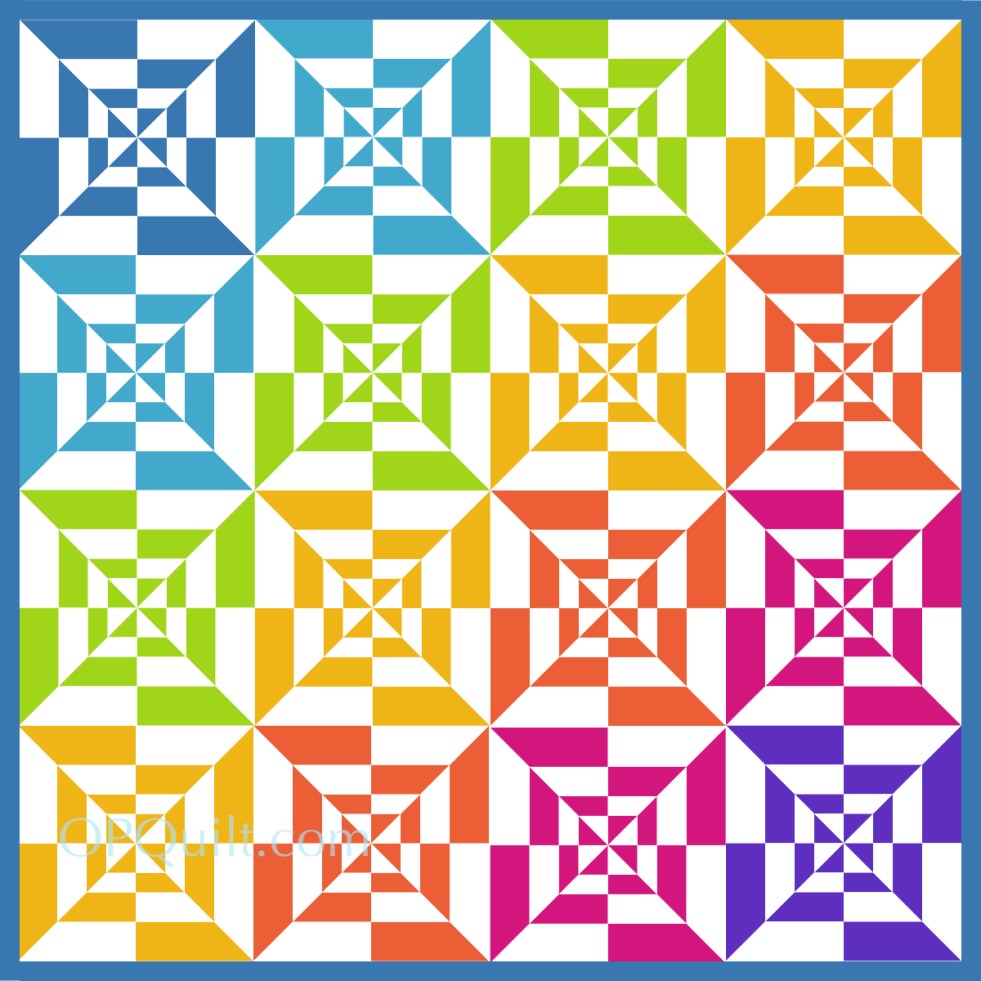
And then I tried merging some pieces, for Blues, a smaller 24″ quilt with a pop. There are a few more options on the pattern. But I wanted to get back to trying freezer paper-piecing on this one. But then I thought, what if someone doesn’t want to try that? So in the main pattern there are three different ways to make the block: paper-pieced (I used freezer paper), traditional templates, and then rotary cutting. In Blues, there are two ways to get it together. We aim to please.
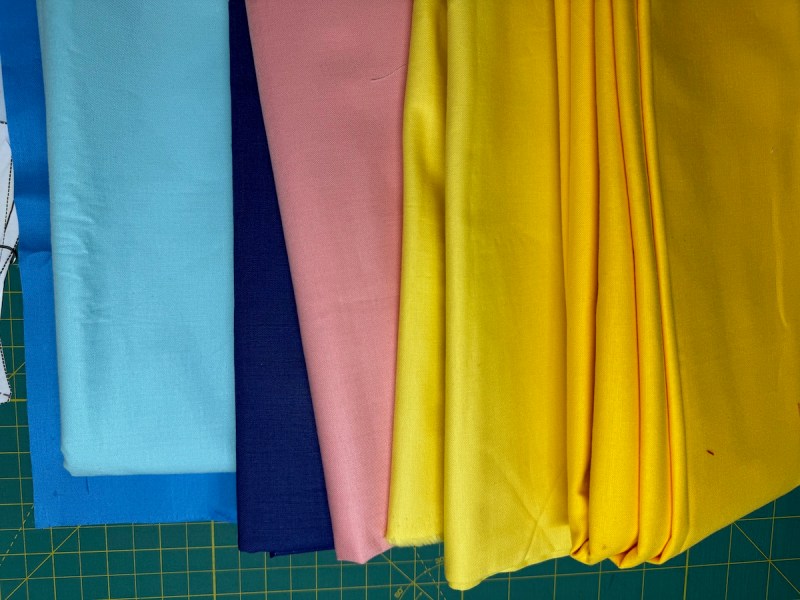
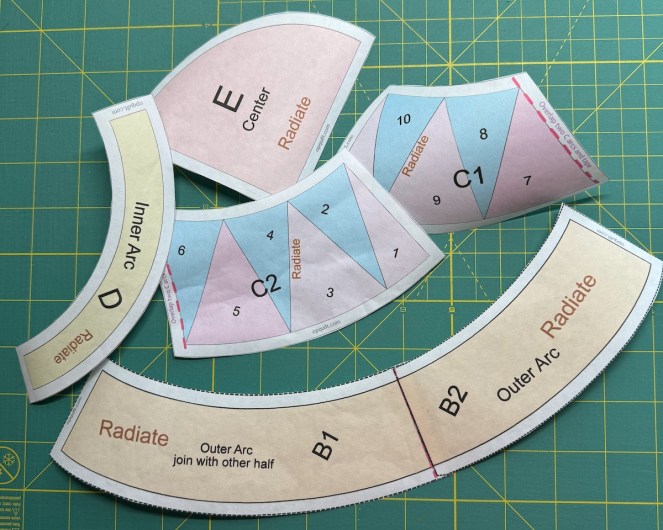
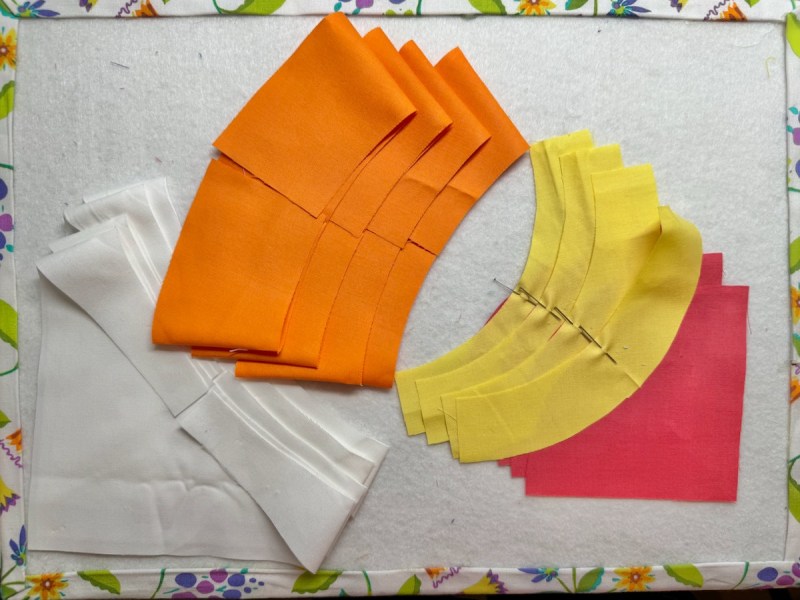
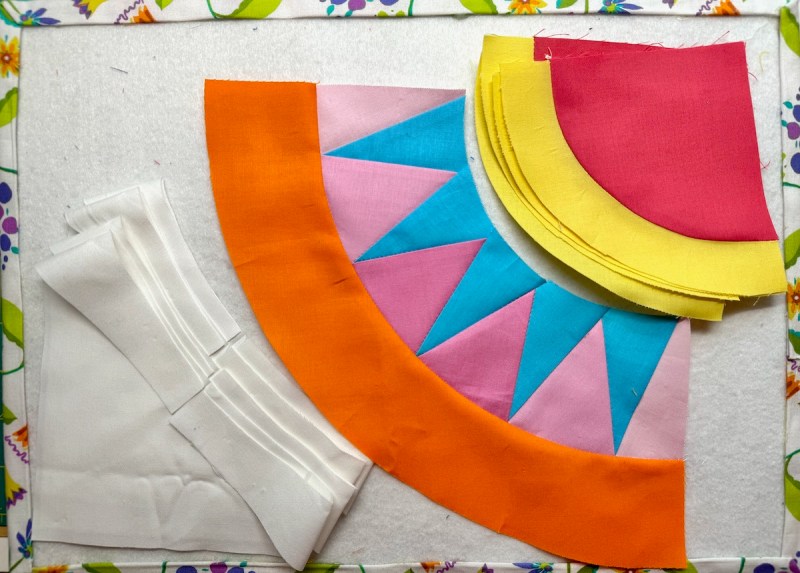
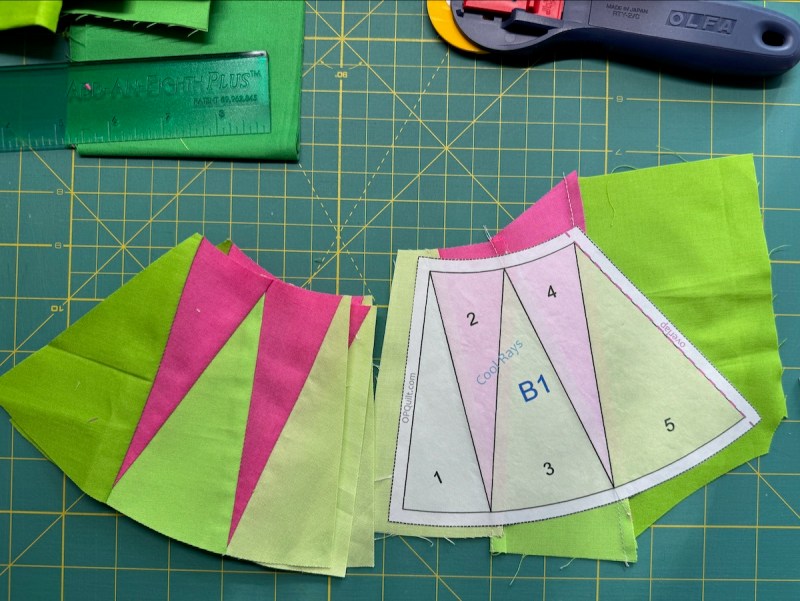
But first, fabric.

I wrote this about a gazillion times, working to get all the info in there. Like, should be pattern pieces be right-side up? Or did it matter? (It matters if you are using print fabrics, but not solids.)

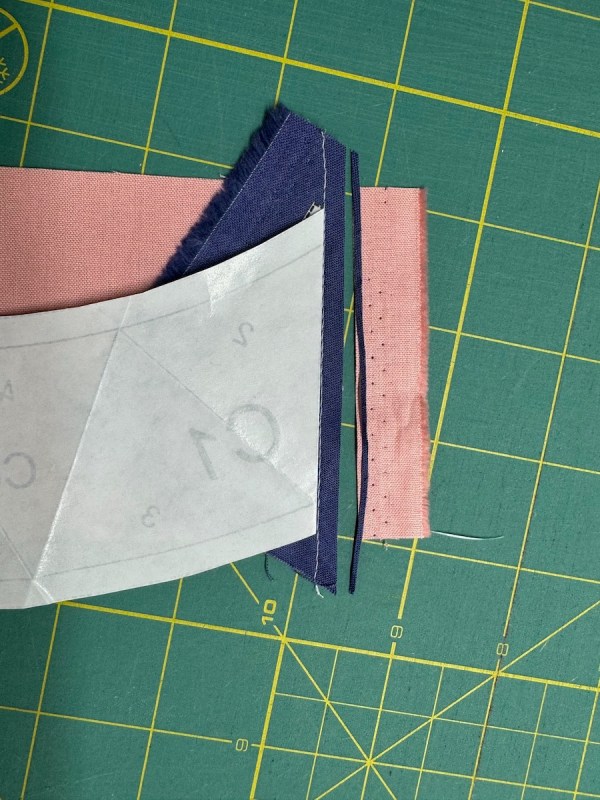
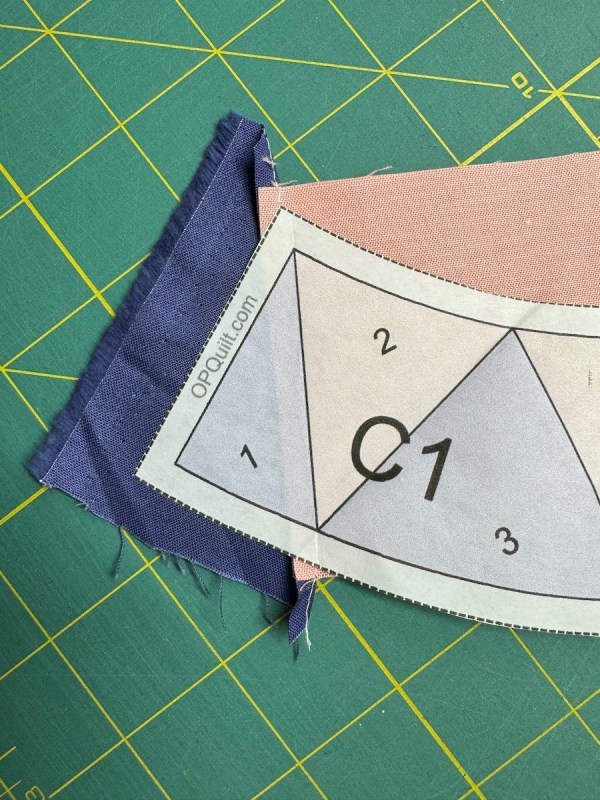
I also tried it with freezer-paper again, as I’m really liking this method. I took about a quadrillion photos to illustrate this post, then decided your eyes would glaze over, if they haven’t already. So here’s the basics in a free PDF handout:

Click on the button to download. Click on the title to get a sneak peek.

There are places I press the seams to the dark, making it easier to put them together (as they will nestle).

There are times I think the seams should be pressed open, so there is no see-through. (Doesn’t that look fancy?)

I believe in pinning.

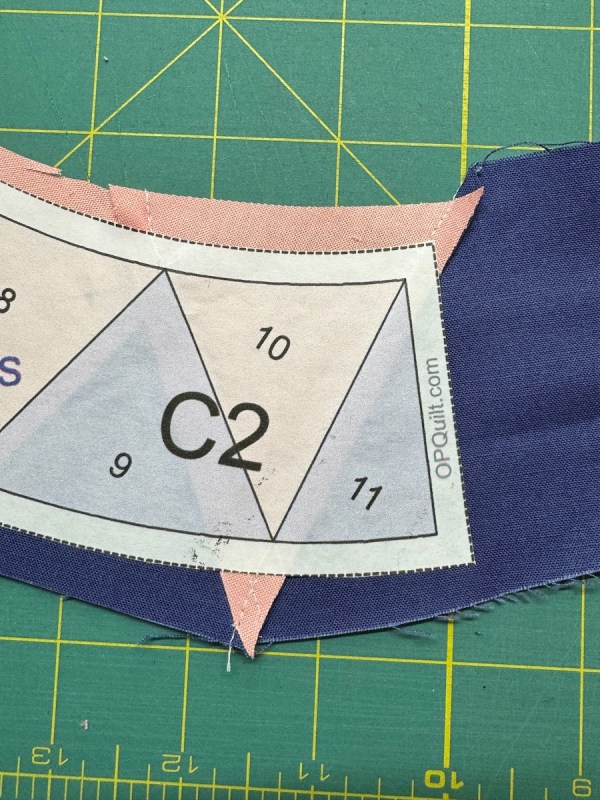
And there are times you should not sew the seam at all, like taking a little break right at the center, moving the seam allowances to the front as you approach that center, and then lifting the needle/presser foot, hopping over the center by one or two stitches. Sweep the seam allowances to the back, then continue. When you are finished sewing the seam, clip the loop of sewing thread at that place.

Mrs. Quinn kept me company. I heartily recommend this book.

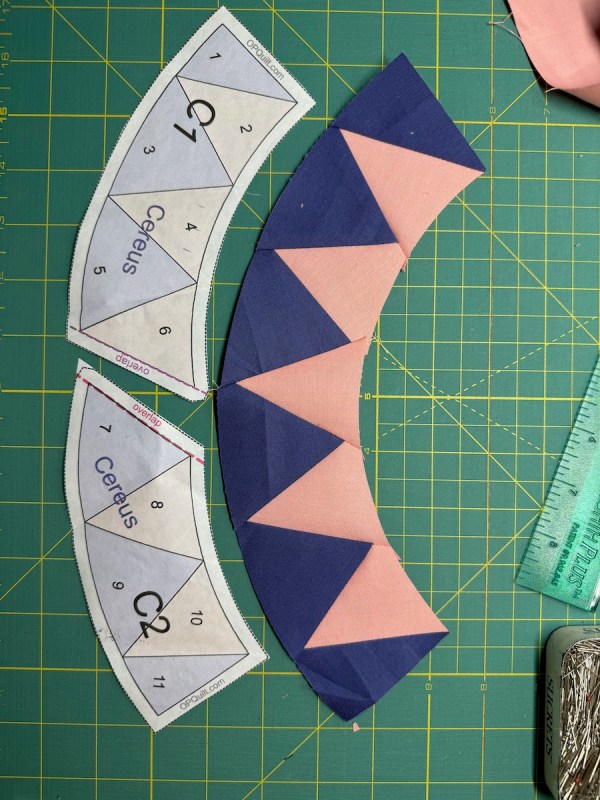
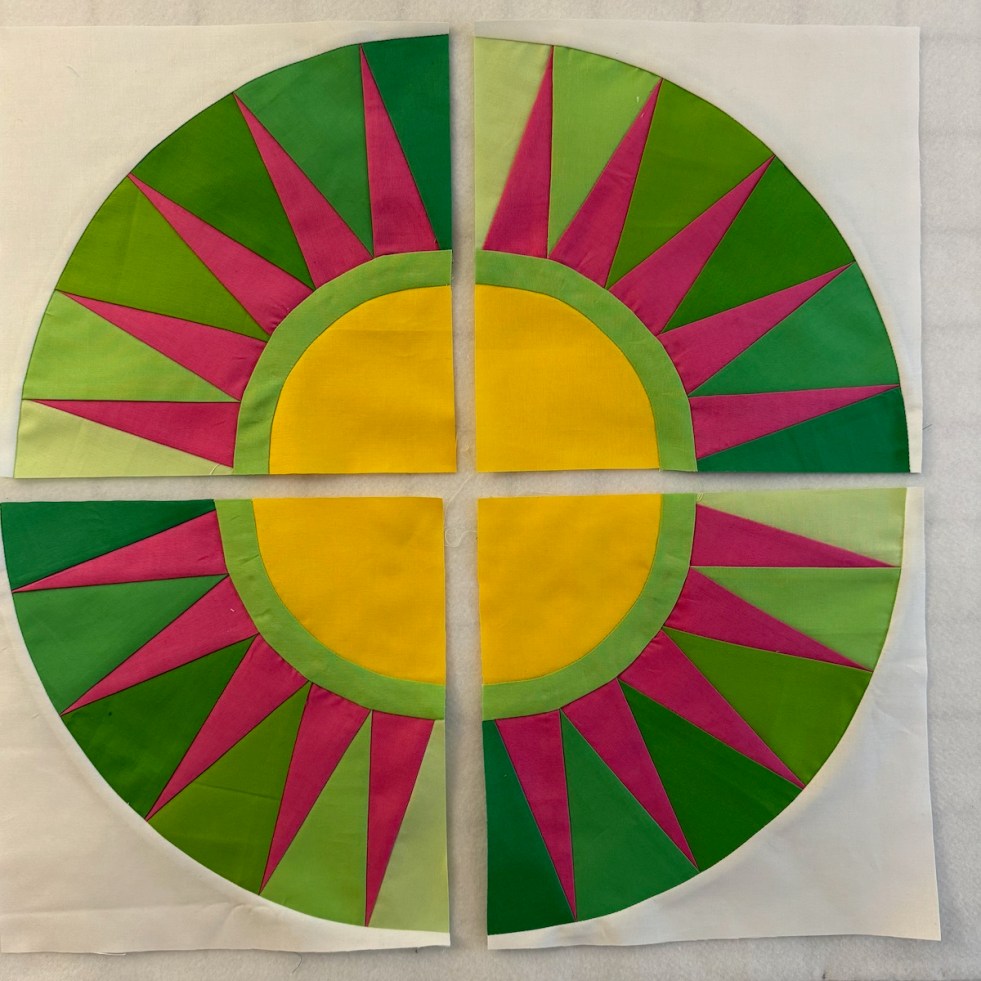
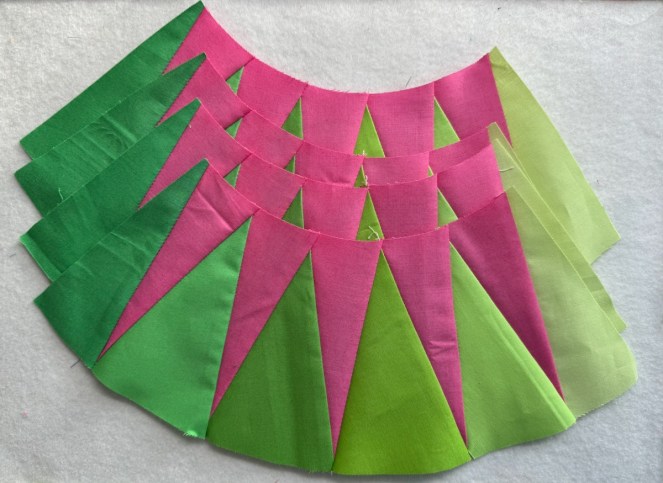
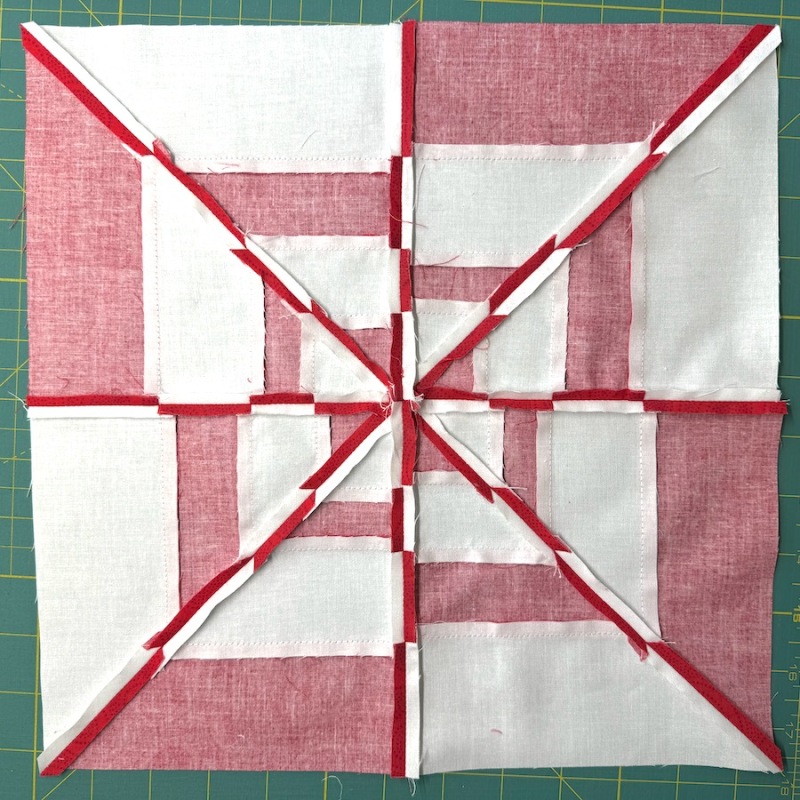
I made these in quadrants, trimming them up as I went. One done.

BIG HEADS UP! If you are making this for the Gridster Bee, make sure your outside reds are “pointing” the right direction. In my version the outside edge red pieces point counter-clockwise. It might be easy to get them going the wrong way.

Two done, this one in a different method (templates), and fabric.

Overall, I still prefer the freezer paper method.
The first time I tried that method, I was quite wobbly.
Second time, just sorta’ wobbly.
Third time, breezed through it.
This time? So easy: I loved it.
I have other posts on using freezer paper for foundation paper-piecing, but for this one, don’t forget to download the handout (above).

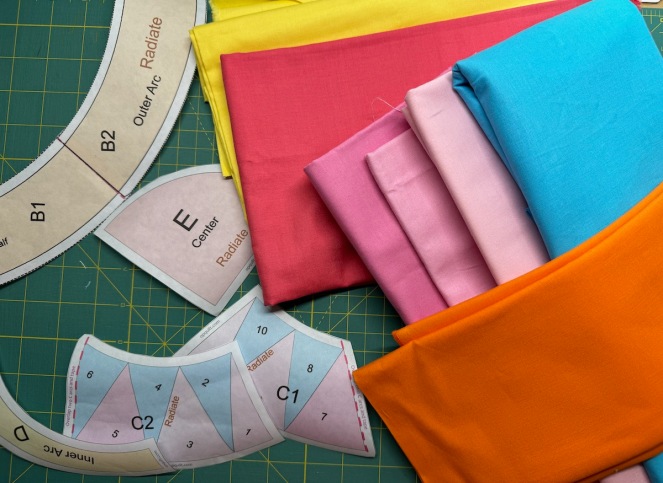
Cousins. I thought I wanted my bee-mates to make it scrappy, but then a package arrived and my Past Self had ordered 4 1/2 yards of Painters Palette Solids in Poppy Red from Keepsake Quilting.

Guess I’m doing Solids.

And this is why I like Painters Palette: I washed all four-and-a-half yards of the red in the washer with one color catcher sheet, and you can see the barest, faintest shimmer in a couple of places. I pre-washed because I was curious; generally I don’t pre-wash my Painters Palette solids, as I know they are pretty colorfast.

Gridster Beemates, keep reading after the end as I’ll have some tips for you.

There are 25 blocks in the larger quilt, so my bee-mates will make two each and I’ll get started on the rest. And a note to my bee-mates: I’ll send out the fabric a couple of months early.

Look for it, and have fun making!

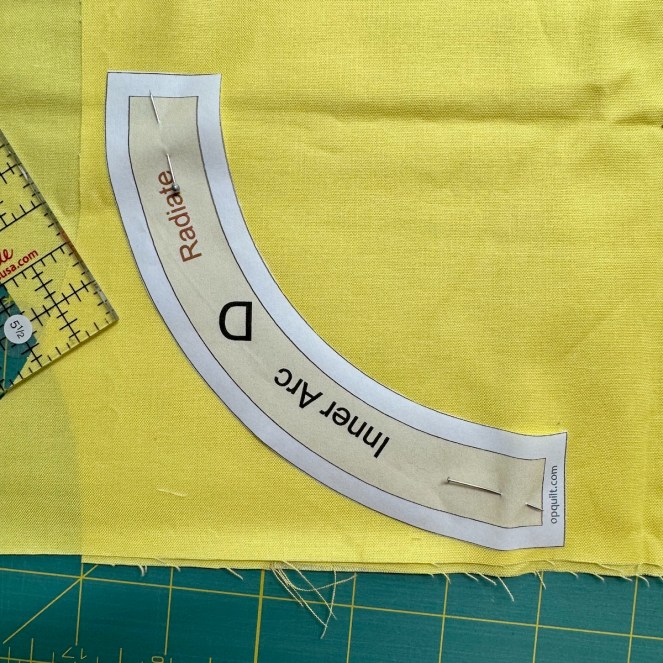
To the members of the Gridster Bee: I’m sending you each a quarter yard of Poppy Red and White.

I worked out the layouts using the dimensions of the fabric, so you can get TWO blocks out of what I’m sending. (I marked the fold of the fabric on the right.)

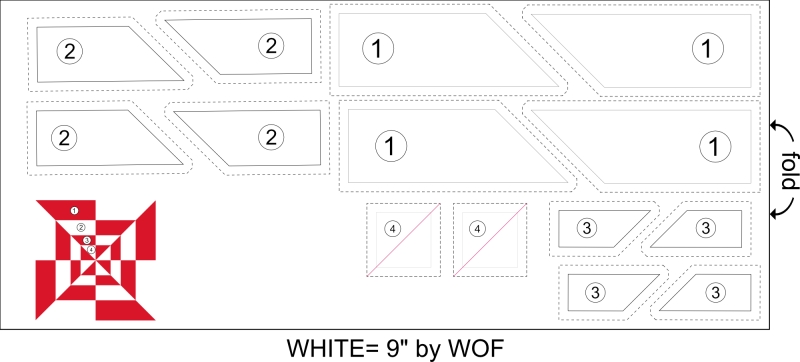
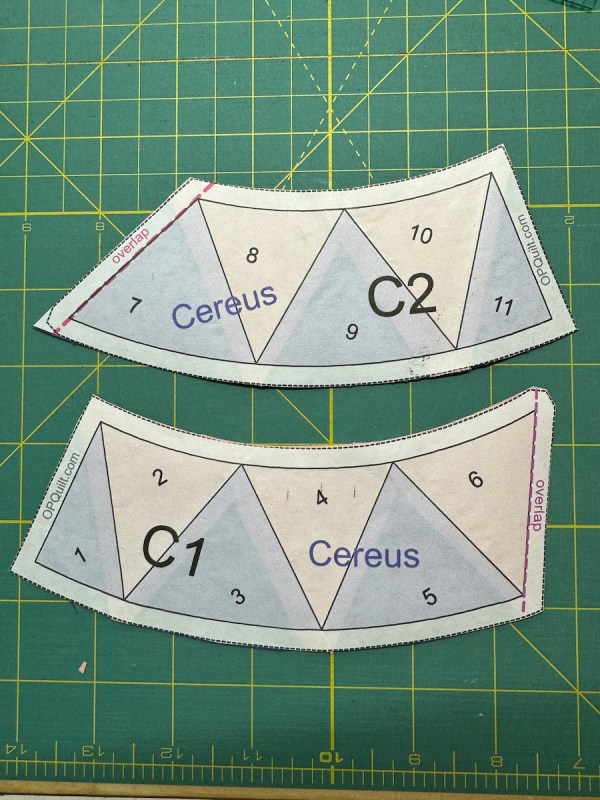
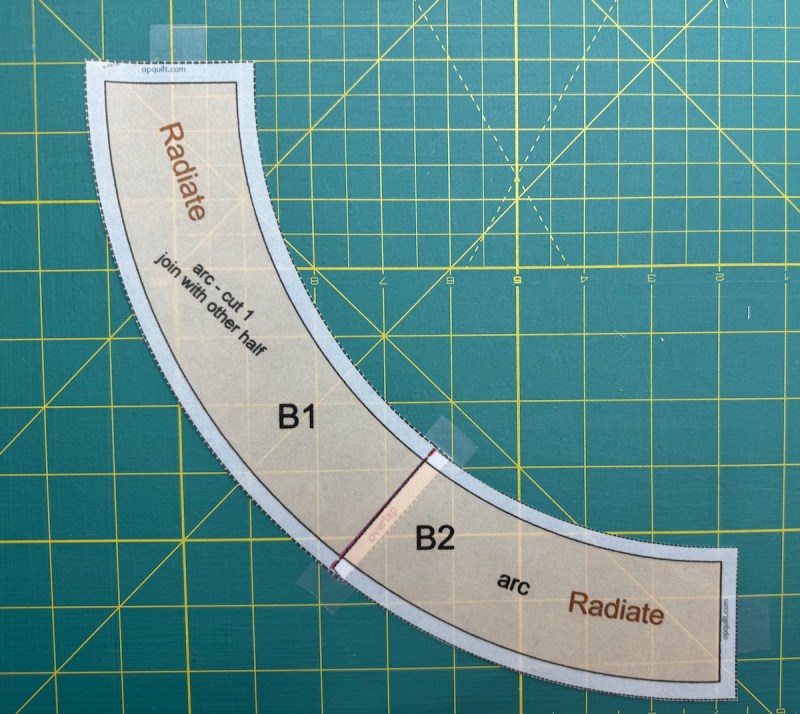
Admittedly this is a layout for templates. If you want to use the Foundation Paper Piecing (freezer paper, or otherwise), it might be helpful to think in terms of strips:

Remember that because this is a solid fabric, and there is no right or wrong side, you can flip the fabric around as is needed. No, there is not TONS of fabric, but there is plenty. If you can’t get the two blocks out of what I’ve sent, send me back the scraps, if you wouldn’t mind, and I’ll combine and get them all finished. I’m trying to get all the blocks out of one dye lot of Poppy Red, which is why I’m calculating this all out.

And if you are a newbie quilter, take it one step at a time. I’ve tried to provide lots of materials and handouts. If you are just *done* after one block, that is fine. Send it, along with your signature block and the scraps, and I’ll take it from there.

Thank you so much for making for me in September–

300 Quilts · New York Beauties · Patterns by Elizabeth of OPQuilt

Cereus: New York Beauties Block 9

If you say “Cereus” it sounds like “Sirius” which is a legit star in our heavens. And if you spell it slightly differently — like Cerus (which I think it was started out to be) — that is the largest object in the asteroid belt between Mars and Jupiter. But no, it’s Cereus, which is a night-blooming cactus, usually only for one night. Most all the names of these New York Beauties have a name related to light or the sun, but this one is related to the moon — when it shines, the cereus flowers open up and bloom.

I start, as always, by layering up the fabrics. I use Painters Palette Solids, by Paintbrush Studios, and since two of our fabric shops have closed recently, I purchase them from Keepsake Quilting online. I have updated the colors chart online, where you can find this pattern. The colors chart is a free print-out: find the Preview Icon just underneath the buttons for purchasing, and you can download it to get the colors I used for the blocks. Since we are doing the blocks bit by bit, I’ll update them as we sew.

From Left to Right: Section 1 is ironed onto the purple, paper is folded back and like Photo 2, we are ready to sew that seam just to the wide of the fold of the freezer paper. In Photo 3, I trimmed it a little narrower than 1/4″ wide, maybe somewhere between an 1/8″ and a 1/4-inch. I have many seams on this section, so I don’t want a lot of huge seam allowances clogging up the works. But this is the only section that is pieced, making Cereus a quick block to make.

I have become completely besotted with the freezer paper method. Some quilters are using regular paper, dabbing glue on it, and continuing as if it were freezer paper, but I’ll put up with the prep work as I like how the freezer paper adheres well as I’m working. Plus I’m not a fan of glue (but maybe that’s because I worked on the collage fruits quilt in between sewing this block, and…ugh).

I lift the folded edge between section 1 and section 2 and iron the fabric toward the dark, then lay it down and iron section 2 onto the fabric. There are many tips on the other blocks I’ve sewn; a complete listing is here, at the tab at the top of the blog. But you can count on the freezer paper lasting for about 4-5 times of use.

Here I just press the freezer paper section straight over onto the fabric.

And here again, I lift the fold, slip the seam allowances under the paper, and press into place.

One trimmed up.

Both trimmed up.

Fold back the sections at the ends, and pin to join the C1 and the C2 pieces together. Make sure you don’t sew the paper anywhere (fold the bits of it out of the way if needed).

Press and there you are!

I always place the C-curve shape on top with the reverse-C-shape on the bottom. The correct term is the Convex on the bottom, and the Concave (now backwards as it is right sides together…and looks like a “C”) on the top. I mark it into sections with pins, match those up, and sew slowly, nudging the edges into place.

I was sewing these on the weekend that the Northern Lights came really low on the hemisphere, during the recent magnetic sun storms. When I stepped outside to see if we had any, alas, we were too low on the globe. I have really enjoyed all the photos I’ve seen of them. I saw the Northern Lights when I was a child, but it’s too far back in the memory bank for me to have any recollection. So I’ll just have to continue with these!

Six blocks mock-up.

How I pressed the different arcs. I like dimension in my quilts.

We need three blocks, but I made four…just because it looks really fun this way.
Enjoy making Cereus!


Yes, I’m a bonafide freezer paper enthusiast. Remember this one? When I about lost my marbles with that outside edge? (although I like the block a lot). Hurry if you want to sign up and get all their blocks — it ends in June.) I printed out the remaining blocks on my freezer paper, and will tackle those soon.

New York Beauties · Patterns by Elizabeth of OPQuilt

Radiate • New York Beauties Block 3

Radiate: “emit (energy, especially light or heat) in the form of rays or waves” (from the Oxford Dictionary) — OR — “(of a feeling or quality) emanate clearly from, as in “leadership and confidence radiate from her” — OR — “(of an animal or plant group) evolve into a variety of forms adapted to new situations or ways of life” (apparently so rare of a definition, I can’t find any examples). And with the movie Oppenheimer earning an Oscar award for Best Picture, I suppose we can also think about radioactivity radiating out from the fusion bomb, set off in New Mexico years ago. But I really think of the sun on a hot summery day, warming you as the cool ocean breezes surround you on a beach. Pick your beach.

Cut out, ready to go. But first! a tip on getting the alignment on that B1/B2 piece:

Left Photo: Using a gridded cutting mat, tape the tip of the B1 piece, using a line on the mat to keep it horizontally straight. Then sort of lining up the center “seam,” align the B2 piece as well with a line on your mat, keeping that edge vertical. Tape.
Right Photo: Trying not to shift the pieces, tape the center seam, extending the tape. Carefully remove from the cutting board and fold the center-seam tape to the back. Cut off, remove, or fold back the edge pieces of tape (Big Decisions).

I lay out my colors and then get going. For this set of rays, I again wanted a gradation of color, but chose to do two stronger rays in the middle background, fading to the sides. You’ll see.

For pieces like this Inner Arc, I don’t iron it down, but instead treat it like a paper pattern piece. Again, your choice. Do try to align the outer edges on either grain (crosswise or straight-of-grain), letting the curve be on the bias. Having that bias makes for easier seaming when you sew the parts together.

First two sections of rays sewn up.

Trimmed, and papers removed. I find it easier to not pop seams, if I peel back the papers from the top edge (smaller curvature) of the rays. Now you can see the two center background rays in the middle are the same, fading to the sides. That’s also why I wrote 3s and 2s and 1s on the freezer paper — just to keep straight which fabric I was using.

Road Trip Rest Stop: admire your work.

I fold the arc in half, and with the tip of my iron, press in a 1/4″ mark, showing me the centers. You could also just put a pin there, or a small pencil mark.

Sewing the units together in steps.

Happy Dancing Number Bears are still here, but here’s our fifth block, finished! It’s really beginning to add up, isn’t it?

Status Report: five blocks finished. When I made this, I was amused to see that the right-hand side of this digital quilt was sort of empty. Of course, that will change, and I may re-arrange the blocks as I want to, when I get them all finished.

A word paragraph paragraphs about fabrics and colors and quilting: While I use Painters Palette solids by Paintbrush Studio, and that’s what my color numbers are on my Preview Page on the pattern (Preview Page is a free download), you may have a wide range of colors in other solids from other manufacturers. Use what you have and what you like. Change up my colors completely. Make them in prints or whatever. Enjoy making, and seeing your little bits of sunshine grow on your design wall, or design floor, or design bed.

We have to bend quilting to our will, to our situations and circumstances, in order to enjoy what we do.

Yes, I do use Trim-an-Quarter/Eighth rulers, but I also use a regular see-through ruler. Yes, I like freezer paper currently, but if you like the regular way of FPP (foundation paper-piecing), do that. Mary, of Zippy Quilts, sent me a link to another quilter who combines the two in this video. I’m so grateful for all you quilters and your interests and your worlds. You fly through rainbows and bring back jewels for me to think about and to use. If you are sewing along and making New York Beauties, tag me on Instagram (@occasionalpiecequilt or #newyorkbeautiesquilt) or send me a photo to my email (opquilt@gmail.com).

Radiate as you go, in order to freak out any one nearby–

New York Beauties · Patterns by Elizabeth of OPQuilt

Cool Rays • New York Beauties Block 2

After leaping around the line-up, we return to Block #2, but instead of the more traditional sew-it-in-rip-it-out, it’s made with freezer paper. Apparently this method is the hot new tutorial/class/method, and you could do a search to find a class if you want, but I still think that first block I did with freezer paper will help you get started. And more tips are on the second block I tried, too.

The Bizness: Since I’ve had this quilt in mind for a few whiles, the whole gamut is grouped together under the New York Beauties tab, above, and that’s where I’ll put most things. The pattern, however, resides at my pattern shop, as does the free handout that lists all the colors of Painters Palette that I used (it’s called the “Preview” on my pattern).

For Cool Rays, I decided to do a gradation of color (popularly called “ombré” these days) in the background behind the rays, so I picked out a range of greens, trying to keep the color changes smooth and in the same color family (a more yellowy-green than a bluey-green).

I used the method of trimming a sheet of freezer paper (off the roll) to about 8 1/4″ by 10 3/4″ and taping it to a piece of cardstick, or equivalent heavier paper. Then I sent it through my color printer, using the rear feeder for a glide path that doesn’t ask the paper to double-back on itself. Cut the pieces out, and you are ready to go. I can get five uses out of one pattern-printed-on-freezer paper, but for this block you only make four.

Hand-crease on all the lines, working from the printed side, then re-crease them from the back.

Keep trimming those seam allowances to slightly less than 1/4-inch. Again, refer to the blog posts linked above for a more detailed step-by-step version of how to use freezer paper.

Trim around the completed section, around the freezer-paper pattern. You’ll be left with four stacks of rays. Seam them together, matching up the red dashed lines. It helps me to line them up in the way they’ll go (on the right).

After using the tip of my iron to press in the marks of where to line up my pieces, I lay them out.

Pinned and ready to sew.

I pressed away from the light center quarter-circle on this one. On other blocks, I’ve pressed the seam allowances toward the circle, for more definition from the front. Experiment with what you like.

And By The Way Department: I’m so tired of that argument about pressing seams open or pressing seams closed — I just saw it again on another website, and I’m like Leave.It.Alone. There is no right or wrong, but only personal preference. Unless you are making for a group, or in a Bee and the Queen Bee wants it a certain way. Then do it her way.

All four blocks done! Now that I look at them like this, I wish I had swapped two of the greens. Sigh. I can’t even imagine remaking it just for that. The quilt will be fine.

All four blocks with my line of Number Bears, made for when toddlers lived here and I had to keep them quiet in church. The bears all snap together. The guys on the left have “casts” made out of more felt, as one of my kids ripped their hands off with too vigorous effort on the unsnapping of the colorful conga line. (This was in the those old days of mending and repairing.) This hangs around my sewing room, because I can’t bear to get rid of it. My youngest is old now, but I still keep it.

Progress so far. We’ve been making a block about every other week, so far, but the upcoming Eclipse may throw us off.

This website has an interactive link that really zooms in to show granular detail of how many minutes it will show totality in your location. After having done the Annular Eclipse in Utah last year, I know how quickly 4 minutes can pass while you are looking at this marvel. Maybe that’s why I’m doing this quilt? Because it looks like the sun in some ways? I do know that’s why I named the blocks the way I did.

And here’s what I like seeing the best: Status Report, with four blocks finished. The list is on the main New York Beauties page.

Happy Sewing!