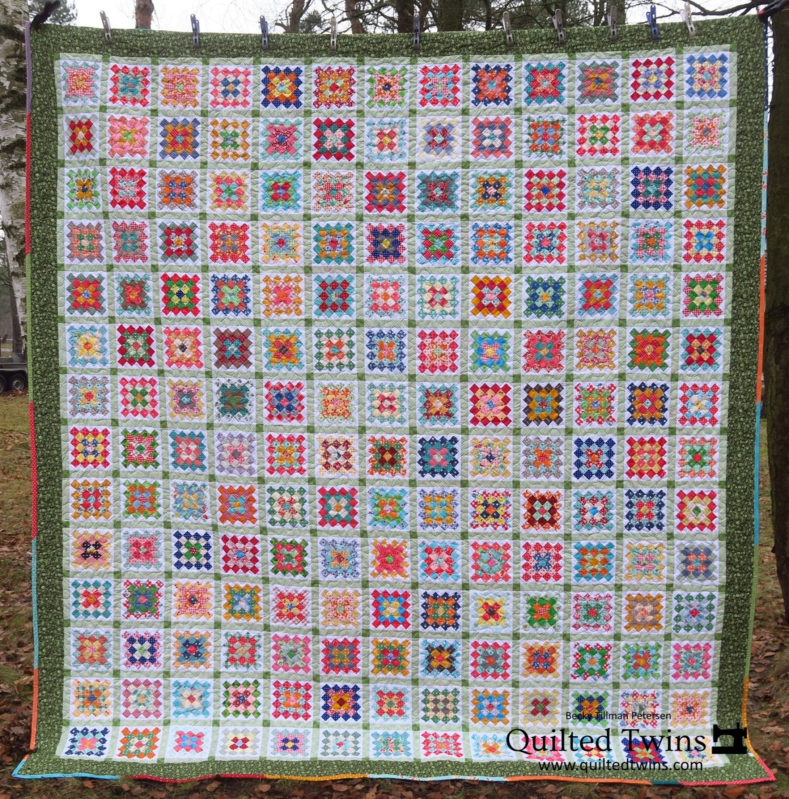
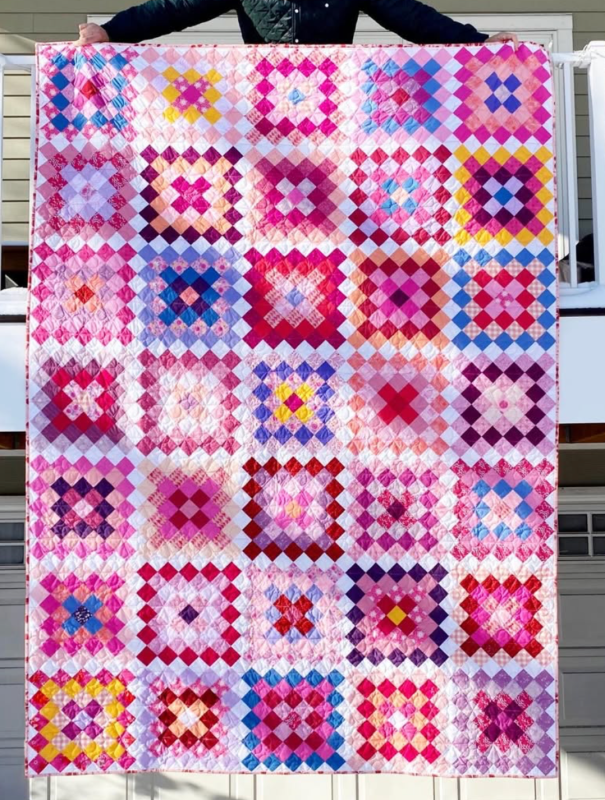
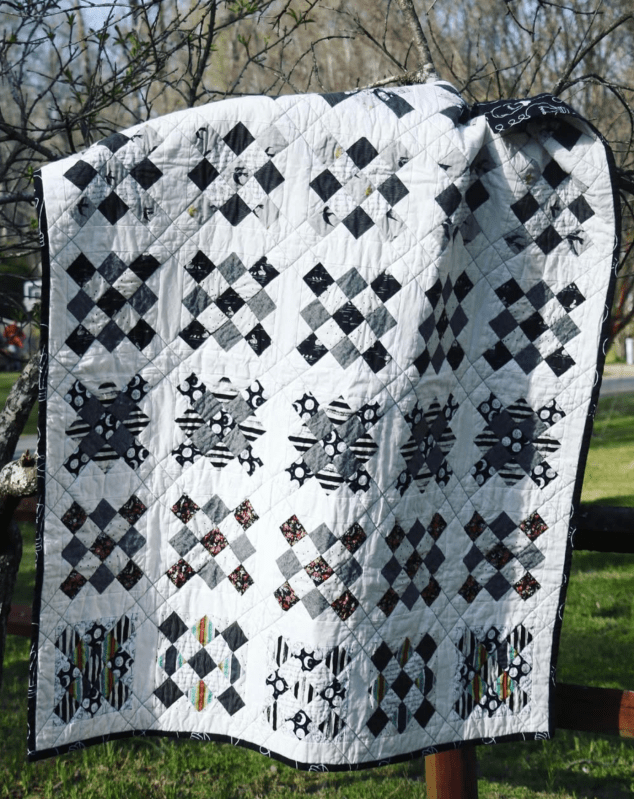
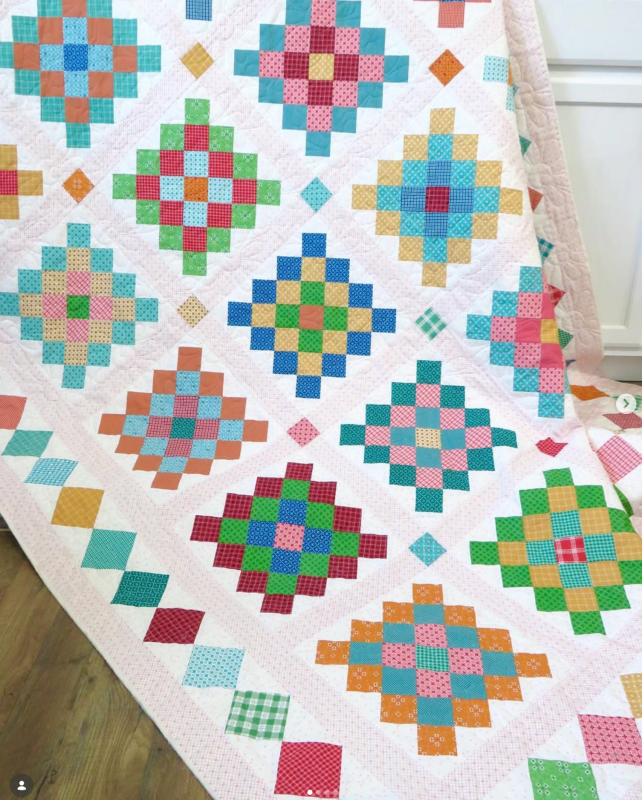
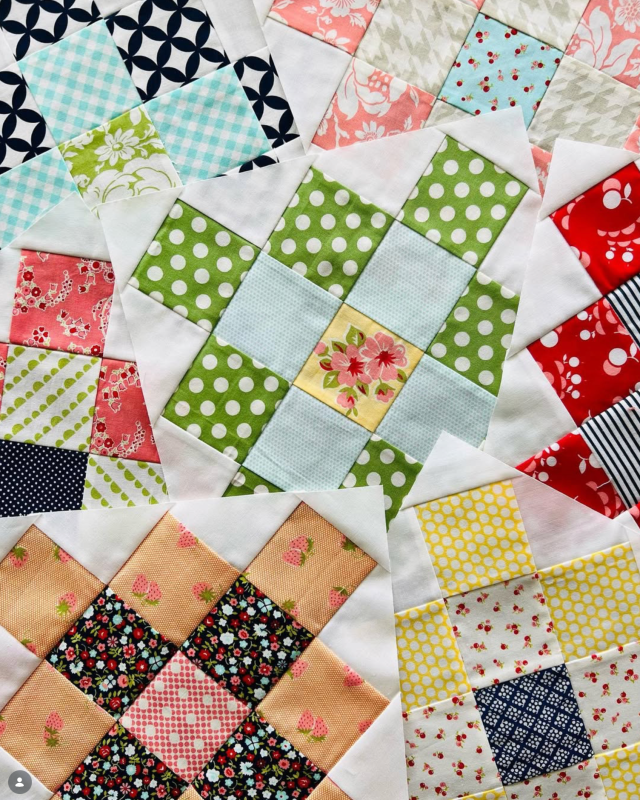
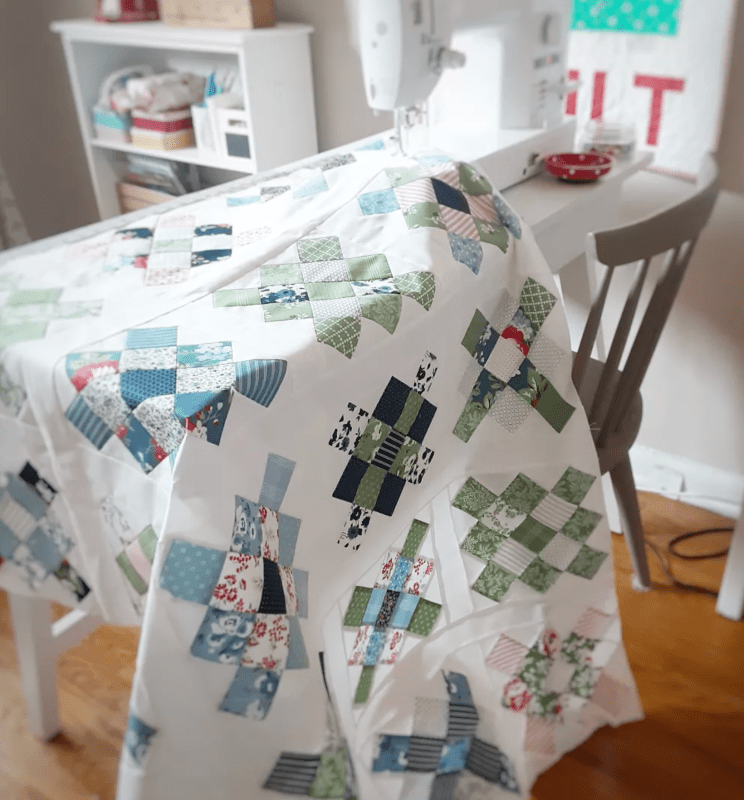
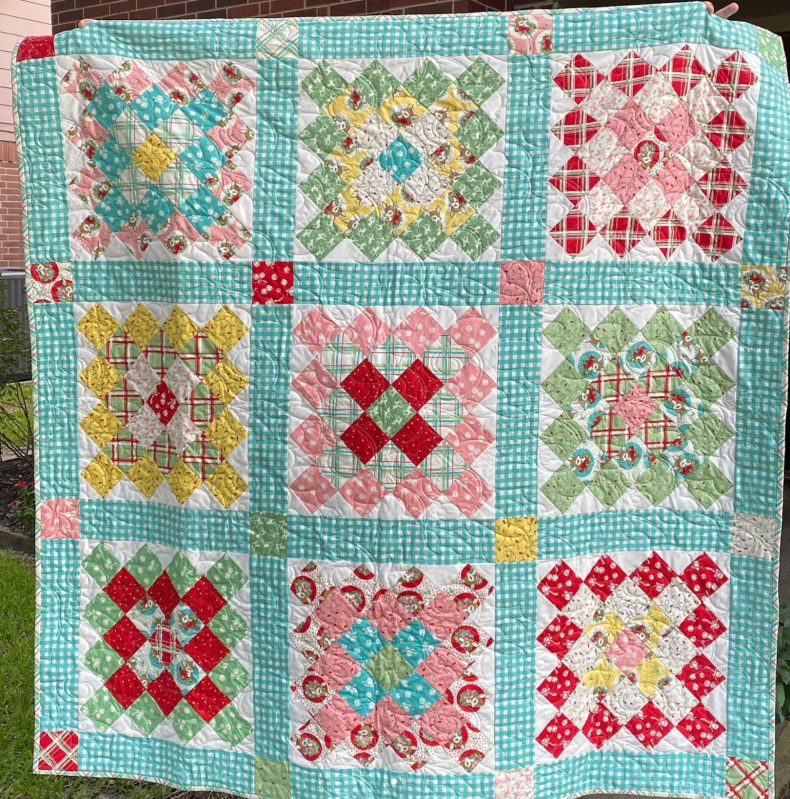
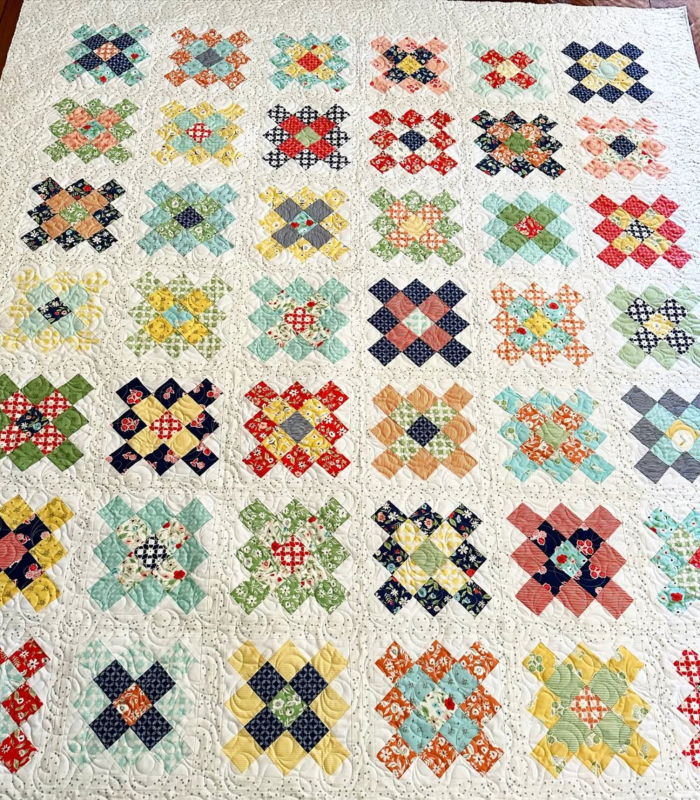
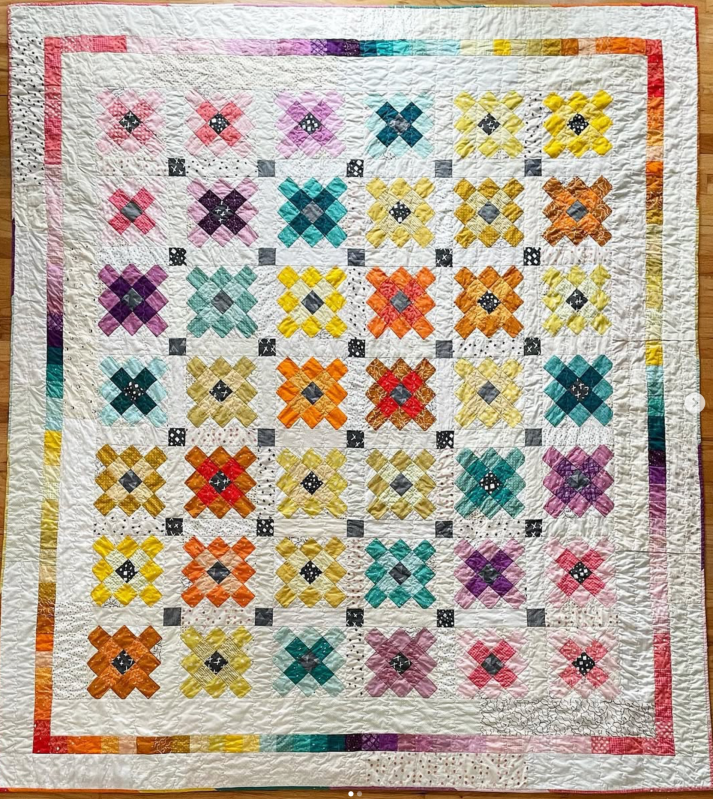
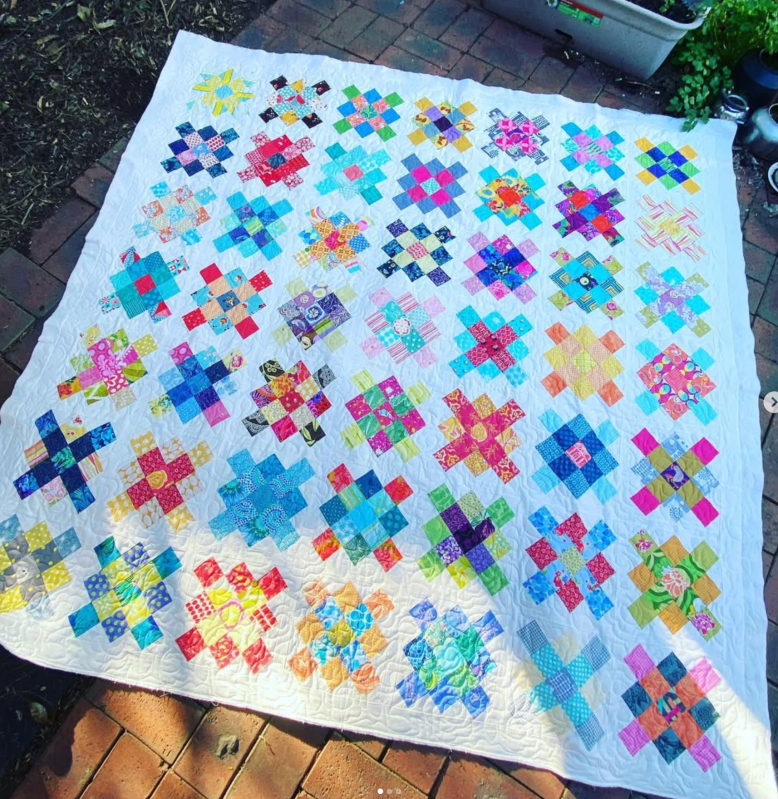
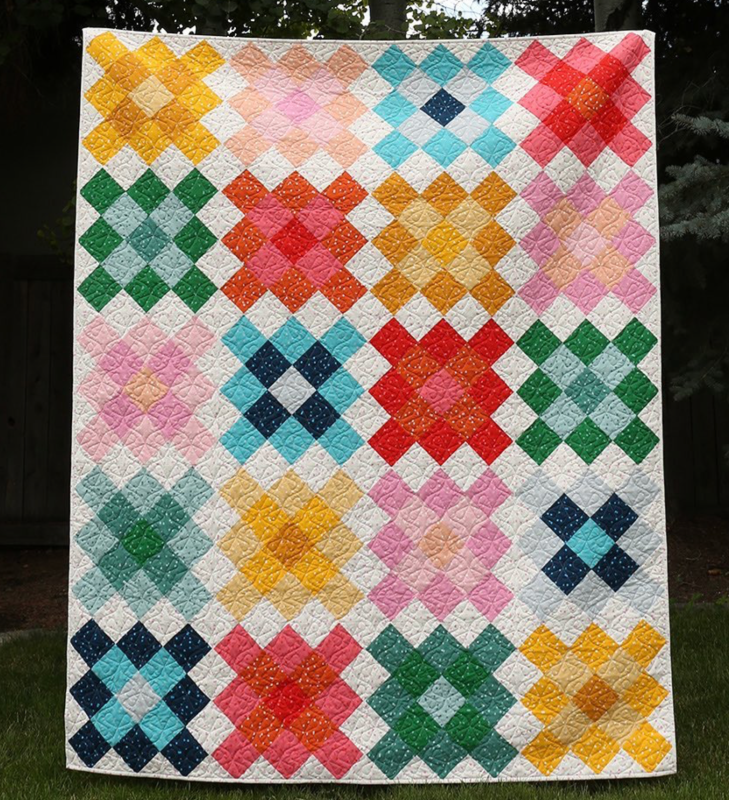
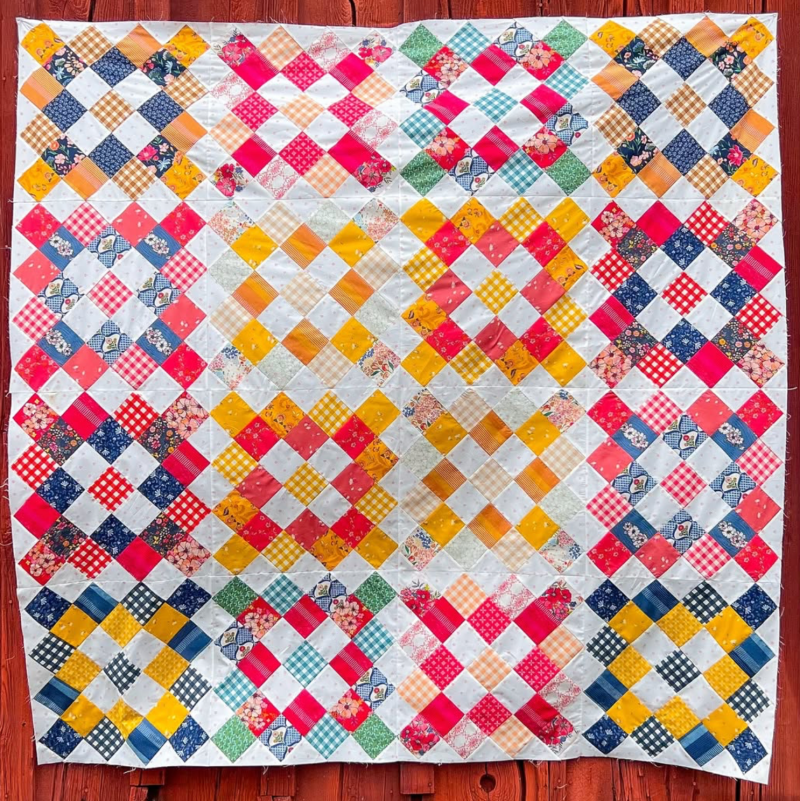
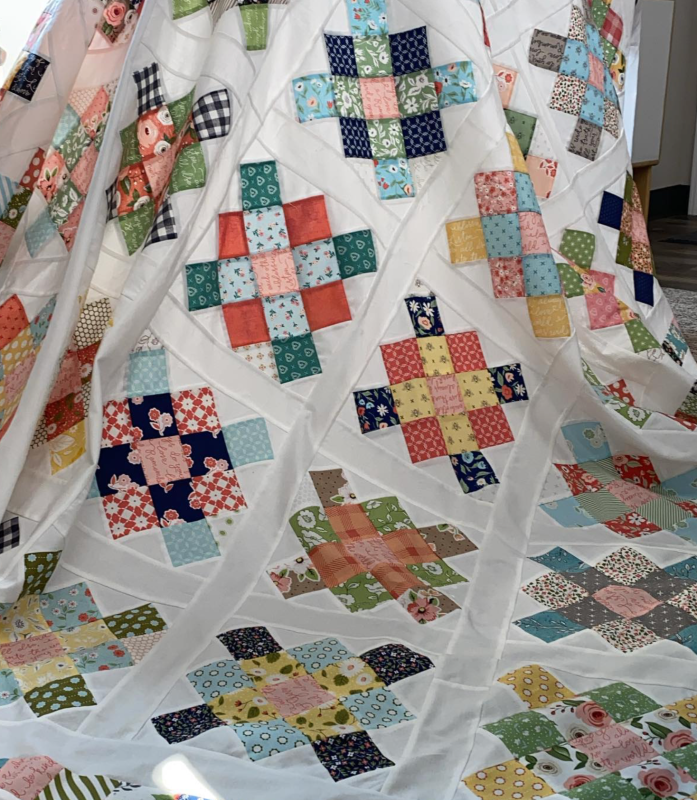
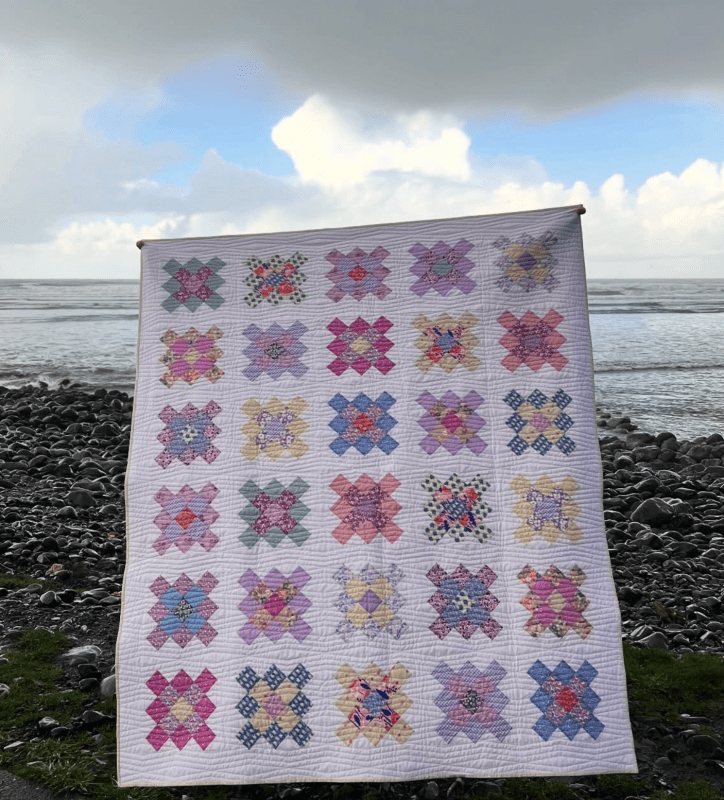
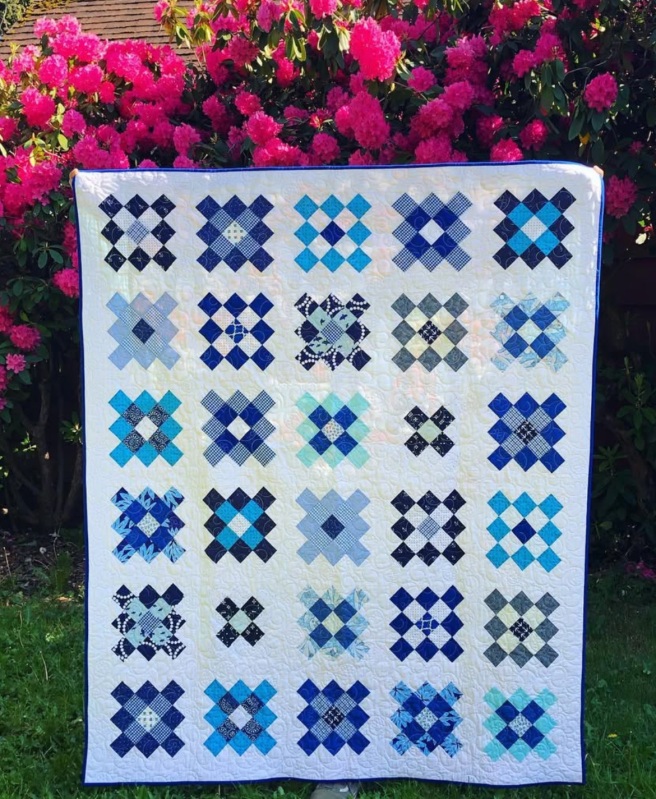
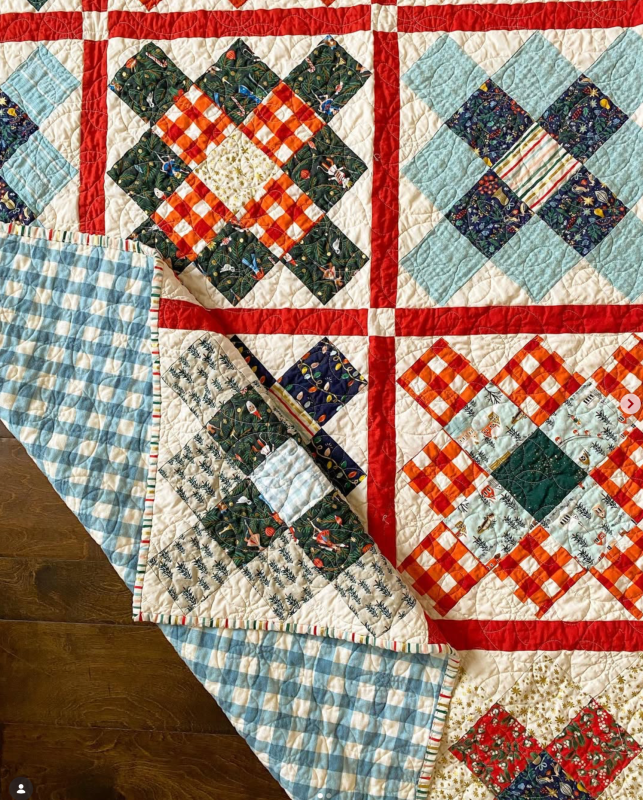
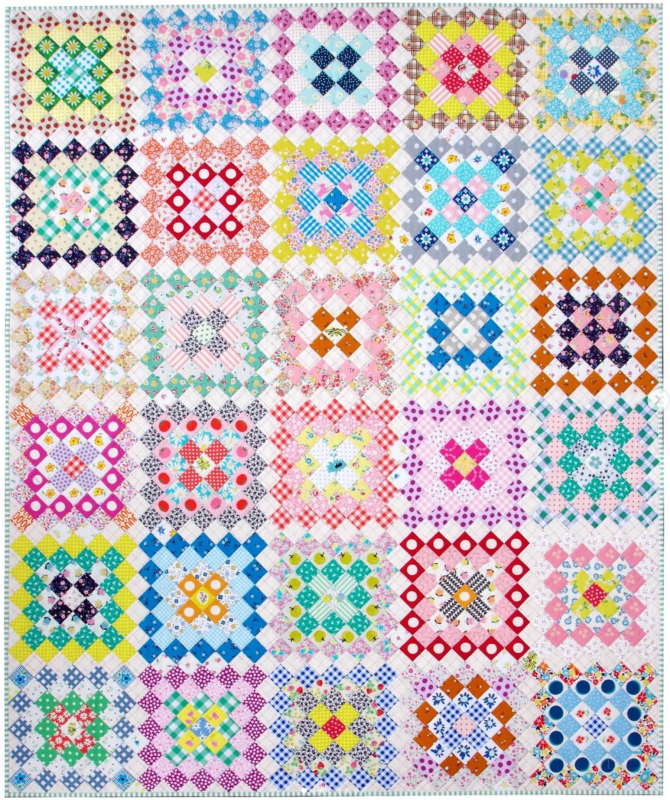
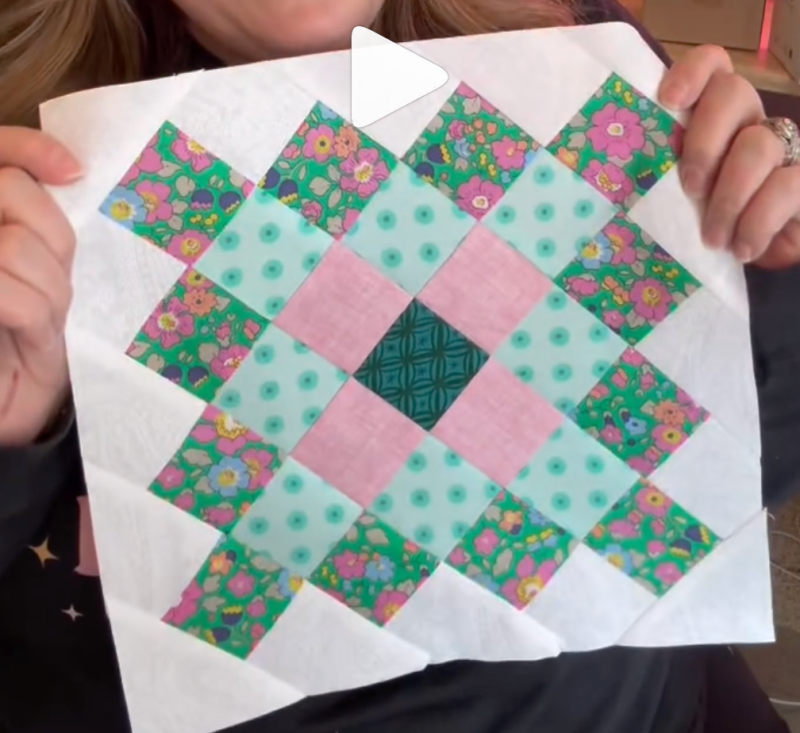
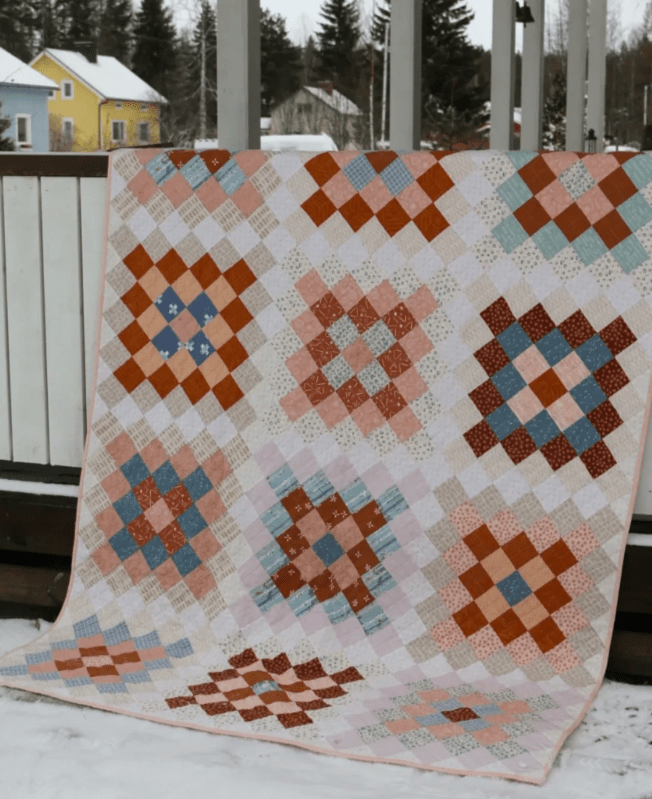
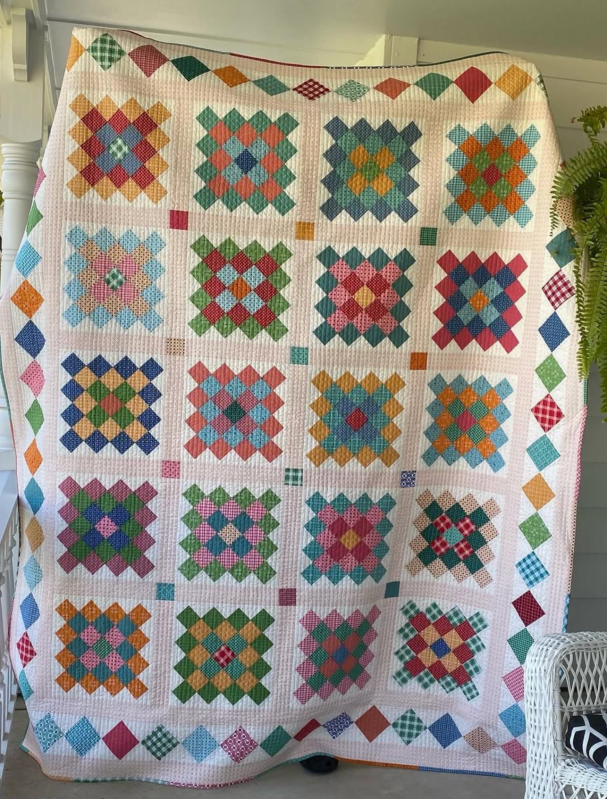
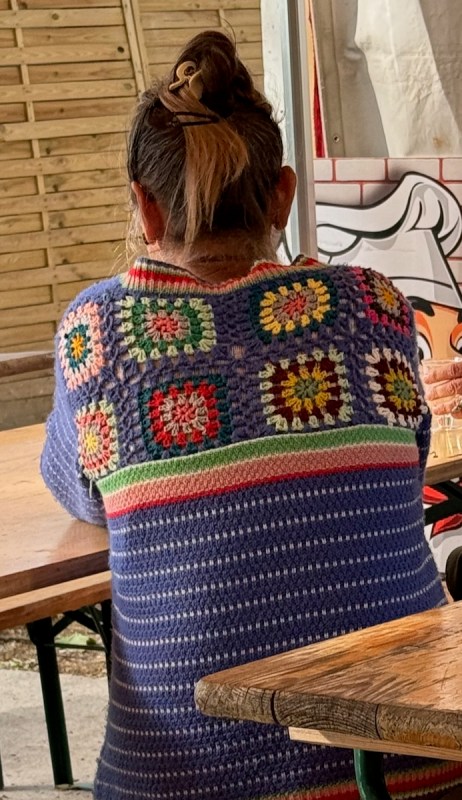
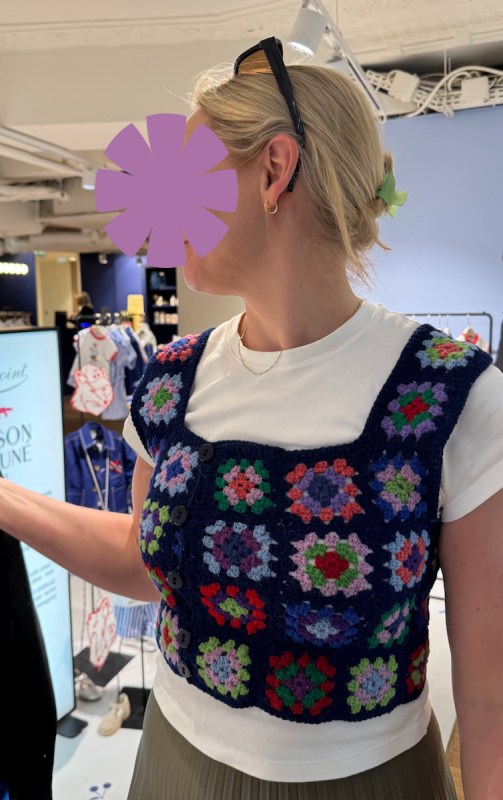
Just for fun’s sake, I decided to do an Instagram search for samples of the ever ubiquitous and pretty famous Granny Squares quilt because the marvelous Carol Gillen and I wanted to do another quilt-a-long with each other in 2026. (I think this will be our fourth?) Come along if you want. First up: the eye candy. I put a conglomeration of links afterwards, and each image is named with the Instagrammer (right-click on any photo to see it in a new tab, and you’ll see the “name” that way, along with the number showing what slide it is).
I think there must have been a lot of Granny Square quilts made in 2020, as a lot of the pictures are from around then.
A bunch of Instagram links that have the quilt, but which don’t necessarily correspond one-to-one to the above gallery:
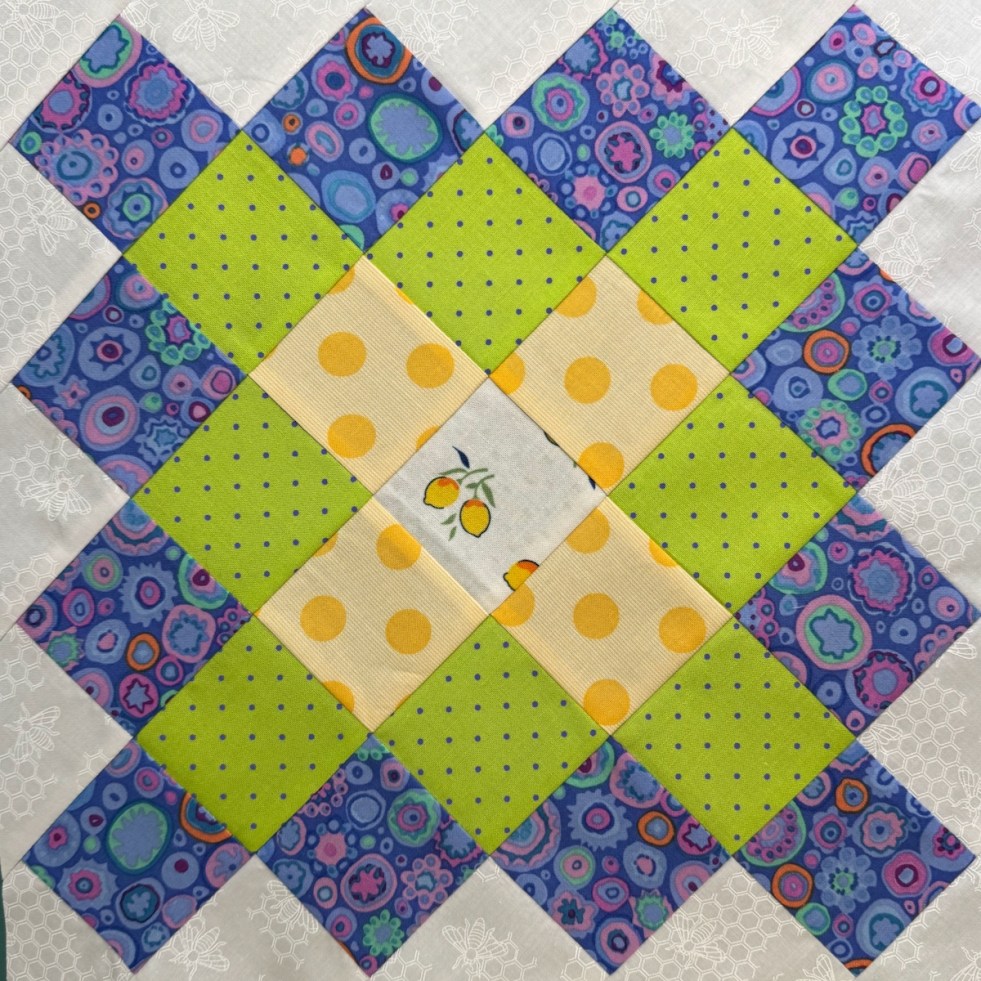
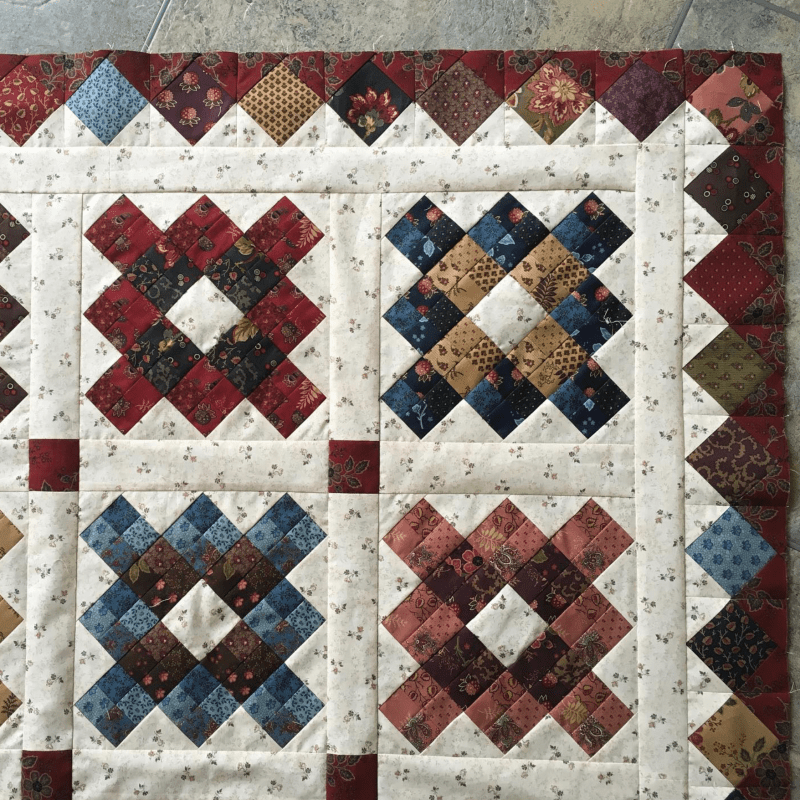
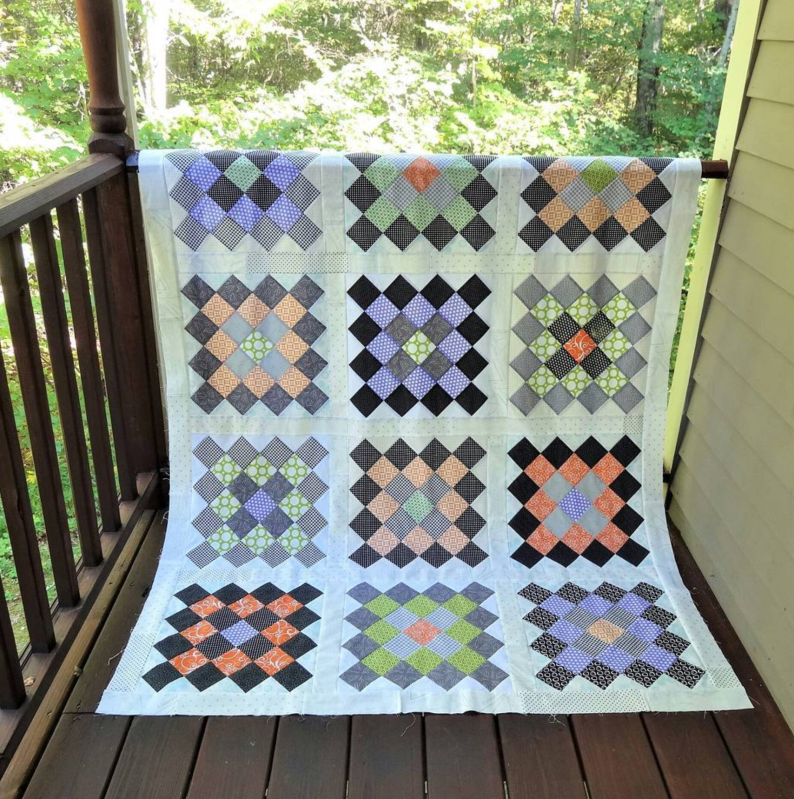
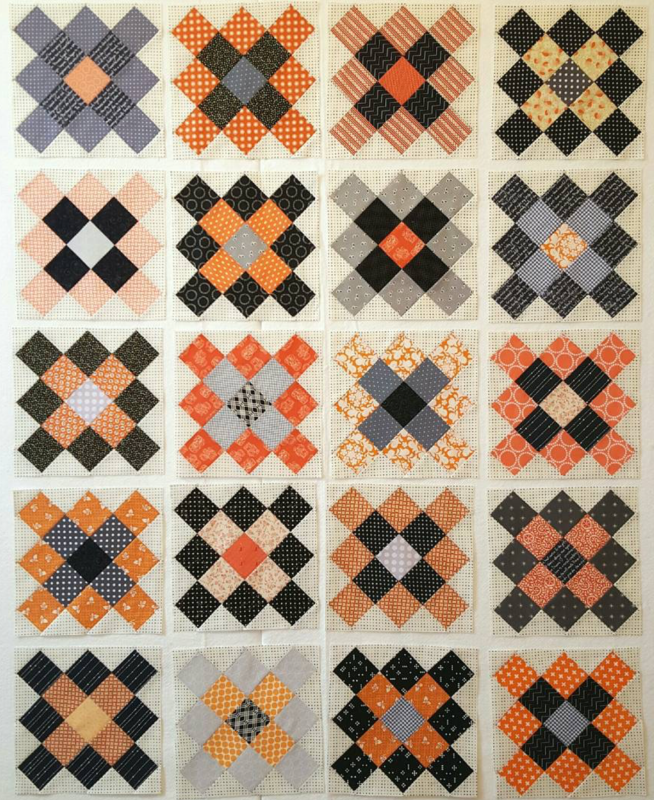
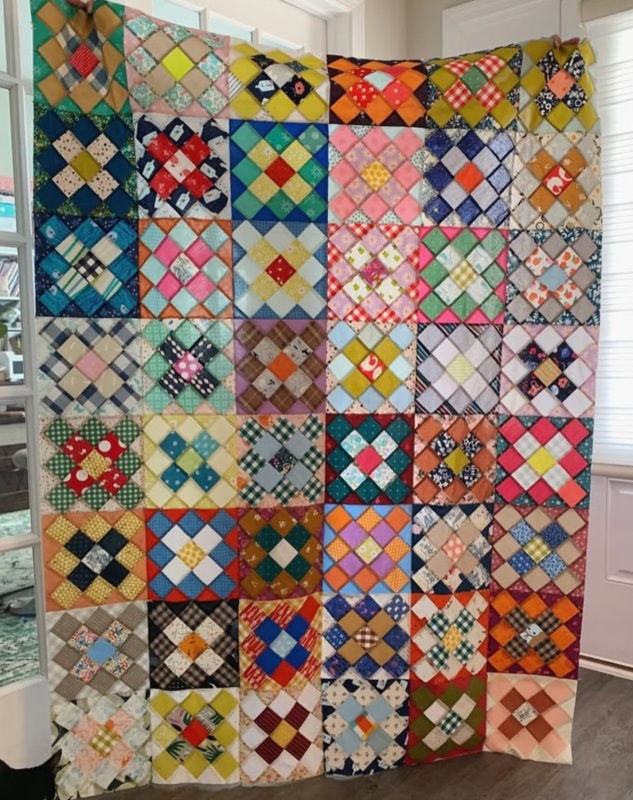
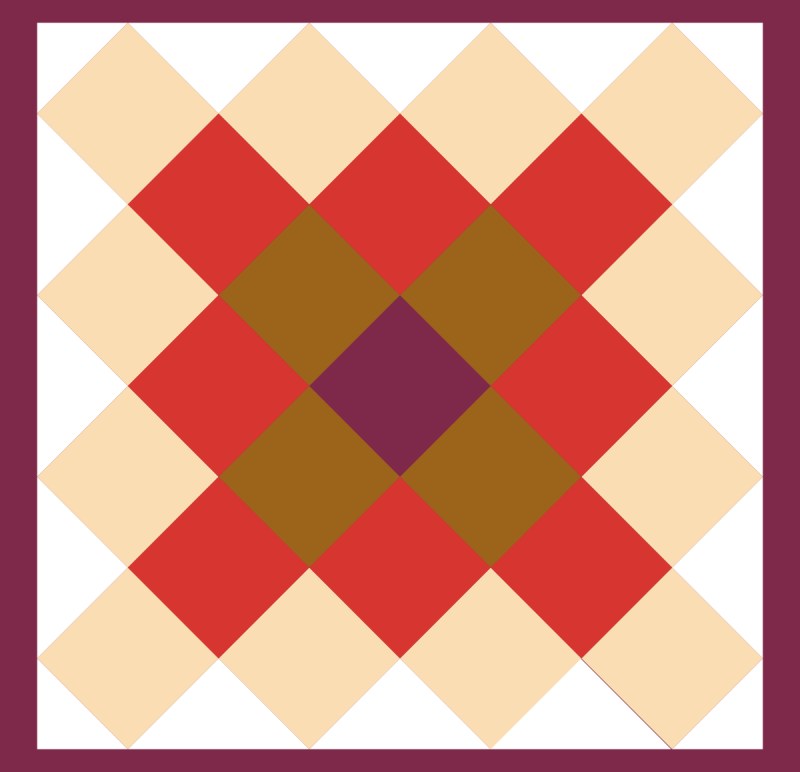
From what I saw, there are two basic kinds: the three-squares-across version and the four-squares-across version — an iteration of the original. (Ignore the photo above with six blocks across; that maker may be an overachiever and she freely admits she only made this one block. And while I admire the quilter who did hers by EPP [shown in the top row], we’re doing Old School Piecing.)
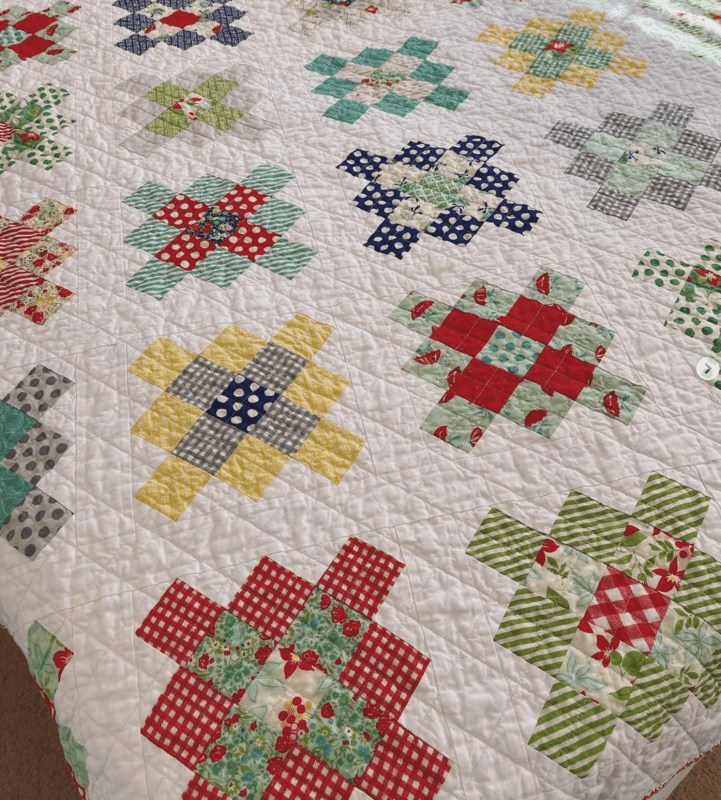
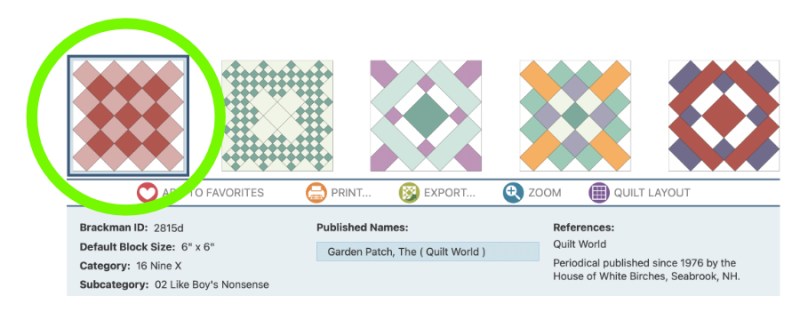
The “OG” Granny Square is the block on the upper left. We also call the one on the upper right a Granny Square, but the original name (according to Brackman) is the Garden Patch block, published in Quilt World in the mid-1970s; the color placement does differ slightly.
I saw a lot of posts, and websites, and perused videos, but I never found the source of the urban legend that says that the center of the block represents the baby, the next row represented the mother (the baby had four mothers?) and the next row was the grandmother (now this child has 8 grandmothers?). Wherever that came from it certainly wasn’t on the radar of quilt historian Barbara Brackman. The block in her book (the Bible of quilt blocks) is called Grandmother’s Pride, and hails from around the 1930s, from a mail order source called Home Art Studios.
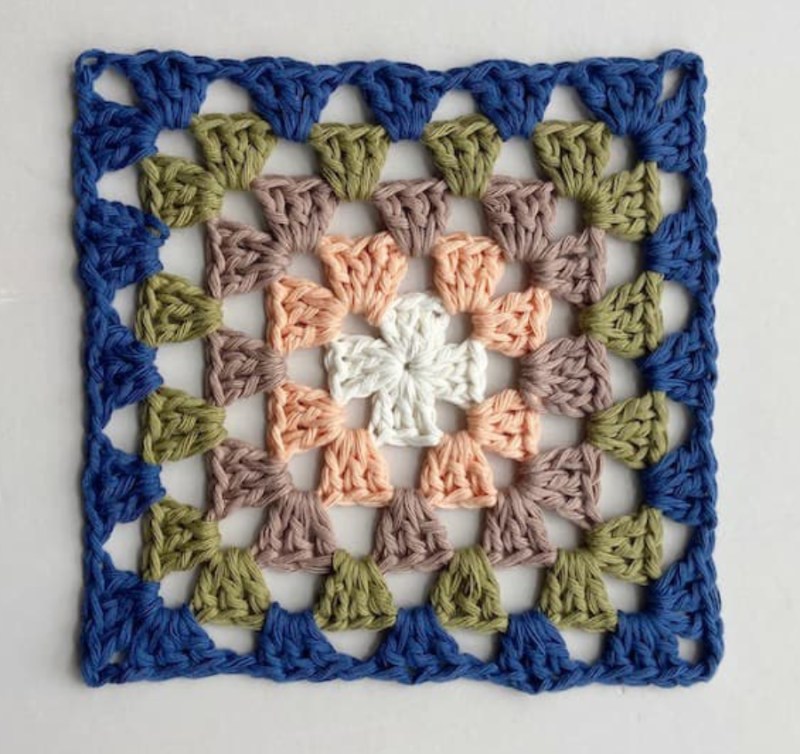
Another blogger had it the other way: the center is the grandmother, the four surrounding blocks are her daughters, and then on to grandchildren. Okey, dokey. I think the origin of this quilt square might have come from a quilter who was trying to mimic the ubiquitous crocheted granny squares whose first origins are from the 1880s, but I have no way of knowing.
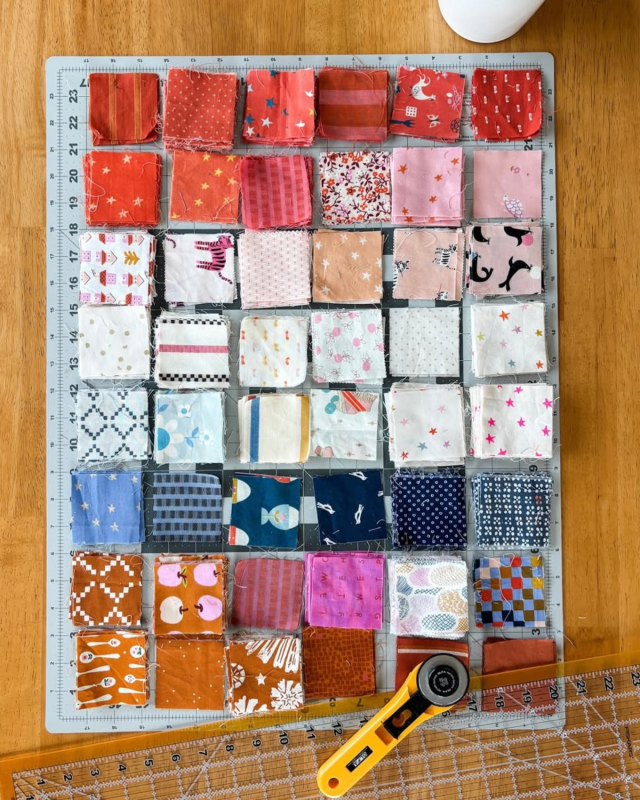
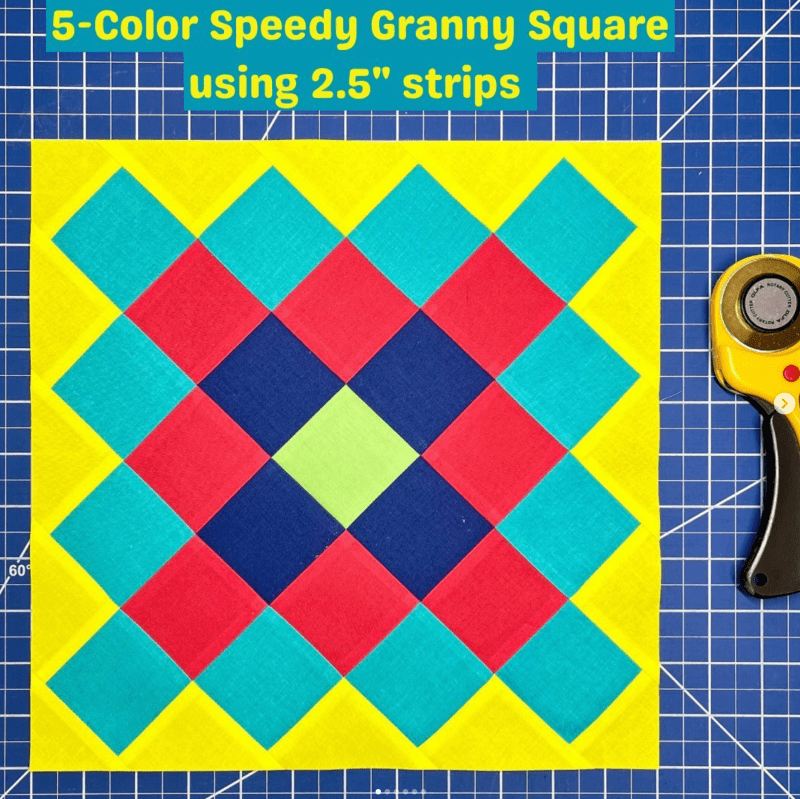
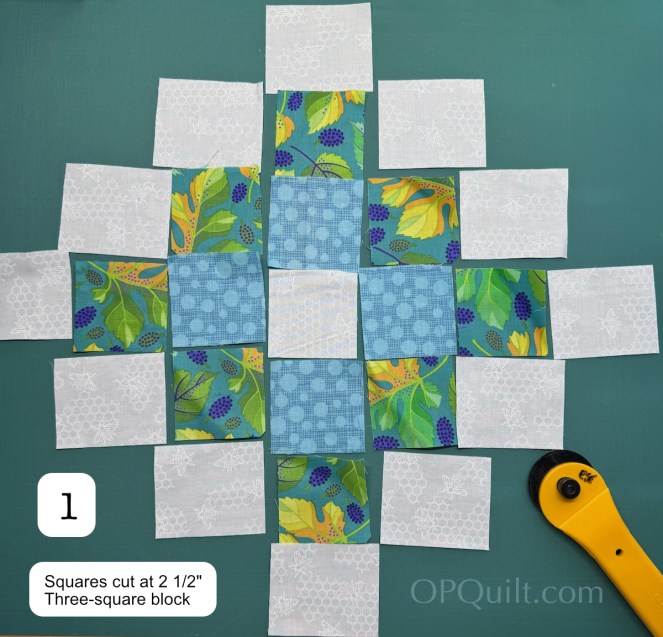
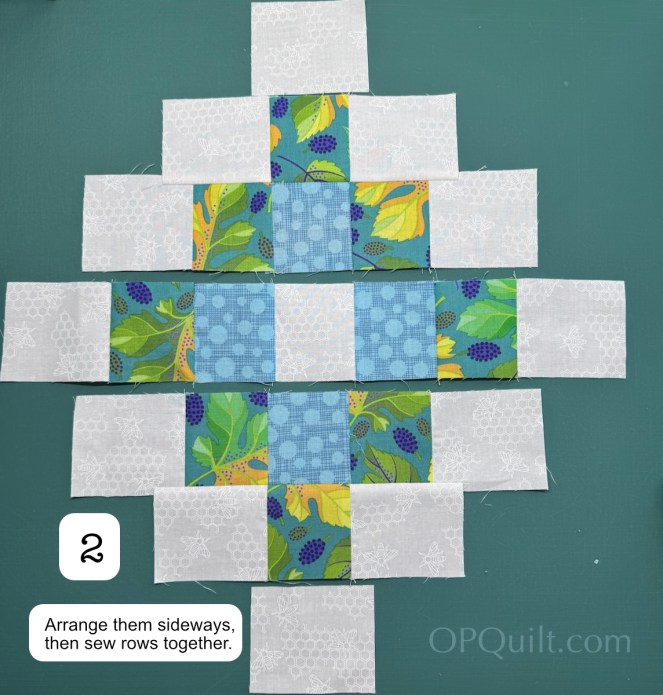
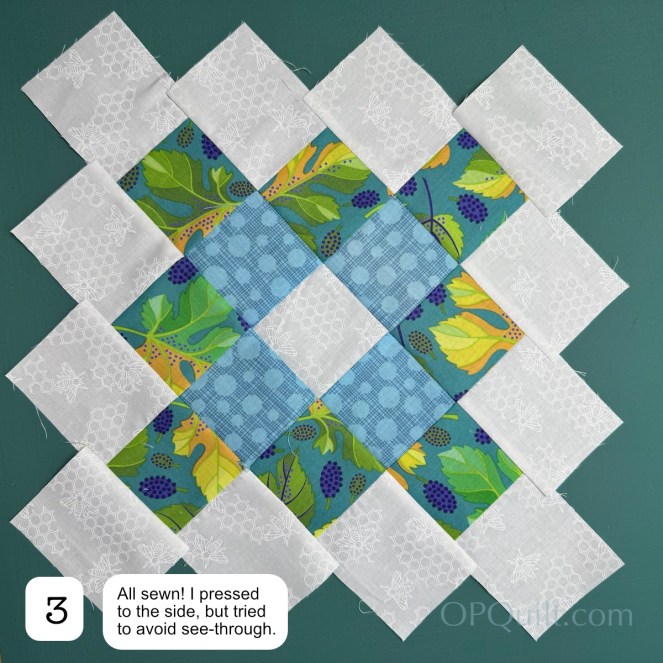
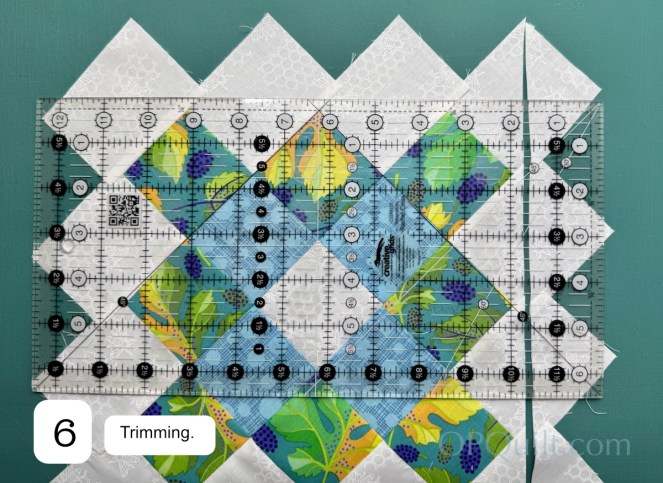
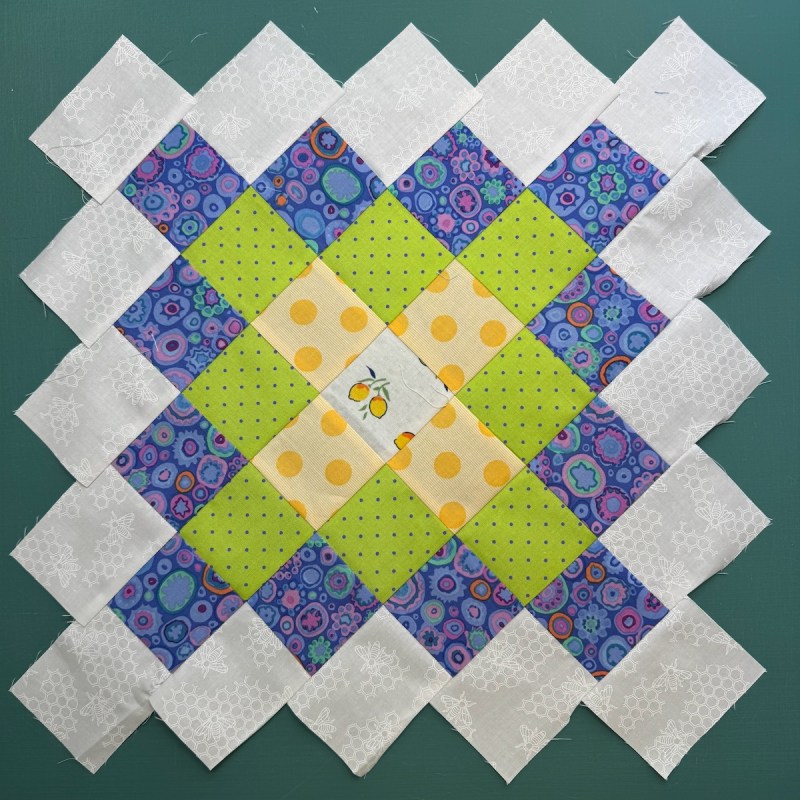
On to the making. Here’s a slideshow with pictures of my first test sample:
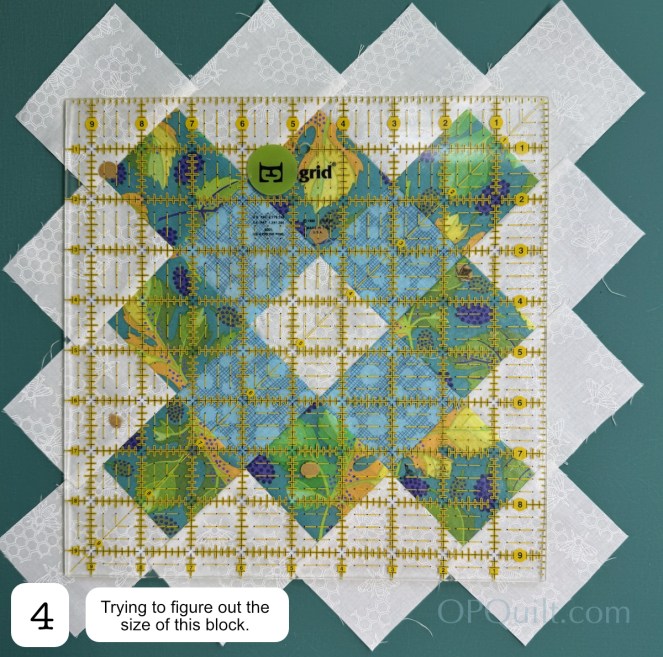
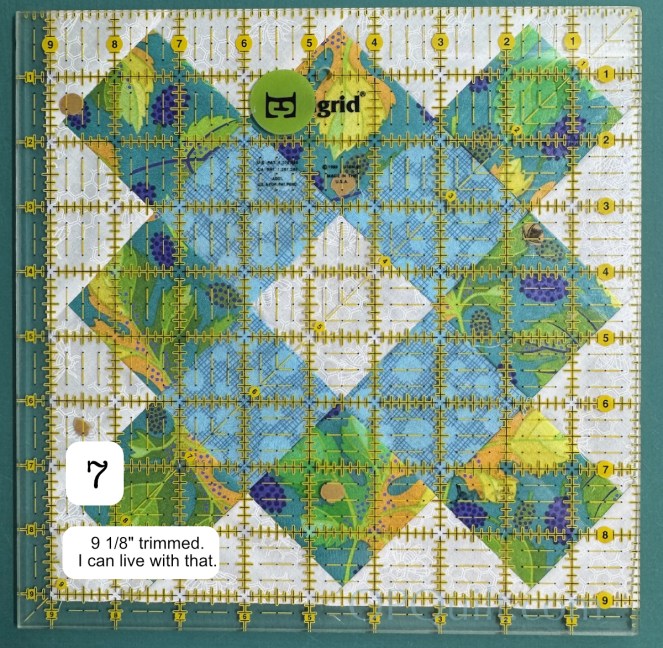
Three-square row blocks using 2 1/2″ squares trims out to be 9 1/8″ which is a block size I can work with.
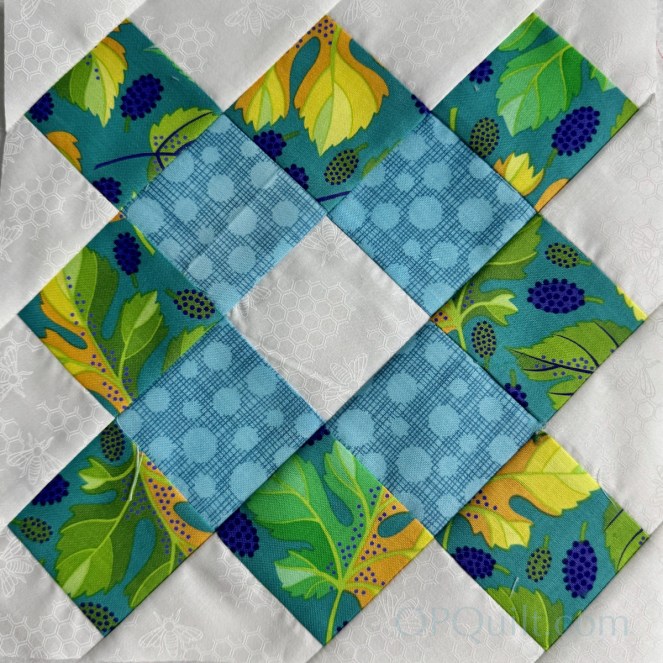
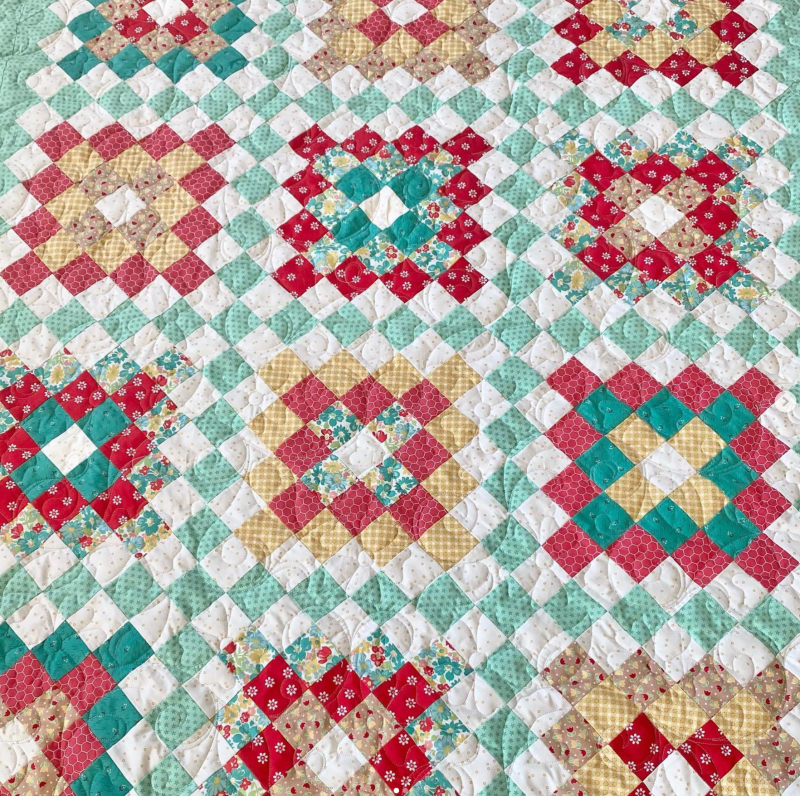
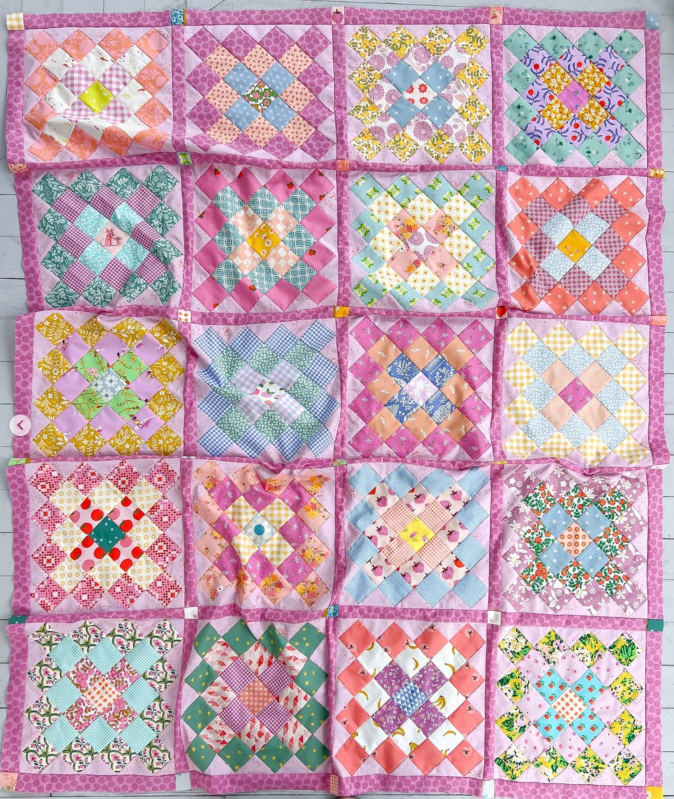
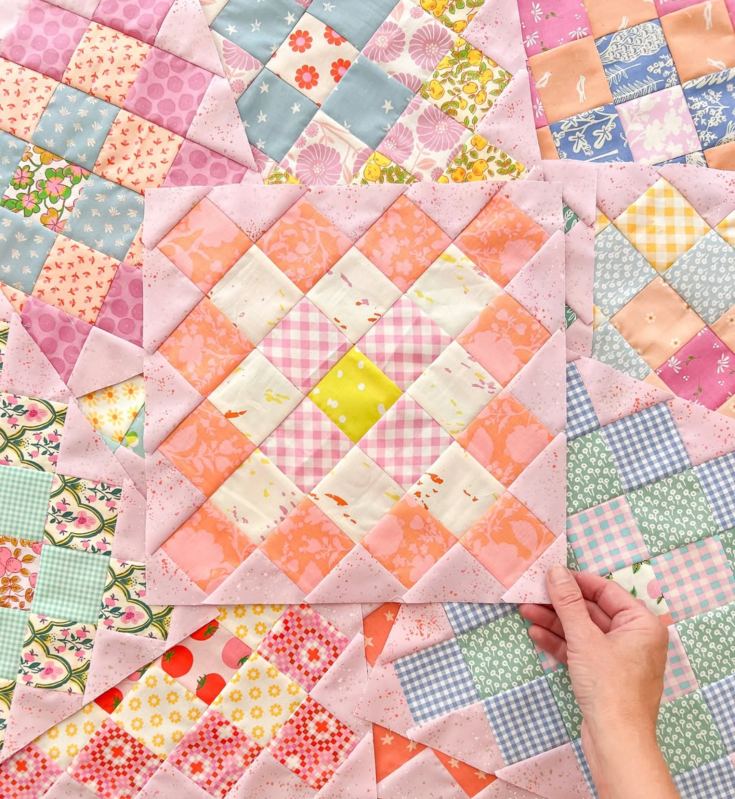
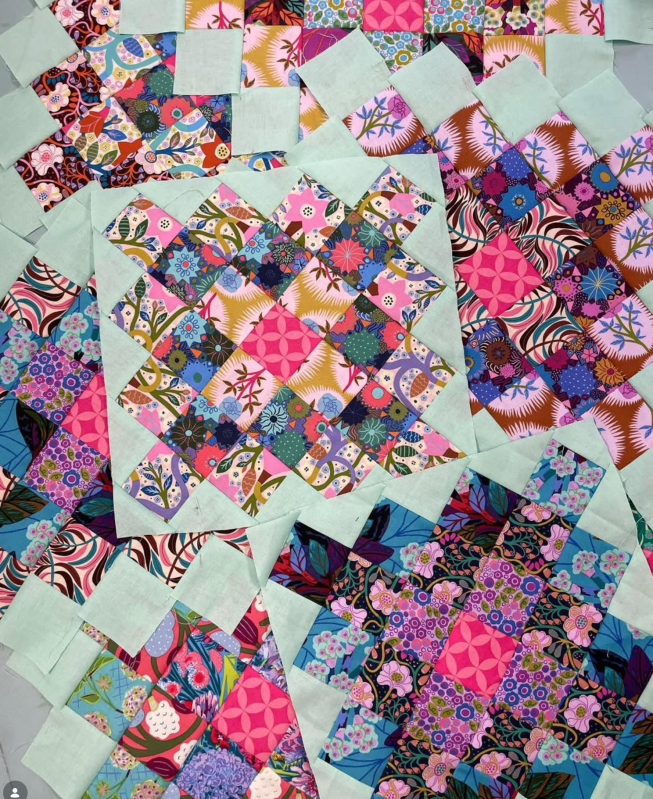
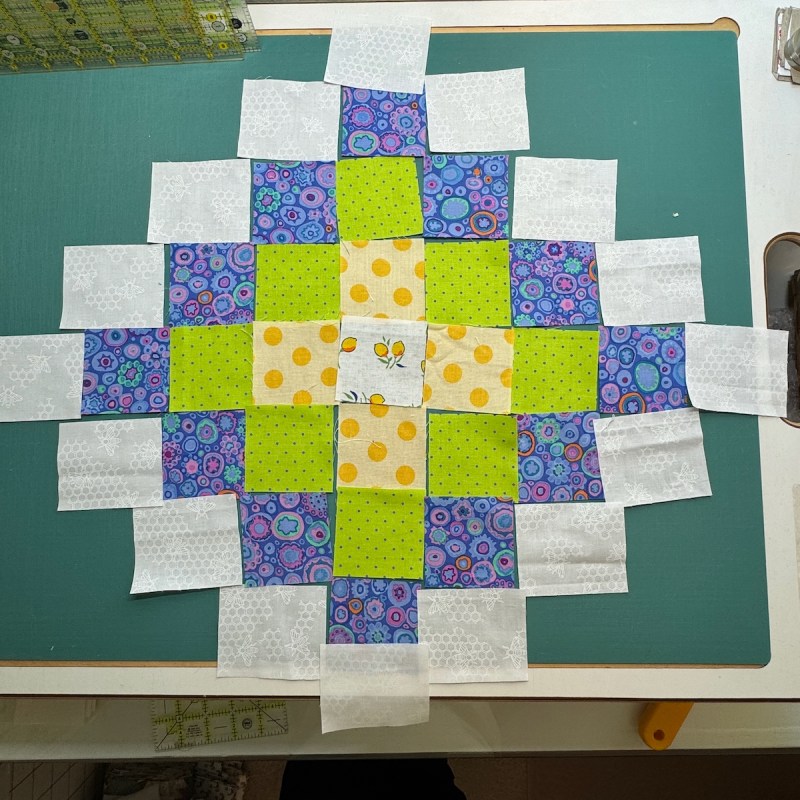
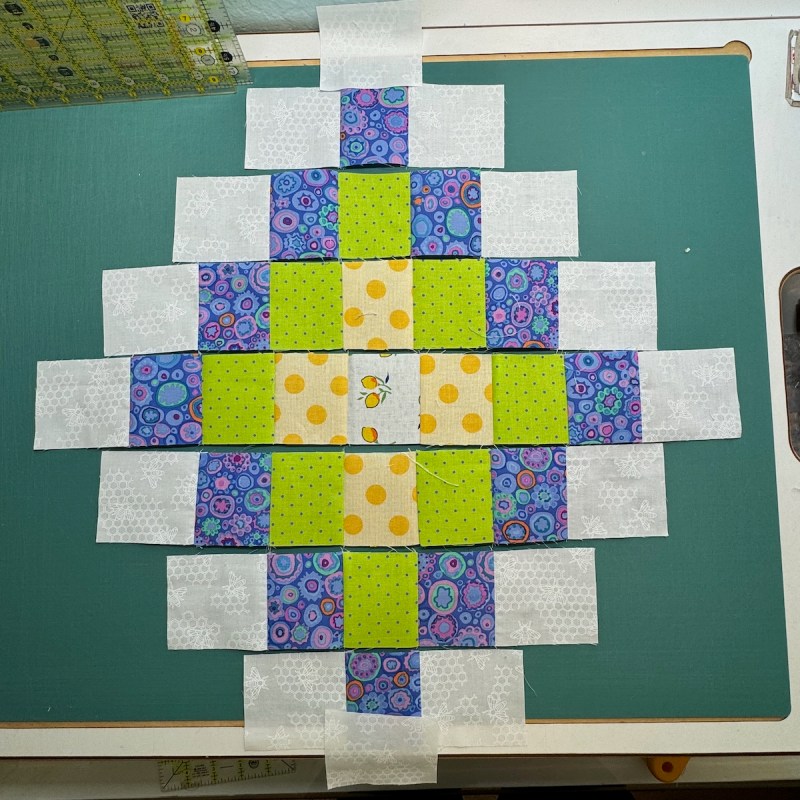
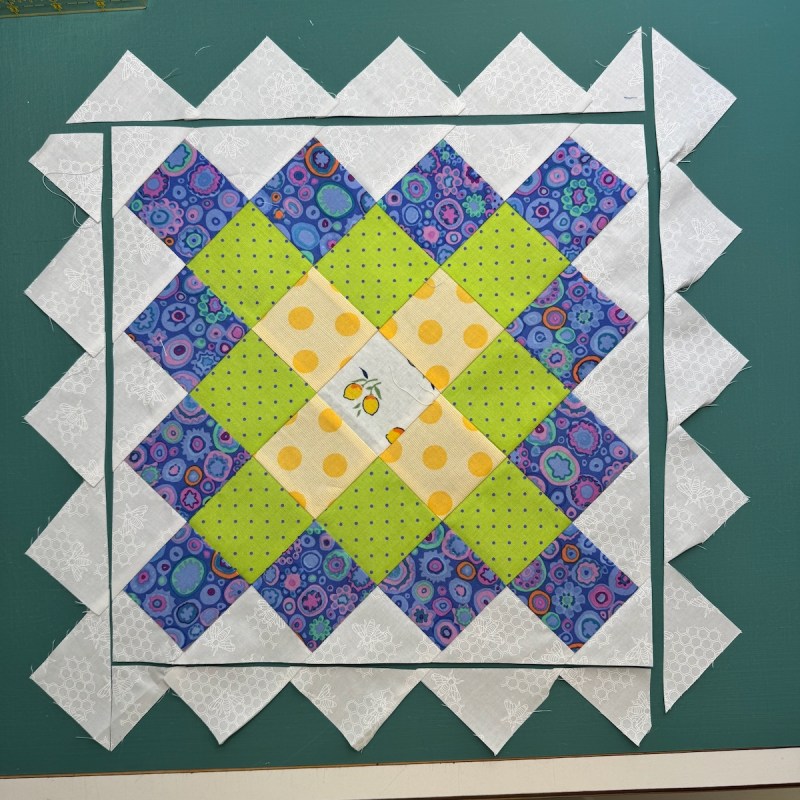
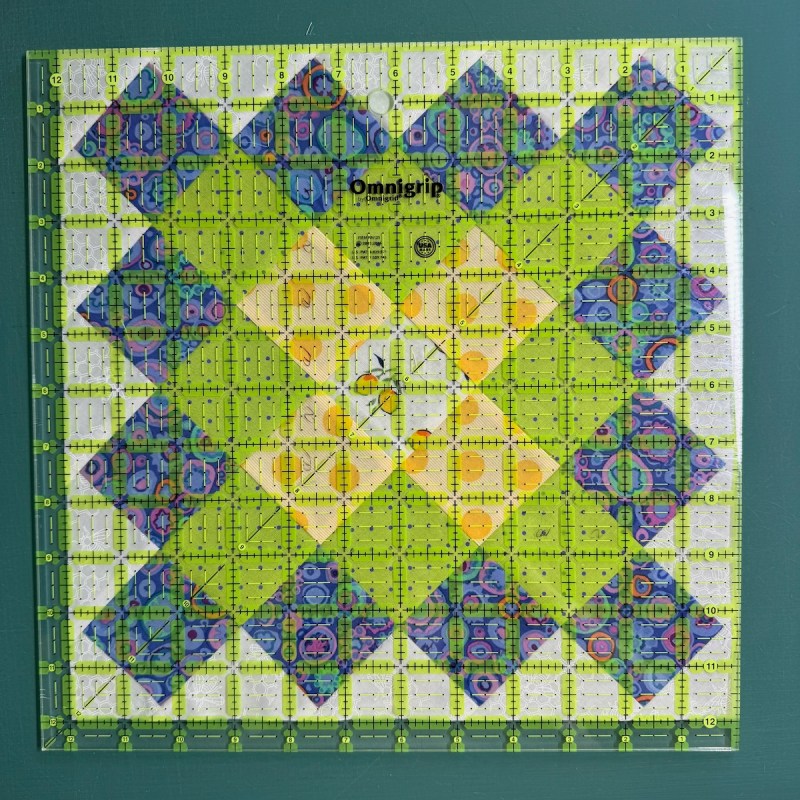
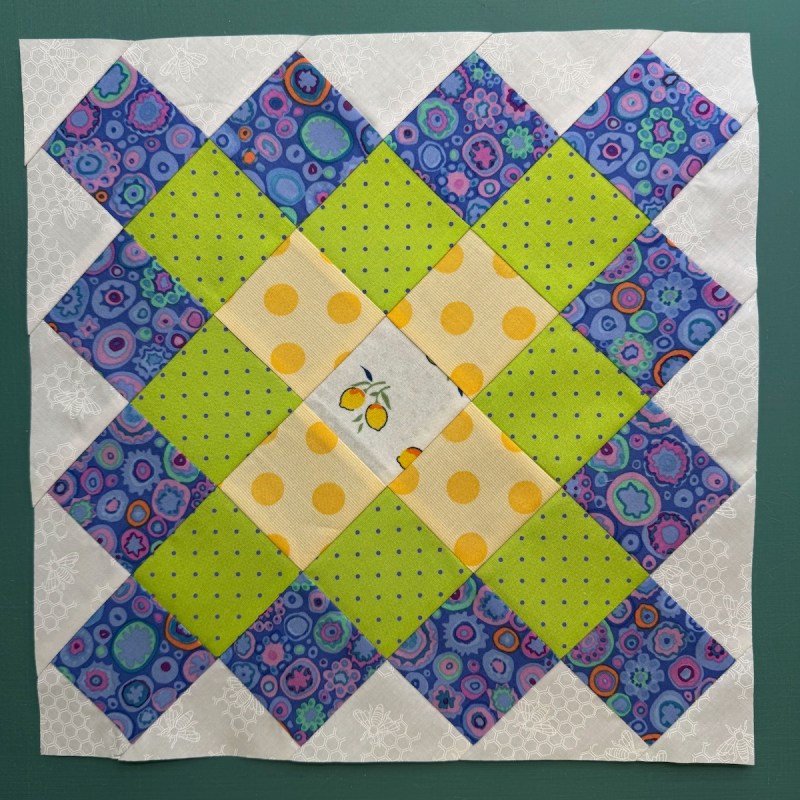
Here’s the test sample for the 4-square block, again using squares cut to 2 1/2″ EXCEPT FOR THE WHITE BACKGROUNDS, which I cut differently (info in the free handout, below):
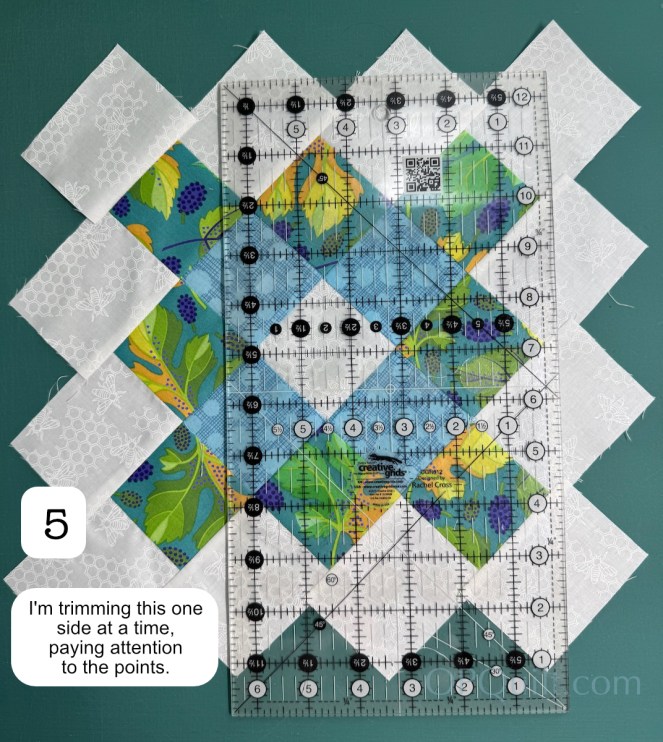
The dimension after trimming is 12″ square. Again, while it feels counter-intuitive to not know the finished size of a block when you begin, it’s probably easier to figure out what size square you want to work with and cut those, and then figure out the dimension of the final block once it’s all trimmed up.
I give you more dimensions and block sizes in the PatternLite Download, which for a while, is free. After that, it will move to my Pattern Shop and will probablymaybepossibly retail for less than a fancy drink in your favorite restaurant. So download it now, while it’s free.
(This is the updated mini-pattern with the quilt-making schedule.)
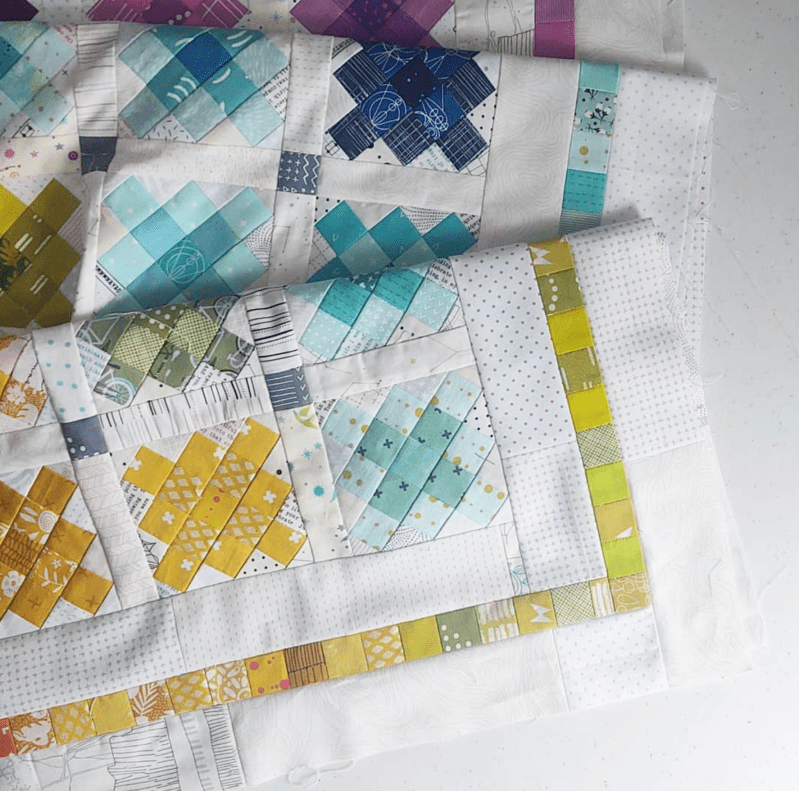
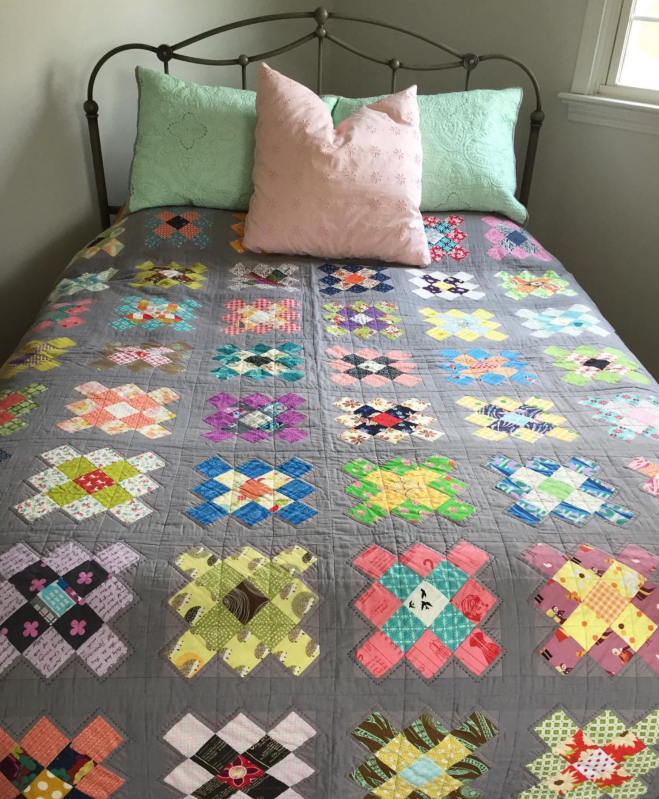
Another Hint: color is the thing. Decide what you want in the middle (light, dark?) and in each surrounding row. I did like the quilts that had different colorations, so sometimes you could see crosses going across the block. Two ways to put it together: sashed? Not sashed? A million different tutorials out there in Quiltland. Once Carol and I get rolling, we’ll probably post up our ideas, but for now, let’s just get started on making blocks.
We’ll probably start somewhere in May-ish? We haven’t decided yet. We’ll put it up on my least favorite-which-used-to-be-a-favorite social media, Instagram. Here are our addresses: Carol and Elizabeth. I’ll also post my blocks up on BlueSky, too, and Carol has Threads. Which block am I going to sew? I’m learning towards the 4-square version, although the 3-square version is also tempting.
Final Throught: Hashtags appear to be pretty useless now in Meta’s world However, I will be tagging my posts for organizational reasons: #ohgrannysquare2026 It might be easier just to follow us on Instagram, Threads or BlueSky or type in the words Oh Granny Square and let’s hope for the best!
I’ve been keeping a log of the steps in the tab above, Oh Christmas Tree Quilt-A-Long, so consult that page when you need to find a post.
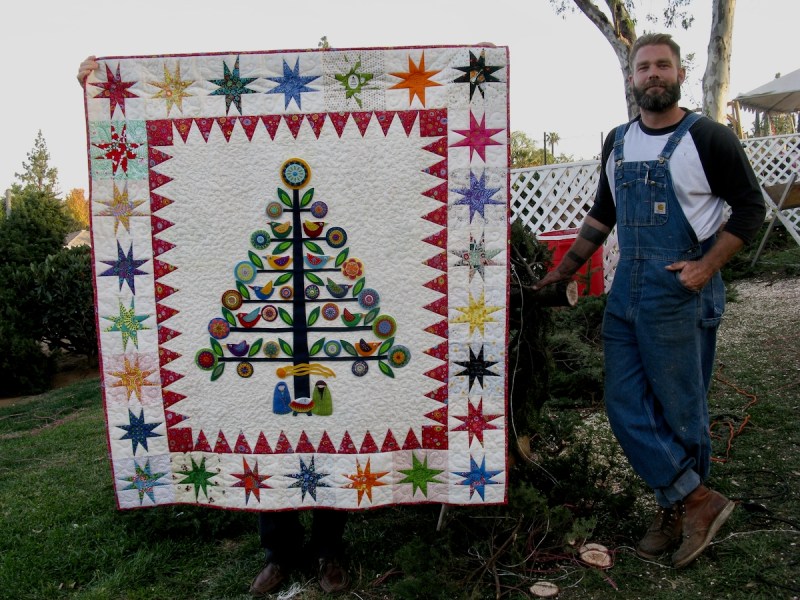
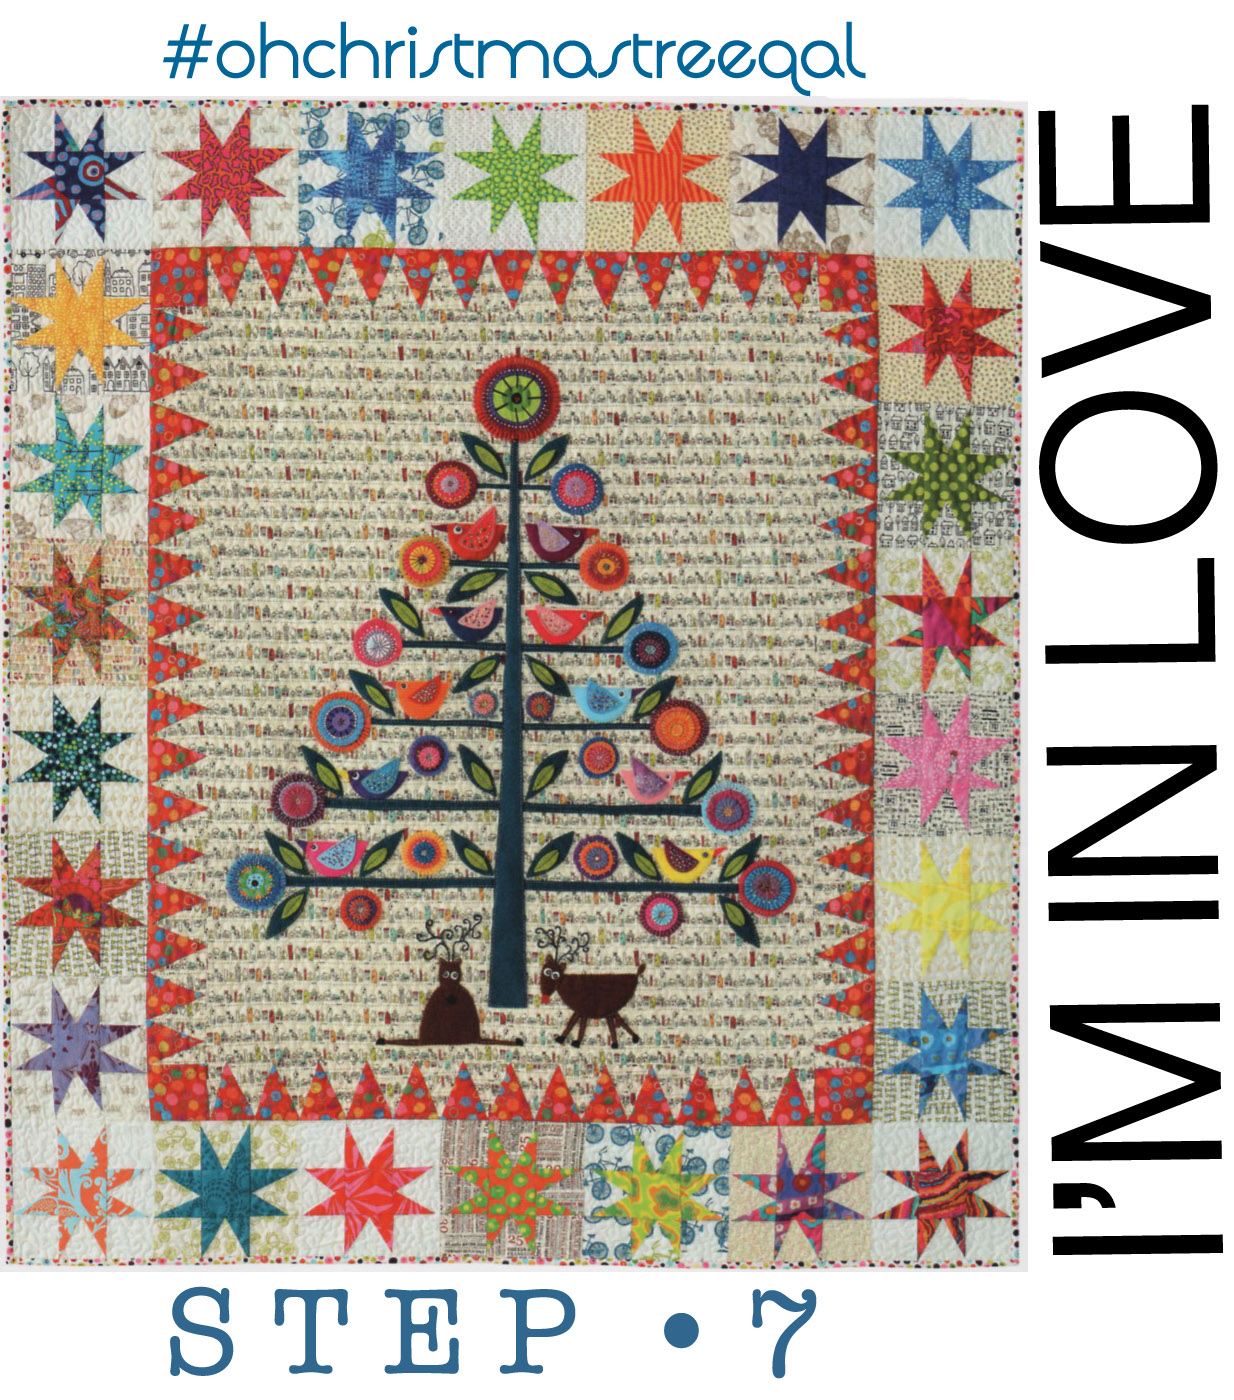
Yes, today we are wishing upon a star, the final part of this quilt. We started this journey 7 months ago in January 2016, right after the magazine came out, and today we’ll finish it up.
Your tree should have the red triangle borders on. See earlier post for how to get them on.
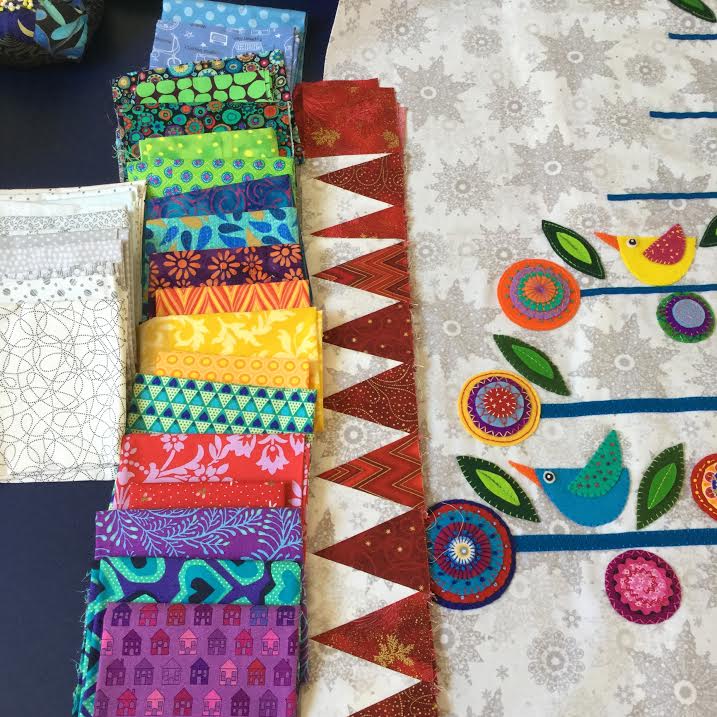
Wendy has laid out several fabrics for her stars, above. I thought I wanted to go with traditional Christmas colors of red and green, but realized quickly that I should go with colors that coordinated with the flowers and birds. In other words, be bold in your star colors.
With your fabrics chosen, now it’s time to make the stars, but before you start, one issue with wonky stars is getting the star points too close to the edge.As Wendy writes: “Yellow star is what NOT to do. Points are at the edge and will be cut off during trimming, or lost in seam allowance. Star points need to finish further down the sides.” I’ve circled them in red, so you’ll recognize this when it happens. It happened to Wendy (that’s her block), it happened to me. Consider that your Training Wheels Block. Now one way to be aware of this is to cut all your blocks a bit larger than they ask for, and to slice the diagonal a bit differently as well.
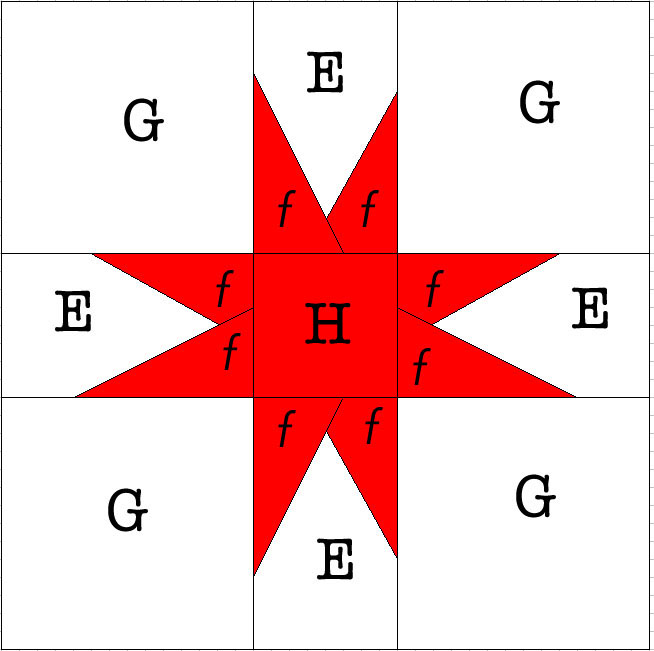
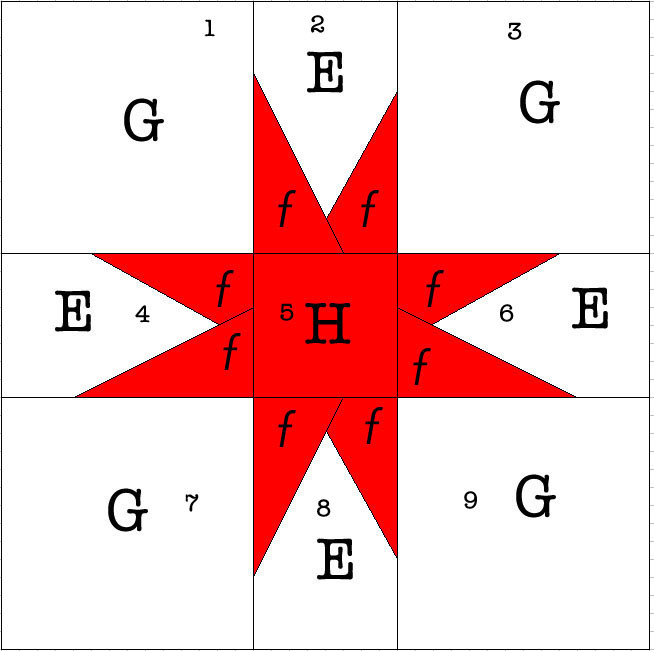
And here’s your roadmap/key to the letters. I put the “f” in lowercase and italicized it, as everything was getting a bit overwhelming with that alphabet floating around.
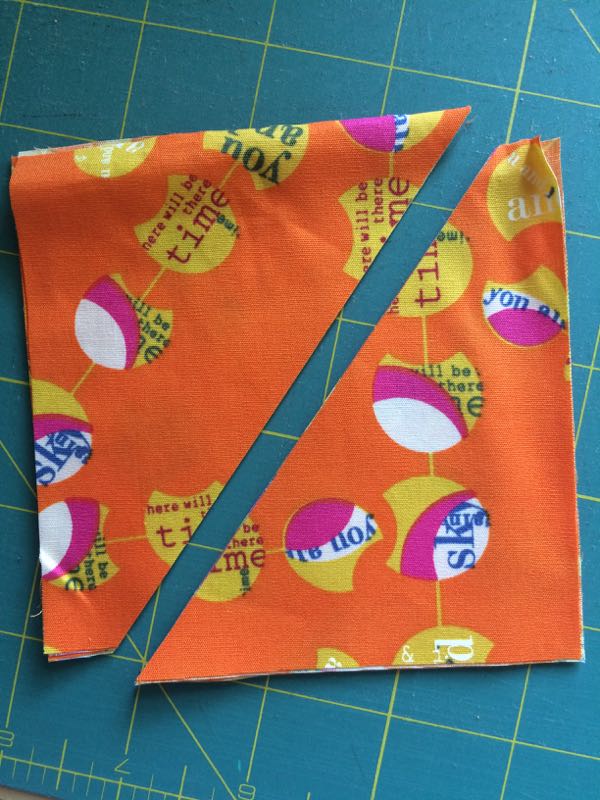
You’ll notice on the chart I mention to cut the f-triangles “skewed.” Cut them like the above shows, so there is a chunky bit on one end. If you haven’t made wonky stars before, you can try it first by cutting it on a strict diagonal, and after some construction, see which one you like. I like this way because I feel like it gives me a good angle and I’m less inclined to get the star points too close to the edge.
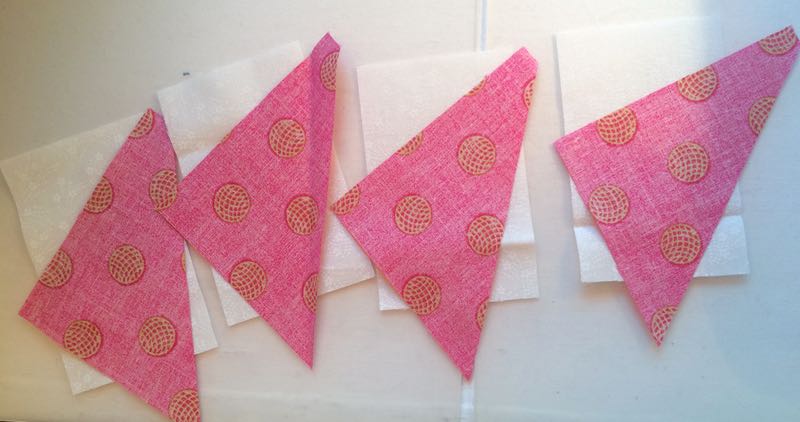
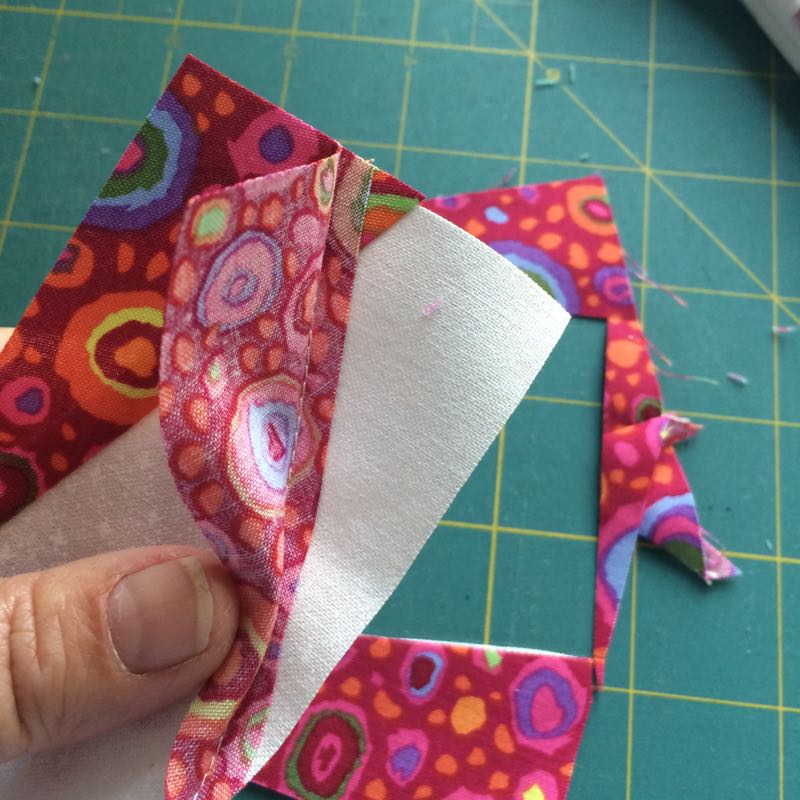
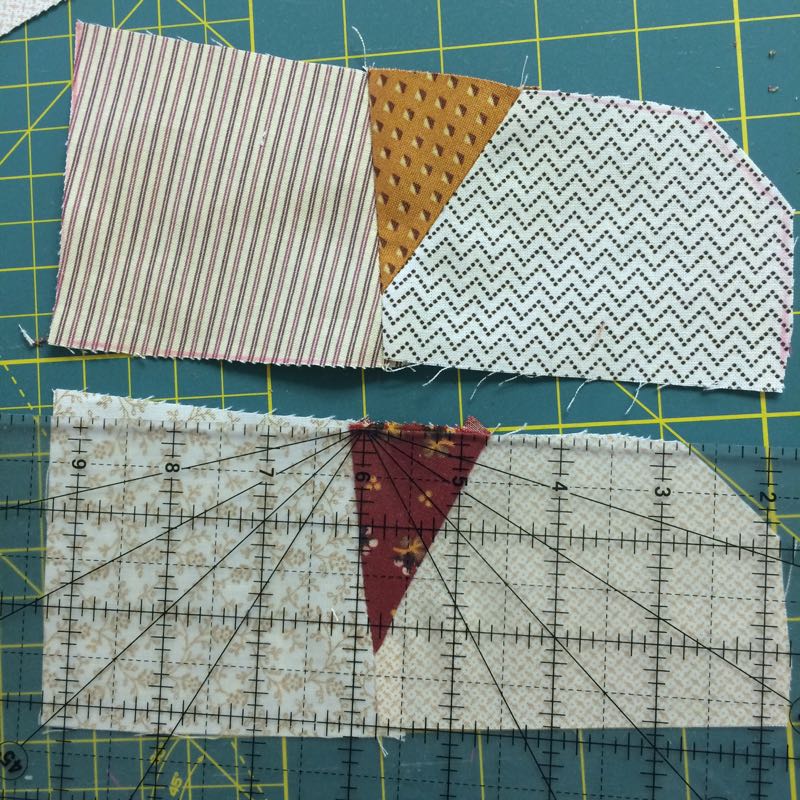
Find the narrower center piece, “E” and lay them out. Layer four f-triangles on top, with the chunky top down from the top edge, as shown. Try to have the lower pointy edge near the middle of the lower bottom edge of the E piece. I often finger-crease a little mark in that bottom edge of the E-rectangle so I know what I’m aiming for. See the next photo.On this piece, I’ve got a pretty good start. What counts is the seam line. So at the top right, it’s down about 1″ to 1-1/2″ and the seamline is about midline, or just a bit to the side of it. As long as you are in the ballpark of the red X at the bottom, you’re fine.
Fold it back to check. Press. Trim off that wedge underneath the star point fabric, as shown below (I’m doing a stack here.)
Now line up the next set. Yes, they are all upside down, as that’s how I’m going to sew them. Again, the chunky tip is near the top edge, and the pointy edge overlaps the first wonky start point.
Stitch, press and turn. If you are worried, check it before you stitch it by folding it back to make sure your star point fabric covers the background E piece all the way on those two lower corners.
Now trim it up to 2 -1/2″ by 4.” In the photo above, I laid my ruler on the outline of the E piece for placement.
Now trim off that underneath piece.
Done with one! Repeat three more times for one star block. Don’t try to get all the points the same–let them be different lengths and placement, as your block will be more interesting. DO make sure you are not too close to the outer edge–you’ll need that extra space for trimming.
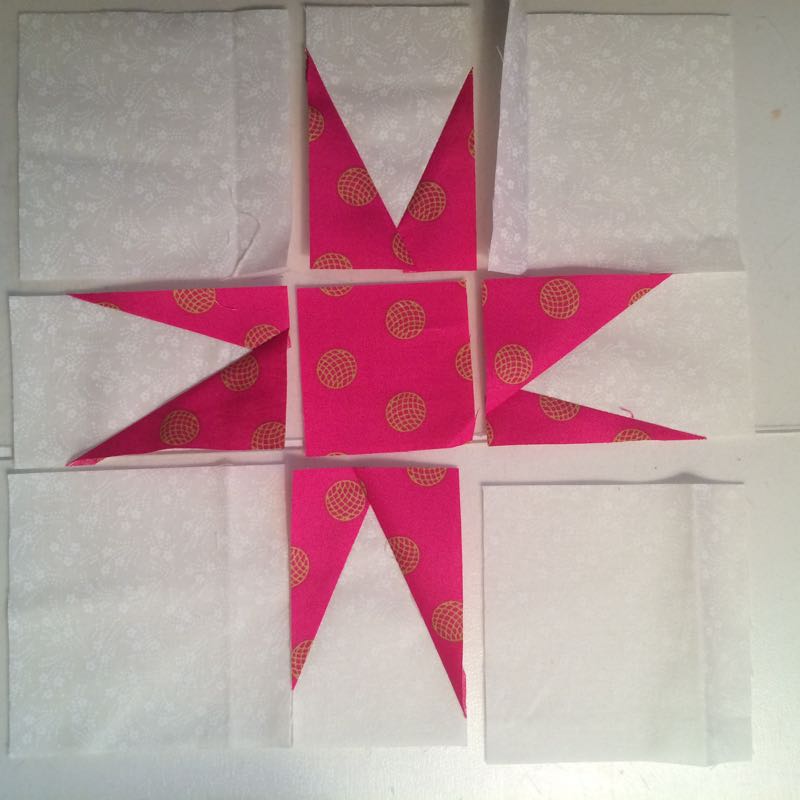
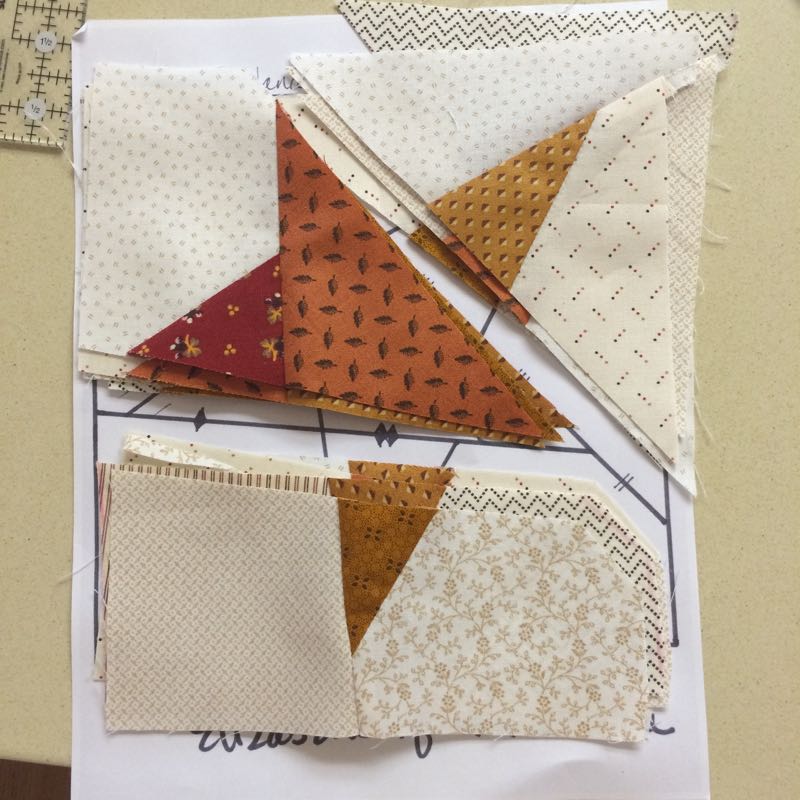
Now line them up as shown, with the H-piece in the center and the four corner G-pieces in their place.
Now you are going to make a “web” of thread, as you sew the pieces into rows. Keep reading.
Unit #1: I stitched G-1 to E-2. Without cutting the thread, I slipped the next pair under the needle and kept stitching:
Unit #2: I stitched E-4 to H-5. Without cutting the thread, I slipped the next pair under the needle and kept stitching:
Unit #3: I stitched G-7 to E-8.
Sew onto a leader/ender piece (mine are just scrap, even though I always think I should be piecing another quilt or something.)
Now to Unit #1 above, stitch on G-3. Without cutting the thread, I kept stitching:
Stitch Unit #2 to E-6. Without cutting the thread, I kept stitching:
Stitch Unit #3 to G-9.
If you can get the hang of this, you can keep all your star points together and really crank through them.
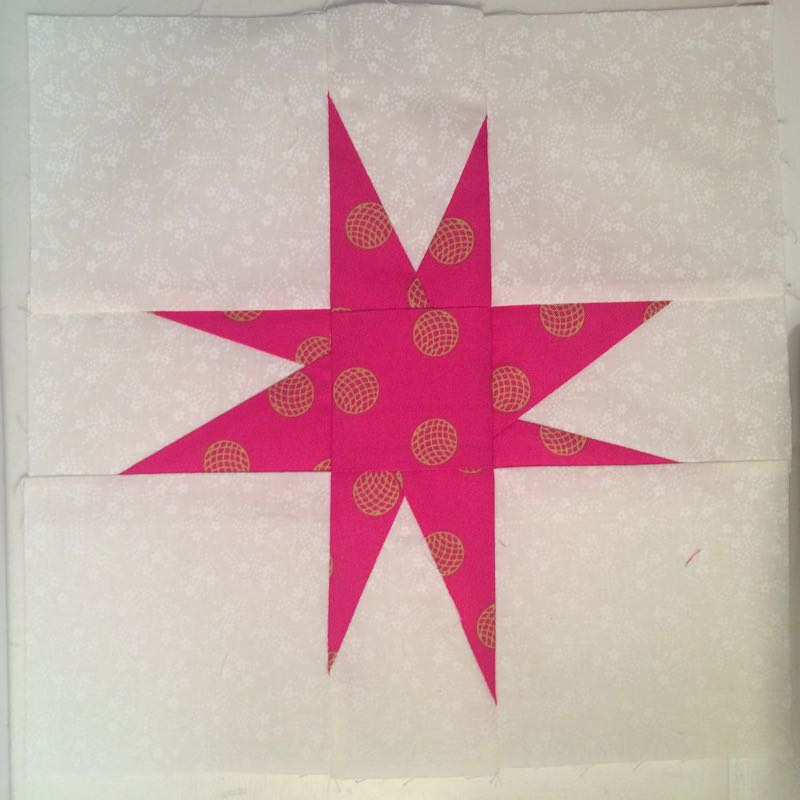
Here, I’ve circled the bit of connecting “web” threads. Press as shown: the center row has the seams pressed to the center, and the top/bottom rows have the seams pressed towards the G-piece (outer corner block).
I’ve sewn them, pressed them, and now I can stack them, ready to sew the rows together. Because of the thread-web, I won’t get a piece turned around, or upside down.
There’s no magic, just press them how you like them, but I do always believe a seam will generally indicate which is the easiest way for it to fall. In this case, it was away from the center.
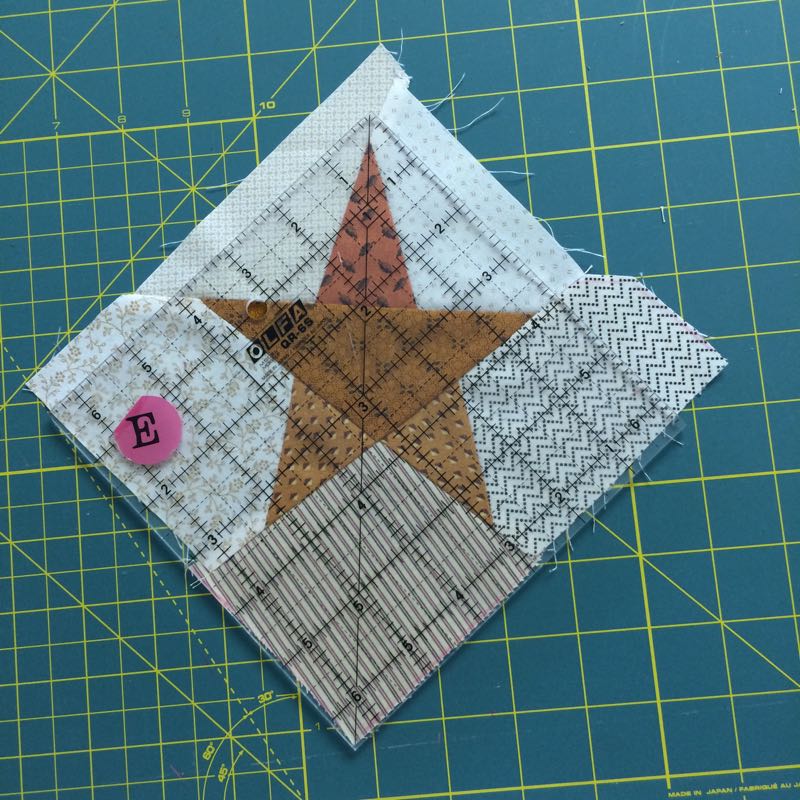
Arrange your stars around the tree how you think you’ll like them. Take a photo, re-arrange if you want. In my case, I ended up making some brighter, bolder stars, and shuffling several times. It also helps if you go get some lunch, or fold a batch of laundry, or maybe snack on some chocolate. Anything to take a break so you can bring some fresh eyes to the process. Do this until you are happy with how they look.Now for some measuring fun. You know that each corner of this quilt will have a star. And generally, the finished measurement is 8″, or trimmed to 8-1/2.” Both Wendy and I caution that you need to make VERY SURE that your H-block is centered in your trimming. Pay attention to the diagonal line and make sure it’s running through the center of the H-piece.
Trim FOUR blocks only, and set aside. What you see above is me making sure that the middle row of my stars would line up when they were placed next to each other. I took my time trimming. If you don’t have the middle of the star lined up, you can fudge it a bit, but not by much.
Diagram of how to get the Wonky Star borders attached
Now comes the hard part.
Take a measurement across the top of Border #1 (triangle-border). Mine was just over 39.” I called it close enough to 40″ as that would fit five star blocks nicely (8″ blocks x 5= 40″); I can also sew a seam or two with a bit bigger seam allowance to get it closer to my measurement (yes, there are all sorts of ways to make our Zen Quilt behave). In my case, I trimmed them to 8 1/2″ so they finish at 8″ when they are sewn in.
Once you get that figured it, trim up TEN blocks. Use the trimming trick above to make sure the star blocks will line up.
See how that trimmed edge is away from those star points? (And yes, I’ve re-done a couple of blocks in my lifetime of wonky star blocks when I trimmed them off.) Sew the FIVE top star blocks together in a row. DO NOT SEW THE CORNER BLOCKS ON YET.
Press the seams to one side, and stitch that row of Border #2 (wonky star) on to your Border #1 (red triangles). Repeat with the bottom row of star blocks. Press seam toward the red triangles border. Your quilt should now look like this.
Before you start on the sides, get more chocolate.
Here comes the part where Wendy says it is kind of like childbirth: you’ll forget about it once it’s over with. I measured the side border, counted up how many blocks were shown in the pattern, and divided that into the border measurement. That was a scary number, so I subtracted one block, and did the dividing again. I ended up needing SIX blocks of just about 7 3/4.” This is the same as the pattern.
Because the measurements were kind of weird, I decided to cheat.
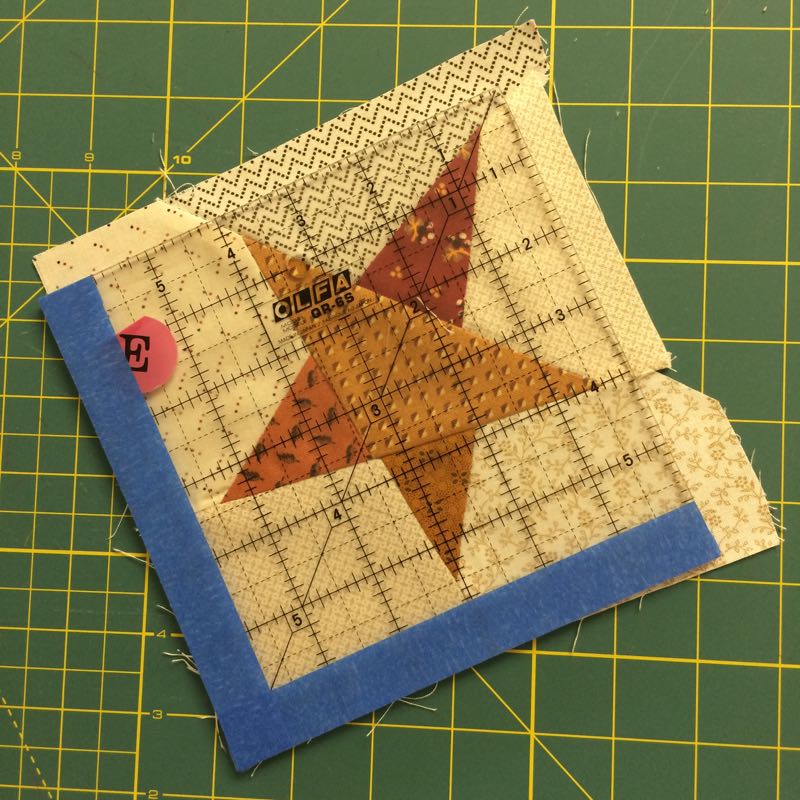
I kept my blocks at 8-inches finished “north-to-south” but cut them to be 7-3/4 inches finished “east-to-west.” Which means I was trimming them to 8-1/2″ and 8-1/4″ as shown above by the blue tape. The “West Side” tape is at 8 1/4″ whereas the “South Side” tape is at 8 1/2.”
I just wanted to make sure that I had at least 3/8″ to 1/2″ away from the pointy edges (blue ovals). Most of the time I succeeded.
Trim up your blocks. Now rotate them so the 7-3/4″ finished dimension is running north-south, and the 8″ finished dimension is running East-West.(This is an update from the original post.)Then sew them together. Press and hold them up against the border. Chances are they won’t fit–they’ll be too big. So. . . cheat again.
Take a bit bigger seams between all the blocks: from 1/4″ inch to 5/16ths of an inch. Check your sewn row again. If they are still too large (and can’t be eased in), choose the two stars that have the most room between the tips of their star points and the seam, and make another teeny bit bigger seam. Now you should be fine.
Breathe Deeply. Go Zen.
NOW sew the star corner blocks to each side border strip–two to each side strip of stars–one on the top and one on the bottom. Press all seams on the strip towards one side. Stitch these borders to the existing quilt.
I then pressed all seams toward that red triangle seam, even if it didn’t want to go there. Now, in looking at it, can you tell that the side blocks are sized a tiny bit differently than the top/bottom blocks? Didn’t think so, and no one else will be able to tell either. I think the solution to the challenging measurements was a success.
As Gwen Marston said, “Nobody ever said, ‘I need a little more stress in my life–think I’ll make a quilt.’ ” Quilting should be fun, even if it’s challenging (and this was definitely a challenging quilt).
Here’s Wendy’s…
…and Betty’s.
Now let’s see yours. Shoot me an email when you get yours done, with a photo of your quilt, and if (I mean, when–I’m thinking positively) I get a few, I’ll put up a post showing off your hard work.
Try not to dance, but you are done! It’s over! You made your quilt!! (Click *here* for a fun dance scene from On the Town, a favorite movie of mine.)
Thanks for joining us on this journey, from January to July, of making the Oh Christmas Tree quilt. I’ve appreciated all your enthusiasm, your comments, and seeing photos on Instagram.
Here’s one of Wendy’s new patterns, My Place or Yours, if you want to feast your eyes on something new. Pattern can be purchased *here.*
Another one of hers is Pieces O My Heart, which just won a blue ribbon at the Sydney Quilt Show. Visit her Instagram feed for more inspiration.
Lastly, if you are not a follower of my blog and you’ve enjoyed this quilt-a-long, I’d like to invite you to become an email follower. Just enter your email in the box above. I generally post about twice a week, with occasional longer gaps. I try to post worthy and interesting content with an occasional “friends and me doing quilty stuff.” I think by building communities and sharing discussions about issues and happenings in our world, we shorten the distance between us, forming strong links of like-minded quilters.
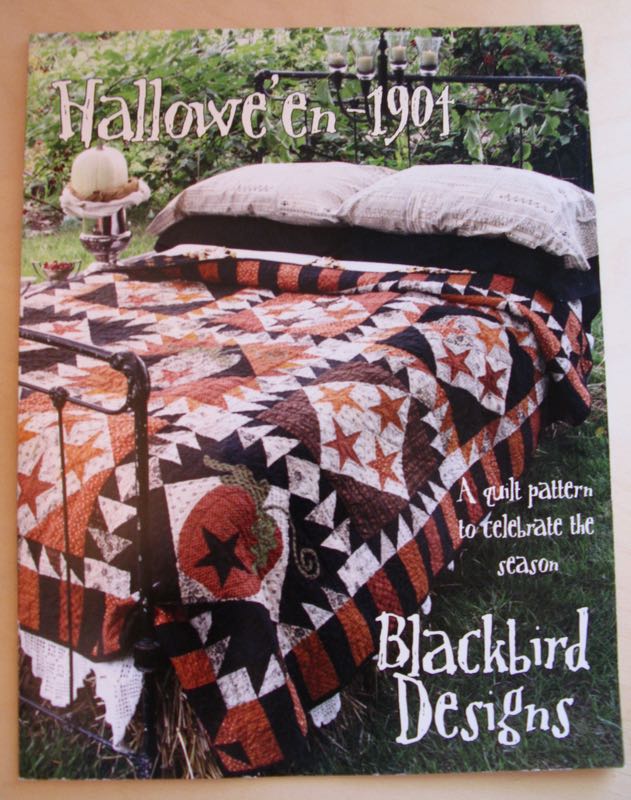
ATTENTION!! THE LAST TWELVE REMAINING PATTERNS OF HALLOWE’EN-1904 IN THE WHOLE WIDE WORLD ARE NOW AVAILABLE FOR SALE AT PRIMITIVE GATHERINGS ONLINE.
ONCE THEY ARE GONE. . . THEY ARE GONE!!!
Okay, see the rest of the post for the backstory.
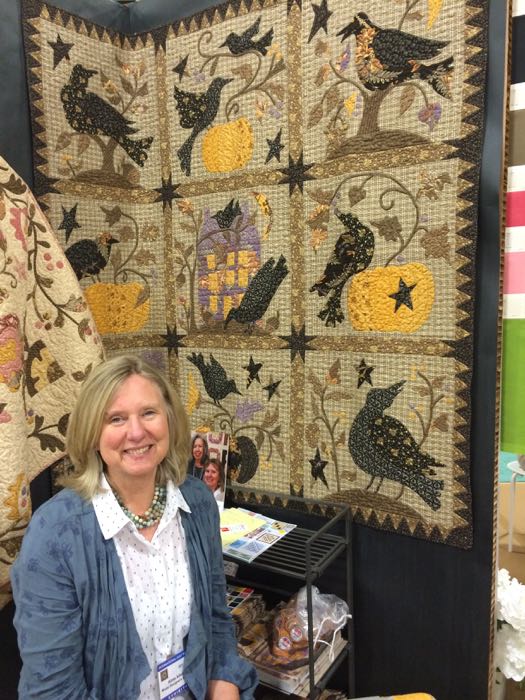
When I was at Quilt Market, I stopped to see Alma Allen of Blackbird designs in her booth in the Moda section and asked her if she had any remaining Hallowe’en-1904 patterns. Because I’m running this QAL, I get a lot of questions like, “Where can I get the pattern?” for as you know, they’ve been rather elusive. Downright scarce, actually.
(Alma is shown above with her newest quilt, The Raven.)
“Well, actually,” she said (and I paraphrase), “I was going through the warehouse and found the last box of those–didn’t know I had them. There’s twelve. Would you like them?” Gulp, golly. . . YES! for I knew that a lot of people had been looking for them. I walked over to Lisa Bongean’s Primitive Gatherings Booth across the way (Lisa is the nicest person ever), and since it was the last day of Quilt Market stammered out my request asked her if she would buy them and get them for us? Yes, she said. And she has.
So here’s a link to the LAST REMAINING 12 PATTERNS ON THE FACE OF THE EARTH that you can buy. Get over there right now and get them. Alma does not intend to make this available as a PDF file after these are sold, so if you want one, you know what to do. Well. . . actually there’s only 11 now. (I just bought one.)
And yes, I do have a giveaway today, but it’s not the pattern (go and get one, NOW, before they sell out). Read through to the end to find out what our giveaway is for today. Now, on to the business of our Quilt-A-Long.
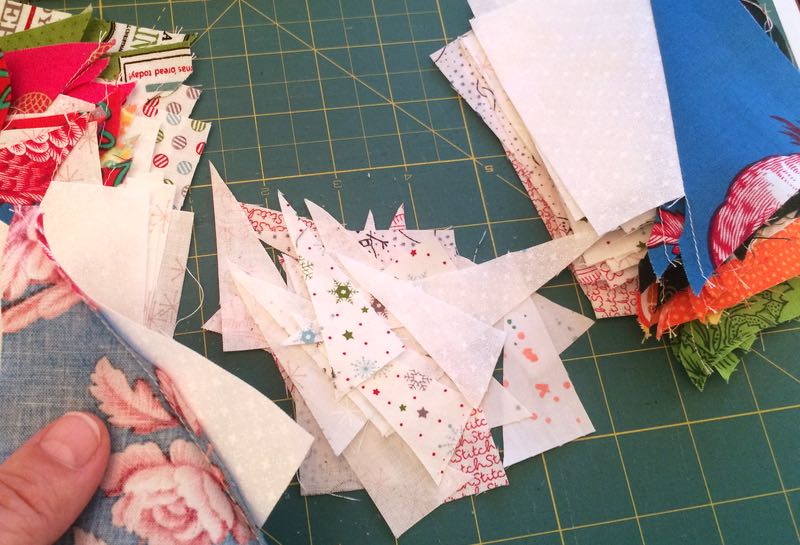
If you remember, I left you with the instructions to get your wonky/appliqued stars done and get them assembled into a block, and add those corner triangles. This month, you are going to make half-square triangles (HSTs) until your rotary cutter falls apart. I’ve updated the previous post about making wonky stars, as I refined the method as I went.
After making all these wonky stars, I just have to say it’s probably about similar the work in terms of appliqué vs. wonky. You’ll be sick of either method by the time you are done, but you’ll also be an expert in that method, too. (Making gives, and making takes.)
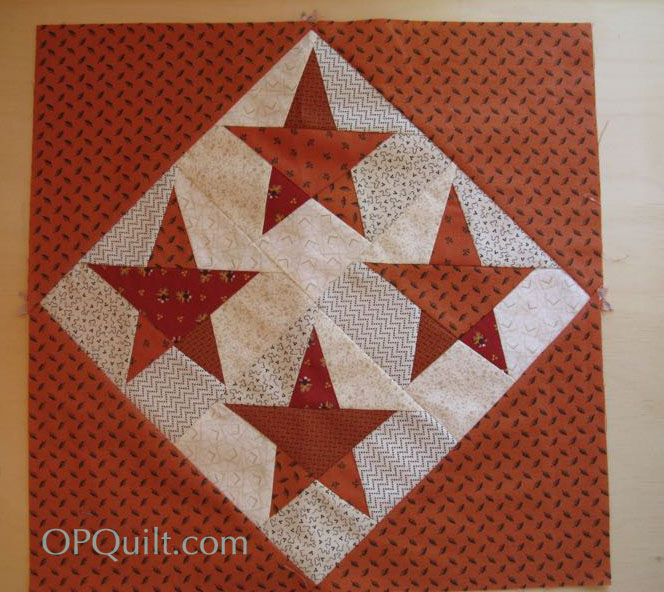
I laid all the blocks on my kitchen floor to motivate me to get going again. Notice that three of the “starry” blocks have orange stars, one has black stars and one is a mix. The big triangle borders are varied; I used deep green triangles on that one in the second row to the far right, but it’s so dark, it reads as blackish.
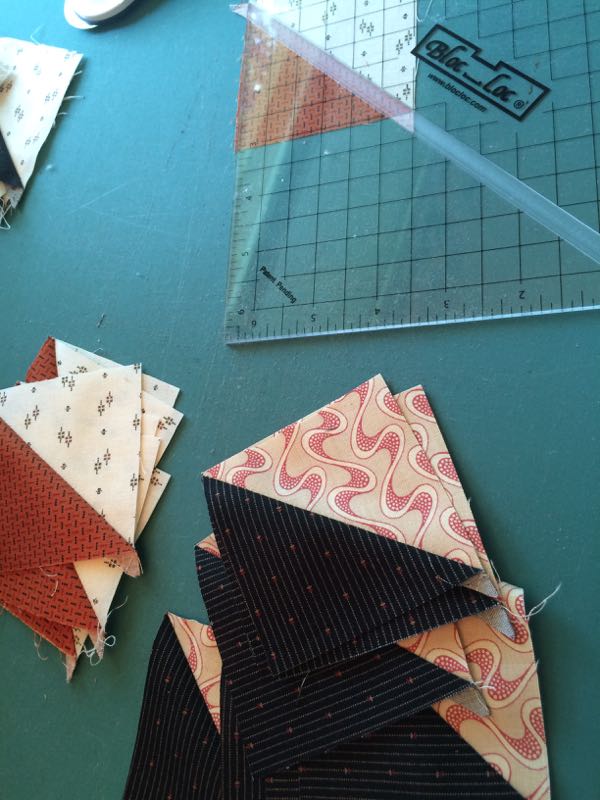
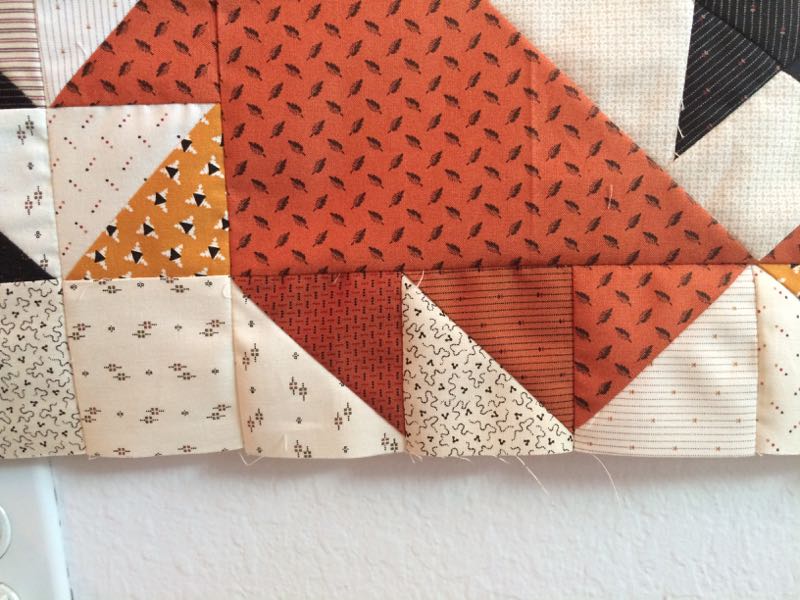
Now it’s time to make half-square triangles until your hand falls off. . .or your rotary blade needs changing. I use Bloc-Loc rulers to make my life easier in trimming, as it has a groove in the underside that nestles onto that fold of your seam, keeping it from moving around while you trim. I can do a whole bunch at one sitting and I think they are more accurate.
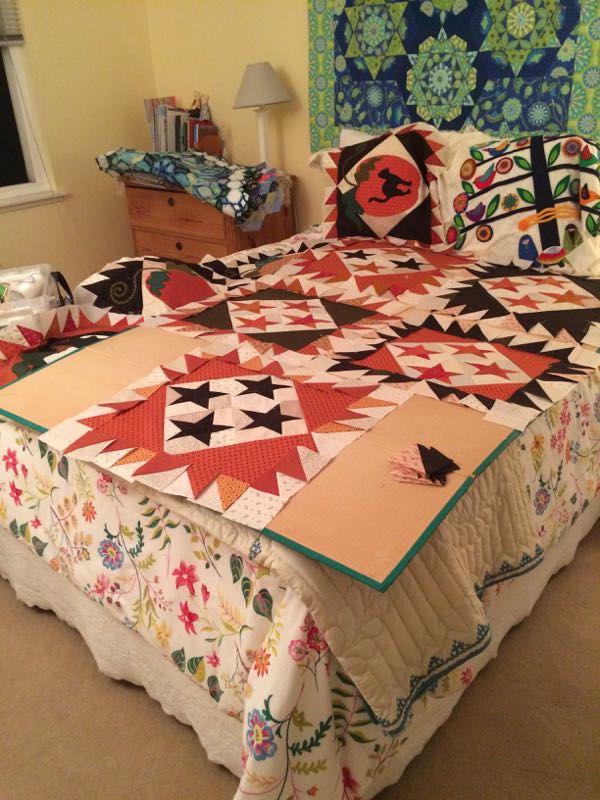
Now commandeer the guest bedroom, and lay out your star blocks. Lay out your HSTs around the edges. Because we use the 8-at-a-time method (talked about in an earlier post) I have multiple sets of 8 identical HSTs. I used three sets per block, swapping out a few here and there to keep the eye moving around my quilt.
Sew them on, as discussed in Step Three (that earlier post I keep referring to).
Because I had four appliquéd blocks, it was a no-brainer to put them in the position above for the initial run-through of placement. One by one, I put up the star blocks, auditioning them. Of course, I could have planned out where the dark triangles were and the HST color placement, but I didn’t.
This is how I ended up, complete with a whoops:
I’ll fix that today. But now I’m caught up with our QAL, and getting ready for the last step (yes!!) in our quilt making: the borders.
Here’s our schedule:
Step 1 (Preparation): February 13, 2016–buy all the fabrics and find the pattern. Mine was purchased from Common Threads in Waxahachie, TX (www.commonthreadsquilting.com). The quilt measures 90 by 90, which is too large for me, so I’m only doing nine blocks. Each block is 20″ square, and with the outer borders, that should come to roughly 65″ square. I may change my mind, but this looks good from here.
Step 2: March 13, 2016–Cut out the quilt: the tan backgrounds of the squares, the border triangles, the smaller half-square triangles, strips for the wonky stars, but save the piano key border for later.
Step 3: April 13, 2016–Assemble four blocks and add large appliques; use Thelma’s method (of Cupcakes and Daisies) for adding the curlicue stem. Make and add half-square triangeles (HSTs) around these blocks, using the 8-at-a-time method of HSTs.
Step 4: May 13, 2016–Cut and make the wonky star blocks from templates and strips. I’m doing five blocks, so will need to make twenty wonky stars and true them up. Add on the large outside triangles.
Step 5: June 13, 2016–Assemble the rest of the star blocks, by adding their HST borders. In the pattern, they are mixed up and varied, but also harmonized (some have a mix of orange and black, some have just black, some have just orange.) Make your own rules and go with it.
Step 6: July 13, 2016–Arrange the blocks on your design wall and stitch together. Cut the pieces for your borders. Make the four corner pinwheels. Sew borders together and attach them to the quilt.
Yes, I combined the last two months, so we’ll be done early–so you can get it quilted!
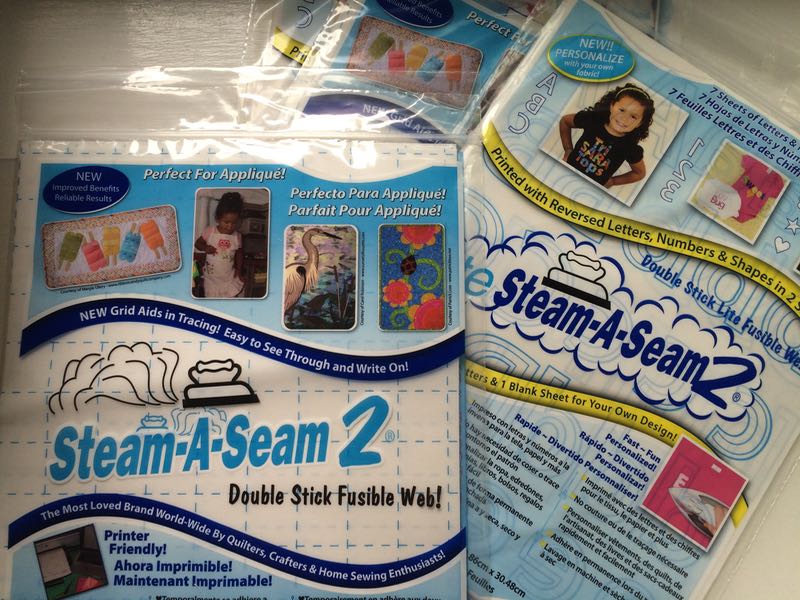
When I was at Market, I talked the people at the Steam-A-Seam booth (The Warm Company, who also make Warm and Natural Quilt Batting) telling them how much I liked their fusible product for the quilt I’ve been making (I used it on all the appliqué parts). I also used it on my Christmas Tree Skirt and really am a fan. Next thing I know she’s handed me some packages for a giveaway, so here I am, giving it away. There are two packages of Steam-A-Seam 2 sheets (5 sheets, 9 x 12 inches in size) and two packages of Lite Steam A Seam 2 (8 sheets of 9 x 12 inches). The Lite Steam A Seam 2 has upper and lower case letters printed on the the release sheet, so when you fuse them down, then cut them out, they’ll be going the correct direction. They also include one blank sheet for your design. Very cool product.
To win all FOUR packages (share with a friend), please leave a comment telling me if you think Halloween should be a kids’ holiday (candy, traditional costumes and pumpkin carving) or an adult holiday (more sophisticated, more zombies, blood and gore, fewer pumpkins). I’ll pick a winner and announce it on the next post. UPDATE: Giveaway now closed.
If you are appliquéing your stars onto your smaller background blocks, go for it and we’ll see you next month. For the rest of you, even those not making this quilt, I’ll walk you through a stack and slash version of a star, pioneered by Thelma of Cupcakes and Daisies.
You’ve seen this before; this is an image I found on the web some time ago of the quilt we are making, Hallowe’en 1904 by Blackbird Designs. Yes, we are again hard at it for the Hallowe’en 1904 Quilt-A-Long. All of four of us will have quilts ready for Halloween, so I’m excited about that prospect. Well, maybe it’s more than four of you out there in the Internets, but at least two of us — Leisa and I — will be among those finished in time for that fall celebration.
Again, Leisa and I are making NINE blocks, down from the original twelve in the pattern. I posted a version of smaller quilt *here,* using all twelve blocks and formulated by Mary Burton. But we’re doing nine, with four appliqué and five star blocks.
A recap of last month’s sewing:
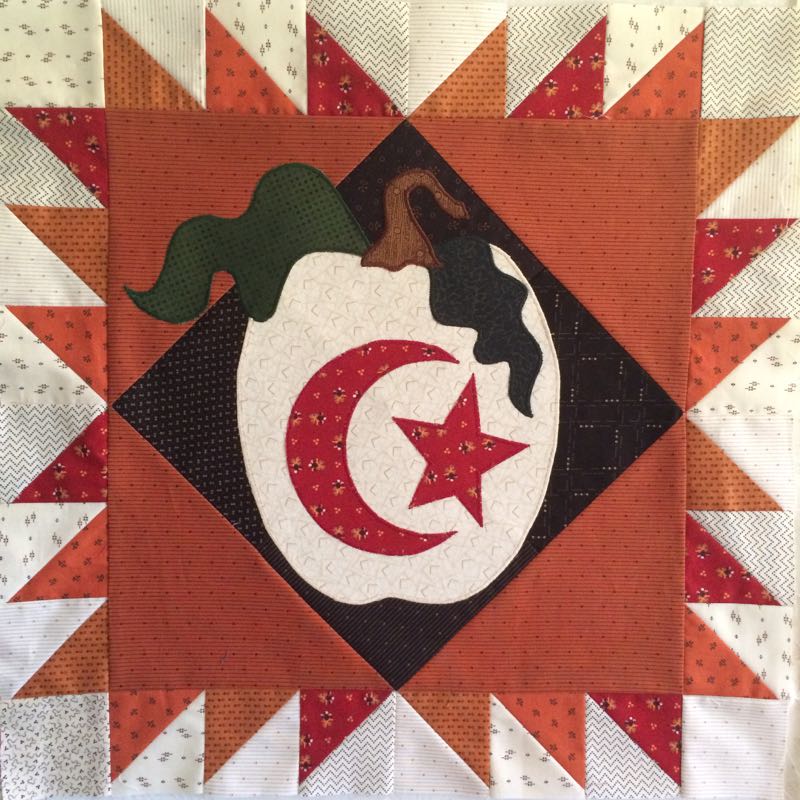
Yes, all four are done, even the one with the weird-o leaf. It’s staying put for now.
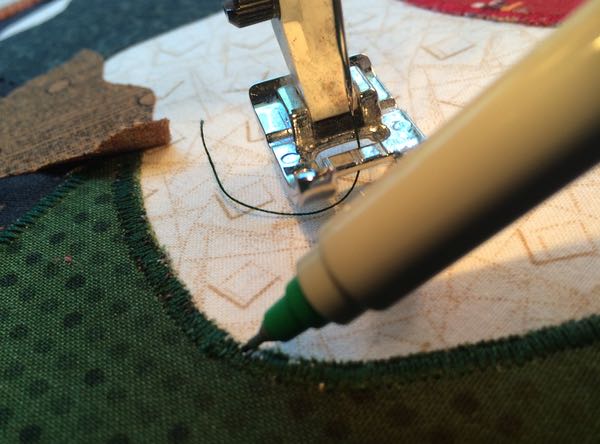
Here’s my tip for touching up those stray bobbin threads that work their way up if you are doing satin stitch: get out a Sharpie marker in the color of your thread and color it in. I also use it for errant free-motion-quilting oopsies.
And this time, we’re heading right into How to Make A Wonky Star. If you want to go the traditional route, of cutting and appliquéing your stars down to your background, go ahead and get going, and we’ll see you next time, on June 13th. Anyone else who wants to learn this technique, stick around.
It’s not a new technique as we used to use it to make things like nine-patch blocks: stack up a bunch of fabrics, cut, swap out the fabrics and sew. I also found a version of this stack-and-slash used in a star block, and the copyright on the page says it’s from 2000-2005. And Bethany Reynolds is credited with the first national use of the technique known as Stack-N-Whack. I tell you all of this to say there is nothing new under the sun, especially in quilting, but only new turns at an old technique or form or idea.
We’ll get this far this month, but will do five of these blocks, saving the points around the outside for next month (although you are free to move forward if you want).
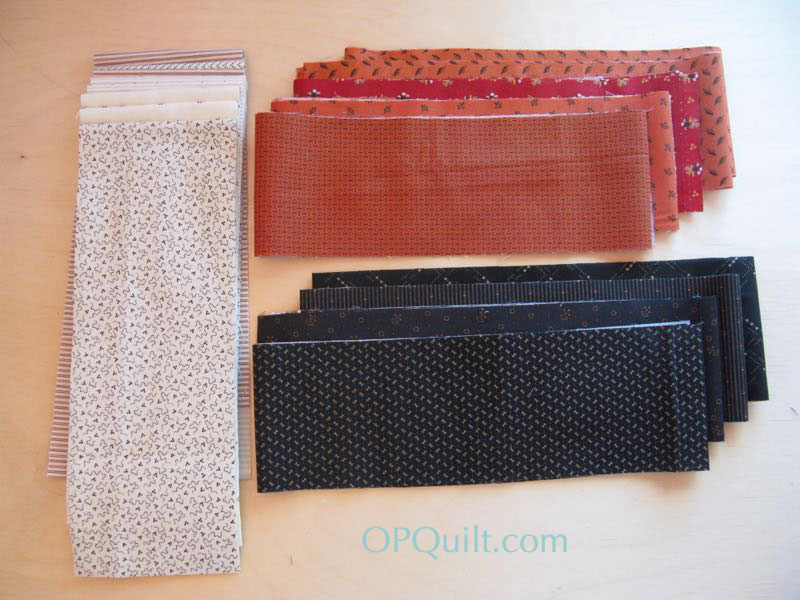
Get out your strips of fabrics, cut according to the chart.
Different versions of the Stack & Slash Star pattern. I drafted and revised this star block multiple times, trying to get the proportions of the Stack & Slash pattern correct. For this reason, please print off only enough for your own use. Please don’t print off enough for your mother or your girlfriend; send them here to get their own.
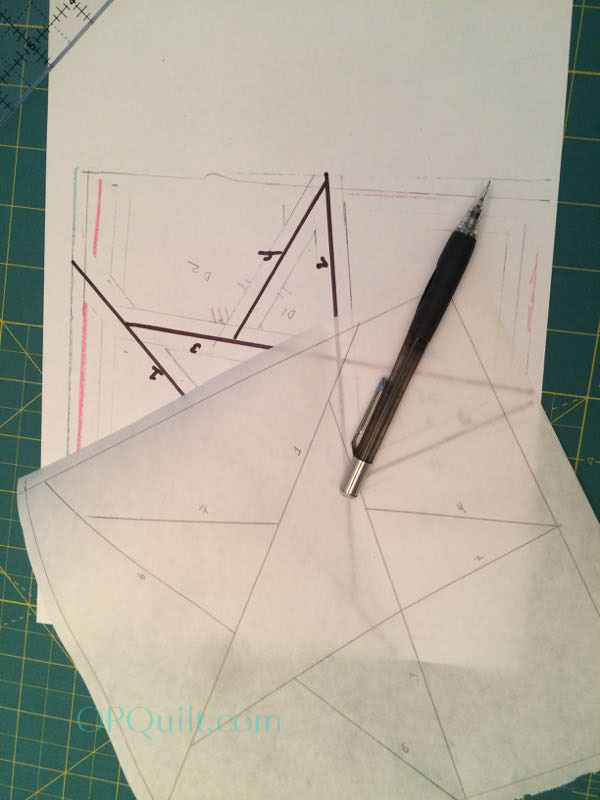
Print off two: one to use for a template for your star patterns, and one to use as a map for when you are piecing.
You’ll notice on the pattern that there are lots of little diamonds and slashes. (These are your notches to help you get the thing back together. It doesn’t matter if you use mine, or make up some marking system of your own, but please do this!) Lay some clear template plastic over the pattern and trace. Looks like mine got reversed somehow, but really it just doesn’t matter one way or the other. Now pay attention to what is the center of the star (A1, B1, B2 and C1) and what is the background (all the rest).
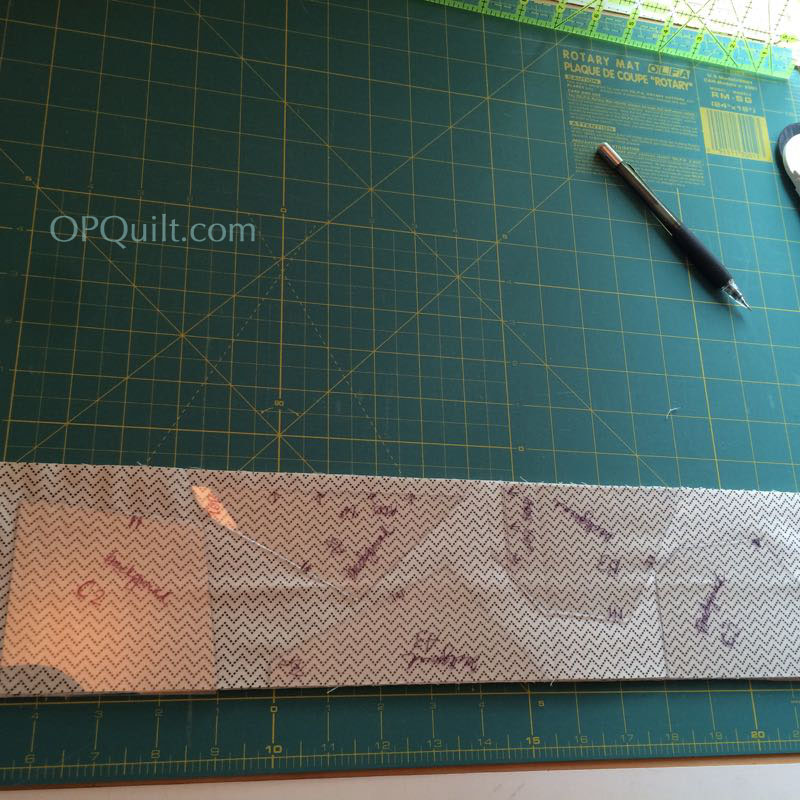
Working with a single layer of fabric (yes, you can stack them up, but don’t put the fabrics back-to-back unless you want to have some “regular” stars and some “reversed” stars. It will drive you a bit crazy, but it’s do-able, in case you forgot), lay out the background templates. (See example below)
If you do the usual cut of WOF, you’ll have part of the fabric facing you and part of it will be facing down to the cutting table, because of that fold. Unfold it before cutting and you’ll avoid this problem. I just had to go back in and cut some parts “backwards” and I made enough for a star or two. So you’ll notice that some of my stars are wonky to the left, and some are wonky to the right. It just doesn’t matter. Really.
Cut around them.
Start stacking up your pieces underneath the templates as you cut them
VERY IMPORTANT: To get the appropriate amount of wonkiness, you’ll need at least FIVE different background fabrics, because there are 5 different pieces to the background. If you want to have the star pieces all different, you’ll need FOUR different star fabrics, because there are 4 different pieces to the star. But so you don’t lose your marbles in construction, cut FIVE different background fabrics and FIVE different star fabrics.
You’ll need to do some shuffling as you sew.
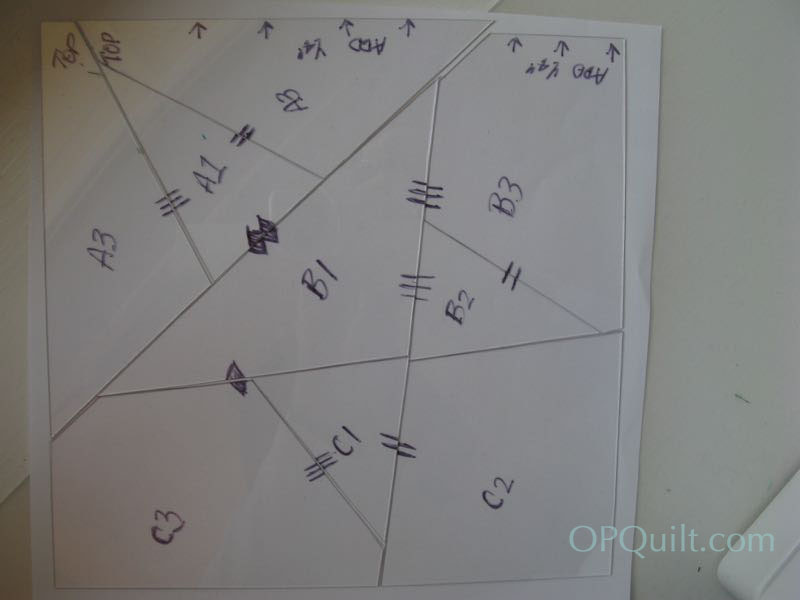
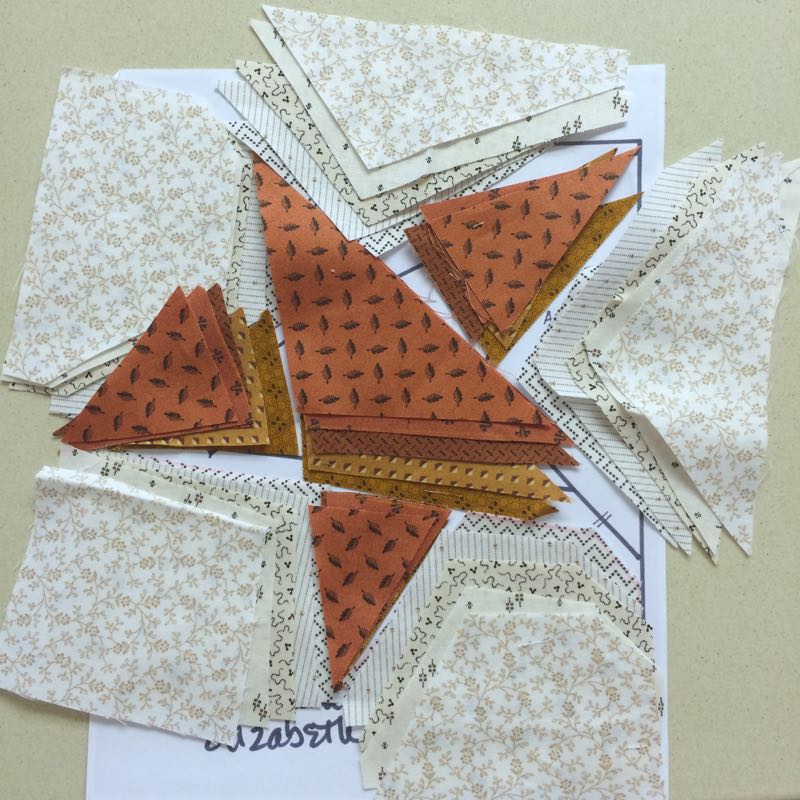
This is the “map” of the Stack-and-Slash Star (another printed copy) so I could use it as a way to keep all the pieces straight. Here you see five different star fabrics.
I cut, then laid out the five different background fabrics, too.
First we’ll do the BACKGROUND fabrics. Leave the star fabrics along.
1–Leave background stack A3 (upper left in this photo) alone. Starting with stack A2 (upper right), take the top fabric and move it to the bottom of the stack. Now move around the star in a clockwise fashion (or refer to the photo to the left which has the pieces listed).
2–Take C2: Take the top TWO fabrics and move them to the bottom.
3–C3: Take the top THREE fabrics and move them to the bottom.
4–B3: Take the top FOUR fabrics and move them to the bottom.
All the backgrounds have been switched, but the star’s pieces are still in the same order. Now we’ll do the STAR fabrics:
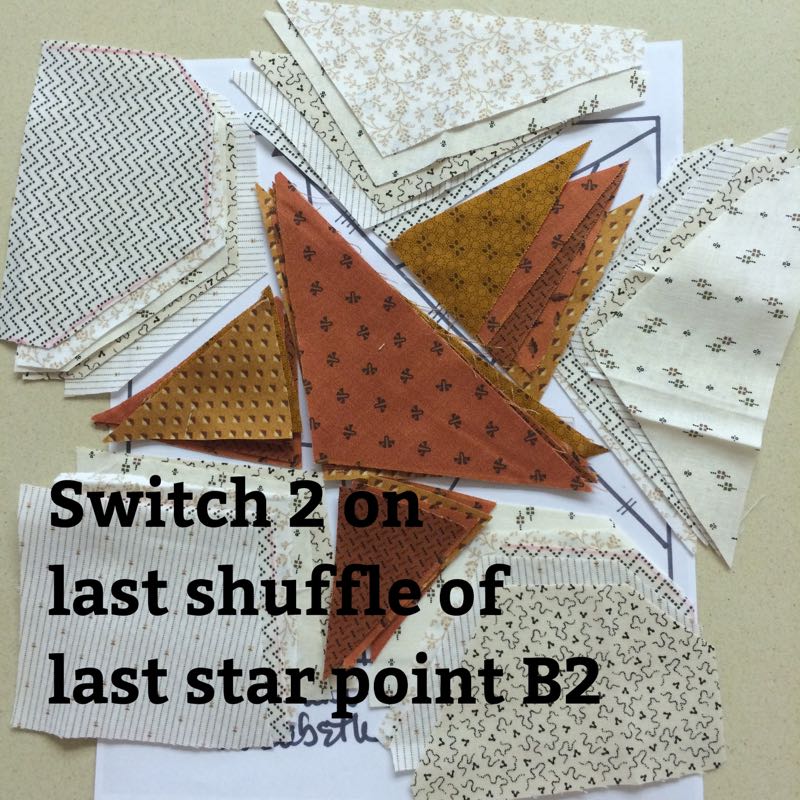
1–Referring the map above, start with A1 (leave it untouched). 2–B1: Take the top fabric and move it to the bottom. 3–C1: Take the top TWO fabrics and move them to the bottom of that stack. Now keep reading.
4–Since you have FOUR star pieces, you’ll need to do some switch the the top FOUR fabrics on the piece B2, and move them to the bottom of the stack. I don’t know why, and no, this isn’t the Gospel Truth, and yes, I could have said it wrong, but that’s what I did to get them all different. This way, when you sew that last star (star #5), you won’t have two the same on the last one. If you do it differently, please let us know in the comments.
If this is all too confusing, on YouTube there are multiple videos — just type “stack and slash,” or “stack and whack.” If you have a lot of time, *this* one is in four parts, but it’s very thorough.
Now we start sewing them together. Sew the A parts together. Sew B2 and B3 together, then sew them to B1 Sew the C parts together.
Above I show how I’m sewing them in parts, always replacing them back on my “map.”
Some sections need straightening up before I sew the next seam. If they are too out of whack, just even them out.
Now all the B-pieces are sewn together.
Sew them to the C-pieces.
I evened out that edge. Notice that monster dog ear at the top right. Don’t even worry about it–just slice it off.
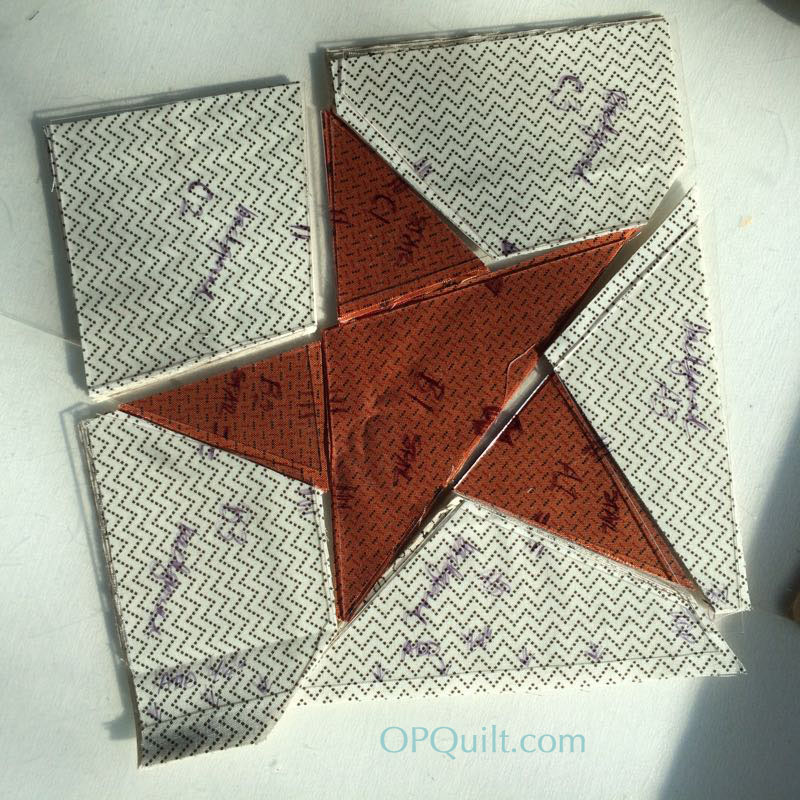
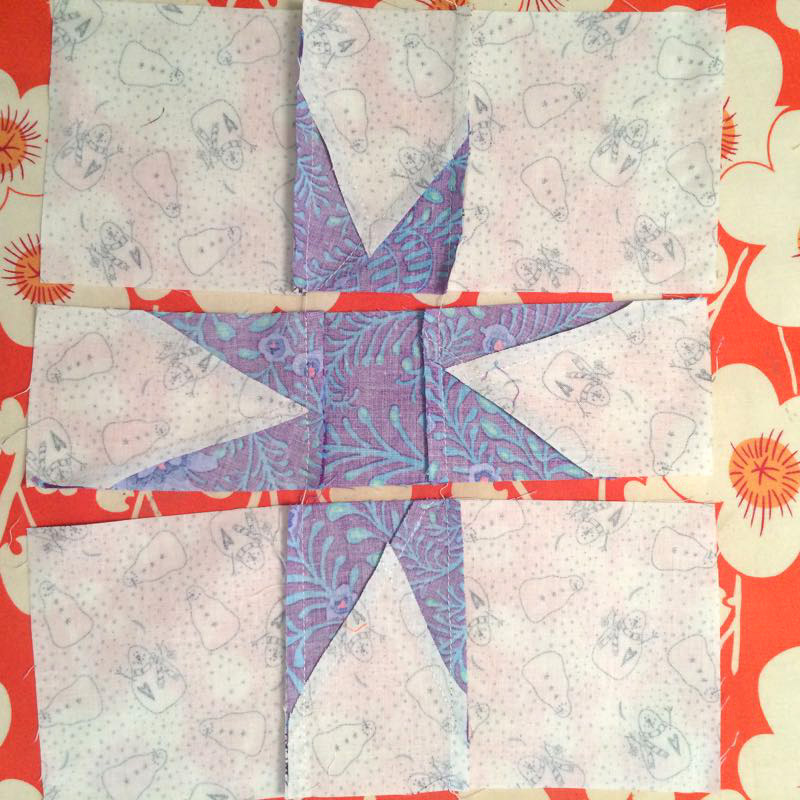
Join the sections together, pressing the seams to one side. All the outside edges are skitty-wampus, but it’s all sewn!
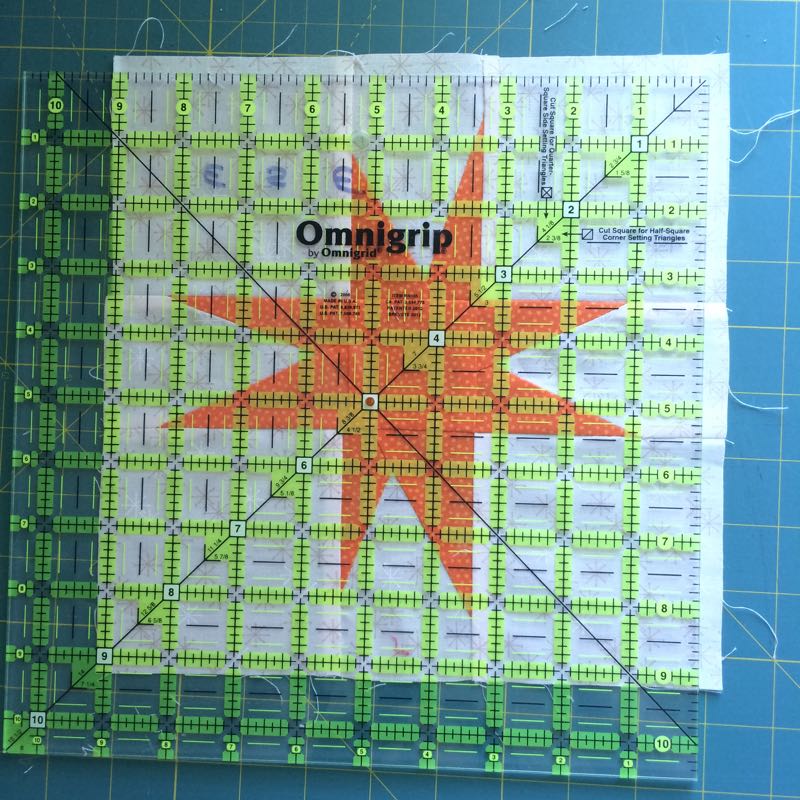
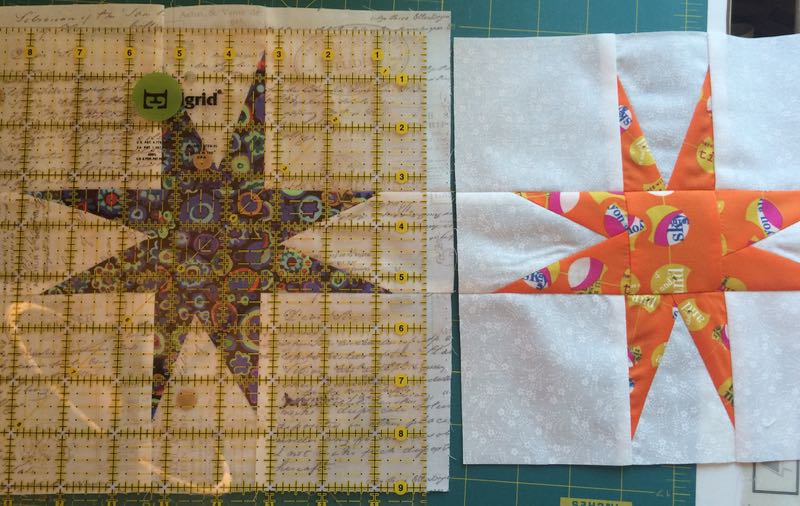
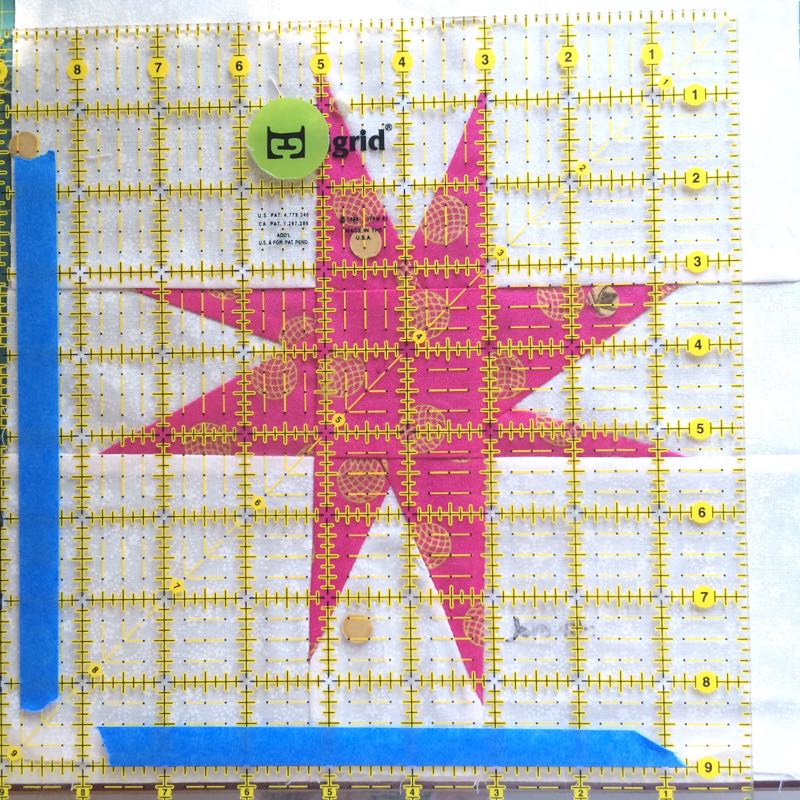
Now it’s time to even them up to our Gold Standard Measurement of 5 1/2″. Find the A1 piece and put that in the upper angle corner and then monkey your ruler around until you have a nice mostly-even space around all the start points.
I put tape on the 5 1/2″ mark so I could frame it up better. Now you see better how I laid it on the wonky star. Repeat this over and over. You can cut and sew a bunch and it goes much faster, but have chocolate at the ready.
Add on your outside large triangles, varying them from orange to black, as are your star points. We’ll save the outside HSTs for next month. So, get busy making wonky stars and we’ll see you on June 13th!
Here’s our schedule:
Step 1 (Preparation): February 13, 2016–buy all the fabrics and find the pattern. Buy your pattern from The Primitive Gatherings Online. Link is *here.* The quilt measures 90 by 90, which is too large for me, so I’m only doing nine blocks. Each block is 20″ square, and with the outer borders, that should come to roughly 65″ square. I may change my mind, but this looks good from here.
Step 2: March 13, 2016–Cut out the quilt: the tan backgrounds of the squares, the border triangles, the smaller half-square triangles, strips for the wonky stars, but save the piano key border for later.
Step 3: April 13, 2016–Assemble four blocks and add large appliques; use Thelma’s method (of Cupcakes and Daisies) for adding the curlicue stem. Make and add half-square triangeles (HSTs) around these blocks, using the 8-at-a-time method of HSTs.
Step 4: May 13, 2016–Cut and make the wonky star blocks from templates and strips. I’m doing five blocks, so will need to make twenty wonky stars and true them up. Add on the large outside triangles.
Step 5: June 13, 2016–Assemble the rest of the star blocks, by adding their HST borders. In the pattern, they are mixed up and varied, but also harmonized (some have a mix of orange and black, some have just black, some have just orange.) Make your own rules and go with it.
Step6: July 13, 2016–Arrange the blocks on your design wall and stitch together. Cut the pieces for your borders. Make the four corner pinwheels.
Step 7: August 13, 2016–Sew borders together and attach them to the quilt.


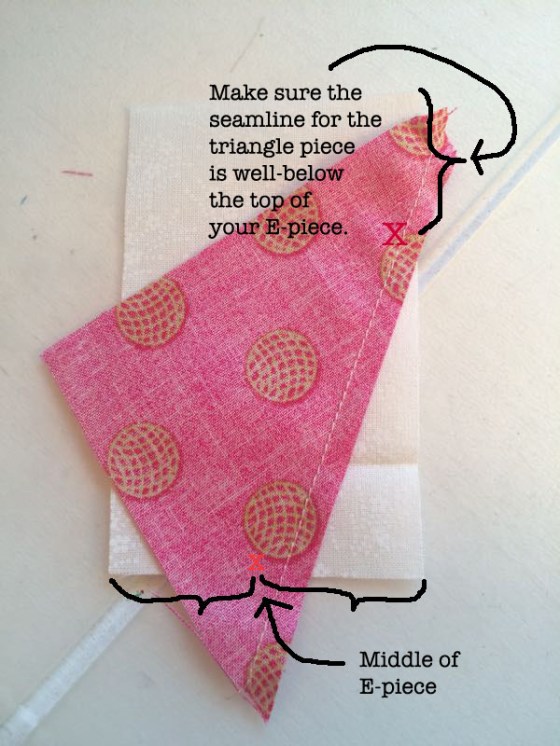 On this piece, I’ve got a pretty good start. What counts is the seam line. So at the top right, it’s down about 1″ to 1-1/2″ and the seamline is about midline, or just a bit to the side of it. As long as you are in the ballpark of the red X at the bottom, you’re fine.


 Trim up your blocks.
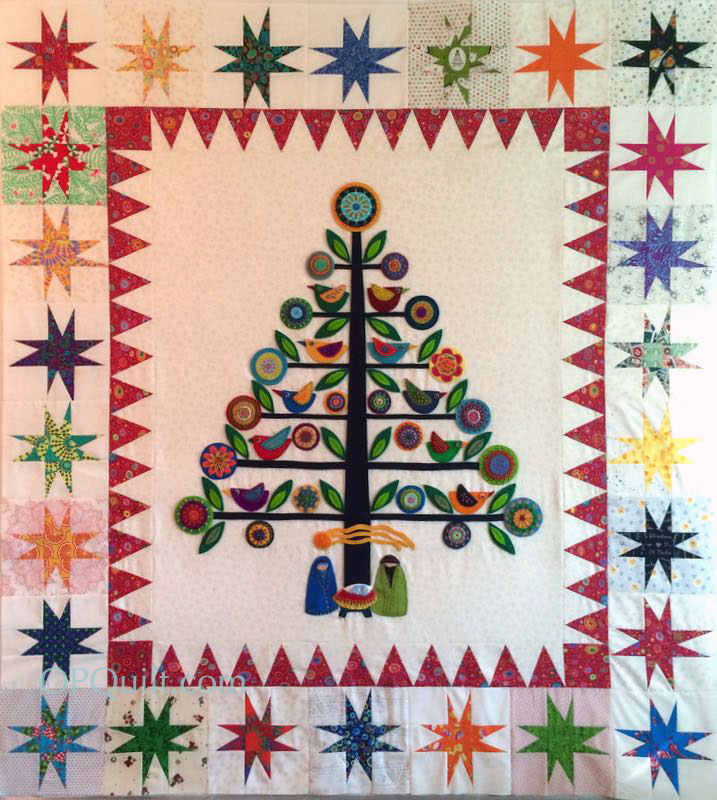


