100 Quilts · Quilts

Lyon Carolings

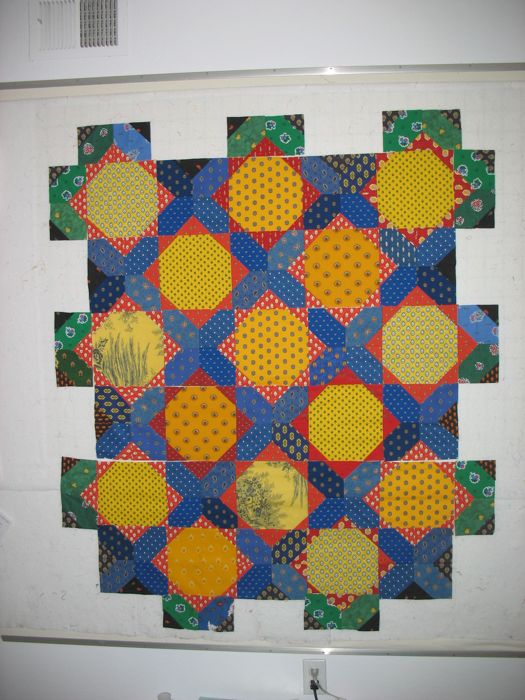
The mad summer of sewing quilts has come to an end.  I found the list of quilts I’d made at the beginning of my time away from the classroom, and “French Quilt” was on the top.  I’d remade this–or as I like to say–I made this twice, just trying to find the right way to show off these fabrics from France.

I just couldn’t decide what to quilt in the center of the yellow squares, but went with a floral motif from the border.  I had to rip out one block when it turned out I hated that particular thread.  I have picked out a lot on this quilt.  I’d originally stitched the green borders with a swirling design from that same outer border.  Wrong.  So I unpicked that, and channel/echo stitched it to mimic the blue X’s in the center of the quilt.

I chose to quilt one of the flowers in the center of the yellow blocks.

Does anyone else hate marking?  I don’t want pencil, although that is the easiest.  And since I don’t plan to wash this quilt (it’s for display), I don’t want something I have to wash to get out.  I don’t trust the disappearing markers, so that only leaves me with chalk and my ragged eye to get the job done.

And the back, with its four colors of toile.  Make that five if you count the hanging sleeve at the very top.

How did I come by all this fabric?  Like Miss Carrie of Schnibbles fame, we had traveled to France.  The first few days were touring around the south of France before we were headed to Toulouse for his scientific meeting.  We’d traveled far that one day, arriving at our B & B late (8:45 p.m.) just outside the town of Aix-en-Provence, after getting lost.  They did serve us our dinner, and the part I remember was having a chilled melon soup in the dark in their courtyard.  It was lovely, and served in a hollowed-out cantelope half that had been frozen.  The French do food right, I must say.

Aix-en-Provence, painted by John Horsewell

The next morning, we ate breakfast with the white mountain in view, an oft-painted mountain, then glancing at the darkening sky, checked out and drove to into Aix-en-Provence.  We were hoping to catch a market day.  As soon as we parked the car (in the carpark on the outskirts of town), the skies opened up and a huge torrential downpour kept up trapped in a deep doorway for ten minutes.  Of course we had only one umbrella between us (!), so we ran from doorway to doorway to the center of the town.  The market was closing up, even though the rain was ending–it was still quite drippy.  We caught a few photos of the newly washed melons, berries, tomatoes, when the downpour started up again.  We dodged into a shop that ringed the market square, peering out at the rain.  We were pretty discouraged.

Then my husband leaned over and whispered in my ear, “Turn around.  I think you’ll be happy.”  I turned and looked.  We had ducked into a fabric shop and although tiny, it was filled, floor-to-ceiling with glorious fabrics printed in the traditional manner of old France.  Those were the days when an extra suitcase was no problem and weight limits had not been heard of yet.  I had brought along a soft-sided suitcase and between my purchases here–and the ones the next week in Toulouse (for they had a lovely fabric shop as well)–I filled that suitcase full.

I have purchased these fabrics in other places, but this shop, found while dodging the pouring rain, was the genesis of my collection.

If you want to start your collection, I can recommend French Connections, here in North Carolina in the US of A.  They have a wide range of choices (that’s where I bought that fabulous yellow border) and I think given the cost of importing, the high price of cotton and the weak dollar against the euro, they have reasonable prices.

Happy Sewing!

Creating · Quilts

WIP–Lyon Carolings

Welcome to WIP Wednesday, hosted by Lee of Freshly Pieced Quilts.

Lyon, what? you are saying?  Lyon Carolings.  That’s my work in progress for today.The title comes from the name of the church–Carolingian–in Lyon, France, which was built by the Carolingian Dynasty from the 7th century, and alternately known as the Carolings. I snapped this photo of the patterned design on their ceiling, because you know us quilters.  It’s like a reflex. See pattern.  Take photo.

I obsessed wrote about the process of converting what I saw to a quilt block on another post; feel free to look it up. I’ve had this quilt top and back completed for a year now, and as my free time this summer is on its last gasp, wheezing its way to the finish line (where I REALLY have to think about school and lesson plans), I was determined to finish this.  So here’s my steps (pictures are below the STEP description).

STEP ONE:
Lay out backing, ignoring the fact that while you pressed it when you put it away last summer on a hanger it has developed new wrinkles.

STEP TWO:
Move the red bucket chairs because you need more room, leaving giant Xcircles in carpet.

STEP THREE:
Tape the backing to the floor, giving it a little tension to keep it smooth.

STEP FOUR:
Lay out the new kind of batting you bought, and realize that it will shrink 2%, which isn’t much, but if you’ve waited this long to quilt this puppy, you can wait a little longer while you squish it out in the newly washed kitchen sink, squish it some more, then drip your way to the dryer and dry it.  Spread it out again.

STEP FIVE:
Lay out the top, and even though it’s a billion degrees outside and in, lean over and pin the quilt, thinking cool thoughts, thinking of this as some kind of Pilates Stretching Exercise as you reach for the middle, sucking in your stomach while you hover over the quilt, safety pinning it to death.

STEP SIX:
Trim off excess batting, then stand back and admire the quilt.  This is an important part of the process because even though your husband really likes your finished quilts and is proud of you and loves to tell others about them, he’s not much interested in this part of things, so it’s you, baby, that has to bring the Atta’ Boy cheer to the table.  Atta’ boy, you say.  Or atta’ girl.  Whatever.

STEP SEVEN:
Begin quilting the blue, because that will stabilize the quilt as you ponder what to do next.  Some have a plan.  I have a desire to Get It Done and will figure it out as I go along.

That’s as far as I have gotten.  I like the puffing that happens as you start to quilt.  I use Superior’s Bottom Line thread in the bottom, with a distinct advantage that it’s thinner so you get get more on the bobbin.  I like the fineness of the thread and that it looks more delicate on the back.  In the top, I keep coming back to using Poly Neon.  For some reason this just works for me in most cases, although I have used other threads such as Superior’s King Tut and Poly Quilter.

I have no problem mixing threads, but do stitch out a sample on a sample quilt sandwich, identifying what I’m doing by writing on the section with a pen. Although you can’t see it really well, there are little numbers written inside those purple circles, above.

I’ve thought about using this flower, or the one below, as a template for how to quilt the yellow centers.  Which always leads us to Step Eight: Visit the fabric shop to pick up a marker to sketch in the flower.

In the post just below (published on my FSFriday last week), I write about how quilts stay done, when everything else doesn’t.  I’ll have another FSF post I’m working on, with a project that has been in process since last October.  Check back, if you want to, to read about that one.

Quilt Shows

Long Beach Quilt Show–Old Quilts

First up at the Long Beach Show is wait.  Wait until the show opens.  I’d gotten there about 45 minutes early, and was about 12 from the front.  By the time the show opened at 10:00, the line snaked out behind me, and down the long passageways.

Second up at the Long Beach Quilt Show–go and see the people who sold me the fabric for my Provence quilt, French Connections from the Carolinas.  They also sell fabulous baskets, which I saw many women toting around all morning.  They were kind enough to pose for a photo before all the crowds arrived.

I then wandered around, browsing through vendors, looking at things to buy.  The strength of this gathering is NOT the showing of quilts, although some are interesting.  Road to California, in January, is more varied and has a juried quilt show, so I always spend a lot of time looking at things there.  This show, an off-shoot of Houston, is like all the vendors came, but not too many of the quilts.  And there always seems to be a display where we are not allowed to photograph.  So I spent the bulk of my time looking at the new ideas offered by the multiple vendors, and picked up a few sacks of treasures to bring home.

I ended up buying the kit to this quilt.  I have no idea why, other than it is very very cute and the fabric choices were right on target.  That’s all I’ll say about shopping at the vendors.

One exhibit was a selection of very old quilts.  While I was standing there admiring this vintage piece from the 1800s, a group of quilters passed by.  One said ” I don’t like these colors.” Another said, “And what’s with those borders?  How could she have chosen those?”  At this point I said, “I guess from whatever they had in the 1800s.”  They did a double take, and said, “Oh!  I didn’t know these were old quilts.”  And they moved on.

This quilt was made around 1845, and is titled Star of Stars.  The panel block prints date from 1815, and the quilt includes French and English chintz, Indiennes prints–just like my Provence quilt!

The center star was fussy cut, and really makes this old quilt pop.

So what can we learn from these early quiltmakers?  Symmetry, as found in this one, from 1870.

Pictoral borders?  I liked that each of these blocks in this quilt from around 1870 were slightly different, showing that they are truly handmade.

Cleverly placed corner blocks in the border? Good use of contrasting values?  I happened on a quilt site the other day and the woman’s quilts were very colorful and well done.  But they were all medium tones, so the overall effect was mushy.  This is anything but mushy.

And when I got up close, I think the outer quilted circle around the points might even be trapunto.

How long did it take this skilled needlewoman to applique all these leaves and vines?

Detail of above quilt.

Everything new under the sun is old, or something like that.  The use of lots of stark white in the quilt from 1850 is very much what some of our “modern quilters,” as they like to call themselves, use to bring contrast and pop to their quilts.  There appear to be three parts to the quilt world today: those who do traditional quilts using traditional methods and patterns, those who do art quilts which includes lots of free form and interesting techniques and lots of embellishment, and these modern quilters.  I like this group, thinking that it has rejuvenated quilting.  One study, oft-quoted, says the average age of a quilter now is 60 years old. If you’re striving for longevity in your industry, I’d be worried if that was the number.

However, I’d bet that the average age of the modern quilters is around 30 to 35; they are the new blood of the quilting industry, and some manufacturers are recognizing this, using the blogs these quilters maintain to reach out to new customers.  We need all three kinds of quilters, I think.

A few more of the older quilts.  Barn Raising Log Cabin, from the 1890s.

Courthouse Steps, from 1890, made of silk.  Another variant in the Log Cabin block.

Detail of above quilt.

Wild Goose Chase.  It’s the variations in the center blocks, coupled with the wild goose chase borders and strong colors that make this quilt a standout.  I like that the lower left green border seems to float.

Detail of above block, showing the casual way the quilter “matched” (or didn’t) her borders and blocks.

This center block is pretty unusual.  The value shift on the left side of the block in the geese border, appears to make the direction of the points switch directions.  While I know this is all happenstance, it’s what makes this quilt interesting to look at.  Do you think her friends criticized her borders?  I hope not.

The amount of pieced triangles in this quilt must number in the hundreds.

While I’m not sure, my impression is that the shapes in the borders are flowers and leaves–irises?

More tomorrow.

100 Quilts

Still Working on the Provence Quilt

This could be the title for about the next million posts, I think.  I pulled everything off but the center and some pieces around the edge.  I talked with a couple of people I admire (Tracy and my husband) and they just weren’t with me on the green borders.  I tried to figure out why, and my husband noted the pieces that jumped out at him–the bright kelly greens. Time to listen a bit, I think.

I like the greens idea–of letting there be another border there, but my advisors were right: the greens that I was using were fighting the rest of the design.  So what’s a quilter to do?  BUY MORE FABRIC!  Of course!

But where to find such specialized fabric?  Like I mentioned before, it’s not like it’s at the corner quilt shop.  I remembered that I’d purchased the last lot at our local quilt show Road to California, and found French Connections, from North Carolina, on the vendor page of the quilt show website.  Success.  I wanted just about everything, but it can get pretty pricey if you get it all.  Their prices are very reasonable, considering what I’d seen in Lyon, France when I was there.  American quilt fabric in France was about $20 per yard; French fabric in America is about the same.

I sent in my order, and chatted with them this morning; the fabric should be here by the weekend, or the beginning of next week.  She also told me she’ll be at Long Beach, as well as Road to California 2011.  Two cross-country drives!  I appreciate the dedication of these quilt shop owners to help people like me get what they need to finish the green borders on a quilt.  Plus. . . a little brainstorm occurred when looking at her selection of fabrics–a little twist of an idea that’s typically Provence-ian.  Stay tuned for what I’ve got planned.

One bright spot about no fabric and being at a resting place: I cleaned up my sewing desk (and cleaned out three sewing drawers).  You may not see it this clean again until the end of summer.

100 Quilts

Blooming Quilt

After ignoring the quilt for a day or two, I reluctantly headed into my study to try and make sense of the mess I’ve made. First? Browse through quilt books. This is Balkan Puzzle from one such book, mocked up in my quilt program. Meh. Then I thought I should look at photos from some of my trips to France, specifically southern France. This idea of a block surrounded by a grid seemed to be common:

Both of these photos are from a Carolingian church in Lyon.

So I monkey around with ideas from the photos, ideas from my files and come up with this one, which is basically the first photo’s design turned on its side. If I focus in on the yellow blocks surrounded by the red “petals,” then it also reminds me of the fields of sunflowers we saw as we traveled in the south of France.

I cut out a bunch of golden yellow squares, and had to piece one of them back together from the previous quilt. Red squares distributed–thanks to the gift of fabric from my friend Tracy, I had just the right kind and color.

I’d found another similar quilt online, and freaked out that mine might be considered a derivative of that one, so I reworked the borders to make it really mine. I probably shouldn’t freak out, as I long ago realized that ofttimes there is a certain zeitgeist in the universe and creative and intellectual projects often overlap. My friend Tracy told me about an experience her sister had about someone apparently trying to claim a Dresden Plate idea as her own. It’s about as silly as Pioneer Woman claiming Texas Sheet Cake for her own (in a post on my cooking blog). So what is new? What qualifies as something truly different and profoundly unique? Once I heard that if an idea was 10% new it was pretty “out there,” and may not even be accepted by the public. Perhaps that’s why retro designs appeal to us–they are new without being new.

Sewing is a slow process, as there is a lot of figuring out of which red square/black square goes where, and the drawing of the line, sewing, cutting, pressing, up-and-down, up-and-down. Another challenge for this quilt was that I was bound by my desire to only use the French fabrics, and there was just no running out to the little shop in Aix-en-Provence in the south of France to pick up something that would work better. Scarcity can make a quilter more resourceful.

But the fun thing is “opening up” the reds around the yellow square. I think the quilt looks like it’s blooming, like a huge sunflower.