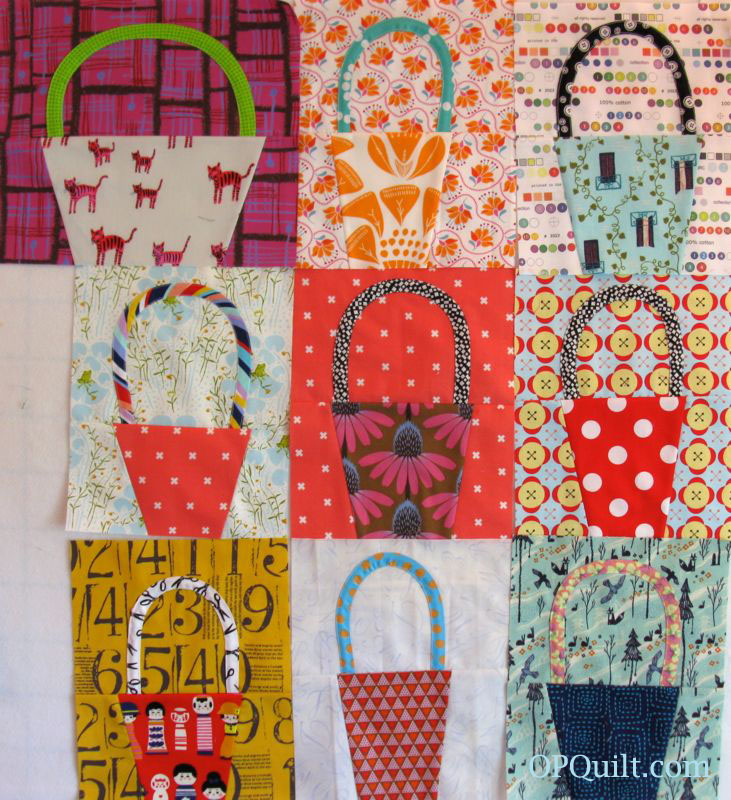
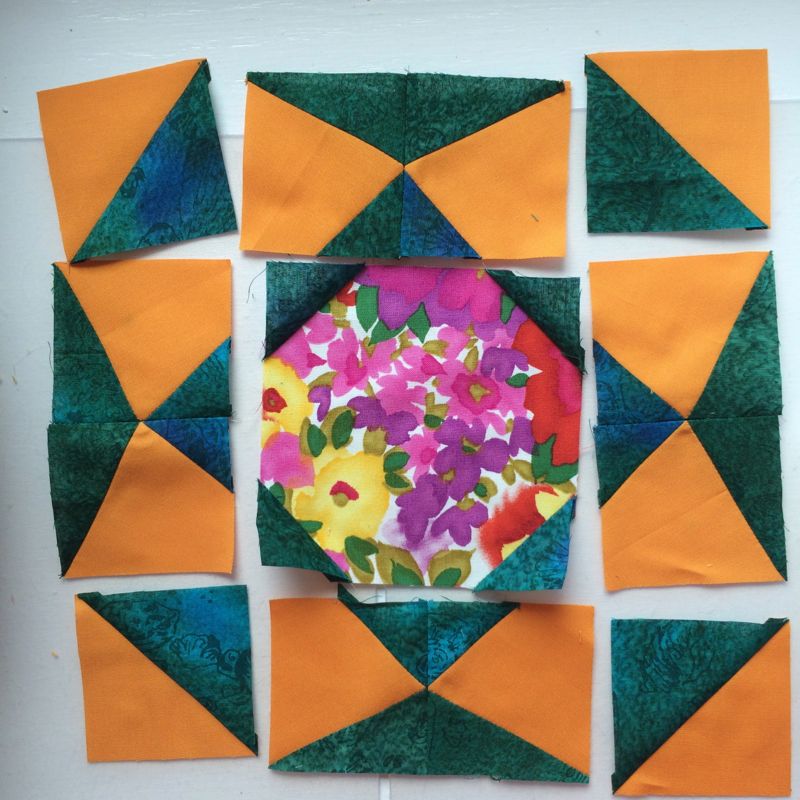
Quilts

Traveling Threads Bee Block: Peaceful Hours, a Few Thoughts on Collaboration

Traveling Threads_logoThis the second block I made for my recent turn at the Traveling Threads Bee.  This was was found while trolling the web for new bee blocks, but the templates I found had the finished block measuring at 11″ which led to some very strange measurements.  I think it was probably geared for metric users, so my apologies to them for this block, which finishes at 10″ square.

Peaceful Hours Block_7

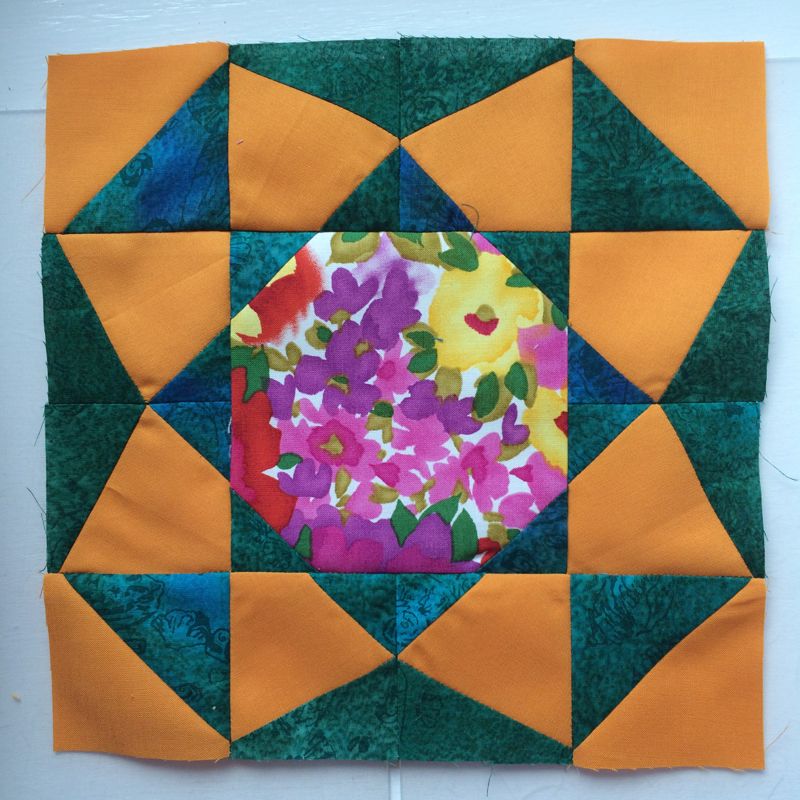
Here is a PDF of the templates for the block.  I am happy to provide them to you as a free downloadable file, but please don’t distribute these blocks to your mother or your friends.  Send them here to get their own, please.  Thanks.  Click to download: Peaceful Hours 10inch

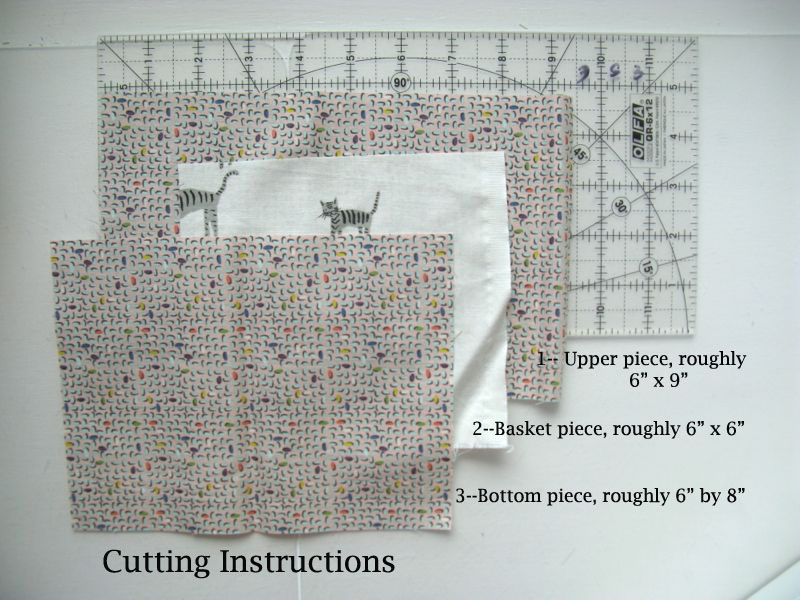
I always like to simplify my cutting, so I tape together the triangles, then measure them, as shown here:

Peaceful Hours layout

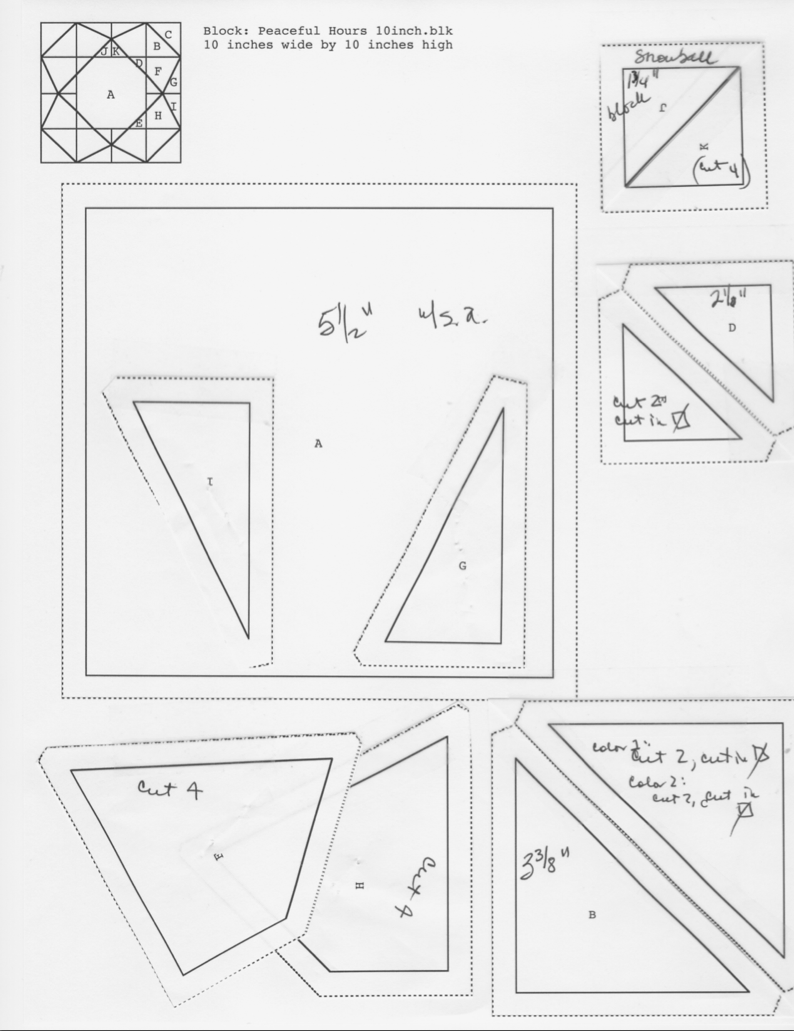
Cut one large 5 1/2″ center square.  I used Lisa’s signature fabric of a bright floral.
Cut four smaller 1 3/4″ blocks to snowball onto the corners.  When you tape these together, remember to cut off that diagonal seam allowance.
Cut two 3 3/8″ squares (orange), and two 3 3/8″ squares (green).  You can either cut them apart diagonally, make them as a two-color half-square triangle (HST), which is what I did.  Trim them to measure 3″ inches square (you won’t have a lot of extra fabric, so be careful).

Cut two 2 1/8″ squares (green), then slice in half diagonally.

Cut the other pieces using the templates, remembering to have all the right sides of the fabric facing UP if you are going to cut them in a layer, as there is a left-orientation and a right-orientation to the F and H templates.  Ditto for the narrow wedge G and I triangles.

Peaceful Hours Block_2

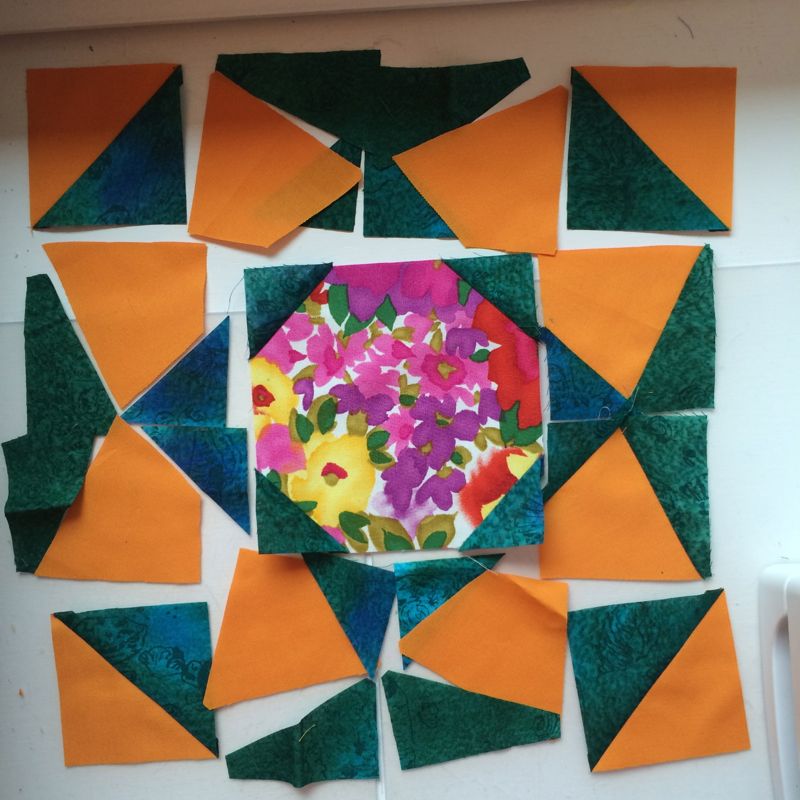
Snowball the corner on your large center square, trim and press, then lay everything out.  This is where you briefly lose your mind on those F and H pieces.  The trick is to find the right angle corner and then let that help you figure out how it goes together.  You’ll always be trying to make those two short sides be that inner corner, but it won’t work.  Look for the right angle: one short side and one long side.

Peaceful Hours Block_3

Stitch on the longer wedgier triangle, press.  Then stitch on the regular triangle.  You’ll have four sets that are mirrors of each other.

Peaceful Hours Block_4 Peaceful Hours Block_4a

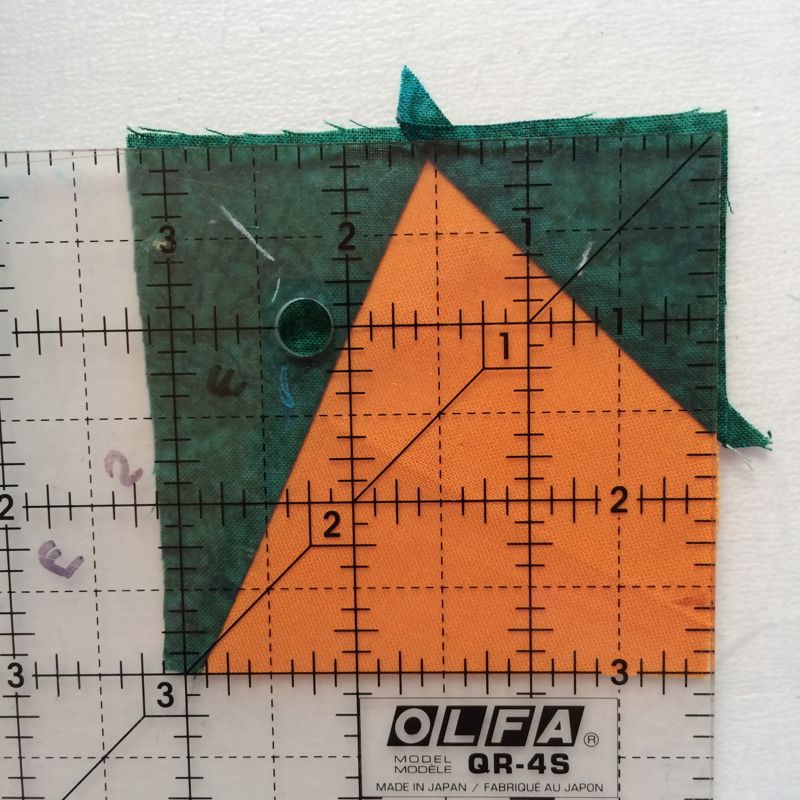
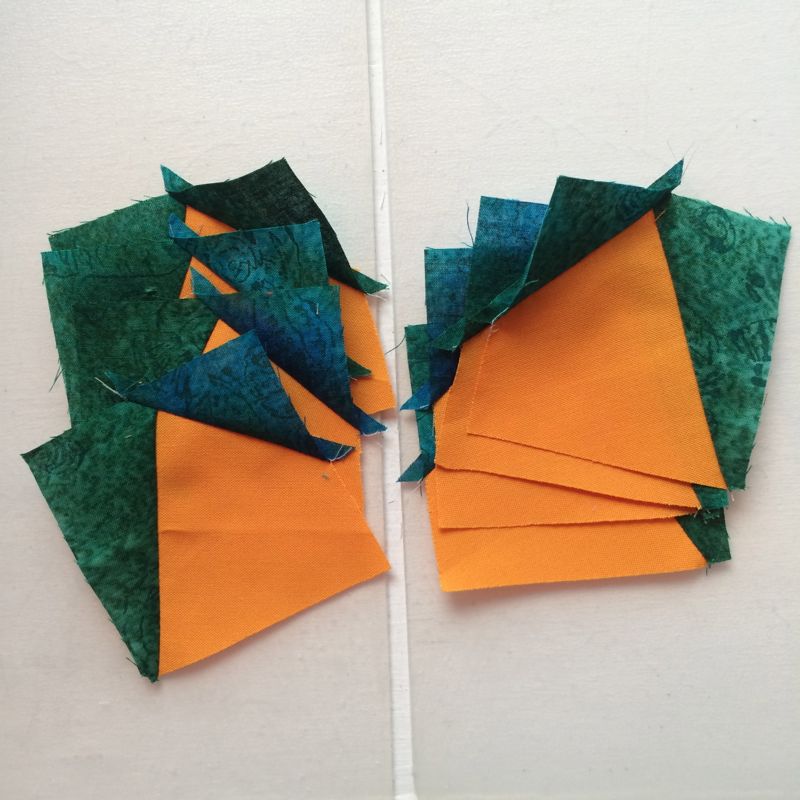
True them up to 3″ square.  That tip should fall right about at the 1 and 1/2″ mark, if possible.  While in my early quilting days, I used to just wait to square up the whole block, now I square up the units as I go, especially on these!

Peaceful Hours Block_5

I stitched together the two mirror-units of each of those angular blocks.  While I am NOT a fan of pressing open these tiny 1/4″ seams, in this case, that is the best way to get them to lay flat.  I pressed the rest of the seams to the side.

Peaceful Hours Block_6

Stitch as shown.

Peaceful Hours Block_7And now here it is!  Give it a good steamy press on a well-padded ironing board, let it cool, then true it up.

Peaceful Hours Quilt 5x5

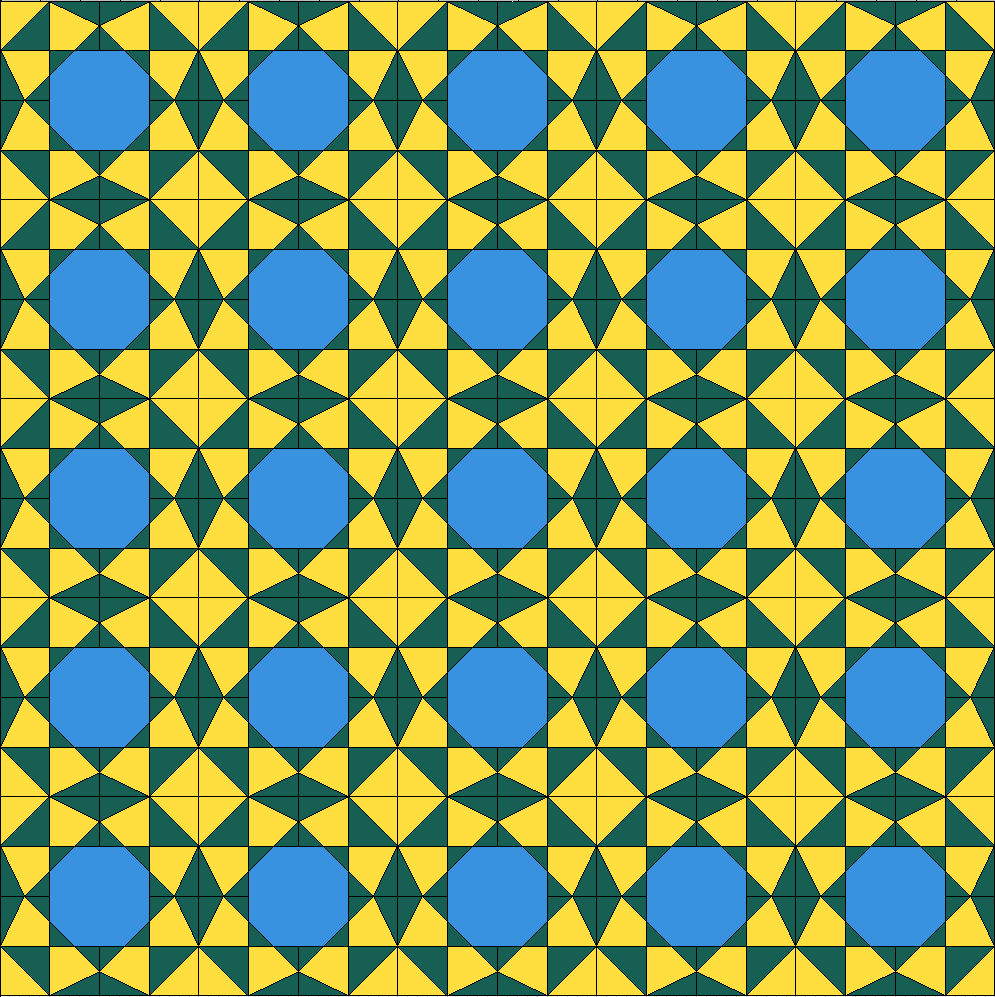
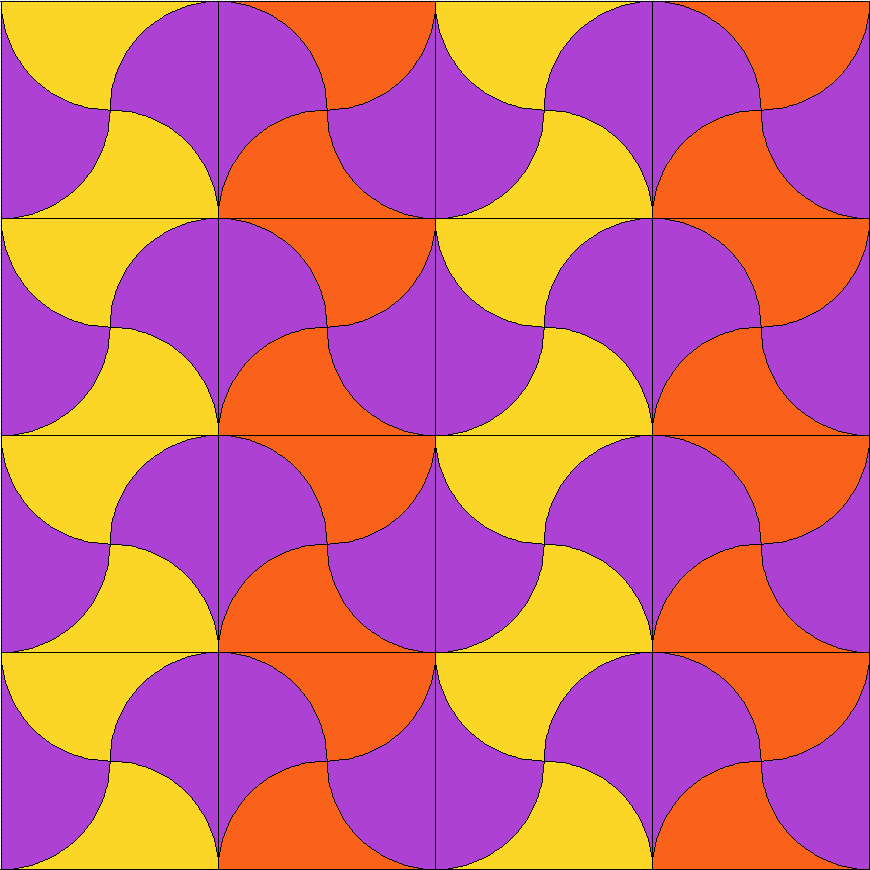
Look what happens when you put Peaceful Hours into a block set of five by five.  I love the secondary circle-type pattern that forms inside.

Peaceful Hours Quilt2 5x5

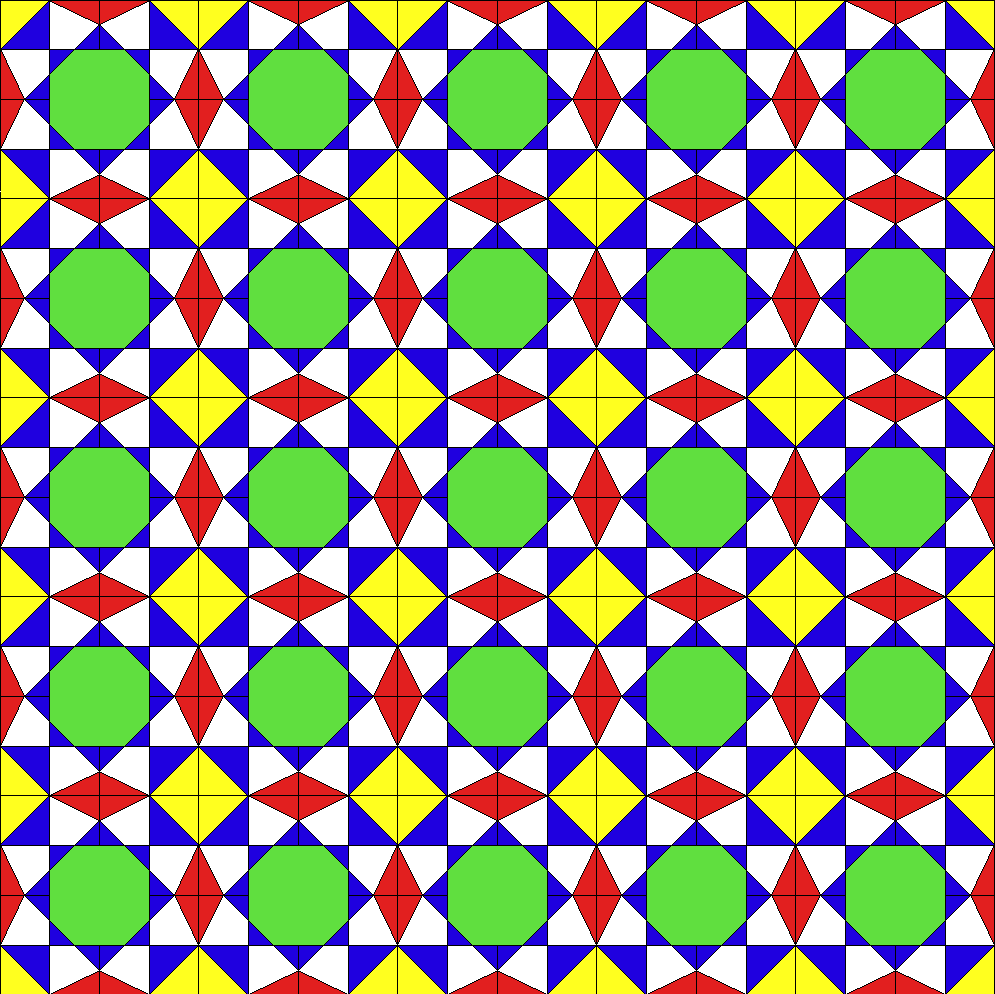
Another coloration.  I’m playing around in QuiltPro software, which I love because it runs well on a Macintosh.  I also have Electric Quilt, which is also good (I use it to draw all my circles EPP blocks), but since I’m more familiar with QuiltPro, I tend to turn to it as it is more frequently.  And no, I don’t get it for free.  I bought it, just like you do.  I don’t hear about it as much as EQ7, so I thought I’d mention how much I like it.

Traveling Threads_Lisa June 2015

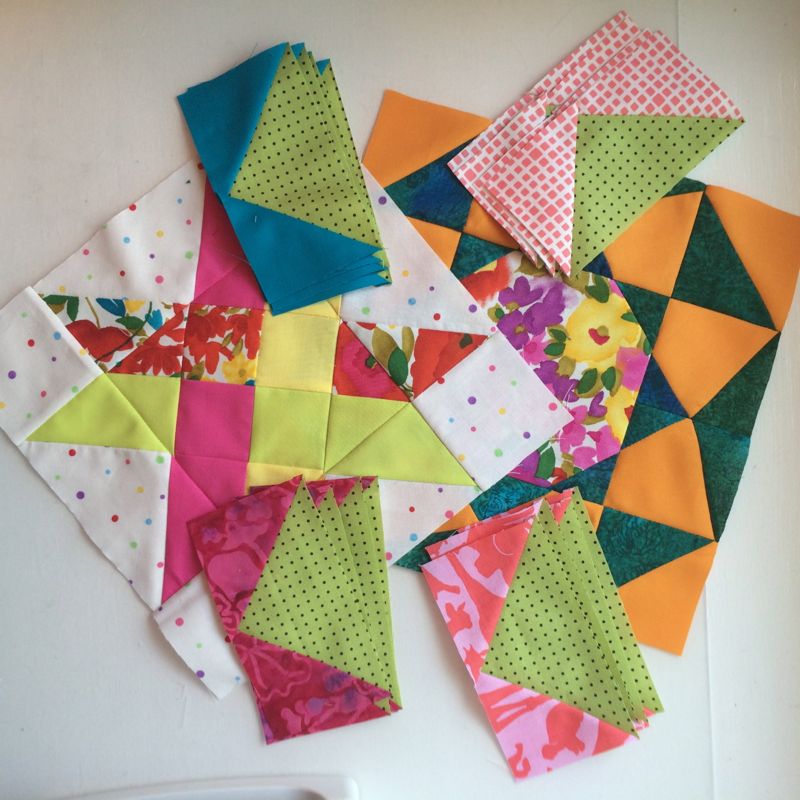
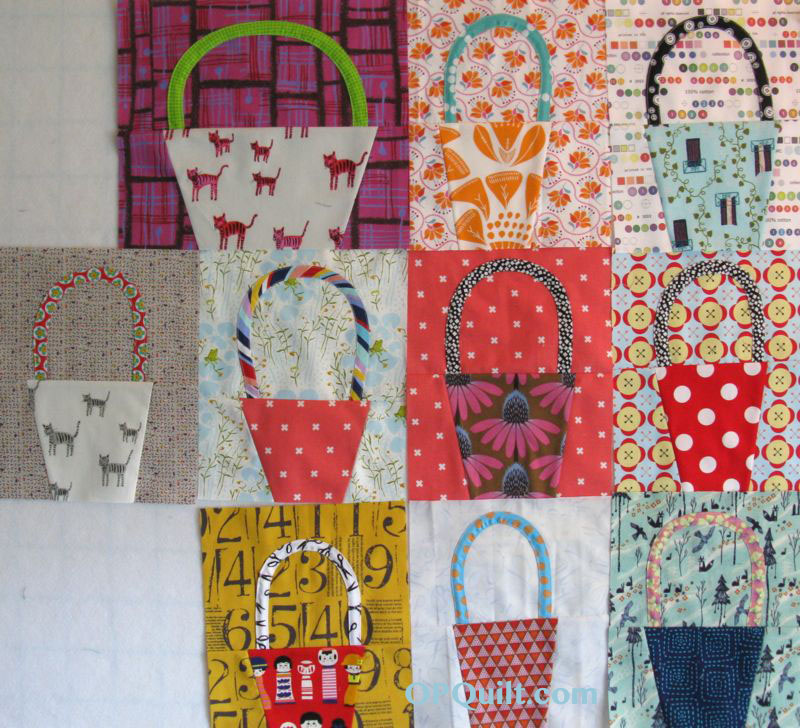
This is what I sent on to the next member of our Traveling Threads Bee: whatever came to me, plus these two blocks, and a slew of Flying Geese blocks for the last person, who puts together the quilt top.

Eastmond Bubble Log Cabin June 2015MCM

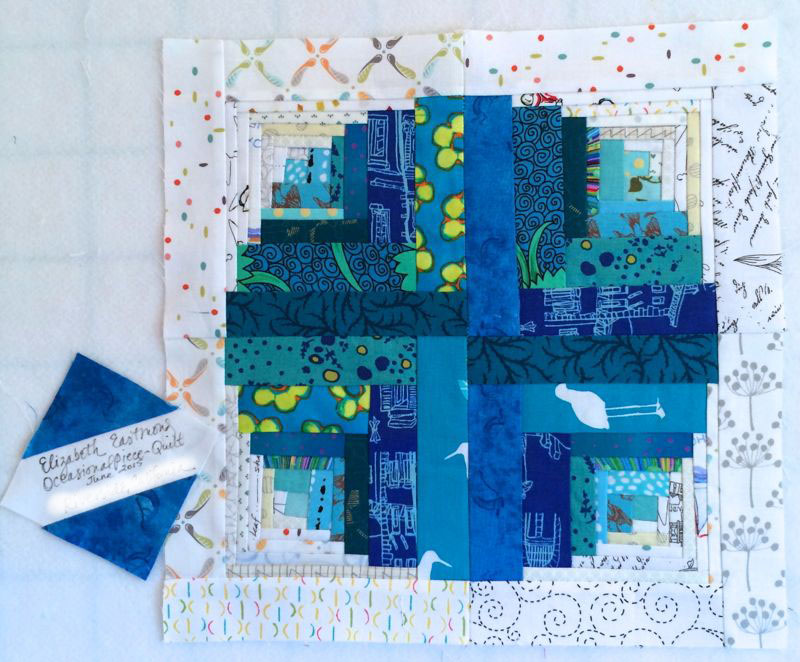
I’ve also finished this block for my bee mate Rene’ for the Mid-Century Modern Bee.  It’s from a pattern by Aylin-Nilya, and this one took some time with the weensy little logs in the center.

Being in a bee, or a group is a collaboration of sorts.  While the generally agreed upon conventions for a bee are pretty standard, we are feeling our way with the Traveling Threads Bee.  The biggest obstacle in both seems to be mailing dates, but beyond that, it’s an interesting experience to climb inside someone’s head for a while, use their colors, (and in some cases) their fabrics, their ideas.  Brian Eno noted that “When you sing with a group of people, you learn how to subsume yourself into a group consciousness… That’s one of the great feelings – to stop being me for a little while and to become us. That way lies empathy, the great social virtue.”

And maybe that’s why this digital world of quilting has used bees and groups to engender understanding, which leads to curiosity about our friends’ lives, which leads to friendships that exist beyond the screen and the blog.  I think it is more than just Pen Pals on Steroids.

Amy Poehler, who spent three years in Chicago with The Second City, an improv group (and later famously collaborated with Tina Fey on SNL) had a good insight when she said to “. . . be open to collaboration. Other people and other people’s ideas are often better than your own. Find a group of people who challenge and inspire you, spend a lot of time with them, and it will change your life.”

I find that has happened to me more than once, and I notice it also in QuiltLand’s redundancy as I read blogs, watch the latest fad blossom (yes, My Small World is coming along–more later) and bloom.  But when someone has a pop of inspiration, works with it, shares it, that collaboration of sorts changes us all.

˚˚˚˚˚˚˚˚˚˚˚˚˚˚˚˚˚˚˚˚˚˚˚˚˚˚˚˚˚˚˚˚˚˚˚˚˚˚˚˚˚˚˚˚
Occasionally my blogging software will place videos and ads at the end of my posts.  It’s a tacit agreement we have: they bootleg onto my posts so I can use their software for free.  I do not control the content, nor the frequency of their ads.

Quilts

Wonky Basket Blocks Tutorial

Wonky Baskets MCM

Carla, of Grace and Favour, asked us to make Wonky Baskets for her bee month for May 2015  Mid-Century Modern Bee.  She sent us some photos of examples of Gwen Marston’s Liberated Baskets and gave us instructions to make colorful baskets with contrasting handles.  I just found my way to completion.  I thought I’d share how I proceeded.

Wonky Baskets_nine

This is a result of the process called “Grading Avoidance.”  (My final papers just came in and I run upstairs in between each paper and play with the cloth to get my brains back.  It’s a skill I’ve learned since becoming a professor.)

Baskets Quilt

Carla’s request reminded me of a quilt I saw last summer in the Springville Art Museum, Going to Market, by PJ Medeiros (quilted by Amity Golding).

Baskets Detail

I liked all the different-sized baskets, so I drew up this sketch:

Wonky Baskets_size options

Wonky Baskets_pair up fabrics

I then pulled up a bunch of two-fabric combinations and laid them all out on my ironing board, and started to cut.

Wonky Baskets_cutting

Wonky Baskets_cutting2

This is how I assemble the basket part, beginning with the bottom piece (or base piece).  I lay the basket piece on top, about 2″ from the edge, and placing the ruler at a slant, I cut through both the LEFT base and the basket pieces.  Shift the basket piece to the left so it overlaps the righthand base piece by about two inches, then lay your ruler down on a slant, and cut through both pieces.  I show you how it looks once you are finished (above).

Wonky Baskets_ready to sew

Pin and stitch, then press towards the basket.

Wonky Baskets_cutting3

Lay the upper piece and the newly constructed basket bottom piece together, then measure about 11″ from where you will cut the base; place a pin.  This is the outer boundaries for the handle.

To make the handles, cut a bunch of bias strips anywhere from 1 -1/4″ to 1-1/2″ wide.  Fold in half, wrong sides together, long cut edges aligned and stitch a narrow (1/8″ seam).

Wonky Baskets_bias pressing

I have these bias strip press bars that help me with the next step: I slide them in, wiggle the seam to the middle back and press.  You can just do this with your fingers on your ironing board.  Try really hard not to stretch out your bias.

Wonky Baskets_sewing handles

The above weensy picture (click to enlarge) shows me 1) auditioning bias strips for the handle (I have a bunch to choose from ).  Go to the ironing board and press, with steam, a curve into your handle, then pin it on (photo below).  It’s better to think about easing in the inside curve, rather than stretching the outside curve, but truthfully, both happen at the same time.

Then back to the above photo: 2) stitch on the handle, doing the inside curve first, then the outside curve; 3) handle stitched, and finally 4) the seam between the upper and lower parts are stitched and trimmed.

Winky Baskets_handle pinned

Wonky Basket_final

For the final press, press seam toward basket so the handle will look like it’s coming out of the basket.

Wonky Baskets_stacks

I cut and stacked a bunch so I could slide up here between grading and sew a couple.  Bias strips are in the front.

Wonky Baskets_ten

And now I have ten!  You can see I’ve made one of them bigger.  I also have a couple of midget baskets ready to make, too, to even out the rows.  I’m just making them–I’ll figure out how to put them into a quilt later, after these last essays are graded, the final given and grades assigned.  A perfect summer project, I think.

Quilts

Moroccan Quilt Tile

Moroccan Tile from JillinItaly

So it all started with this photo, from the Instagrammer JillinItaly, a small sweet shot of tiles on a Moroccan floor.  It actually started with my #the100daysof4square project (an offshoot of #the100DayProject) and since I have to come up with four squares of something every day for 100 days, this was what I chose.  Maybe it was the color, the interesting half-clamshell that formed a whole clamshell and an apple-core block, I don’t know.  It was just one of those serendipitous moments that made me want to struggle my way through learning how to draw it in EQ7 (I still depend on my trusty QuiltPro, but wanted to become fluent in two quilt languages).

Moroccan Tile Quilt

I’m also suffering badly from Spring Fever, even worse than my students (which now you know must be nearly a four-alarm alert of Teacher Fatique and Mindlessness), so much suffering that I let them out early today.  Again.  That’s two days in a row and the kid who went his freshman year at Cornell (but is now back here) looks at me as if something was whack-o, and the kids in the back row just grin from ear-to-ear, even though I had to tell one of them she was on track for a stupendous grade of D, if she didn’t get her Stuff Together and pull it up to a sunny C.  Are you surprised when I tell you that she was completely surprised?  Didn’t think so.

So I just had to do something different tonight rather than think about all of that, and here it is: a free pattern for a six-inch block of the above.  Moroccan Tile Block six-inch  Have fun.  I have not yet made it, but Leanne of SheCanQuilt has a wonderful tutorial, complete with video, on sewing curves, so I’d check over there if I were you.  That first picture from JillinItaly’s feed just lit up my wee IG universe (click on the icon on the right to see more), so maybe it’s not the only the fabulousness of the pattern, but also those colors that say Spring Is On Its Way, or if you are in the Southern Hemisphere, it may be saying, You’ve Had a Good Summer, Now It’s Time For Fall, but I’m not really seeing more than those saturated — while also being faded — yummy peaches and golds and magentas.

Quilting in Progress on Pineapple

As far as the other project goes, I have not yet keeled over, but am still working steadily on getting it quilted.  I’ve already ripped out several parts, but I think I know now what I’m doing, so that’s a relief, as any FMQ quilter can tell you.  I might just yet make that deadline of Tuesday.  Stay tuned.


Quilts

Neonatal/Preemie Quilts with a Free Pattern

Neonatal Preemie Quilt

The Riverside Raincross Quilt Guild, to which I belong, has many community service projects, one of which is their making and donating neonatal, or preemie, quilts to the County hospital’s NICU.  I sat across from Mary last guild meeting, as she patted the stack of little quilts, and told us the story about how her friend, who is a nurse, lays them all around the layettes when she gets a new stack from us, and how she loves looking at them.  All those little quilts made with love.

Neonatal Preemie Quilt_1

They are 30″ square, lightly quilted (at least all the ones in the stack were, for that makes them more huggable and drapable).  I had some fabric I’d ordered last year that I wasn’t that fond of (the hazards of online-ordering, although the fabric itself was very popular and cute and I thought it would be good for a boy), plus I had a block I wanted to try out, which first surfaced in the 1940s.  Here is a PDF pattern for that block, a 15″ square Twin Darts: Twin Dart 15%22 block.  (Click on the link to download.) Make sure your printer settings are set to 100% and it should come out okay.  You’ll be making four large blocks.

It’s an easy pattern, but there are a lot of bias edges, so my advice (in hindsight) would be to give them a good shot of spray starch before piecing.  All the quilts are pre-washed before they go to the babies, so it will be washed out.

Then I wanted to try a Pillowcase Binding.  I liked Susan B. Katz’s excellent tutorial, found *here.*

But I ended up going the tutorial from Rita, of Red Pepper Quilts (found *here*), as it was not for an art quilt (which Susan’s is) and yes, I did baste the quilt top to the batting in a couple of places before sandwiching them all together, then turning.

I then top-stitched around all the outside edges to close up the opening, then quilted around all the arrows (or darts) and other main seams.  Done!  I have another one in the works, which I’ll post about, too, as well as give you the free pattern.  I put this up on Instagram, and many people had the same response I did–a good way to winnow down the stash as well as doing good.

While looking through the web for guidelines about batting (apparently polyester or cotton, no wool), I found this document and modified it to post here: neonatal_quilt_guide  Please check with your local guild as to size and other requirements, as they are obtained from your local hospitals.