Quilts

Road to California 2013–part II

The next two posts are photo-heavy, but I decided to put the quilts I wanted to show you up in two, rather than three posts. (BTW, these are in no particular order.)

AmerSpirit

Laurie Wozniak’s American Spirit, was one of several done for the American Spirit batting display, and for which they handed out calendars with photos of the quilts.  I liked the postage stamp theme.

ColoradoQuilt

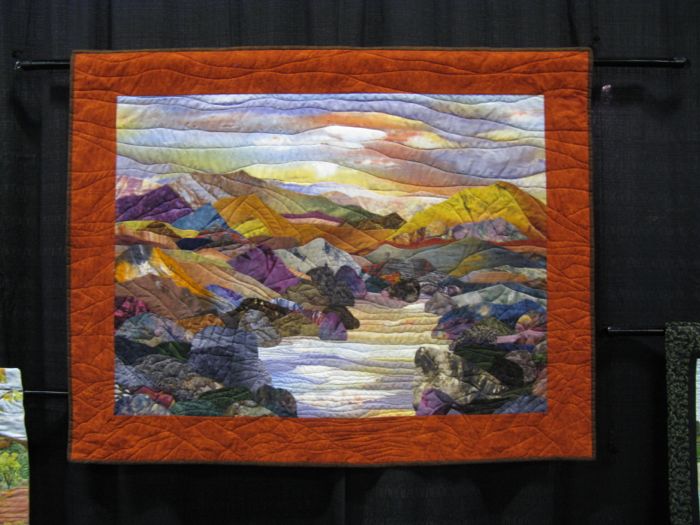
Lynette Hallmark’s Colorado Evening was the other one in this series that caught my eye.

Bubble1

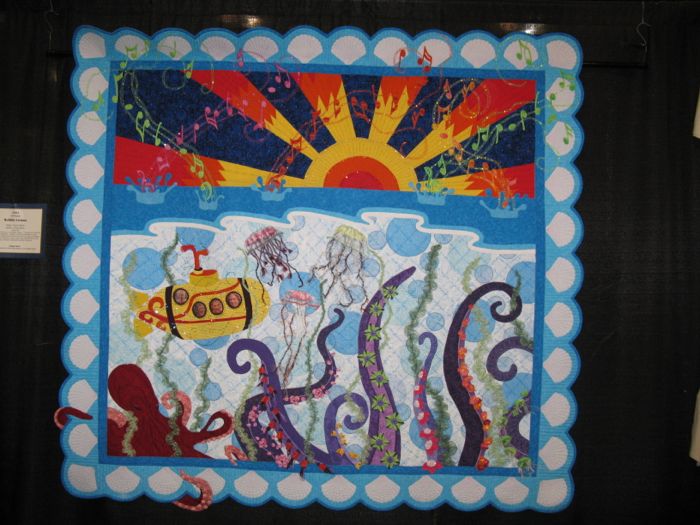
Bubble-Licious was made and quilted by Karla Dahms of Minnesota, and was inspired by the Beatle’s song “Octopus’ Garden,” from A Yellow Submarine.

Bubble2

Bubble3

ChignikQuilt

Artists Mark McDermott and Cat Larrea of Alaska, participated in a curated exhibit titled “Perspectives: Fantasy and Reality.”  This piece, Chignik Bay Lagoon, is a digital image of an original watercolor, which was then enlarged, printed on fabric and quilted.  Both artists have geoscience backgrounds.

Chignikdetail

CircularReasoning

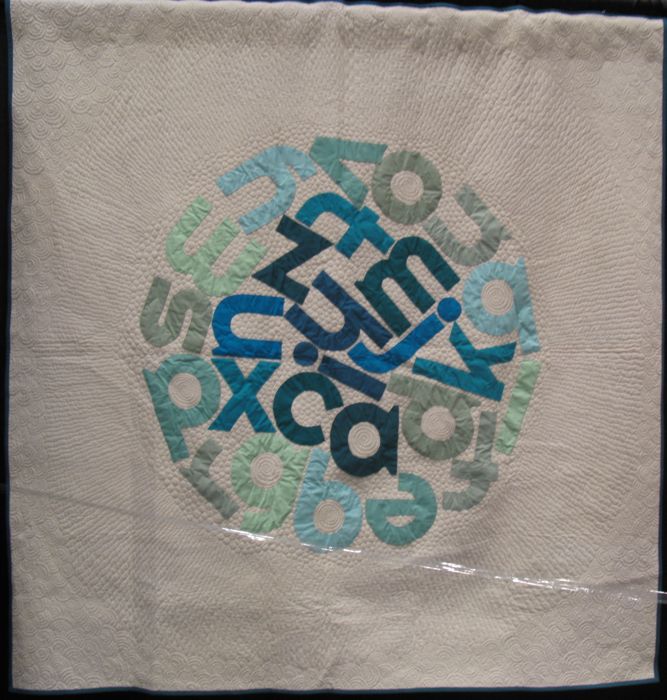
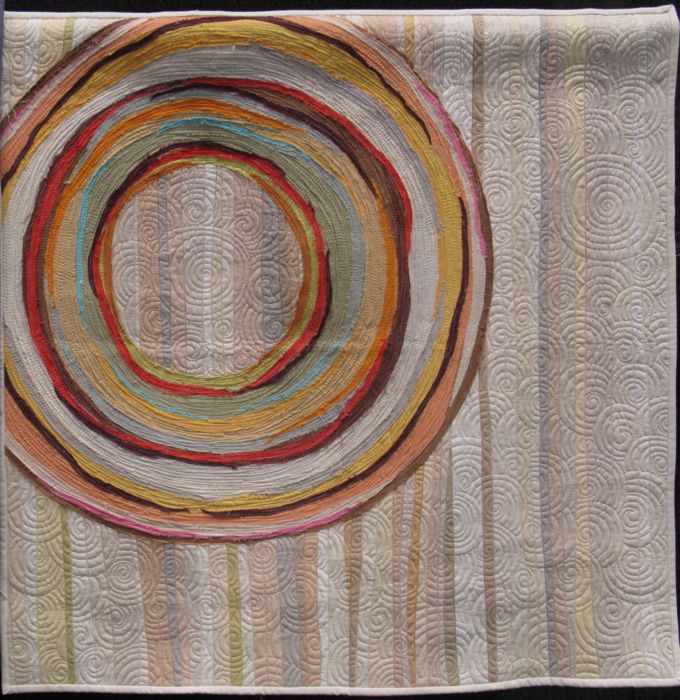
Road to California always has a section of Faculty Quilts, and this very well-known quilt, Circular Reasoning, is by Emily Cier, and is quilted by Angela Walters.

CircularReasoningdetail

CityEdge1

City Edge 1 and 2 (this quilt and the next one) were made by Gerri Spilka and Delia Dungan and are from the Perspectives exhibit.  Both are from Philadelphia, Pennsylvania and were inspired by their cityscape.

CityEdge2

FromStone

This quilt by Hollis Chatelain, From Stone, was inspired by a trip to beach near Brisbane, Australia. (from the Perspectives Exhibit)  Confession: I’m always in a love-hate relationship with her quilts.

MidTown1

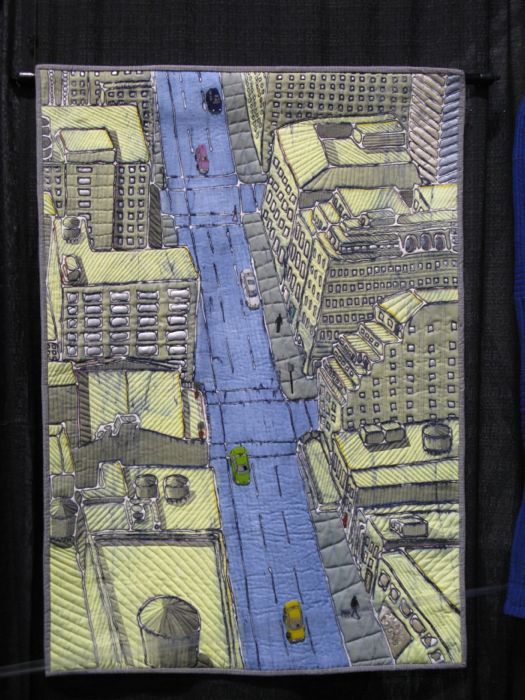
MidTown A and B (this quilt and the next) were made by K. Velis Turan of New York.  She used fabric, dyes, textile paints, and. . . shrink plastic (what we used to call Shrinky-Dinks) for the cars.  Since so many of us have a love affair with big cities (but often are glad to retreat to the ‘burbs), I thought these quilts were terrific at showing the compressed space of buildings side-by-side, but sited on river-like boulevards.

Midtown2

Midtowndetail

CrazyPlaidQuilt

Allison Aller, another member of Road faculty, made Crazy for Plaid, her version of the traditional Gothic Windows pattern.  She used machine and hand embellishment (below, sorry for the blurry photo).

crazyPlaiddetail

GirlPearl

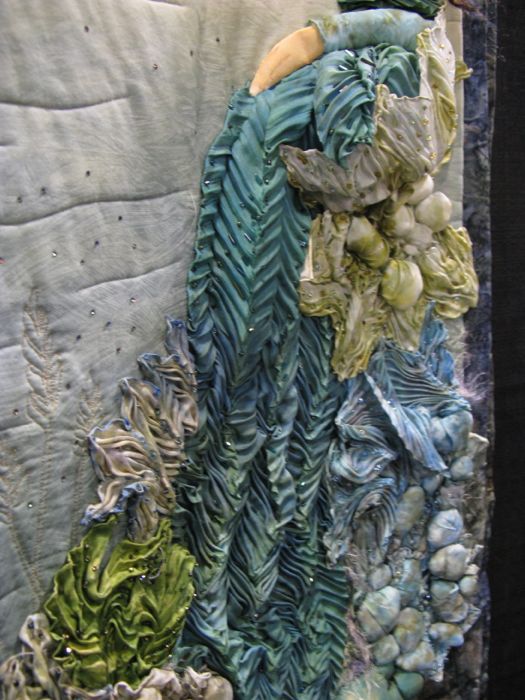
The main reason I was fascinated by Girl with a Pearl by the Sea, was because of that incredible mass of textured silk on the quilt.  Detail below.  Quilt made and quilted by Sandy Winfree. Can’t decide if I like it or not.  It’s a novelty quilt, and I think sometimes Road goes overboard on those.  Overall, I have to say I think this year’s Road offerings are better than last year’s.  Fewer sparkles for sparkles’ sake, for starters.

GirlPearldetail

GoneFishin1

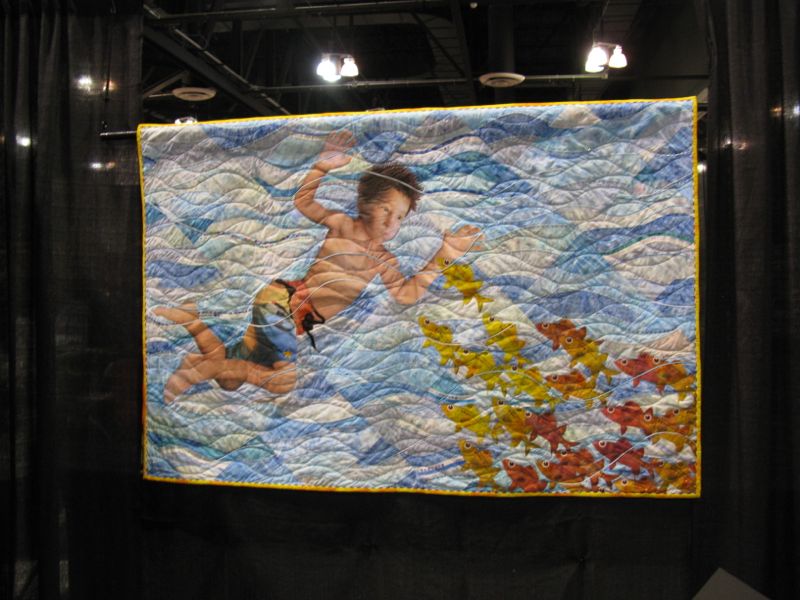
Another sea-themed quilt (there were a lot of them this year) was this young boy swimming in a school of fishes.  Sylvia Clary of Florida, titled this Gone Fishing, and is apparently inspired by her real-life young grandson Carson.  It’s the details and whimsy of this quilt which drew me in.

GoneFishin2

Check out the use of selvages in this waves. The fish were made of her hand-dyed fabric, and this quilt included hand-painted, hand drawings duplicated for use, along with thread play, crystals (this is one quilt that I didn’t object to them being attached to, as they were used in the design, not to overwhelm the design) and lastly, photo collage.  It was a real treat, but as usual, my favorites don’t always get the ribbons.

GoneFishinBack

Ignore the words floating above this postcard, which was the back of the quilt.  Fabulous.

GoneFishingDetail

JenningsQuilt

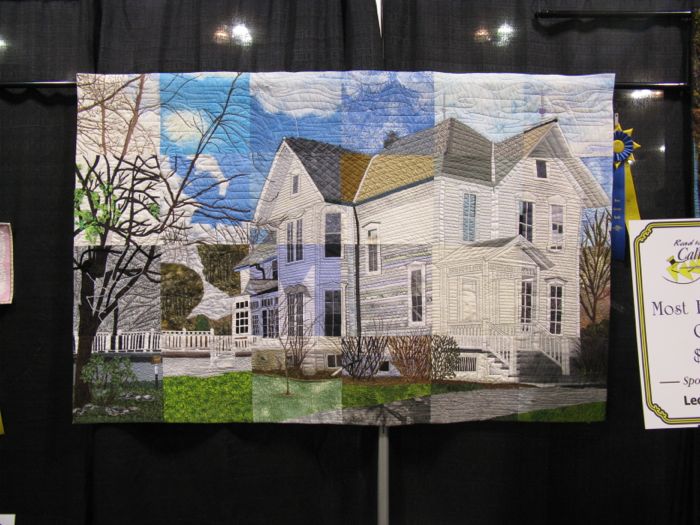
Suzanne M. Riggio, maker and Terri Kirchner, quilter, both of Wauwatosa, Wisconsin (say that quickly) put together this “slice quilt” by the Milwaukee Art Quilters of an old home where they held their meetings.  The Jennings Homestead has applique, fusing, painting, inking, embroidery and discharge techniques.  Is anyone else wanting to do a “slice quilt”?  They are fascinating to me.

Jenningsdetail

JumpingQuilt

Jumping Off the Cliff with Freddy Moran, made by Kathryn Bernstein and Pam Dransfeldt of Los Angeles, California.  It’s fun to see Freddy influences in a quilt again.

Jumpingdetail

LoneStarburst

Another faculty quilt.  Lone Starburst was made by Kimberly Einmo and quilted by Birgit Schuller. Einmo wanted to create a quilt “one Jelly Roll Bundle plus one background fabric.”  She succeeded.

MonetQuilt

Monet in Pasadena, was made and quilted by Melinda Bula of California.  She used fusible applique and heavy thread play to create this quilt from her hand-dyed fabrics.  The inspiration was the Huntington Museum and Gardens in Pasadena, CA. Details below.

MonetDetail

Monetdetail2

Monetdetail3

NYStateQuilt

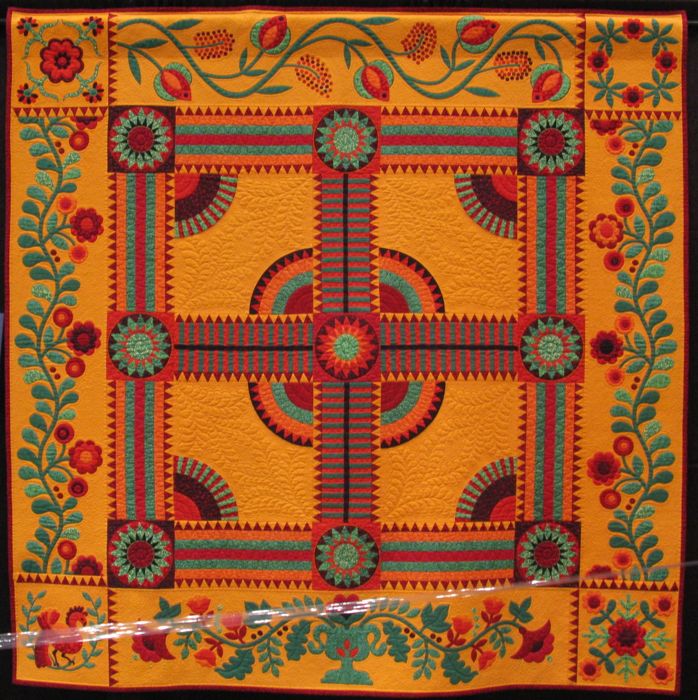
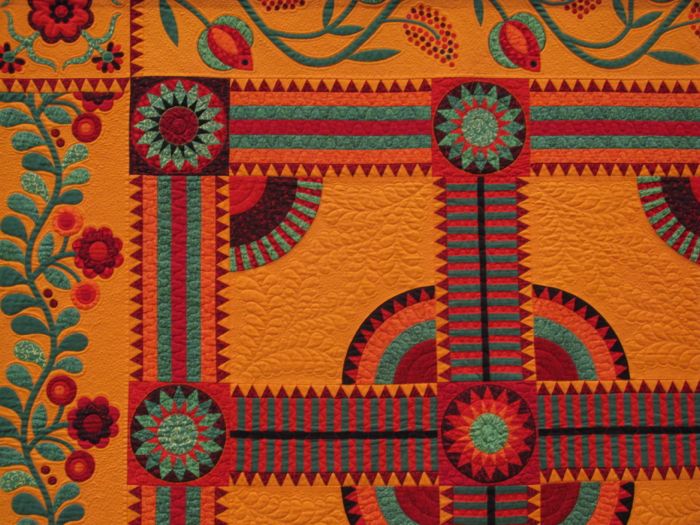
Two sisters, Sue Nickels and Pat Holly, made this quilt together (Sue quilted it).  It’s titled New York State of Mind, and is part of the faculty exhibit. Didn’t we used to call this orange color “cheddar”?

NYStatedetail

OldChina1

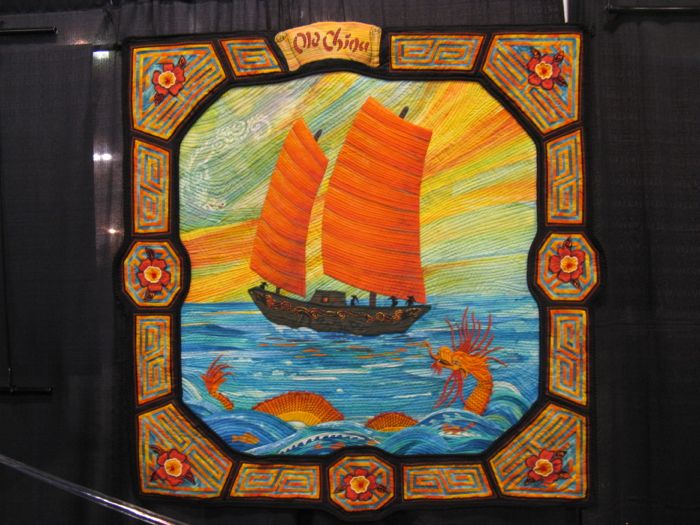
Old China was made and quilted by Nita Markos, and was inspired by a photo from her childhood.

OldChina2

OneFineDaydetail

I’m showing you the detail first on Cynthia England’s quilt, because it’s made of so many teeny tiny pieces.

OneFineDayQuilt

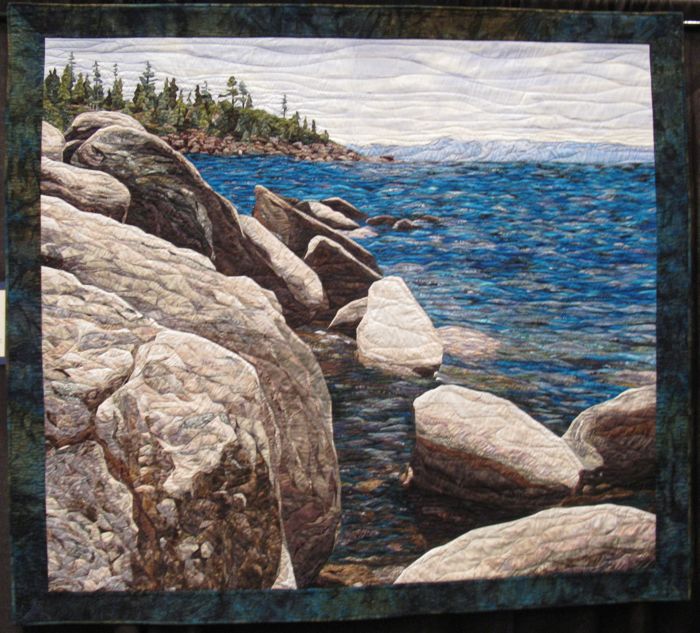
One Fine Day (from the faculty exhibit) was inspired by a photograph she took of Lake Tahoe, spending a day there with friends and her family,  a good “day to remember” she says.

OrganicLogCabindetail

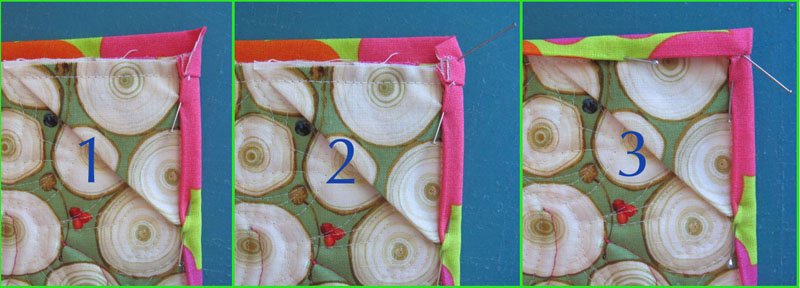
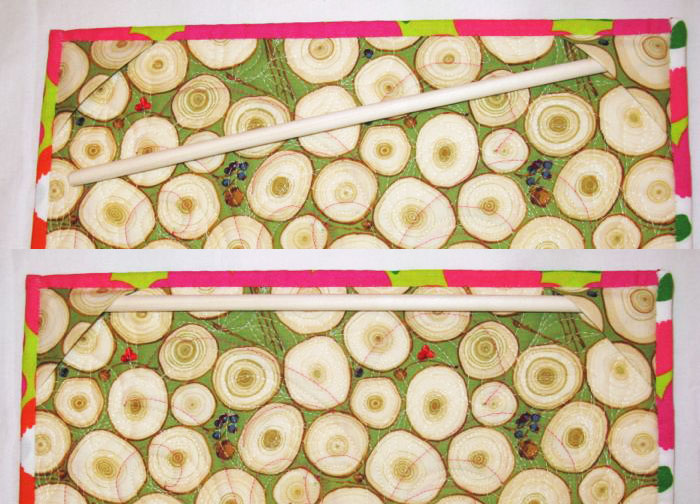
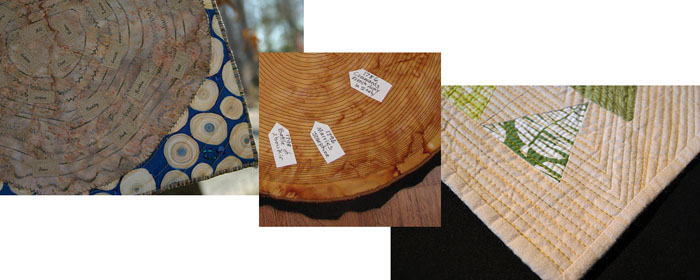
The pieces in Organic Log Cabin #3, made and quilted by Jennifer Emry, were “scissor-cut. . . without measuring to get that ‘organic look.”

OrganicLogCabinQuilt

This one was fun to study.  Until I went to the other ballroom to see the quilts, it was about the only “modern” quilt in the exhibit.  Road trends toward the traditional, so I was happy to see a bit of a break-out here.

OutBoxQuilt

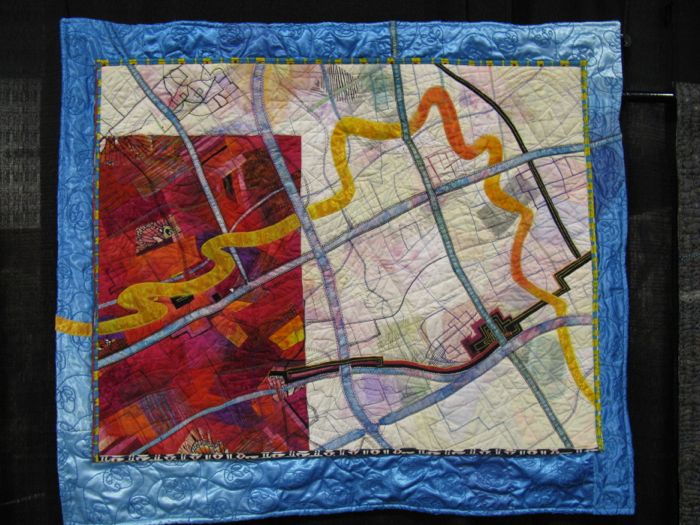
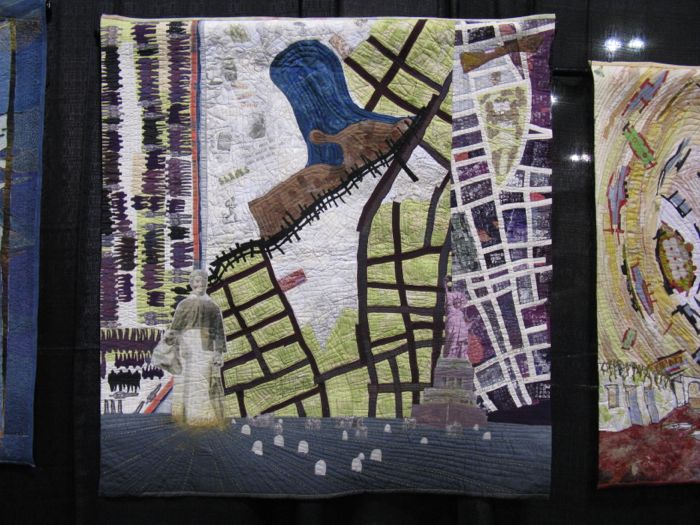
Another from the Perspectives exhibit was Out of the Box, by Sandra E. Lauterbach from Los Angeles California, and is based on a map of Shanghai, China.

PocketPaisley

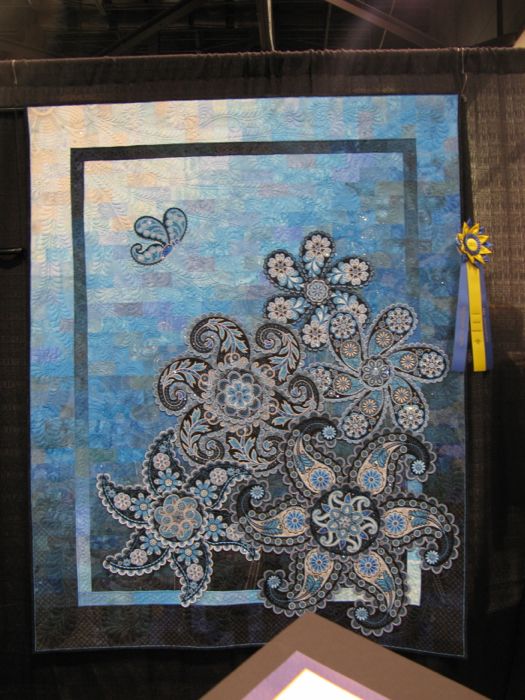
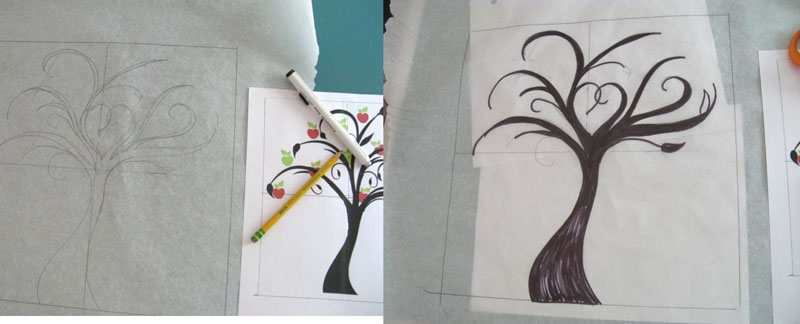
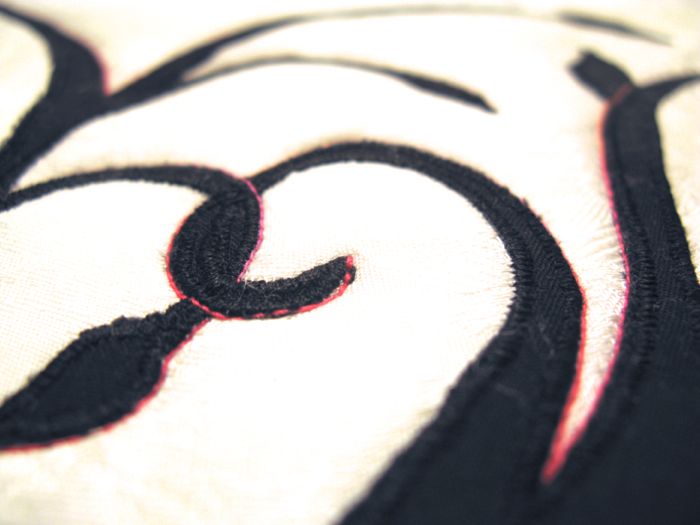
Lorilynn King’s Pocket Full of Paisleys had a “private name” for the quilt while she was working on it (she called it her LOUD quilt).  She decided to learn her embroidery software, and used turquoise thread when testing.  She kept going and this was the result.  (As you may have noticed, some of these quilts are hard to photograph, because they either have signs on stands in front of them, clear plastic tape strung across, or the lighting and/or angles are a struggle to work with.)  I liked hearing that she had an “official name” for this quilt, and a “private name.”  I do the same thing, feeling like giving a quilt a name is sort of like naming a child–you can’t really know what that name is until the quilt is finished.

PocketPaisleydetail

Remick

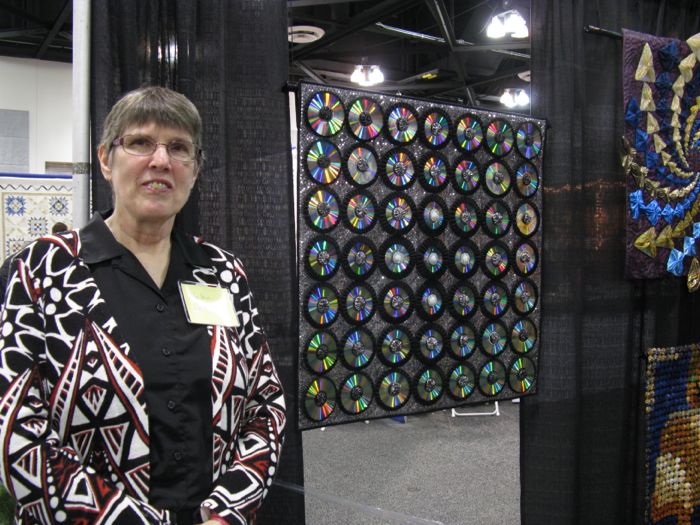
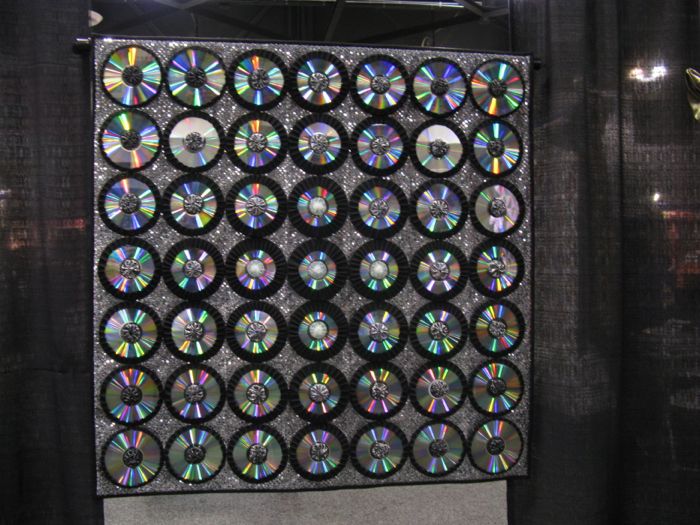
Helen Remick had an alcove all to herself, showing off some of her quilts.  The one that caught my eye was YoYo 11: Reflections on Changing Technology.  She writes: “As one technology replaces another, some things are preserved, others lost.  CDs in yo-yos hold manuscripts, family history, rituals and vacations.  The collage on the back side is made from images and documents on these CDs.”

RemickQuilt1

RemickQuiltBack

RemickQuilt2

I also liked this one, but didn’t catch its name.  It evolves into yoyos at the border.

SecretGardenQuilt

Deborah Sorem’s My Secret Grandma’s Flower Garden has many allusions and references to her grandchildren in the quilt, and “represents three generations.”  Detail below.

SecretGardendetail

SolidsSign

Lupine designed and made by Emily Cier, quilted by Cathy Kirk

SolidsExhibit

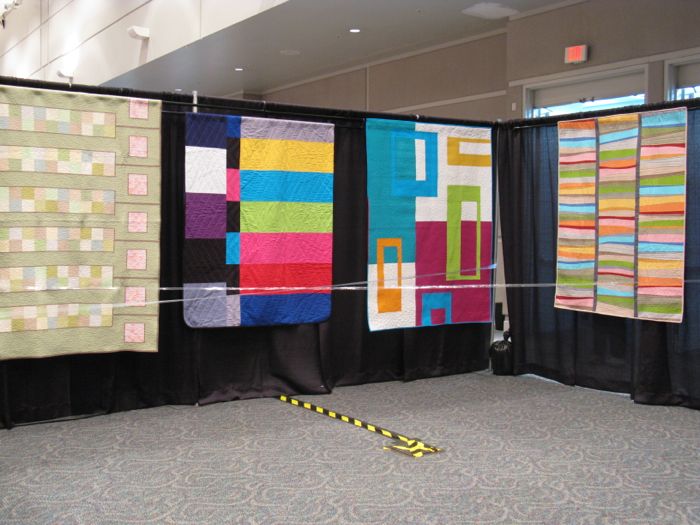
I finished the exhibit in the main ballroom, and slipped over to the smaller ballroom, where I found this gem of a display by Robert Kaufman.  Of course, I read a lot of blogs by modern quilters, and this past weekend was QuiltCon–a modern quilt convention (next one is in two years!), so have been surprised that the organizers of Road haven’t yet made a nod to the influences of these quilt.  But here was a small exhibit of some amazing modern quilts.  One frustration was that none were labeled: not the maker, nor the title, which is a glaring oversight, I think. Enjoy the modernism of these quilts. Update:  Leanne of She Can Quilt emailed me all the correct titles.  I’ve amended the blog to add in this new information.

Leanne writes: “The quilts are all from the book called We Love Color, compiled by Susanne Woods, published by Stash Books.”  The one quilt not shown below (but shown above) is TV Color Bars Quilt, designed and made by Betz White.  I hope I put these in all the right places!

Solids1

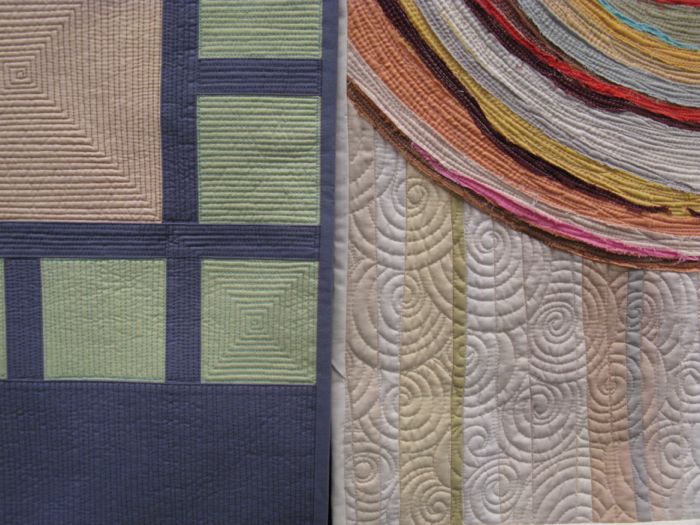
Stepping Stones, designed and made by Lisa Call

Solids2

Orbit, designed and made by Jennifer Sampou, quilted by Angela Walters

SolidsQuilting

Solids3

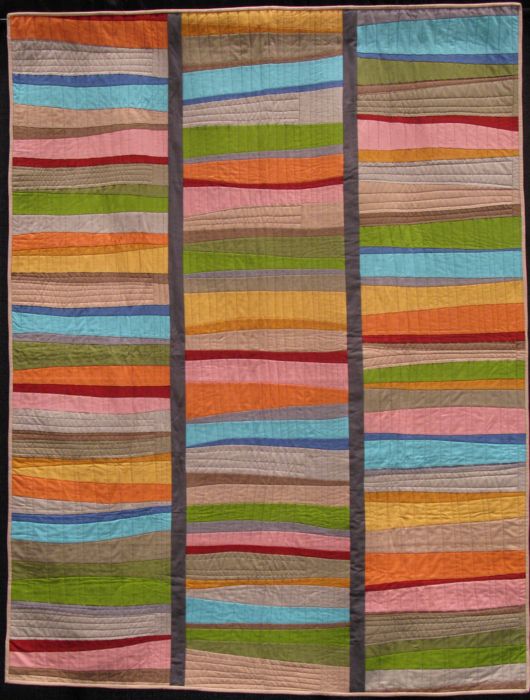
Stacked Blankets, designed and made by Valori Wells

Solids4

Think Big, designed and made by Jacquie Gering, quilted by Angela Walters

Solids4a

Solids5

Sanibel designed and made by Weeks Ringle and Bill Kerr

Solids6

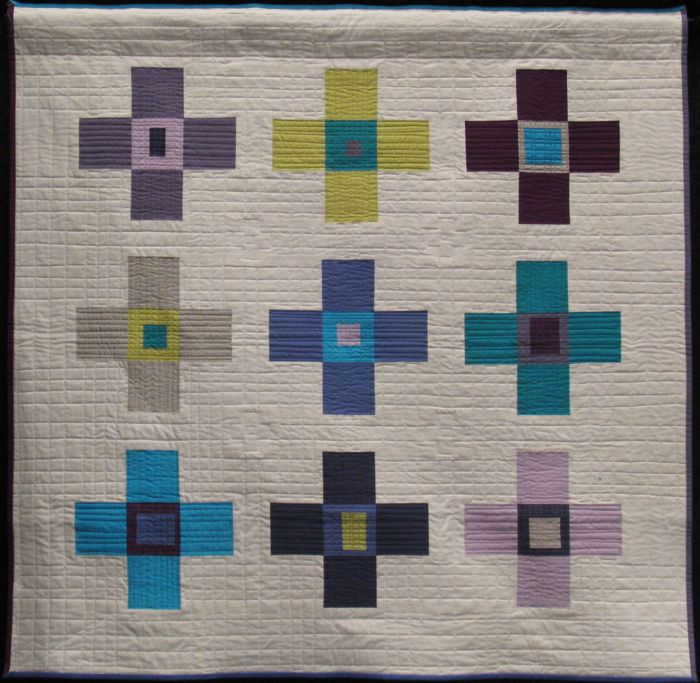
Modern Cross, designed and made by Kathy Mack

Solids7

Centered, designed and made by Cherri House, quilted by Angela Walters

Solids9

Color Frames, designed and made by Amy Ellis, quilted by Natalia Bonner

Solids10

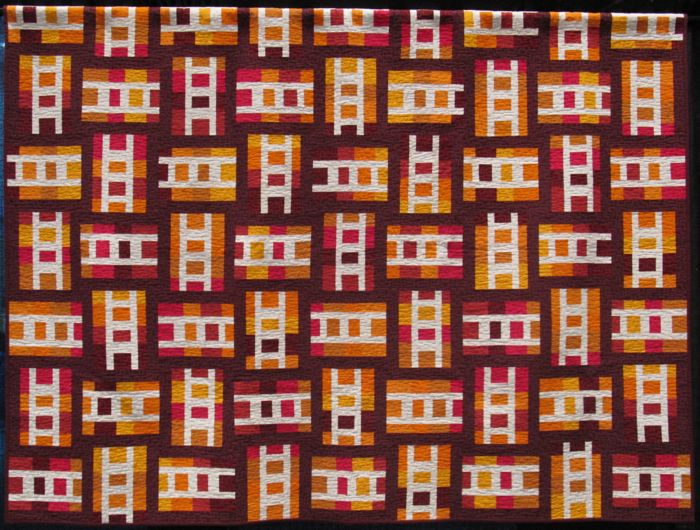
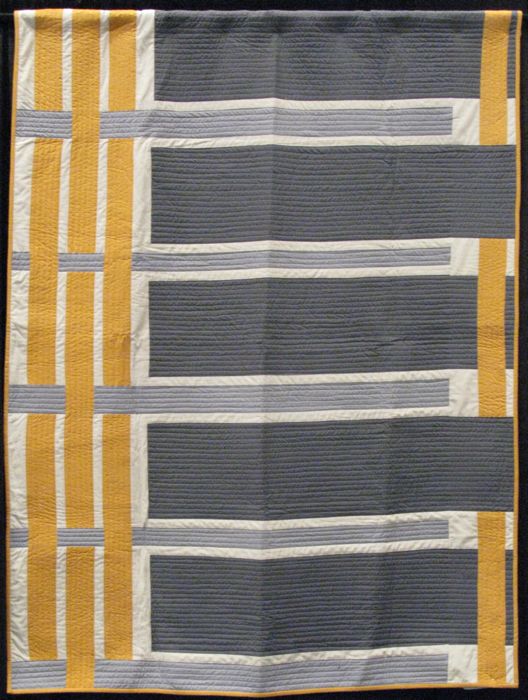
Ladders, designed and made by Elizabeth Hartman

Solids11

Keys, designed and made by Alissa Haight Carlton

SolidsVendor

One of the vendors also had a touch of the modern in her display. This was Ginger’s Quilt Shop in Ontario, California, which I found a week later was closing its doors.  I was sad, because they’d been so helpful when I was making my Scrappy Stars quilt, in helping me figure out which color to use to back the stars.  I did go up to one of the closing days, picked up a slew of solids (I’d purchased a stack from them at the show), and said my good-byes to a great quilt shop.

Next post: last of Road to California quilts.


200 Quilts · Four-in-Art · Quilts

One Black Leaf, deconstructed

One Black Leaf art quilt1

Inspired by Betty’s photos, I took One Black Leaf outside to be photographed by her sister trees, because of course, with those curves, it’s evident this quilt is feminine.

OneBlackLeaf back

And just like Betty and Rachel’s quilts share a commonality, this one too shares something with Betty’s–we both used the Martha Negley slices of wood print; Betty’s was in the blue colorway and on the front, and mine’s the green on the back.  The binding is from that half-yard of Marimekko I purchased while in New York City last summer with my husband.  So far it’s been in two projects and I still have a scrap or two more.  This post is picture heavy, as I’m talking about the approach I took to creating One Black Leaf, including technical aspects, false starts and home runs.

One Black Leaf 1

So the poem is ringing in my head: one black leaf, one black leaf so I know it has to be a tree with bare branches.  I start by ripping off a piece of paper from the roll of doctor’s examining room paper I got a while back.  It’s great paper — it holds up to erasing, and is thin, flexible and cheap.  Try a medical supply house for yours.  I draw a 12-inch square because that’s one of our group’s parameters, and like what we did in high school art class, I draw a grid both on my square and on the illustration I found that I want to mimic.

One Black Leaf 2

I draw as best I can (not my strong suit), using the grid to guide me, yet I kept thinking of the espaliered tree I’d seen on the web (last post) and even though death comes around for us all, at the heart of it, I know that love survives even mortality.  I color it in with black marker.  Because I’m working on thin paper, I protect my cutting mat with scrap pieces of white paper so no bleed-through. I flip it over and color it in on the back, too, because I want to fuse this onto my fabric and know it has to be backwards.

One Black Leaf 3

I lay the Steam A Seam down, figuring out which of the papers should be taken off first completely ignoring their instructions to determine which is the pressing paper and which paper is to come off first.  I got lucky.  Reminder to fuse the whole design down onto the black fabric before you start cutting.  (Of course I did that.  Not.)  Sigh.  I fused the design to the Steam A Seam, then started cutting it, before I remembered you aren’t supposed to do that.  So I stopped, laid out the traced design on the Steam A Seam onto the black fabric, THEN cut it out.

One Black Leaf 4 fail

I had some problems.  Turns out (after a quick search on the web) that Steam A Seam “wears out” or loses its ability to adhere after it has been in your drawer for a while.  Since I know this batch is at least 10 years old, I’m in a world of hurt.  Who wants to cut out those teensy branches again?  So I call the Quilt Rescue squad. . .

One Black Leaf 5 rescue

. . . and first try placing the paper release sheet from the other part of the Steam a Seam and pressing it lightly to make it stick back on the teensy branches.  Worked okay, but there were still some spots that needed some help.  Then I remembered that once, in a class with Elinor Peace Bailey, she used a plain old glue stick to put things in place, giving it a press to disperse the glue.  I did this.  I had a few problems getting the tree back into place, so I laid my white fabric down onto my design, and arranged the branches until they matched the original design.  And by the way, it took me longer to describe all of this than it did to do it.

Your takeaways from this section:

1. Read the directions.
2. If your Steam A Seam is older, first fuse it back onto their release paper with a warm iron and light touch. And from now on, store it in a plastic bag.
3. Use your design paper to help you get the arrangement into place.
4. Use a glue stick if you still need some sticking down.  Press with a warm iron to disperse the glue.

I decided the block needed a bit more stability, so I ironed on some lightweight interfacing on the back of the entire piece (I did this also for the last art quilt I made, as I had seen it mentioned time and again in the Twelve by Twelve book. If you don’t have this book, you should.)  Then I set my zig-zag stitch for a narrow satin stitch, then went all around my tree in black thread.  I referred to my Jane Sassaman book where she talks about if you have it really close, it frames it, and if you have the zig-zags slightly loose, it blends more.  I was somewhere in the middle.

IMG_6211

She also cautioned the quilter to “take it slowly” and to take our time when doing stitching.  I need to have that tattooed on my forehead. I think if my Steam A Seam had been fresh, and I had been more careful about getting it to stick, I may have averted some of those sticky-outy bits of fiber from the edges.  But because this tree is going every which way, I think some was inevitable.  Small scissors took off most of them.

IMG_6213

Jane Sassaman also outlines her pieces with heavy thread.  I decided to use green for the inside curves and pink for the outside curves. Here’s the pink.   There was a ton of tying off on the back (as I pulled all threads to the back, tied and buried them), but I like how it gave a little pop to the quilt. I used pinkish King Tut (from Superior Threads) and their Poly-Quilter in green, which I understand is being discontinued (but I still love it).  Use a size 16 topstitch needle which has a larger eye, go slowly and you should be fine.  I use their Bottom Line in my bobbin — it’s my personal recipe for quilting success — and used what was close in color as I occasionally I like to use what I have.

OneBlackLeaf detail1

(Another view, after the quilting was finished)

One Black Leaf 6

I had used some white fabric from one of my trips to Germany.  It has a heavy damask woven design of flowers and I didn’t want to completely obliterate it with the quilting.  I laid some wax deli sheets over the tree and using a Flair pen (it won’t go through the paper with its soft tip), I auditioned some quilting ideas.  I’m not a really fabulous FMQ (free motion quilter) but I can do some.  I decided on leaves.

One Black Leaf 7 stitch

I liked the idea that while the black leaves on the tree are for us, there are others that have gone before who are still around us.  I can’t bear the thought that we all just go “poof” at the end of life, and judging from the memorial quilts I see, others feel the same.  Of course, a lot of these ideas are informed by my personal spiritual/religious beliefs as well.  I went at the quilting–doesn’t take long if you are doing a small quilt (another reason why I like this size) and in no time I was done.  And yes, it kind of obliterated the design in the fabric.

One Black Leaf 8 trim

Next big hurdle, which you wouldn’t think would be a big deal, is to trim.  It’s really a decision on how to frame it.  That blotch in the lower right-hand corner of the untrimmed piece?  Where I tried out my zig-zag stitches and also left a burn mark with my iron.  Luckily it was cut off.

One Black Leaf 9 corners

I have a method for hanging these small quilts which involves a dowel (photo at the end) but I have to put in corners to hold the dowel.  That square is about 2 1/2″ in dimension; fold it in half and pin it to the upper right and left corners.

One Black Leaf 10 binding1

My standard small-quilt binding: 2″ strips, folded in half, sewn to the upper and lower edges.  Trim even with the edges and press out away from the quilt.

One Black Leaf 11 binding 2

Repeat with sides, but be careful as you trim even with those sides. Press away from quilt.

One Black Leaf 12 trim

You’ll need to remove any bulk you can in a binding this tiny, so trim off a little of the corner and the bits of seam allowance as shown.  When I say not to cut anything off the binding strips, I mean the business part of the strips–the stuff you’ll need to fold over.  Just follow the diagram as I think my written description is confusing.

One Black Leaf 13 binding3

Then since my assistant left for the day, I had to use pins to hold things in place.  Fold in the sides (1), give a little push to the upper edge to fold in the bulk (2), then fold down the remaining strip (3).  If you go in this order, you’ll always enclose your raw edges.  If your raw edges are still showing after the folds, you’ve reversed it and folded in the top/bottom first.  You’re smart.  You’ll figure it out.

One Black Leaf 14

My friend Tracy taught me ages and ages ago that I didn’t need to pin or clip around the whole quilt, that I could just do the corners and fold in the rest as I stitch down the binding.  I do that even on my larger quilts.

dowel hanging device for art quilt

Cut a dowel the size of the back, minus a scoonch of room, then sand the cut edges.  Slip into place.  It will balance on a push pin nicely.

OneBlackLeaf quilting

OneBlackLeaf

Selfportrait OneBlackLeaf

Self-portrait
February 1, 2013

Quilts

One Black Leaf


4-in-art_3

FourArt2_Full

This is our second round of our art group, self-titled Four-in-Art.  Our theme was “tree” or “trees,” however the artist wanted to think about it.  I call this “One Black Leaf.”  And as is my usual, I’ll save the craft and construction details  for the next post.

The other artists in our group are listed below, and are also revealing their quilts today, too.  I’d encourage a visit to see how they interpreted the theme.

Four-in-Art Trees

Leanne, of She Can Quilt
Rachel, of Life of Riley
Betty, who reveals hers on Flickr

When I was musing about this theme of trees a couple of weeks ago, I noted that I seemed to be surrounded by, and touched by, the idea of the end of life, of death.  I may have become more aware of this because of my tiny experience with cancer, or perhaps it is because I have two brothers-in-law who are fighting cancer.  Or because when we drove away from my mother after visiting for Christmas, it was nearly unbearable, knowing that life, and our time together, is finite.  In Albert Goldbarth’s poem “Won’t Let Go,” he notes that at the end of the of it all, no matter what your age or life or experience, there is always “one black leaf for everybody.”

I remember talking with an arborist in Washington DC once, about how dead trees looked in winter–nothing blossoming, nothing growing, the bare branches stretched to the sky.  She smiled as I went on and on, then said “Oh, they’re full of life, all right.  You just can’t see it.”  I thought of her remark often as I walked the National Mall that winter, admiring the trees’ scaffolding revealed by fallen leaves, those graceful branches stretched out above the cold ground.

HeartTree

So I chose to combine a photo I saw of an espaliered tree–a tree that was trained into an arranged shape by the hand of man and which had a heart at the center of it–with a drawing of a tree that looked to me like it was in motion, was half-tree/half-vine.  I liked the look of the drawing, how it wasn’t static, wasn’t near death, even though it had plenty of black leaves on it.  Since I am not a trained artist, I have to start from a reference point.

And sometimes that reference point is an idea, a range of experiences, a poem about one black leaf.

Four-in-Art

Four-in-Art, quilt 2

collapsed piece

This little pathetic, collapsed piece of dangly bits is where I found myself at the end of a day of invention as I worked on my second entry in our Four-in-Art art quilts group.  We are still holding, the four of us.  And from the dead place I spoke of last week, I’ve made progress.

Although I know it doesn’t look quite like anything yet, the quilt is coming along.  Nicely, even.  Reveal date is one week from today. I’ll be ready.  Hey! I already have a title.