Quilts

Antique Crib Quilts and Karl Benjamin

triple irish chain crib quilt

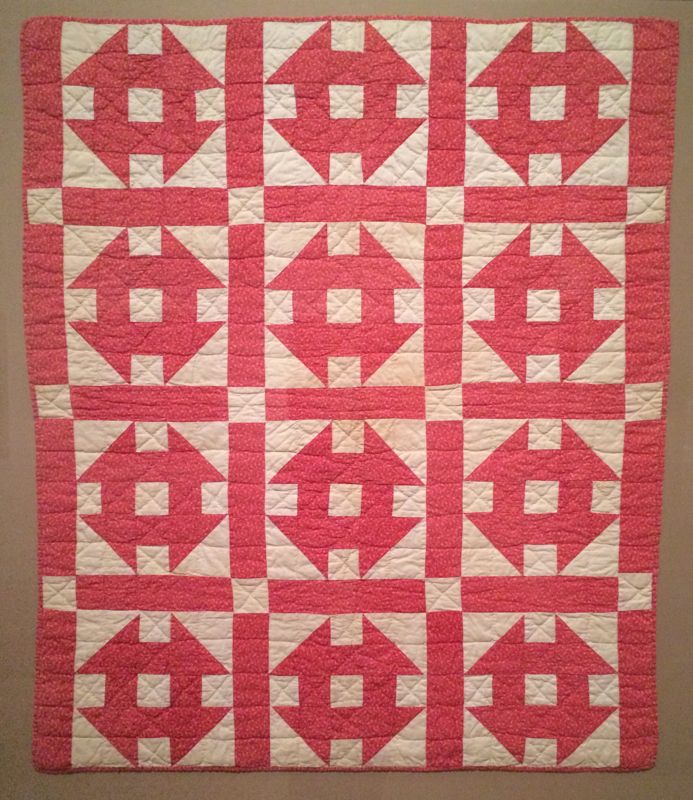
Recently we went to the Los Angeles County Museum of Art (LACMA) and viewed a small exhibition of crib quilts.  I thought I’d share them with you because while they look so old and antique they also are refreshingly current in some of their color choices and design.  Above is a Triple Irish Chain from the 1930s, one of the “younger” quilts in the exhibit.  I did find interesting that while no one really knows the origin of the label “Irish Chain” some suggest it came from the quilts fashioned “from bags of scraps sold to workers in the Irish shirt industry, who made quilts for sale in their spare time.”  No dimensions were given, but they are smaller quilts, roughly 2 feet across and 3 feet high.

triple irish chain crib quilt detail

Detail of Triple Irish Chain crib quilt.

square in a square crib quilt

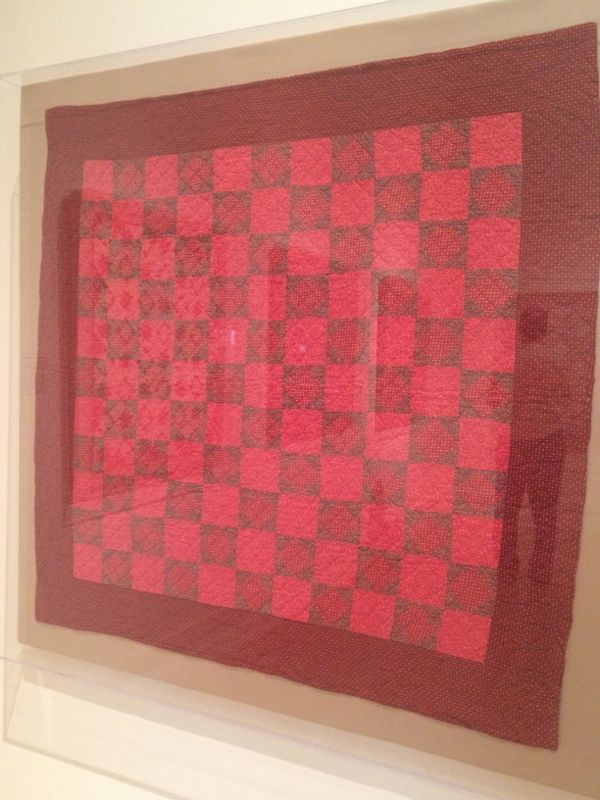
This “Square within a Square” quilt was made in Pennsylvania around 1880.  All of the crib quilts were protected behind a plexiglass box, and some quilts were really hard to photograph, given the glare of the lights (I never could get a decent photo of the “Bars” quilt).

square in a square crib quilt detail

Detail, “Square within a Square.”

dutch windmill crib quilt

Another more contemporary quilt, made around 1920, is this quilt with two names: “Dutch Windmill” or “Hearts and Gizzards.”  This one is also from Pennsylvania and is machine quilted.

dutch windmill crib quilt detail

While you can’t really see it too well, on each larger black piece is a name embroidered in red, perhaps revealing the “creators of each separate block.”

churn dash

While this pattern is known as “Hole in the Barn Door” or “Monkey Wrench,”  we typically refer to it as “Churn Dash.”  This one is both hand and machine pieced and is from the 1880s.  The title card next to this had this tidbit: “From the beginning of the 1880s, the primary sources for patterns were magazines and newspapers with diagrams and instructions, and ultimately mail-order companies.”  The more things change, the more they stay the same.

mariner's compass crib quilt

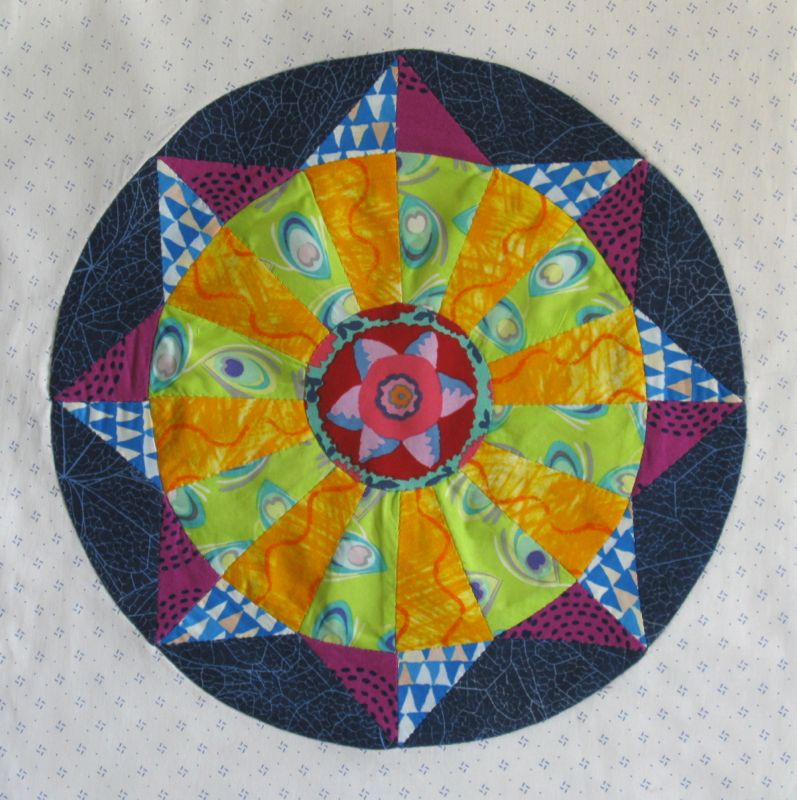
“Mariner’s Compass,” from the 1880s.

mariner's compass crib quilt detail

“Mariner’s Compass,” detail.

lemoyne star crib quilt

This little “Le Moyne Star” is hand pieced and quilted and is dated to 1840.  I love the on point setting of this little quilt, as well as the use of the red setting triangles in the borders, causing it to look like a shooting star effect.  The title card shared this info about the dye: “Before the synthetic production of alizarin crimson in 1869, printed patterns on textiles were colored by “Turkey Red” dyeing, named for an eastern Mediterranean method that required soaking cloth in oil and dyeing it with madder root.  The print on this quilt resembles chintz patterns from India that were popular in Europe in the eighteenth and early nineteenth century.”

lemoyne star crib quilt detail

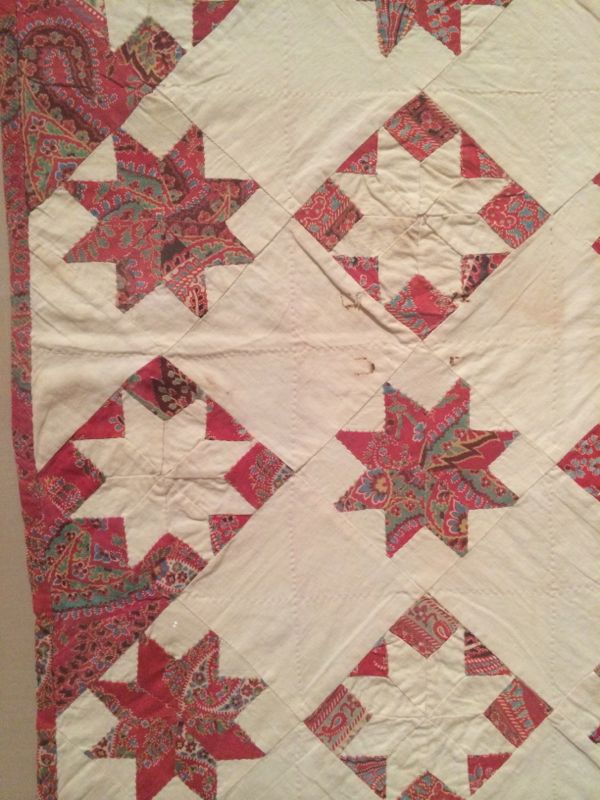
The quilt was slightly pinkish; this is not an aberration of photography.

flying geese crib quilt

This “Flying Geese” quilt is hand pieced and hand quilted, by machine bound and dates from 1870.  This one was my favorite in the collections because of its very modern look and the fabulous fabrics.  LACMA’s curator wrote “This quilt exemplifies the reductive nature of quilt imagery, which distills and captures an enduring impression of an object. . . .[namely] the migrations of geese.”

flying geese crib quilt detail

Modern Art Painting random

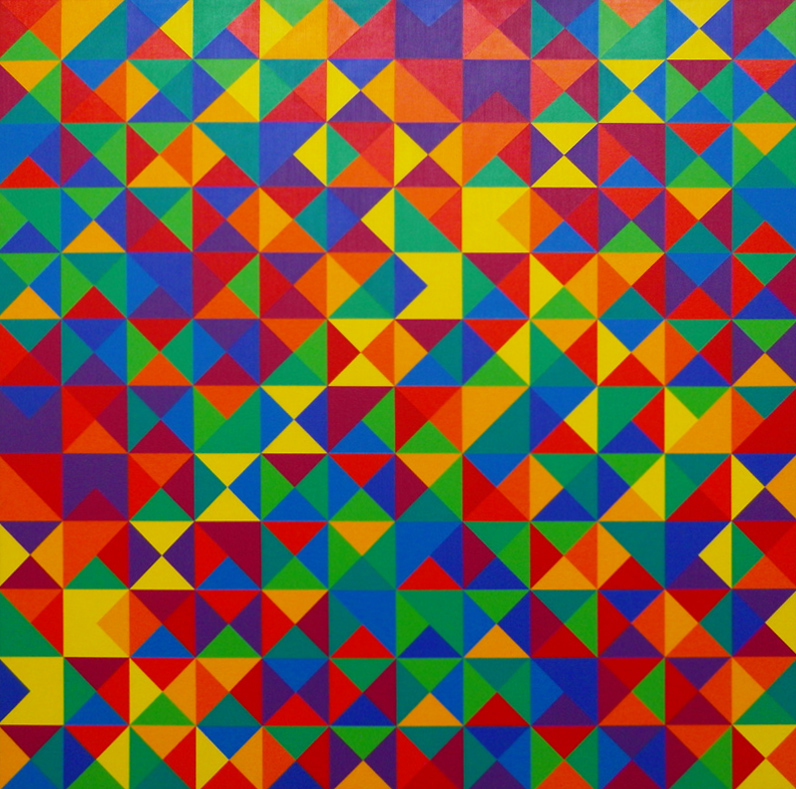
We walked out through an adjoining gallery, where this painting caught my eye.  Since we were with my sister Christine and her daughter (and baby granddaughter), I didn’t linger, but did think it would make a great quilt.  And while we’re on the subject of fine-art-possibly-inspiring-a-quilt, take a look at these:

SAMSUNG DIGITAL CAMERA(found *here*)

This is the work of Karl Benjamin, known as the father of Hard Edge painting.  His ideas are perfect for inspiring quilters, as we work in hard edges, with our seams and our cloth.

Karl Benjamin log cabin(from *here*)

He died two years ago at the age of 86, but has left a legacy of  “vision, not logic” as the LATimes says.  As we quilters struggle with “naming” the different factions of the quilting world (art quilters, traditional quilters, modern quilters. etc.) I loved how he talked about the various labels given to his paintings, in an interview (click if you want to read more):

“Hard Edge got started the late 50s, and I hate that word. It doesn’t mean anything. What’s a soft edge? Monet? To write about something, you have to find a word, so unfortunately I don’t think that was a very good word.
“Abstract Classicism was another one. Someone had a show in London, and irrationally corporate called it Abstract Classicism. Well, it was good for your career, because you had a name now, but it didn’t mean anything. But you take it in context. In any art, there’s the romantic and the classical. It’s always kind of torn between those two poles. So there was Abstract Expressionism, which was accepted for wild painters, which were brand new then, and Abstract Classicism, which was opposed to expressionism. But it balanced out equally.”

Los Angeles Modern Auctions (LAMA) May 6, 2012 auction catalogue(from *here*)

You can find more of his paintings *here*  and *here* or just do a search on his name in Google Images.  (Have a great time.) Okay, back to our museum visit. . .

bojagi
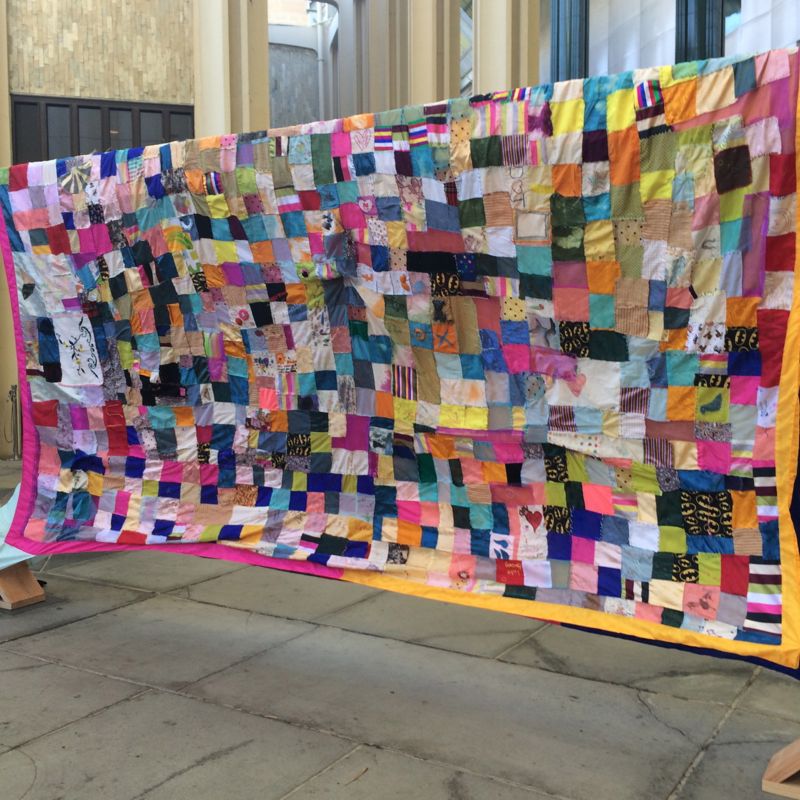
It was Korean Day at LACMA and in the courtyard was this quilt-like display, titled “Community Bojagi.”  A bojagi is a “traditional Korean wrapping cloth,” and over 1700 people collaborated to make this riot of color and patches.

Boro(photo from *here*)

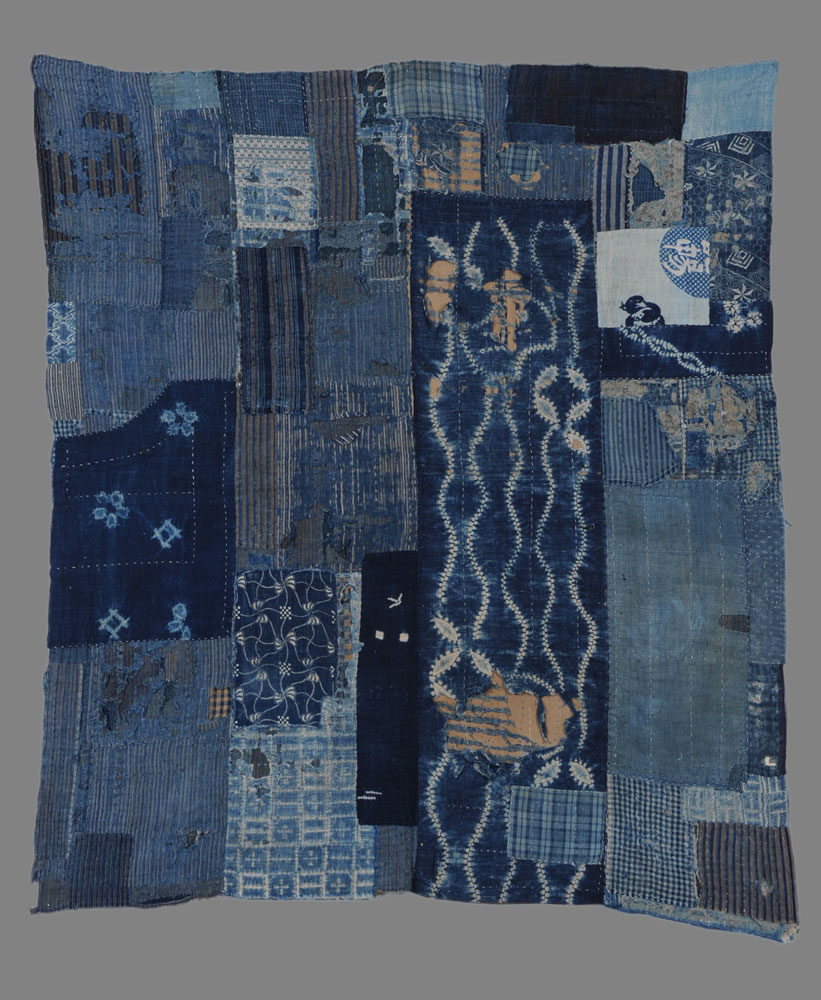
It reminded me of boro, the Japanese tradition of mending cloth to keep it viable and which, over time, becomes its own art piece. . . just like some of our quilts.  They, like the crib quilts shown above, are made for use but are often made for display.  Who knows how many of ours will end up in museums a hundred-plus years in the future?

Quilts

Signature Quilt for Lora

Lora suddenly moved away and two of us in our church group decided she needed a quilt to remember us. One day she was here, puttering around in her house. Then a fall, where she wasn’t discovered, which led a brief stay in a skilled nursing home. Her children rallied round her and took her to live near them, where Lora can be cared for.  So I went looking for ideas for a signature quilt (see them at the bottom of this post), and decided on the basic signature quilt block since it needed to be put together quickly.  My friend Lisa (who is our friend’s niece) and I decided on a 6″ block.

Signature Block 1

For every signature block, cut one bigger square in a light color (so the signatures will show) and two contrast squares.  The dimensions are above.  You can see that I double-stitched the diagonal seam, the lines 1/2″ apart. I then cut in between that line so I could have some HSTs in case we needed more places for signatures.  In case you haven’t done one of these, the directions are:

1–Line up the contrast square with the light-colored square and sew a diagonal.  I use The Angler tool from Pam Bono so I don’t have to draw lines.  Stitch a batch of blocks, then go back in and stitch 1/2″ away.

2– Cut in between the two stitched lines, then press the contrast fabric away from the center white block.  (Set aside the cut-off triangle.  You’ll now have a growing stack of Half-Square Triangles  (HSTs) for another project!)

3– Sew the other side (which is what you see above).

Signature Block 2

Done.  I then cut a bunch of strips of freezer paper and ironed them on the back of the white strip, so to make it easier to sign.  We’ll have them sign with a Micron Pigma Pen .08 as it leaves a nice line.

This same process is the one I follow when we make Signature Blocks for our bee, only we use the light colored fabric cut to a 3 1/2″ square and the contrasting “snowball” blocks are 2 1/2″.  I don’t save the triangles on those.

Signature Block 3

I finished 74 squares this past couple of days.  Isn’t the fabric beautiful?  Lisa has a whole collection of batiks which she graciously contributed to this project.  (Yeah.  I contributed the Kona Snow.)

Signature Block 4

I signed mine so you can see what it looks like.

Signature Quilt 1

Here’s a signature quilt, pulled from the web (sorry, I don’t have the attribution), and they used their extra HSTs in the borders.

Signature Quilt 2Here’s another version, without borders.

Lora, in her earlier years, made wedding cakes.  The rich, the famous, the well-heeled, and well, all of the young girls in our church all sought out her cakes, because not only did they look elegant and beautiful, they tasted good.  Rich and yummy, full of vanilla fragrance and just the right amount of sweetness to make you come back for seconds.  Or thirds. For my daughter’s wedding, she also made a double-fudgey chocolate groom’s cake.  It was only at the very end, a year ago, that she gave two of us her secret recipe for the frosting, and the secret ingredient that made my kitchen smell like her cake was baking right there.  She also did flowers, interior decorating, and we loved it when she decorated the church hall at Christmastime for our church dinner, transforming it to a winter wonderland, making us all feel like we were the rich, the famous, and the well-heeled, instead a bunch of modest church-goers.  Lora did everything up Big.  Every year she would get the giant wreath out of the storage closet at our church, get a ladder and hang it up on the wall behind the speaker’s podium, arranging and re-arranging the red glass balls so they looked like someone just tossed them up there.  That look takes real skill.  Lora was part of the warp and weft of our church, and while some say she’ll be back, others say she won’t.

I think the reason why this affected us all so much is that within the space of a couple of weeks, Lora’s life spun around on a dime and her life in her home, which she had decorated in rich autumns and golds, was probably over.  That quickly.  Yes, she’d had some health problems.  Yes, we knew she was more frail.  But how our lives in our carefully curated homes end is not something any of us like to think about.  So a fall can happen, or a sudden health reversal, and like a flash, we can be taken from our collections, our quilts, our memories: a sudden shearing off of a life.  And what happened to Lora is right around the proverbial corner for all of us, and we know it.  So perhaps by making her this quilt, we are saying we understand.  To the best of our abilities at this younger times in our lives, our hearts ache for you.

With this quilt we are saying, Lora, you are not forgotten.


EPP · Shine: The Circles Quilt

Circles Block #5, EPP Sew-Along

Circles EPP Button

EPP Circle #5_final block

Circles Block #5 • Capella

This is the fifth in our series of circle blocks, inspired by circles I’ve seen in my travels, as well as found on other quilts.  I think this one was found in Barbara Brackman’s Book, Encyclopedia of Pieced Quilt Patterns and modified slightly.  I chose an eight-pointed star to keep the variety in our English Paper-Pieced blocks.  I assume you have some knowledge of English Paper Piecing, which is the method of printing out a pattern, cutting it out, then wrapping and sewing your fabric over the little pieces before sewing them together.  When I read that last sentence, I know for sure we quilters are a bit insane.

A word about cutting out the pieces and another couple of words about fabrics.  The patterns are drawn to the best of my ability, and although I long to be a machine, cranking out the patterns, I am not.  So sometimes I might cut the pattern right on the line, sometimes I may fudge and cut it slightly inside the line and sometimes I cut it on the outside of the line, just like it used to happen in those Famous Old Days.

My favorite fabric to use is one that has a soft hand, and is 100% cotton.  Why? Because I need to be able to shrink up — using a hot steam iron — any excess caused by my human imperfections.  All the fabrics above, except for the green print, are those type of fabrics and after working the circle, they lay nice and flat.  The green ones caused many moments of ill will at the ironing board, because it is a sheeting, like what you find in a batik and is very tightly woven. Many Art Gallery fabrics are made from this type of weave.  This fabric generally doesn’t move or shrink or give once it has been stitched.  It is what it is, so if you need to shrink in a bit extra of the ease. . . um, not happening.  I know that when I quilt this thing, I’ll put some extra stitches in those wedges and they will flatten out and be fine, but there were some tense moments earlier this week when I discovered the problem.

rwb-shine_block-five-1

The free patterns are now returning (Red, White and Blue version, above).  I request that you not distribute them, but send people here to this website to get them.  Click to download a PDF file: 

SHINE Block 5 pattern_opquilt

Please remember to set your printer settings to 100% and check the little scale square included on the pattern.  It should measure 1″ in size. The illustrations of the patterns below vary from the newer version of the pattern.

EPP #5_prepping pattern

Those outer arcs I knew would be confusing once they were covered with fabric, so I prepped up the pattern by drawing arrows pointing to the top center-most point.  This will help when I try to sew them together later.  (I should have drawn them on both sides, as I ended up putting the printed side UP.  Sometimes I am my own worst sewing enemy.)

EPP #5_wedge piece v1

I wanted to try to fussy cut some chevron fabric so that the zigzags were going down the middle of the double-wedge piece.  I matched the chevrons, then lay on the pattern.

EPP #5_2wedge piece v1

Circle 5 rejectAnd once I’d sewn a few together, I just didn’t like it.  Call it a gut feeling, but it just didn’t feel like it was made of the Right Stuff.  Back to the cutting board.  I printed out another set of patterns, cut them apart, and started again:

EPP #5_cutting v2

Remember to be aware when you are laying out your pattern.  Mine are laid with all the printing UP.  And yes, I can see where I should have trimmed off those pieces a bit.  So don’t be in a hurry.

EPP #5_cutting v2a

Again, I use my rotary blade to cut the fabric roughly 1/4″ away from the paper.  I can trim it more closely when I am hand-sewing if I want.

EPP #5_cutting v2b

EPP #5_cutting v2c

This is from the BEFORE block, but you can see my general layout.

EPP #5_placing pattern for circle

If you have a motif and you want to make sure your circle is centered, one way is to fold the pattern into fourths, and put the tip of the fold in the center of your motif.  Pin one side, then carefully unfold and pin the rest.

EPP #5_placement for circle pinned

EPP #5_auditioning outer points2

I stitched all my wedges together, then I constructed the star-point ring: I sewed all the star points together, then joined them to the blue outer arcs.

EPP #5_auditioning outer points1

This is my attempt to figure out if I wanted the blue-triangle fabric over the green, or over the yellow.  I try out my combinations as I go.  I’m spending a lot of time sewing this and I want to like it when I’m finished.

EPP #5_back with papers

Blue-triangles over the yellow was the winner.  Here is the back with all the paper in it.  I will never tire of this view.

EPP #5_lumpy bumpy

But boy, does all the paper make it lumpy.  (And that unforgiving green sheeting-type fabric didn’t help either!)

EPP #5_flattened out center

I took out all but the blue outer arc papers and gave it a press.  Much better.  Now I need to audition that center.  The first flower (above) was a definite NO.

EPP #5_making center1

I cut out several more.  I use a running stitch around the outside, then laying it on a piece of fabric to protect my ironing board, I give it a shot of spray starch.

EPP #5_making center2

I slip in my cardboard or plastic circle template, then lightly press it, pulling that thread taut to draw the gathers up around the circle.

EPP #5_making center3I turn it over and give a good press.  Pick the iron up and down so you are NOT sliding it around–you want your circle to be centered, not skewed and moving the iron can throw it off center.  You can moosh it into place with your fingers if it does move off-center, then press it again.  Let it cool, then cut the thread to about 4 inches and slip out your template.  Tighten the thread back up again.

Trying out Centers for EPP Circle#5

Aren’t we having fun?  Yes, I tried seven different circles.  I do keep these little circles though, as they may come in handy further on in our series.

EPP #5_prepping background

You can choose to English Paper Piece your outer edges onto your circle (pattern is here: EPP Corners) but I think this method of appliqué yields a better product.  Prepare a square of 14 1/2″ fabric, then fold it into quarters and give a light press to give you some guidelines for placement.

EPP #5_whichway1

You get to decide how you want your block placed.  This one emphasizes the outer points.

EPP #5_whichway2This one emphasizes both the outer points and that cool inner square thing that is happening around the wedge circle.  I like both placements, but went with this one.

EPP #5_applique circle

I smoothed out my circle onto the large square, then used appliqué pins (you can use regular pins) to attach the circle to the background.  I leave that mess at the edge of the arc to deal with as I come to it, as I am appliquéing around the circle.  When I do get there, I snip out the extra seam allowances from behind to remove bulk, tuck in the raw edges, smooth out the outer line and stitch it down.  (I wrote about it on Circles Block #3.)  Monkey with it until it is a nice and smooth outer line.

I know there is a lot going on in this little corner of your sewing, but be patient and work with the cloth, use the pins and the tip of your needle to smooth the fabrics into place, and it will happen.

After this large circle is appliquéd on, I cut away the background fabric from behind the circle, leaving a 1/4″ seam allowance.  (Again Circles Block #3, shows this step.)  Center your chosen small circle over the hole.  I like to do this on a hard, flat surface, so that there is no distortion.  Pin, then appliqué it on, making sure you have sufficient coverage with no gaps.

EPP Circle #5_final block

And there you have it!

I’m thinking I’d like to do at least twelve circles, but again, feel free to move at your own pace, stopping when you feel like you’ve done enough.  I do want to remind you that Downton Abbey is just a short three months away, so you may want to get a hand-piecing project to do in front of the TV come January.  These circles might work for you.  If you do make a circle, shoot me a photo and I’ll post it up here.

Since this is a free pattern, please do attribute the source of this to Elizabeth at OccasionalPiece-Quilt  (or OPQuilt.com) and do not print off copies for your mother or your friends.  Please direct them here to get their free copies.  Many thanks.

Quilts

Bag for a Budding Interior Designer

Drafting Tools Bag_1

Now that my daughter’s three young children are all in grade school, she decided it was time that she went back to school and study her favorite subject: Interior Design.

Drafting Tools

She sent me these three pictures with the request: “Can you make me a bag to hold my drafting tools?”  I’m on it, Barbara.

Drafting Tools Bag_2

I fused fusible fleece to the outside bag fabric, then cut the interior lining and set them both aside.

Drafting Tools Bag_3

She needed a protected place for her drawing leads, so I sewed a block of fabric onto bag front piece, and sewed the pocket into segments.  Then I created an outside flap (the clock fabric). I cut it on a slant and fused it to (again) fusible fleece.  I inserted a zipper in between the clock fabric and the lining, then bound all the edges, including the exposed edge of the other side of the zipper.  Then I sewed  it on, covering that flowered pocket piece.  This also is place she could put papers, or her magnifying glass, or whatever else.

Drafting Tools Bag_4

After sewing in a zipper at the top edges, then sewing up the sides and bottom, I boxed the corners to give a little bit of space inside.

Drafting Tools Bag_5Last, I put a handle on the back side, in case this is deep inside her backpack and she needs to grab it out in a hurry.  Hope it works, Barbara!  Happy Studying!

Circles EPP Button

 Coming up at the first of the month: English Paper Piecing Sew-Along, Circles Block #5.