Quilts

Elizabeth’s Lollypop Trees-Final Photos

Elizabeth's Lollypop Tree Quilt_5I wanted to take some final photos of my Lollypop Trees quilt, partly because I didn’t feel like I’d done an adequate job posting about it when I had finished it (and did worry about overkill in writing about it).  But in writing this post, and taking some final photographs, I also wanted to think about it again, to interact with it.

Elizabeth's Lollypop Tree Quilt_3This quilt had been a part of my life for three years, and I worked on it fairly constantly, with a all-out blitz of quilting at the end.

Elizabeth's Lollypop Tree Quilt_10

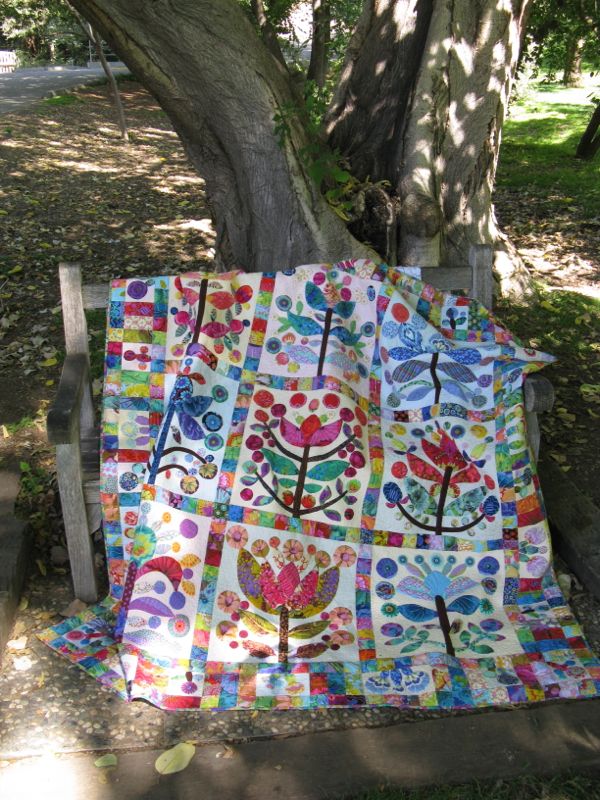
Quite frankly, it may be one of the best creative works I ever make, and I didn’t want to rush by it in a hurry.  So I pulled it out again, and photographed each block (see tab above for close-ups) and spent one pleasant afternoon hour in our local university’s Botanic Gardens, pinning it up, draping it over benches, finding that place that would make me satisfied, and would do the quilt justice.

Elizabeth's Lollypop Tree Quilt_4

The gardener at the Botanic Gardens even stopped and sat on a nearby bench, watching me drape the quilt, I’m sure partly to see my reaction if I would drop it into the stream below.  I didn’t, keeping a good grip on it while I binder-clipped it into place.

Elizabeth's Lollypop Tree Quilt_2

I used to walk over this bridge when I went to school here, first getting my undergraduate degree, and less often, when I was working on my graduate degree.  I felt like I was revisiting a crossroads sort of place where I had existed as a younger woman, all full of spit and polish and fire and vigor.  Today, with the heat nudging up to 90, I felt more spent, less sure of myself even though I am several years past that point when I used to bring my lunch and sit on one of the benches.  Often my husband, himself new to this university, would walk up from his office and join me.

Elizabeth's Lollypop Tree Quilt_1

We’d sit on one of these benches, always planning to buy one for the university if ever either of us should pass on, with the inscription: “Elizabeth and Dave loved this garden,” — an idea which seemed light years into the future.  Less so, now.

Elizabeth's Lollypop Tree Quilt_9

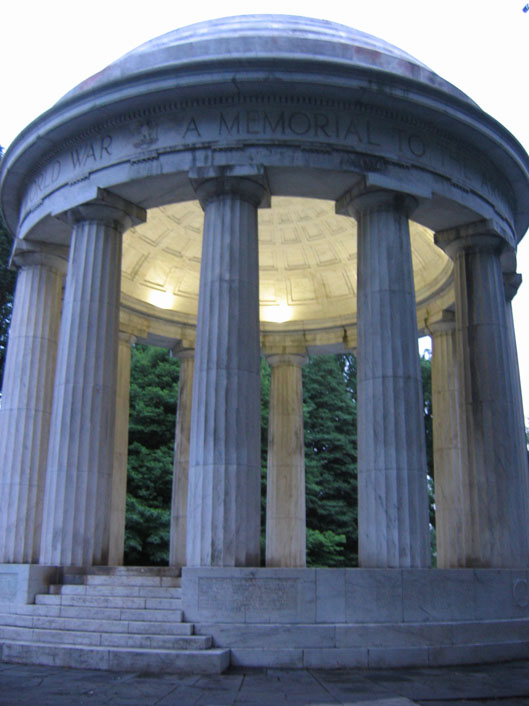
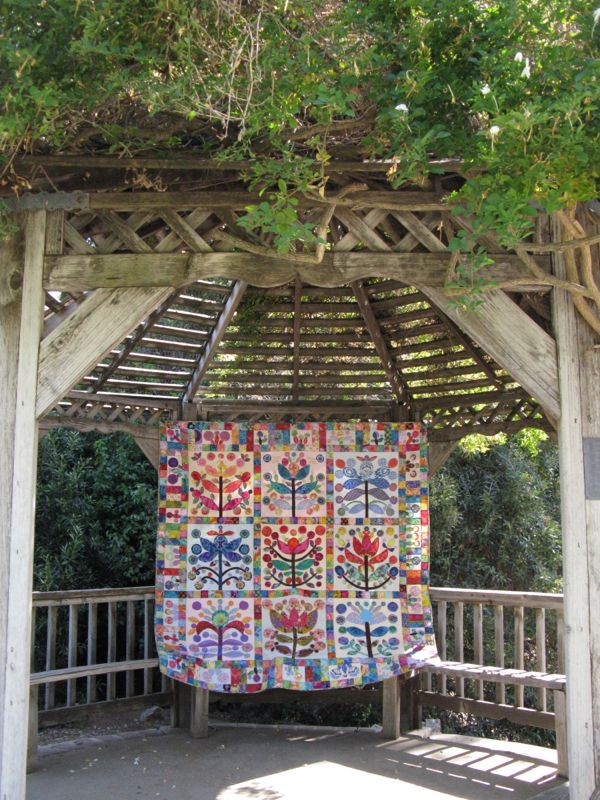
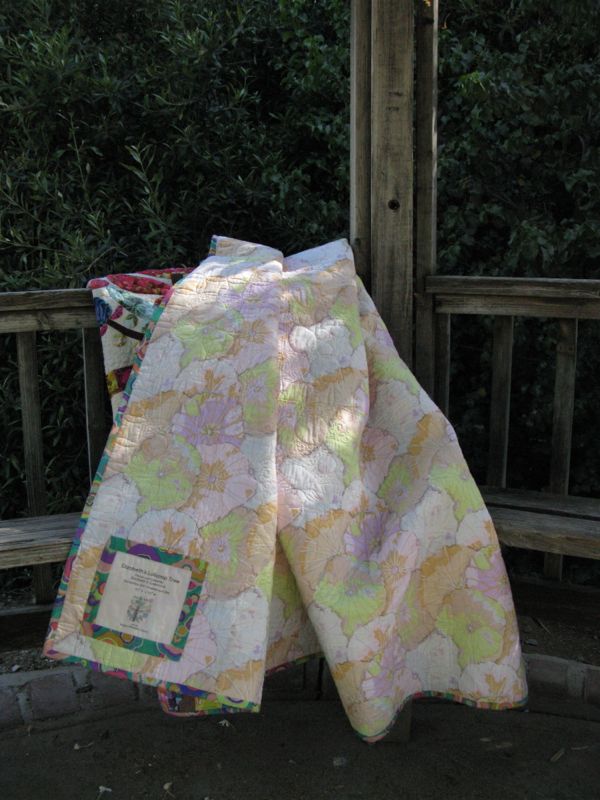
I walked up the hill past the lath house shielding plants from our hot Southern California sun, past the rose garden, up through the arbor. Just past the iris patch I found this gazebo.  Like a bride in her glory, I arrayed the quilt, primping and draping and spreading out the bouquet of appliquéd flowers.

Elizabeth's Lollypop Tree Quilt_7

Elizabeth's Lollypop Tree Quilt_8

Elizabeth's Lollypop Tree Quilt_12

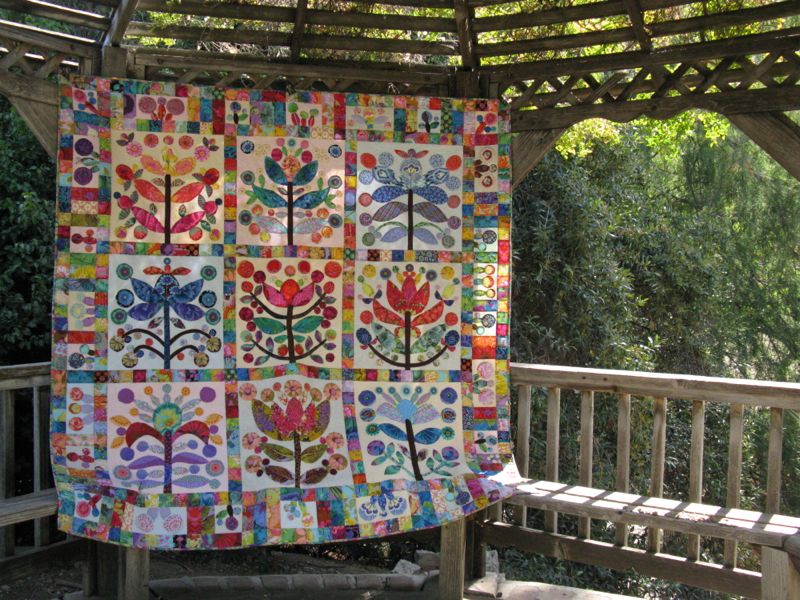
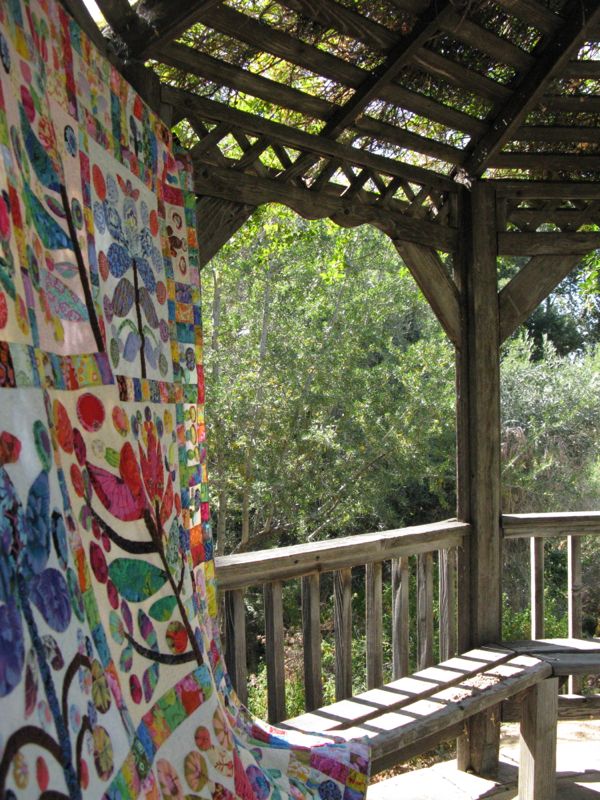
Sunlight illuminated the quilt from the back, a bee settled in to buzz around my head, and a slight breeze blew the quilt to and fro. . . time to go.

Elizabeth's Lollypop Tree Quilt_11

Elizabeth's Lollypop Tree Quilt_13

There is an old saying that goes something like this: “When the house is finished, the man dies.”  I don’t think that applies to me, finishing this quilt, but there is something of a finality when a quilt that has extracted lots of creative energy is finished.  It’s an ending, with the quilt becoming its own memorial, its own momento mori of that three years of my life, gone and never to be seen again.

Elizabeth's Lollypop Tree Quilt_14

I fold up the quilt, dodge that bee one more time, and head down the through the shaded gardens.


Quilts

SHINE: Circles Block 1, English Paper Piecing

Circles EPP Button Circles Block EPP #1 Worn out from two back-to-back trips, I spent the day quietly hand-sewing my Circles Block #1, Swirlygig, using the English Paper-Piecing Method.  A couple of weeks ago, I had decided I wanted to make a series of circular blocks, but I wanted to do them slowly, with hand-sewing.  So I’ve turned to English Paper-Piecing, which involves using paper shapes sewn inside your fabric.  For a pretty good how-to video, watch *this one,* which uses hexagon shapes.  The only difference between this video and how I do it, is that I sew from the back to the front with my whipstitch.  Do whichever one you like.)

rwb_block1

The free patterns are now returning (Red, White and Blue is above).  I request that you not distribute them, but send people here to this website to get them.  Click to download a PDF file:

SHINE Block 1 pattern_opquilt

Please remember to set your printer settings to 100% and check the little scale square included on the pattern.  It should measure 1″ in size. Illustrations of patterns below will differ from the newer version of the pattern.

Laying Out Pieces EPP A word about laying out the pieces.  The straight grain (threads parallel to the selvage) and the cross grain (threads running across the fabric) have less stretch that does the bias, which is what we call the diagonal line across the fabric.  So when you know you have to ease that 1/4″ seam allowance over a curved edge, lay it out so that diagonal bias will align with that edge, as shown above.  I didn’t lay out the swirl pieces with regard to grain (paying attention instead to the fabric’s design), but certainly any time you need a little more ease, or want the fabric to fold easily over a pattern piece, put that bias to work for you. Stitching First, cut out the shapes, then cut out the fabric, leaving 1/4″ seam allowance around most of the pieces.  Baste the pieces onto the paper (good time to use up old icky thread that you don’t want to use in your quilts).  Some people like to use freezer paper, others like to use glue.  If you do a search on English Paper Piecing, everyone has a favorite method.  Mine is folding the seam allowances over the paper edges and sewing them to the paper.

When I started sewing the inner swirling pieces together, it was easier if I placed the piece with the outward (or convex) curve on the top (like Spun Sugar does *here*, but I never clipped any of my seam allowances, nor used glue–just pins).  I lined up the outer corner and sewed a couple of stitches to anchor it.  Then I moved on down the seam, using an overcast whipstitch.  I was happy that it went quickly. Circle Block Circles Here’s my Instagram photo of the first few swirls sewn together.  I was sewing these as my husband drove us home across the Arizona desert.  I have a rigid plastic box that hinges in the middle, folding out like a portable desk, and I keep everything in there. Stitching Circle BlocksAfter I sewed together most of the inner circle, I went back to joining the last three together independently, then added them to make the circle. Next up were the little triangle points and the outer arcs. Concave Piece in Front I tried sewing these on two different ways: first the little triangle points, then the arcs in between them.  Fail. Better to sew a few triangle points to their outer arcs, then attach that to the existing circle.  Then repeat.

I sewed about five points and arcs, attach it to what I’d sewn on before, attach that new section to the circle, and then start again with a few new arcs and circles.  Above you see me finishing off the last of the sewing the arcs/triangles to the circle. Backside of Outer Arc Things can get a little skitty-wampus, but this is the back, showing it sewing with all their papers.  I was trying out some designs with my colored pencils, so you see some different colors on the paper.

I’m sure you noticed that the swirls move a different direction in the fabric, than from the drawing.  Everything is dependent on how you lay out the printed pieces, text UP or text DOWN.  In one of our blocks, we’ll lay them the reverse direction, and have it swirl the other direction. Inner Circle Pieced

Everything is sewn together, and pressed.

Circle #1 EPP Paper Still In The outside corners have been seamed together, then sewn on.  Again, it’s a little wonky-looking because the papers are still inside.

UPDATE: After doing a couple of circle blocks I found I liked it better using a 14 /12″ square and appliquéing on the circle.  Your choice. Perfect Circles I used Karen Buckley’s Perfect Circles to make my center circle, sewing a running stitch around the outside edge, then drawing it up around the plastic circle, then pressing it into place.  You can iron two pieces of freezer paper together and trace off the circle on the pattern to use as your template, if you don’t have the Perfect Circles. I was having a hard time figuring out how to get that circle on.  I took out all the papers, gave it a good steamy press, pinned on the circle and just appliquéd it on. Circles Block EPP #1 And that’s the first circle block!  I am still learning about which colors and shapes and directions will go where with these circle blocks; feel free to experiment as well.  I have learned that I can be overly critical with a particular block, but when worked into a quilt, my concerns and criticisms often disappear, so I just keep going. I’ll post one of these about every month, somewhere near the beginning of the month.  I hope to get twelve different circle patterns by the time I’m through.  I hope you join me on the journey! Circles EPP Button

Quilts

Circles: English Paper Piecing

Inspired (always) by Mary, who blogs at Molly Flanders Makerie, I have had circles on the brain for several months now, hiding behind that other stack of things I’m always yakking about.

MollFlandersPincushions

from *here*, which also includes a link to her tutorial

I searched through Barbara Brackman’s Encyclopedia of quilt blocks and found quite a few circle blocks that interested me.  I have missed having a handwork project to keep myself busy while I watch movies or chat, so wanted to get one together before I start some of my summer travels.

I drew a circle block template in my QuiltPro program, but wanted a 12″ block.  Um, my printer doesn’t print that big.  So I took a screenshot of a quarter-circle, printed it out four times, then taped it together.  I then took it to my local copy center and had them copy it off at a little less than a buck–not bad, I thought.  Now I can draw a new block every time, experimenting with what I’ve found here and there and saved in my oh-so-old-fashioned paper files out in the garage.  The quarter circle pattern can be downloaded here: QuarterCircle

Circle Quilt Block #1 drawing_1

Notice that the 12″ line is the NOT the outside line, but just inside.  I did it that way to allow for seam allowances, but please don’t let it confuse you.  That curve ruler is leftover from my Clothing and Textiles college days, but you could use a large dinner plate, or other curved edge.

Circle Quilt Block #1 drawing_2

Circle Block #1 is done.  I plan to let this project wend its way through the next several months as I’m doing my part for the Slow Quilt Movement.  (Is there even such a movement?  So often I see someone talking about a block and whoosh!–there it is the full completed quilt two days later. This one won’t be like that.)

Circle Quilt Block #1 drawing_3

I cut it apart into its pieces.  I don’t know if I’ll paper-piece those outside quarter-circles onto the circle block, or appliqué the circle to a big 12 1/2″ square piece of fabric.  Stay tuned.

Barbara SMALL

Tomorrow is my mother’s birthday, and I’m visiting her and taking her out to lunch.  If you haven’t talked to your Mom this week, give her a call.  You may not be as lucky as I am to have a mother celebrate her 86th birthday, so don’t waste any time.  If your mother is still here with you, pick up the phone and read her a poem from your childhood, tell her your best memory of a birthday, ask her forgiveness for a time you were naughty and broke her heart, and close by telling her one way she’s a good example to you.  Happy Birthday to my mother, a beautiful, thoughtful, smart, well-read and intelligent woman who always made our family believe that they were the most important thing on the planet.  Here’s my poem for you:

Quietude

Quilts

Happy Memorial Day Weekend

DC WWI Memorial

The District of Columbia World War I Memorial (on the left of the Reflecting Pool, as you face the Lincoln Memorial)

WWII Lincoln Memorial

Sunset, World War II Memorial

Arlington Cemetary Mem DayArlington Cemetery, with all the flags out on Memorial Day.

My husband and I were lucky enough to spend a year in Washington, DC, a formative experience, and that included Memorial Day Weekend, with the Rolling Thunder Ride.  I think I spent most of the day in tears, as we began the day on the bridge leading to the Lincoln Memorial and waved on the riders for a long, long time.  I also visited the Wall (as the Vietnam Memorial is called) and saw all the moments and ribbons and flowers and treasures left there.  Each keepsake will be collected, categorized and saved.  The honor given to those who laid in cemeteries, had names on the Wall, or seeing the aging veterans that flooded the city was intensely moving.

Happy Memorial Day, to all of you.

Vietnam War Memorial Statuette