
When I first starting making this quilt, I cut each flying geese block by hand because I was not able to rotary cut. I drew out the lines, cut a triangle, and piled up the cut pieces in bags for their corresponding temperatures. After constucting them, I found out how unstable the edges were, how inaccurate a method this was. Of course, it didn’t help that one arm was in a sling, but hey, a quilter’s gotta’ do what a quilter’s gotta do.


I’ve also done the snowball-on-the-square method, which is good for single Flying Geese.

But I’m a fan of the four-at-a-time, provided you use the Mostly-Magical-OPQuilt method of trimming them. I showed this trick to my friend Cindy of LiveAColorfulLife the other day and she said it changed her life. I took that with a grain of salt, considering the covid-lives we’ve been living, but I was happy it worked so well for her. Here we go.
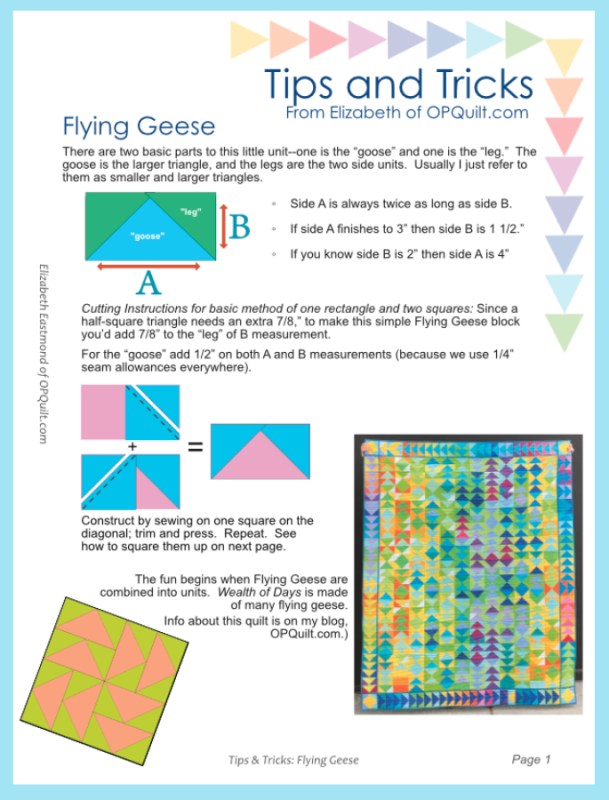
NOTE: In the free Tips and Tricks Handout, downloadable below, I give you a formula for figuring out what sizes the large squares and the small squares should be. No more charts!
I use a 4-inch ruler for smaller Flying Geese, and a 6-ish-inch ruler for larger. (Can we talk about Rulers?) It’s all in where you take your first cut, and the angle of that first cut.

Step One. Make your Flying Geese, and grab a ruler, preferably one that has a diagonal line.

Step Two: With the flying geese point FACING TOWARDS YOU, line up the ruler’s diagonal line with that right-hand folded edge.
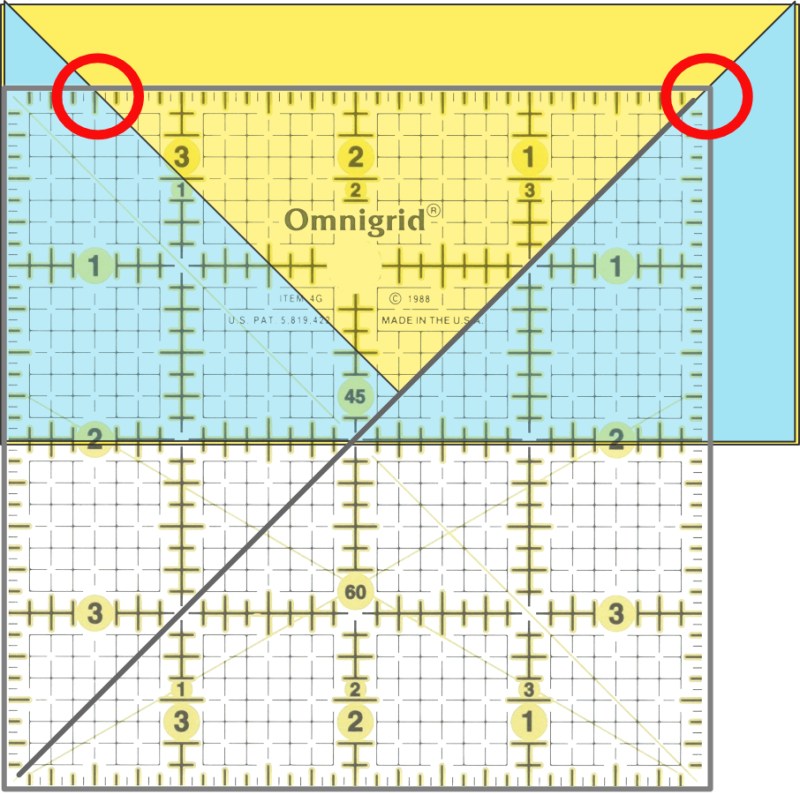
Step Three: Concentrate on where the r.h. tip of the ruler is, and where the measurement for your Flying Geese is. I’m trying to make a Flying Geese that will finish at 3″ by 1 1/2″ tall, so I’m concentrating on the 3 1/2″. If you have done your measuring and cutting correctly, don’t worry about the lower edge right now. Line up the r.h tip ON THE FOLD.
Line up the target measurement on the LEFT-HAND FOLD, as shown. Note: I am now free to make Flying Geese any size I want, not just what’s out there in the manufactured acrylic cutting rulers.

Step Four: Trim the RIGHT excess and the TOP excess.
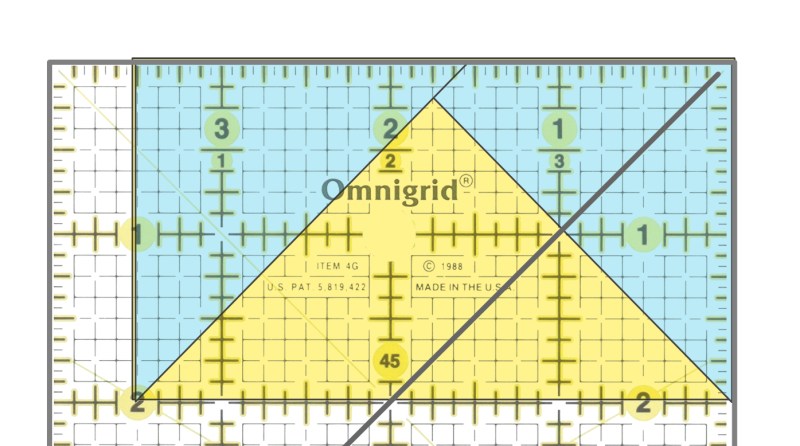
Step Five (and final): Rotate the Flying Geese block so the tip is pointing away from you. Line up the LEFT (3 1/2″) and LOWER (2″) side or the measurement at which you want the block to finish. Trim away the remaining excess (as shown).
I can crank through a ton of flying geese using the four-at-a-time and the Mostly-Magical-OPQuilt-method of trimming. So can you.
Okay, because everyone likes a free handout, here it is: Tips and Tricks from OPQuilt.com — Flying Geese.
Happy Quilting!
Discover more from OccasionalPiece--Quilt!
Subscribe to get the latest posts sent to your email.

I love your method to trim geese to size. I’m going to try it! Thanks for sharing!
Can I give a shout out to SPRAY STARCH? Really helps me with fiddly little pieces.
(not gonna lie, sometimes my flying geese are really half square triangles)
Thank you for such a clear & concise handout for making Flying geese. I’m actually working on a project not that will have them in varying sizes. It’s a wallhanging, so there are enough for good practice without becoming overwhelmed.
Just love your temp quilt! Thanks for the flying geese tips. I not sure if I’ve ever made a quilt with them. Can you believe that? I know I have a design using wonky flying geese. Better add it to the ever growing to-do list. Or maybe not. I’ll never get them all done.
Thanks Elizabeth!
Good information for those who aren’t aware of all the different ways to make Flying Geese. You’re very generous to share this.
I’m confused. What “folded edge”? Are you trimming 2 FG at a time?
Thanks for sharing your flying geese tutorial!
So, am I understanding that you go up a size (or two) for the four at a time method and then trim down?
Great tutorial for the geese, Elizabeth.
Thank you Elizabeth for the tutorial!
I love flying geese and yes, they always need trimming. My favourite method is foundation piecing. Thanks for this
You are always so good to share handy tips – thank you!!!!! BTW, this is my favorite method for making Flying Geese, but I wasn’t aware of the math and oddly enough, this really helps 🙂
When I first saw your temp quilt I thought it was a stained glass quilt. BEAUTIFUL! It’s on my bucket list of quilts to make. I’ve never made a quilt of solids before. You were instrumental in me making “My Small World” quilt, which is top finished, now to sandwich and quilt! Love your blog and everything you have to say, you have a way with words. First saw you as guest speaker (zoom) with our Beach Cities Quilt Guild. Look forward to your emails everytime I get them. Thank you.
Stunning quilt-it glows! Thanks for taking the time to write the FG method-I can’t wait to try it.
Another great and helpful post. The quilt is so colorful. This beats the mathematical methods I’ve used for flying geese blocks. Your illustrations are marvelous! Is that all done with Affinity? The ruler showing thru to the sewn FG, wow. Thank you.
Ho! We should have had your tutorial on how to make those geese come out right before one of our recent block swaps, which had us all tempted to say naughty words as we tried to get the geese right!